
In detail: do-it-yourself repair of an automaton belt on trousers from a real master for the site my.housecope.com.
If you want to do well - do it yourself
Life hack for quick repair of the belt buckle.
Broken buckle? Try the screed! An inexpensive and quick belt repair will be provided by the most common tie. This option is especially good if you do not plan to wear a belt for release (if you suddenly feel embarrassed). You can choose the color of the tie that best suits your belt. Simply thread the tie through the loop where the buckle was located and tighten to the length you want.

Hello everyone and good mood!
Here is an overview of the anti-slip remedy - an automatic buckle belt. An almost irreplaceable thing, unless, of course, you wear suspenders 🙂
I think in the wardrobe of any man there is more than one or even three belts for pants - for all occasions. Someone prefers only belts cut from a single piece of leather and does not recognize anything else. I agree that it is brutal, cool and very expensive. I do not consider myself to be such a person and I prefer "office" style belts as a survey product. They use simpler leather + all sorts of additional tricks of manufacturers, designed to improve the appearance. The lifespan of such belts, with regular use, is approximately 2.5-3 years. And gradually they migrate from new trousers to those that are not yet ashamed to be worn in the country :). Unfortunately, the price tag in our retail for such belts has become not at all humane - about 2500-3000 rubles. (about $ 50), so I decided to try a belt from China. In addition, I was interested in the design of the buckle.
So, such a belt came to me.
| Video (click to play). |
The belt itself and the buckle are packed: 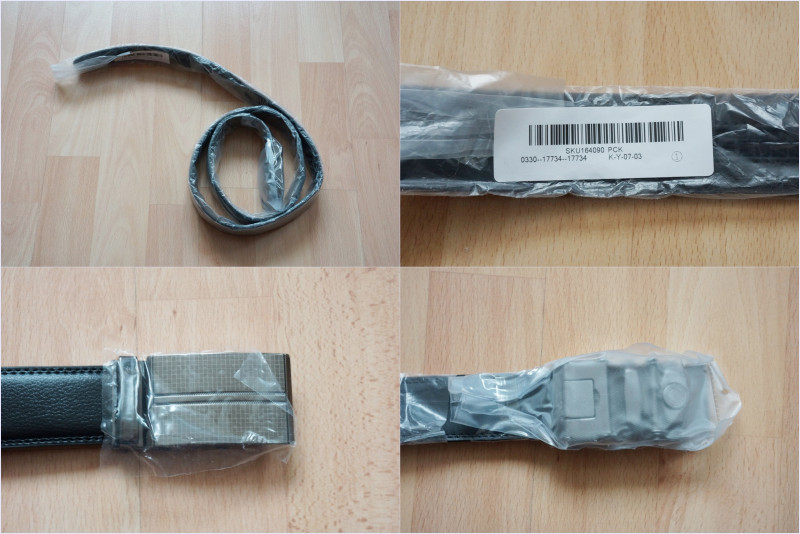
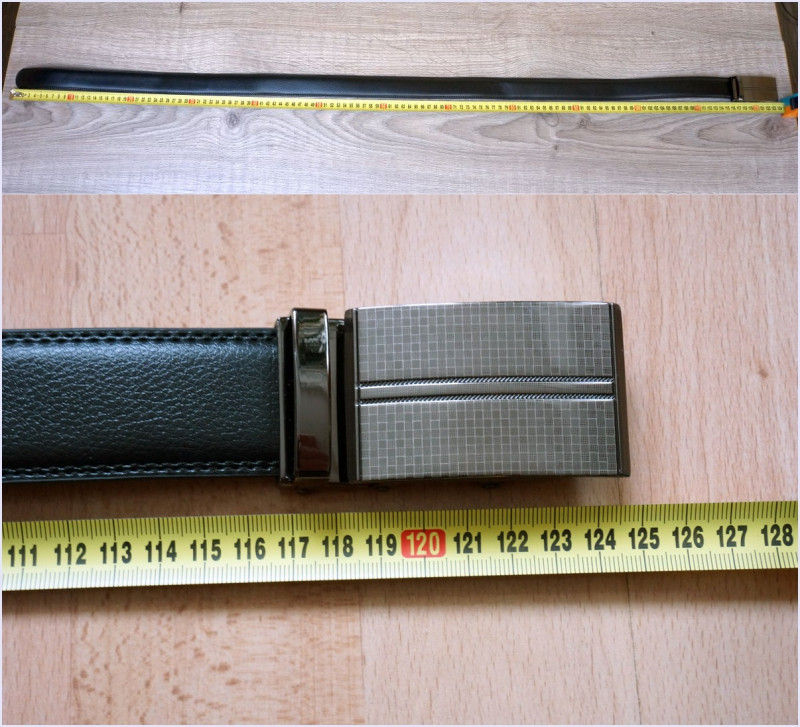
120cm: 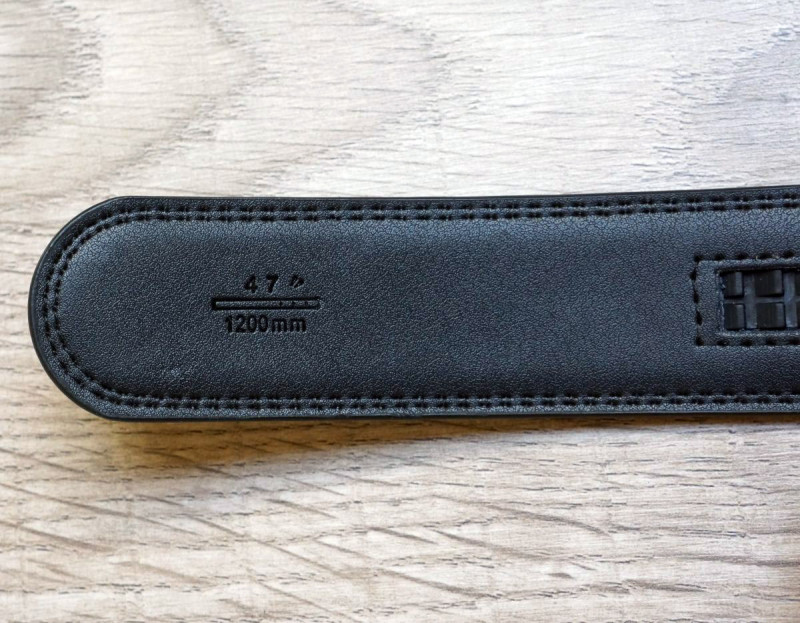
Weight:
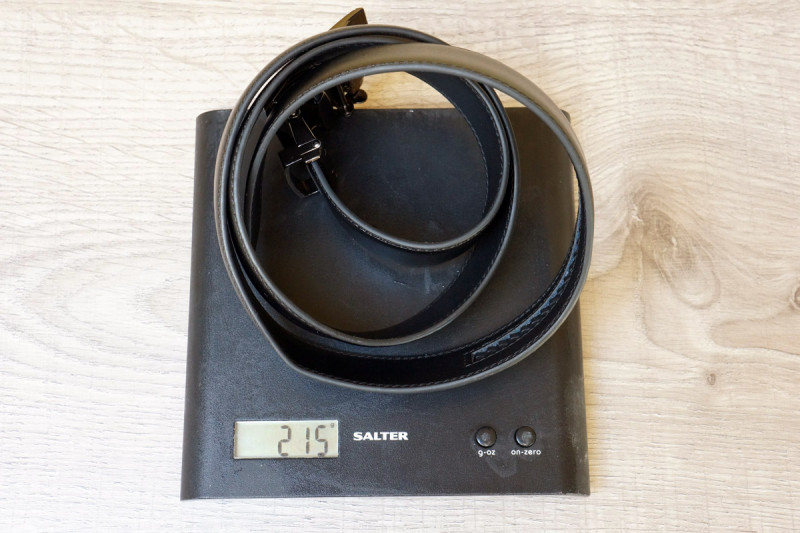
Moreover, half of the weight falls on the buckle:
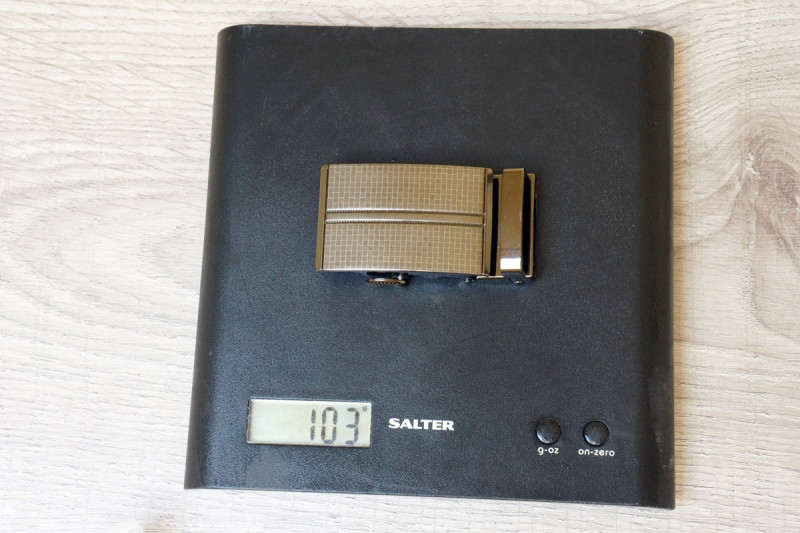
A bit heavy, sir (until you remember the army belt 🙂
The product is provided for writing a review by the store. The review is published in accordance with clause 18 of the Site Rules.

Very often, the wedging mechanism of the safety strap in the car begins to jam when the belt is pulled out of the reel, even if it is pulled very smoothly, and in the cold season it is practically impossible to fasten it on. In this article, I will show you how to make a DIY seat belt repair within ten minutes, right in the car.
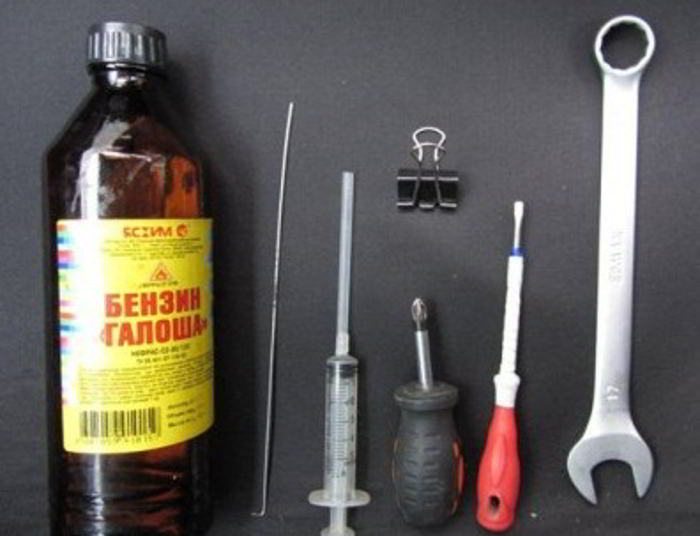
To perform this type of robot you need.
- Short cross twist
- Straight slotted twist
- Seventeen socket wrench
- The clip can also be used with a clothespin
- Film for protecting car seats from dirt
- Knitting steel knitting needle or stiff wire
- Syringe with a straw
- Gasoline for refueling lighters

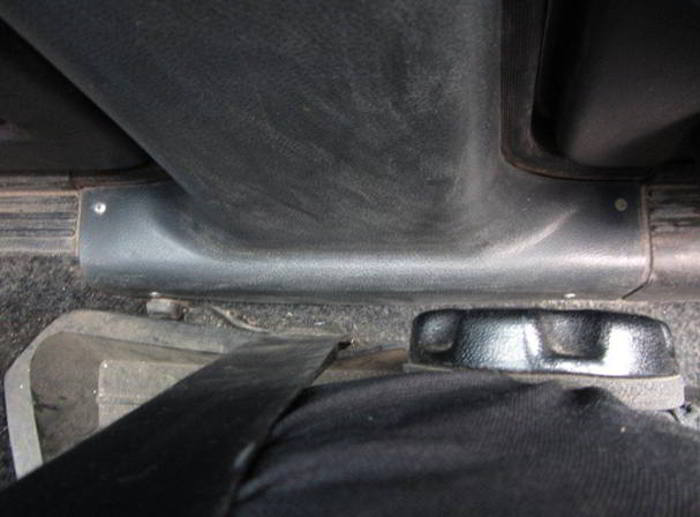
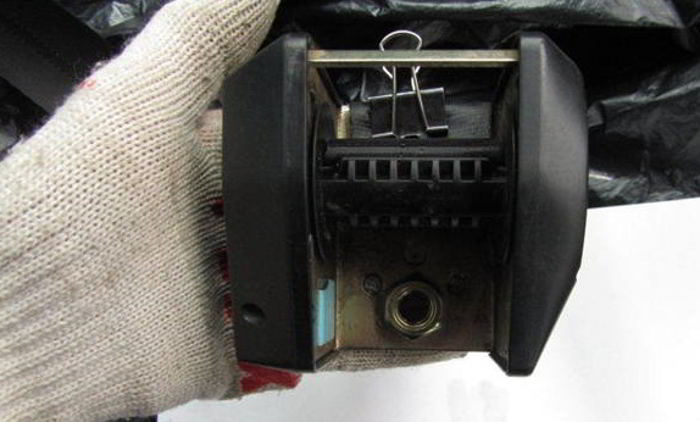
- To remove the B-pillar cover, unscrew the four self-tapping screws with a Phillips screwdriver.
- Then we take out the entire seat belt and attach it to the eyelet using a clip or a clothespin.
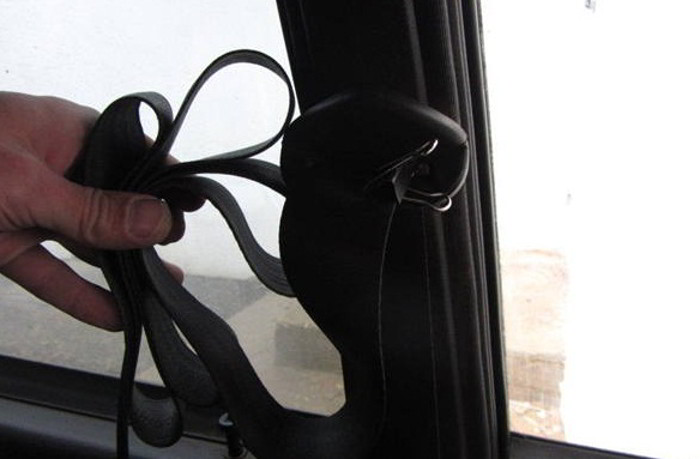
- Using a seventeen socket wrench, remove the bolt that secures the coil and take it from the bracket. Do not allow the spool to unwind and secure the strap to the spool with a clip. It is necessary to fix it so that it is more convenient to carry out repair work.
- Close up car seat film, and put the dismantled mechanism on it, you need to sit on another chair.
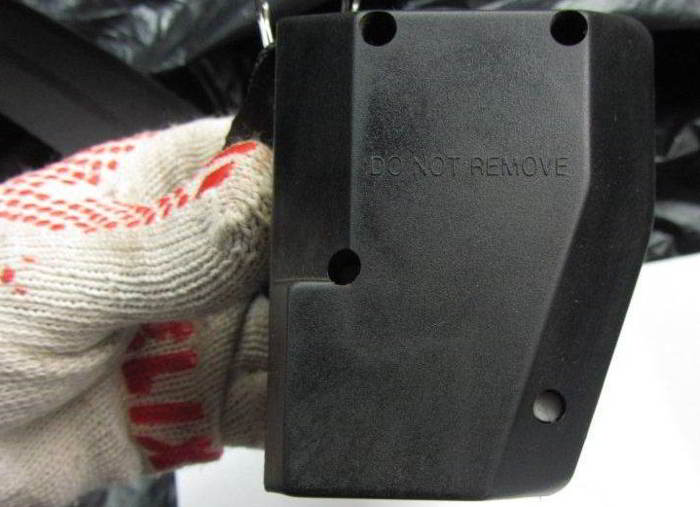
- Next, we are looking for a lid, under which the inertial mechanism is located, for this, shake the coil and under which lid it rattles and we need it.
- To remove the lid, you need to remove the four plastic caps, use a knitting needle to remove them. Using a slotted twist, remove the cover.
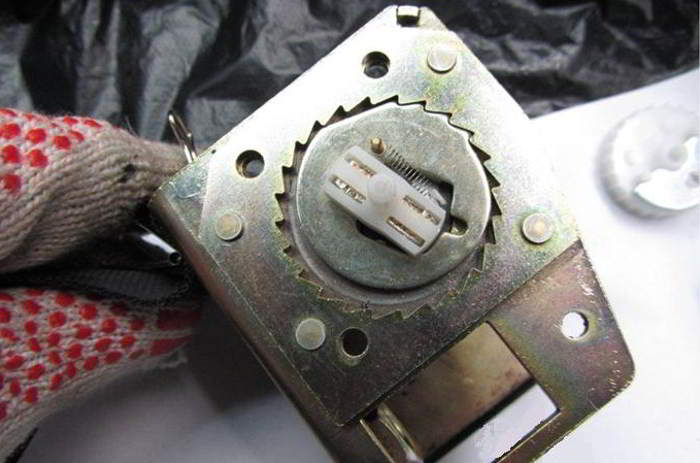
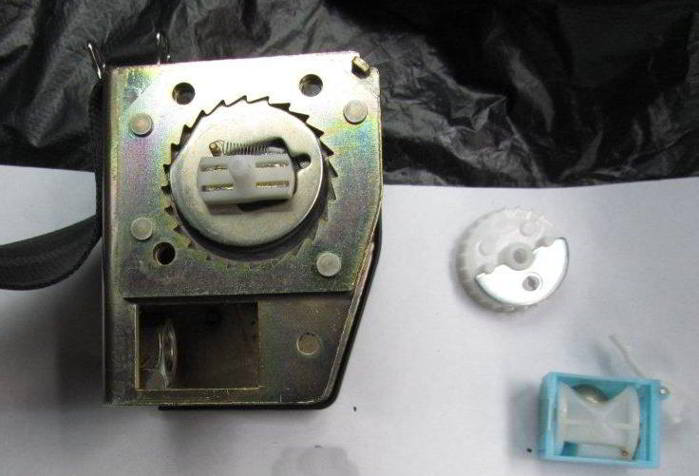
- We remove the opened mechanism (the box contains a cylinder, a metal ball and a rocker).For the mechanism to work properly, the rocker arm must move freely along the axis and not jam anything. To check, place the mechanism in a vertical position and tilt the upper part towards the ball, the rocker arm should return to its original position, without any wedging. If, nevertheless, there is wedging, it is necessary to flush the axis of the rocker arm until it begins to rotate freely and without jamming.
- Then we take out the inertial mechanism (taken out without an additional tool), it is metal and is located under a plastic gear. In the central part of the hole there is an eccentric with teeth (it is the reason for the belt jamming during pulling out) the space under it should be well cleaned. To do this, you need to pour a small amount of gasoline into the center and around the perimeter, preventing the belt from winding, then remove the clip.
- Next, we take the coil in our hand so that you can hold the spring and the plastic guide with your index finger, wind the strap with the other hand, and pull it a couple of times. This procedure must be repeated two to three times. Important: do not allow the belt to reel before you put the mechanism back.

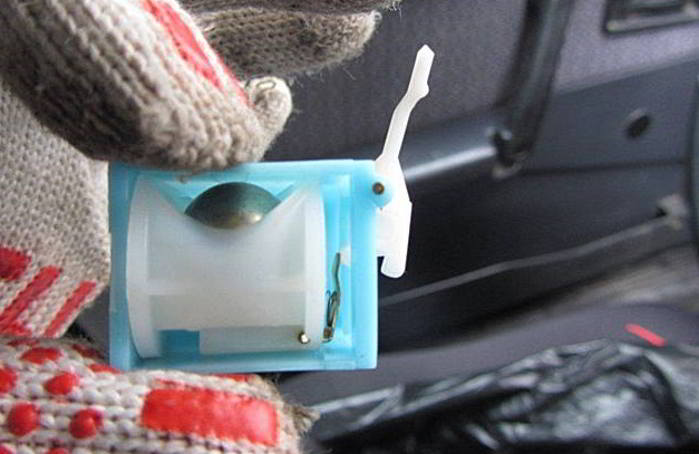
That's all the repair of the seat belt with your own hands is finished, it remains only to assemble in the reverse order, and install it in place, it is recommended to carry out the same procedure on the second mechanism for prevention.

How to shorten the belt
A belt that is too long is not convenient to use and looks ugly.
Belt, correctly selected in length (waist), must be fastened on the third or middle hole. Usually belts are made longer and after purchase they must be shortened to an individual length (adjusted to fit).
The belts are shortened from the buckle sidenot from the end of the strap (tip) where the punched holes are located. Do not try punch additional holes in the belt along the length. New holes, pierced with a non-special tool, reduce the strength of the belt, do not look neat, and the long strap of the belt will not add beauty either.
There are four types of buckle attachment:
- on the clip (can be shortened easily),
- on the screw (can be shortened easily),
- sewn-in (it is better to choose such belts by size; when shortening, you will have to tinker or seek help from a workshop),
- on a rivet (it is better to choose such belts by size; when shortening, you will have to tinker or seek help from a workshop).
Consider how to shorten the belt at different types fastening buckle.

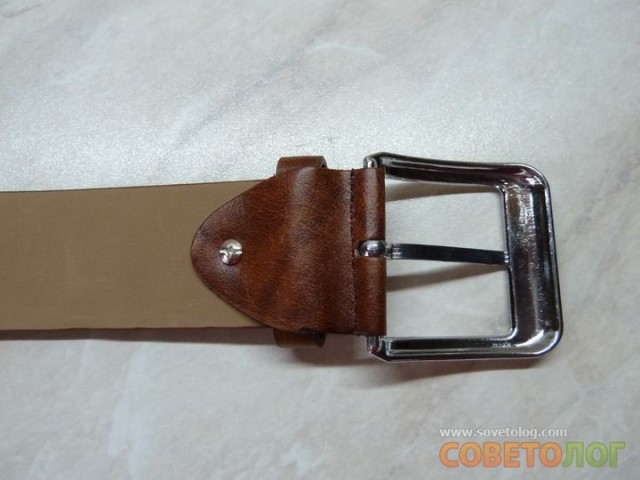
A belt with this buckle fastening is the easiest to shorten.
Fold back the locking tab on the inside of the buckle.

We take out the belt from the buckle.

We measure our waist, in the place where the belt of your trousers is usually located.

The waist in our case is 85 cm.
Belts with buckle fastening on the clip have no holes, so it is usually customary to leave a free edge of about 15-18 cm.

It turns out that the length of the belt should be:
Waist + 15-18 cm.
In our case, for a waist circumference of 85 cm, the required distance is:
We measure the required length (in our case 100 cm) from the very tip of the belt.

We put a mark. You can cut it off with scissors, but it is better, of course, with a knife.

The cut is smoother.

Insert the cut edge back into the buckle and fix it.

So that the fixing teeth fit better into skin , it is necessary to slightly pull the strap away from the buckle while pressing the retainer well at the same time.


A belt with such a buckle attachment can also be shortened very easily.
To detach the buckle from the belt, you need to unscrew the screw on the back of the buckle.


We measure our waist by belt level trousers.

We measure from the third or middle hole distance equal to waist.

We put a mark. And now we subtract the buckle length from this distance. In our case, the waist is 85 cm. - 5 cm. Buckle length. It turns out that we measure out only 80 cm.

Cut off the excess part with a knife.

We do not throw in a piece of the cut off belt with a hole, but use it as sample to mark a new hole.


Of course, it's best to punch a new hole. punch.
If there is no punch, the hole can be twist scissors, just twist. Otherwise, along the notches, the belt will break at this point.

A better to drill a new hole with a drill.


Using the screw, we fix the buckle in a new place. Pay attention to the location of the belt loops, the belt strap is inside her.


The seam on the harness, it is neatly unpicked with a blade or a clerical knife.
The belt is shortened in the same way as the belt with the buckle fastening on the screw.
With an awl on the belt and harness, new holes are punctured and the seam is sewn manually. In detail this technology is described here ... If this is difficult for you, you can take the belt to a master in a shoemaker.

The most unfortunate, in my opinion, the mount. I try not to buy such belts, the more it is noticed that usually quality such belts bad... Riveting equipment is usually expensive. Therefore, it is easier to find a workshop where eyelets, buttons, buttons, rivets are installed. There they will shorten your belt and put new rivets.
I don’t throw away the remaining cut pieces from the belts. This is a great material for bracelets , especially if the length is enough for the girth of the wrist. You can make another trendy accessory .

Posted by Julie 22
Very often, the wedging mechanism of the safety strap in the car begins to jam when the belt is pulled out of the reel, even if it is pulled very smoothly, and in the cold season it is practically impossible to fasten it on. In this article, I will show you how to make a DIY seat belt repair within ten minutes, right in the car.
To perform this type of robot you need.
- Short cross twist
- Straight slotted twist
- Seventeen socket wrench
- The clip can also be used with a clothespin
- Film for protecting car seats from dirt
- Knitting steel knitting needle or stiff wire
- Syringe with a straw
- Gasoline for refueling lighters
- To remove the B-pillar cover, unscrew the four self-tapping screws with a Phillips screwdriver.
- Then we take out the entire seat belt and attach it to the eyelet using a clip or a clothespin.
- Using a seventeen socket wrench, remove the bolt that secures the coil and take it from the bracket. Do not allow the spool to unwind and secure the strap to the spool with a clip. It is necessary to fix it so that it is more convenient to carry out repair work.
- Close up car seat film, and put the dismantled mechanism on it, you need to sit on another chair.
- Next, we are looking for a lid, under which the inertial mechanism is located, for this, shake the coil and under which lid it rattles and we need it.
- To remove the lid, you need to remove the four plastic caps, use a knitting needle to remove them. Using a slotted twist, remove the cover.
- We remove the opened mechanism (the box contains a cylinder, a metal ball and a rocker). For the mechanism to work properly, the rocker arm must move freely along the axis and not jam anything. To check, place the mechanism in a vertical position and tilt the upper part towards the ball, the rocker arm should return to its original position, without any wedging. If, nevertheless, there is wedging, it is necessary to flush the axis of the rocker arm until it begins to rotate freely and without jamming.
- Then we take out the inertial mechanism (taken out without an additional tool), it is metal and is located under a plastic gear. In the central part of the hole there is an eccentric with teeth (it is the reason for the belt jamming during pulling out) the space under it should be well cleaned.To do this, you need to pour a small amount of gasoline into the center and around the perimeter, preventing the belt from winding, then remove the clip.
- Next, we take the coil in our hand so that you can hold the spring and the plastic guide with your index finger, wind the strap with the other hand, and pull it a couple of times. This procedure must be repeated two to three times. Important: do not allow the belt to reel before you put the mechanism back.
That's all the repair of the seat belt with your own hands is finished, it remains only to assemble in the reverse order, and install it in place, it is recommended to carry out the same procedure on the second mechanism for prevention.
If the seat belt does not function in the car, it is necessary to urgently eliminate the cause of the breakdown, since it is dangerous to drive with faulty or problem belts, this is contrary to traffic rules.
Among the common breakdowns that occur during the operation of seat belts and the mechanisms that control their work, the following can be distinguished:
- jamming of the belt when trying to buckle, even in the case of a smooth pull;
- belts do not stretch due to frost or wear of the roller mechanism;
- belts do not retract when unfastened;
- the coil lock is broken or the main mechanism is damaged.
Of course, there are other problems, but they are less common, which means that the risk of encountering such a breakdown in your car is minimal. Many people believe that in some breakdowns it is possible to drive with faulty belts, but, according to the rules of the road, if the vehicle is operated with a faulty seat belt mechanism, an administrative fine may be imposed on the driver.
In addition, the car manufacturer is not responsible for a transport accident, even if the car is under warranty service in the event that the owner has not contacted specialists for replacement of the seat belts. Therefore, before you repair belts with your own hands, you need to understand that all changes are made, as they say, at your own peril and risk.
Most often, the owners decide on an independent repair because of the very expensive maintenance. For example, replacing a belt mechanism or completely replacing belts on a standard middle-class passenger car will cost the owner at least 15 thousand rubles. Not everyone is willing to pay that kind of money, especially when it comes to a simple breakdown, for example, the need to lubricate or replace the gear of the main mechanism.
In every modern car, seat belts work according to a fairly simple principle - a reel with a blocker based on a gear mechanism, with the help of which the reel rotates. The gear mechanism itself is closed by a small pendulum with a ball or spheroidal support with a system of levers. When the belt is pulled out smoothly, the support rotates with the spool gear, and with a sharp jerk, the flywheel is blocked. In this blocking system, most often there is a malfunction.
Thus, to repair the coil and other mechanisms, it is necessary to remove it, for which almost all cars will need to remove the trim, and on some models the seats on the side with which the belt is not working properly. For removal and self-repair, you will need tools, which should include:
- a set of flat and Phillips screwdrivers;
- a set of spanners of various diameters;
- lubricant, wire, wipes and material to protect the seats and upholstery.
Depending on the complexity of the repair (sometimes a complete replacement of the coil is required), other additional tools may be required for work. Do-it-yourself repairs at a VAZ are much easier, especially on older versions, since these cars do not have side airbags, the trim is easily removed and installed, and there is no need to remove the seats.


