In detail: do-it-yourself repair of a vaz 2110 seat belt from a real master for the site my.housecope.com.
What does a jammed belt mean? Over time, the seat belt mechanism begins to wedge, that is, it does not allow the belt to be pulled out of the reel, even when you pull it very slowly, and quickly buckling up in winter becomes a real problem.
The problem is simple and can be solved in ten minutes without leaving the car.
From the passenger side I have already carried out such an operation, now I present a photo report on the repair of the driver's belt.
Tools and materials
- Phillips screwdriver, short
- slotted screwdriver
- wrench on “17” box
- stationery clothespin
- a plastic bag or a piece of plastic - to protect the seat from contamination
- knitting steel knitting needle or a piece of stiff wire
- syringe with a tube *
- gasoline "Galosha" or gasoline for lighters * (if in a canister with a small spout, then a syringe is not needed)
With a short Phillips screwdriver, unscrew the 4 self-tapping screws on the lower cover of the middle drain and remove the cover by pulling it up.
Next, we pull out the entire belt and stop it with a clothespin on the eyelet.
With a 17 key, unscrew the belt reel mounting bolt and remove it from the bracket.
Keeping the belt from winding, we fix the belt on the coil itself with the same clothespin.
Fixation of the belt is necessary for the convenience of further operations.
Next, we cover the seat, for example, with a plastic bag, so as not to get it dirty,
we put a coil on it, and Sami transfer to the next one.
Now we need a cover, under which an inertial mechanism. Usually it is thicker (in the photo it is on the left), but you can
and shake the coil - under which the lid will rattle - that is what you need.
| Video (click to play). |
To remove the lid, you need to remove 4 plastic caps from it - Squeeze them out with a knitting needle,
holding them with your hand from flying out.
Pry off the cover with a slotted screwdriver and remove it ..
Before us opens the first mechanism of the belt (It is removed freely, with your fingers) - This is a box with a cylinder, with a ball inside, and a "rocker".
We check the rocker - is it free on the axis of rotation? Having placed the "rocker" vertically, we tilt its upper part towards the ball.
It should take a vertical position quickly and without the slightest jam!
If there is jamming, then we wash the axis of rotation of the "rocker arm" until it begins to rotate on the axis absolutely freely!
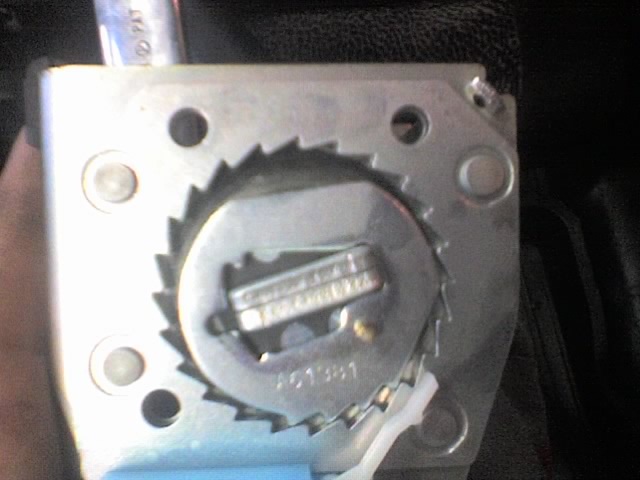
Further, the second mechanism - inertial - It is steel and is located under the plastic gear. It can be removed freely with your fingers.
In the center of the toothed hole there is an eccentric with teeth (which wedges the belt when pulled out sharply), the space under which needs to be cleaned. To do this, pour a little gasoline around the perimeter of the hole and a little to the center, keeping the belt from unwinding, remove the clothespin for a while.
We take the coil in one hand so that with the index finger we hold the plastic guide with the spring, and with the other we tighten and wind the belt several times and pull sharply several times so that the mechanism would engage. After that, we again fix the belt on the reel and repeat this operation 1-2 more times.
We assemble the coil and put it in place in the reverse order.
If the seat belt does not function in the car, it is necessary to urgently eliminate the cause of the breakdown, since it is dangerous to drive with faulty or problem belts, this is contrary to traffic rules.
Among the common breakdowns that occur during the operation of seat belts and the mechanisms that control their operation, the following can be distinguished:
- jamming of the belt when trying to buckle, even in the case of a smooth pull;
- belts do not stretch due to frost or wear of the roller mechanism;
- belts do not retract when unfastened;
- the coil lock is broken or the main mechanism is damaged.
Of course, there are other problems, but they are less common, which means that the risk of encountering such a breakdown in your car is minimal. Many people believe that in some breakdowns it is possible to drive with faulty belts, but, according to the rules of the road, if the vehicle is operated with a faulty seat belt mechanism, an administrative fine may be imposed on the driver.
In addition, the car manufacturer is not responsible for a transport accident, even if the car is under warranty service in the event that the owner has not contacted specialists for replacement of the seat belts. Therefore, before repairing belts with your own hands, you need to understand that all changes are made, as they say, at your own peril and risk.
Most often, the owners decide on an independent repair because of the very expensive maintenance. For example, replacing a belt mechanism or completely replacing belts on a standard middle-class passenger car will cost the owner at least 15 thousand rubles. Not everyone is willing to pay that kind of money, especially when it comes to a simple breakdown, for example, the need to lubricate or replace the gear of the main mechanism.
In every modern car, seat belts work according to a fairly simple principle - a reel with a blocker based on a gear mechanism, with the help of which the reel rotates. The gear mechanism itself is closed by a small pendulum with a ball or spheroidal support with a system of levers. When the belt is pulled out smoothly, the support rotates with the spool gear, and with a sharp jerk, the flywheel is blocked. In this blocking system, most often there is a malfunction.
Thus, to repair the coil and other mechanisms, it is necessary to remove it, for which almost all cars will need to remove the trim, and on some models the seats on the side with which the belt is not working properly. For removal and self-repair, you will need tools, which should include:
- a set of flat and Phillips screwdrivers;
- a set of spanners of various diameters;
- lubricant, wire, wipes and material to protect the seats and upholstery.
Depending on the complexity of the repair (sometimes a complete replacement of the coil is required), other additional tools may be required for work. Do-it-yourself repairs at a VAZ are much easier, especially on older versions, since these cars do not have side airbags, the trim is easily removed and installed, and there is no need to remove the seats.

