
In detail: do-it-yourself shirt repair from a real master for the site my.housecope.com.
What if you accidentally tore a new item?
Throw away or give a chance for a "second life"?
Of course, it depends on how seriously the item was damaged, but if there is a possibility of recovery, why not try ...
Consider a similar repair using the example of a men's shirt.
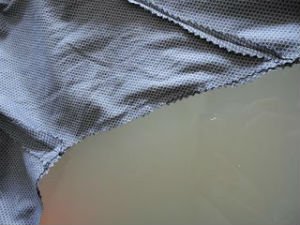
So, there is a men's shirt with a tear in the pocket on the front.
It will not work just to sew up or glue the hole here, the gap is too large.
Therefore, you can make a semblance of an applique from the stitched tape.
In a fabric and accessories store, I bought a keeper cotton braid of a suitable color.
Before repairing a shirt, I cut off all the threads.
At first I wanted to glue a piece of suitable fabric from the wrong side to secure the cuts, but then I decided not to "weigh down" the product.
I take a non-woven adhesive, cut a strip to fit the gap and glue it from the inside out.
The cuts are reinforced and the look from the wrong side of the shirt is "decent".
Next, I try on the braid.
First so
Not that…
I dwell on the third option.
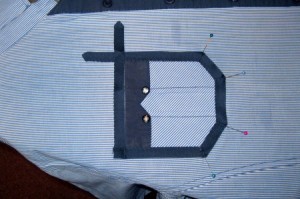
I pin the braid with pins and sew it with a straight line exactly to the edge.
Compare before and after renovation.
As I was later told - The shirt became even more beautiful!
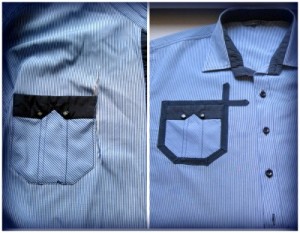
Thus, you can repair not only a men's shirt, but also other things.
This repair method is simple, does not require special material costs, but it helps to return the "face" of the damaged product, as you could see from the example of repairing a men's shirt.
You can learn even more about how to repair and alter various things from my new course - "Sewing, repair and alteration or Remake with imagination." Details here
How to fix the collar? And so that the shirt will still serve!
| Video (click to play). |
Just flip the collar. The bottom, unworn part of the collar should become the outer, top. If you have already done this operation, you can make a radical change: cut and sew a collar from a contrasting or companion fabric, and so that this detail does not look foreign, add cuffs and / or a patch pocket, a pocket strip or fasteners from the same fabric.
If at the collar, as often happens, the fabric creeps out at the fold, then you need to take and using a ripping knife, which every seamstress or a regular blade has, rip the collar from the stand. Then darn a neatly worn place, or sew a narrow strip of fabric under it, turn it over so that the lower (preserved) part becomes the upper front part, sweep and then sew to the rack.
If the top has become completely unsuitable, rip off the collar from the rack and. on top of that, rip it open at the seams (but carefully so as not to damage the seamy side and the lining. Then iron and cut out a new collar on it (you can from the remnants of fabric, from the bottom of the shirt, from a completely different suitable fabric and combined with the shirt). Fold the top and the wrong side facing each other, put a gasket on top, sweep, sew, turn out and sew again at a distance of 0.5 cm from the edge. Then sew the collar to the stand.
If the stand is worn out, completely unplug the collar from the neckline; stamp the worn out part of the rack. Then turn the collar over so that the lower part becomes the upper front part, hem it to the neckline. It remains only to carefully sew the upper button loop and sew a button in its place, and make a new loop on the opposite side!
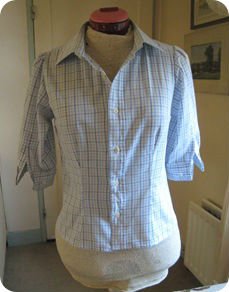
In fact, there are a lot of options - children's clothing, aprons, and much, much more. But today we will focus on the alteration of a man's shirt into a woman's.We offer you four master classes on sewing a women's blouse from a men's shirt, as well as a few additional ideas on how to alter a men's shirt.
Men's clothing is usually larger than women's. Therefore, that any alteration, which consists in reshaping men's clothing so that it fits well on a woman, will be associated with the need to reduce the size of the clothing. The following areas should be especially narrowed: shoulders, sleeves, torso.
The only exception would be the chest area. Men's shirts are shapeless in the front. Women, on the other hand, usually have a groove or some kind of fold under the bust, creating a bend. In any case, we will need to cut the bust so that the shirt has the correct curves if you are sewing for a feminine silhouette. It will be easier if you first make the undercuts, and then narrow the torso area.
To remake a men's shirt so that it fits well on a woman, three tasks must be completed:
- Make the width from shoulder to shoulder narrower;
- Make darts under the bust so as to get roundness in the chest area;
- It is necessary to narrow the sleeves and the body of the shirt itself
Step one - narrow your shoulders:
1. Put on a shirt and mark where your shoulders end.
2. Take off your shirt. Draw a curve from the shoulder mark to the armpit, under the original seams in the sleeve. Fold the shirt in half and cut along the lines you have drawn, folding both sleeves together so that they are the same length.
3. Turn the shirt and both sleeves inside out. Lay so that the right sleeve is on the right side of the shirt and the left sleeve is on the left. The button holes on the cuff should be at the bottom.
4. Pin the sleeves back with pins. Do this by matching the top of the sleeve with the seam on the shoulders and the seam of the sleeve with the seam on the shirt. The right sides (outside of the shirt) should be facing each other.
You will end up with a hole in the armpit because the sleeve is shorter than the sleeve hole on the shirt. Just tie the sleeves to the shirt so that the hole is as small as possible.
5. Sew the sleeves to the shirt.
Step two - make darts:
1. Turn the shirt inside out and put it on. Draw a curved line just below the chest and up to the side of the shirt. This will be the dart.
If you notice that the dart goes into the shirt pocket, either dart below the pocket, or remove the pocket altogether to start.
2. Using a ruler, extend the line all the way to the edge of the shirt.
3. We need to transfer the dart to the other side of the shirt. If you're using chalk, just fold the shirt in half and bring the line over to the other side. If you want everything to be as accurate as possible, then take the following measurements:
a) The horizontal width from the top of the dart to the side of the shirt;
b) The length of the side of the shirt from the arm hole to the horizontal line I drew in the first step.
c) The length of the side of the shirt from the sleeve hole to the end of the dart. As you can see, I got it: 1) 17 cm; 2) 5 cm; 3) 23 cm. Use this information to draw an identical dart on the other side of the shirt.
4. Mark the darts with pins.
5. Sew the darts just below the line you drew with the ruler. How much lower is up to you. The basic rule is this: the smaller your chest, the closer to the line you should sew.
6. Turn right side of shirt inside out and measure. If you are satisfied with the grooves that you made, then turn the shirt inside out again and cut off the excess material that is above the dart line. Iron the seams of the darts.
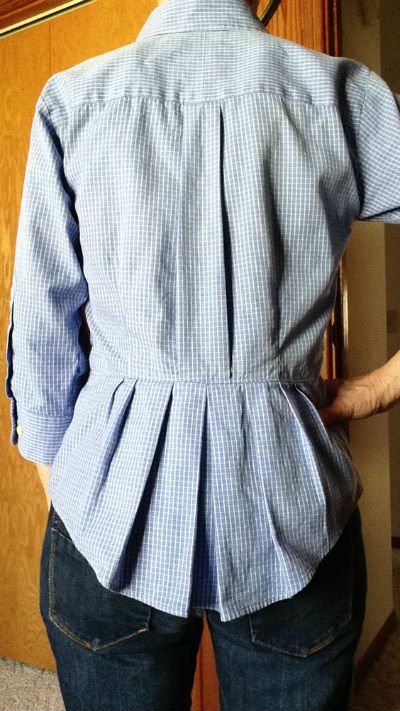
Step three - narrowing the torso and sleeves:
1. Turn the shirt inside out and put it on. Mark where your waist line is, and then mark where you have the back of your hand. Always measure with a margin, the shirt, if necessary, can be narrowed a little more, but enlarged back - no.
2. Take off your shirt. Draw a straight, slightly curved line across your sleeve from armhole to cuff.Then draw a curve from the armhole to the bottom of the shirt. The widest part of the bend is the mark that marks your waist. Cut off.
3. Pin together to mark the seams at the armhole and sleeve cuffs. Use pins to mark the torso starting from the opening of the armhole. The darts will make the back of the shirt longer than the front.
4. Sew. Try to keep the seams of the armholes and dart seams open.
5. Iron all seams, measure. If you want the front and back of the shirt to be the same length, hem the back.
I tuck my shirt into my jeans, so this is not a problem for me. You can also cut the sleeves and re-sew them if they are too long.
Or make a summer shirt out of a winter shirt, cutting off the sleeves completely or leaving short ones. Do this before narrowing the sleeves.
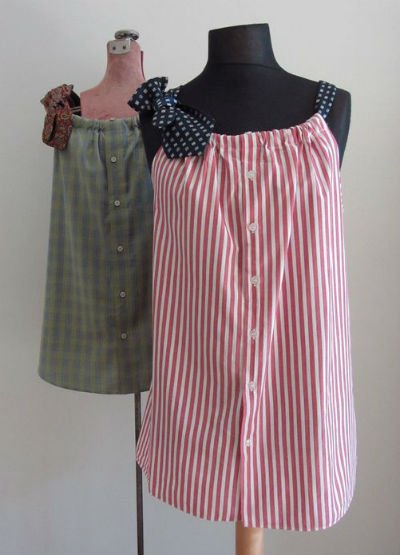
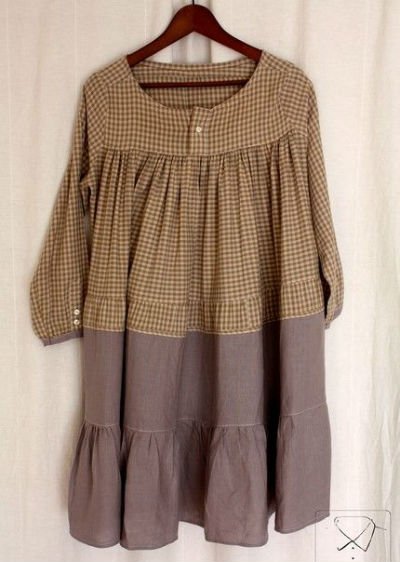
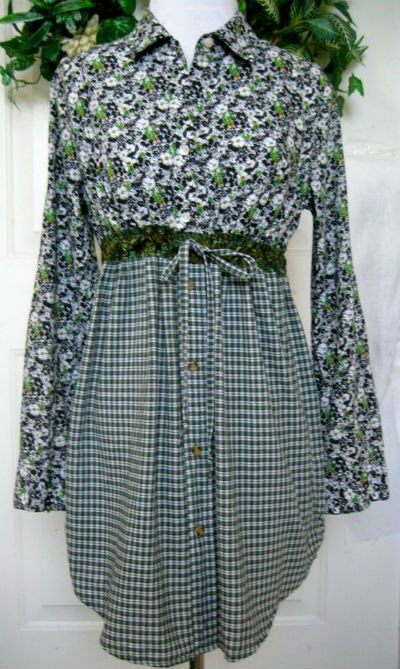
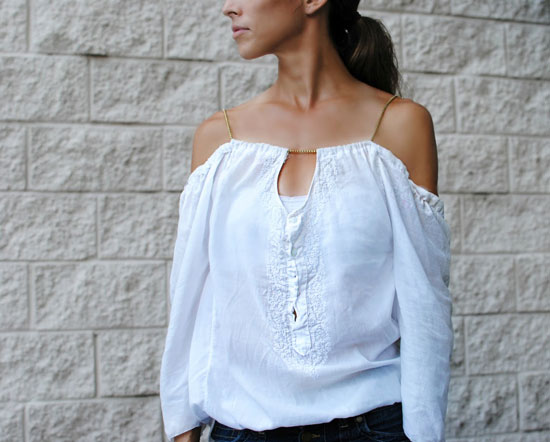
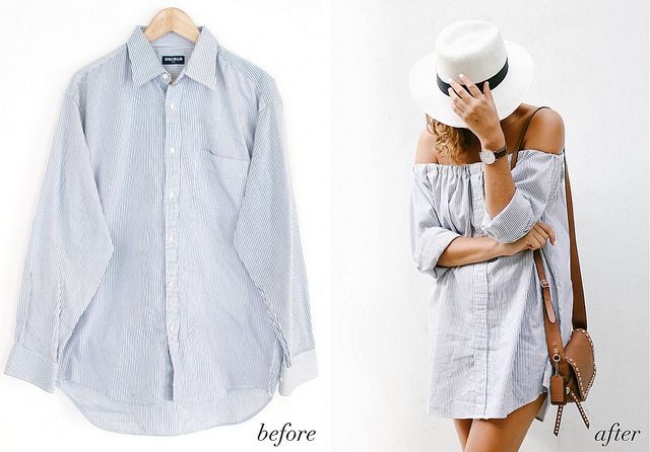
If you can find a really long shirt (longer than mid-thigh), you can safely remake it into a dress.
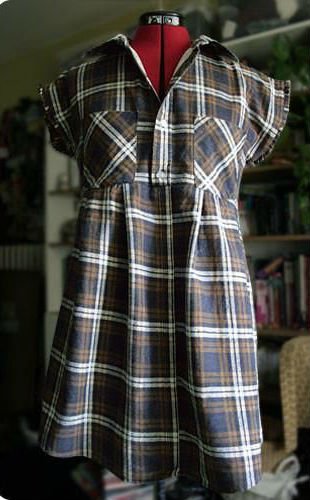
The plaid shirt is a classic, it is present in the wardrobe of almost every girl. Here's a way to remake a mens plaid oversized flannel shirt with feminine accents.
Lay out and examine the shirt to see how it should change after the excess is cut. The larger the shirt, the more fabric you have to deal with to create the ruffles. You can also get fuller sleeves from larger shirts. Remove those pockets that are where you are going to place the ruffles.
Turn the shirt inside out, it should fit well on you. Pin the side seams on both sides to help shape the shirt. To make the shirt fit better, add small chest undercuts on both sides. Cut the fabric carefully, leaving 16mm of pins for seam allowance. Trace the openings of the armhole or draw directly onto the fabric with chalk.
To make ruffles on the chest, cut five strips from the remaining excess fabric of the shirt, measuring so that 1 part of the width is equal to 16 parts of the length. Sew each section lengthwise using a basting stitch. Pull gently on the thread to create a ruffle effect.
Pin the ruffles at the front of the shirt, and then sew in a zigzag stitch. For this rework, I decided not to hem the edges to achieve a worn effect.
Cut off the collar of the shirt where the stand begins. Sew the fifth ruffled strip to the inside of the collar stand.
In order to correctly determine the length of the sleeve, put on a shirt and pin the sleeves with pins to the length you need. If the shirt is large enough, you can end up with rather puffy sleeves that won't pinch your bicep. Gather excess fabric at the base of the sleeve to make lantern sleeves.
Finally, hem the bottom of the shirt to the length you want, and iron all seams.
1. First, take a regular men's flannel shirt, which will be at least two sizes larger than yours. From the excess fabric that comes from the sides of the shirt and the bottom of the sleeves, we will make ruffles (note the dotted line in the picture).
2. Cut along the dotted line to create four crescent-shaped pieces of fabric.
3. You will need to gather the edges of the cut fabric, thereby making the ruffles.
4. Sew on the pleated hem along the button and collar line. If you want, you can sew on 2 rows of cuts with ruffles on each side and use all 4 pieces of the cut fabric to make the shirt more interesting.
What is important to consider when making a dress from a shirt: You can make a stand-up collar by folding it in half, either folding it out or in, and then sew it on. It is best if you fit the outer edges of the ruffles to prevent excessive wear from washing. On one shirt, I tried to sew the collar only at the outer edges of the ruffles, but this made the fabric too thin and the ruffles did not hold their shape well.
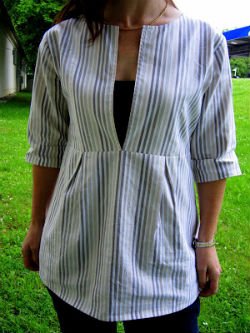
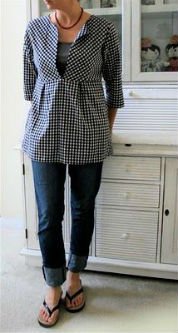
Another option is to change a large-sized men's shirt into a women's blouse.
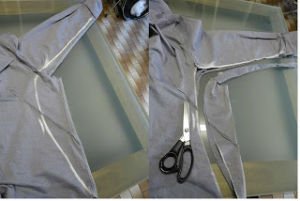
First, cut off the sleeves and unpick the side seams, leaving the shoulder seams intact.
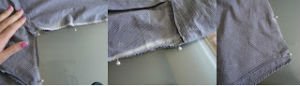
Further, from the seamy side, we fasten it with pins so that we get a silhouette.
It is necessary to make a groove in the chest on the side and in the front, as well as a groove in the back, so that the shirt fits well.
We pin the sides of the shirt to place the undercuts in the right place. Then we sew the darts where they should be and smooth them out. Now is the time to try on the shirt and make sure that all the darts are in place, if not, you will have to reopen and sew the shirt so that everything is in its place.
After trying on, when you have made sure that all the darts are located where needed, we sew the side seams of the shirt. We measure the length of the shirt on ourselves from shoulder to bottom, and transfer these measurements to the shirt. Then we cut the hem of the shirt to the desired length.
We measure the length of the sleeve from shoulder to elbow and cut along the line corresponding to the new seam. After that, pin the sleeve to the shirt with pins and mark the new armhole with chalk.
In this model, the sleeves are lanterns, so we will collect the upper part with a thread before attaching it with pins to the shirt. After that, we pin them with pins and sew them backwards. This means that the cuff cut will now be in the front instead of the back, which will give you more freedom of movement.
Obviously, the cuffs were too small to be easily fastened at the elbow, so we tuck them in and iron them before sewing them on to the stitches that were already on the cuff.
The photo may not be visible, but on each sleeve, there are two button holes, so you can use cufflinks if you wish.
Sew on the extra buttons that remained on the cut-off bottom of the shirt onto these additional button holes to make the shirt more designer.
We offer you a few more ideas for converting a men's shirt into items of women's clothing:


We wish you creative success!
Share your comments on the proposed ideas and master classes, and suggest your options.
Read about what you can do out of old jeans here.
For several months, I collected various ideas for reworking old things into new ones. Most of all "hooked" on the idea of alterations from men's shirts. Not only interesting, but also very simple, even for beginners.
I share with you my stock of ideas.
Good ideas! The dress on the mannequin and the skirt were mesmerized! Thanks to!
.
Worthy of the chosen one 
.
I have a lot of good and expensive shirts. Now they are "retired", can they really find a use for them? 
She also added. Fun, today I am with the slogan: “Give a second life to men's shirts! 
You can also sew an apron.
O! And I did something like this to my daughter - it turns out that I invented the bicycle
Great collar and back ideas! Just class!
Claaaaass. How many ideas !!
Only the last one seems to be just an independent T-shirt. Very interesting, by the way)
A very valuable compilation! There are a lot of shirts. All have only one flaw - the cuffs disheveled from the watch. Indeed, you can remake them into aprons. In wet felting, an apron is an essential item. Thanks!
Elena! To your health! Inspiration to you! I myself am sitting with 2 large bags of old men's shirts and I torture them to the right and to the left.
I liked the ideas too. Great!
Marina, good luck with your creativity!
Super! Thanks for the selection. I saw some ideas for the first time
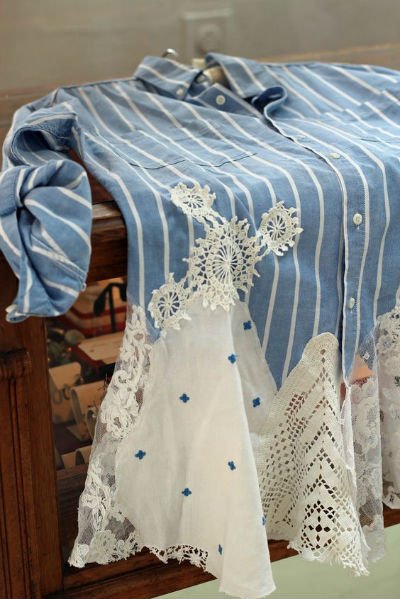
.I want to add my own photo as an option. For a boho style shirt is a godsend
Find!
I liked the selection very much.
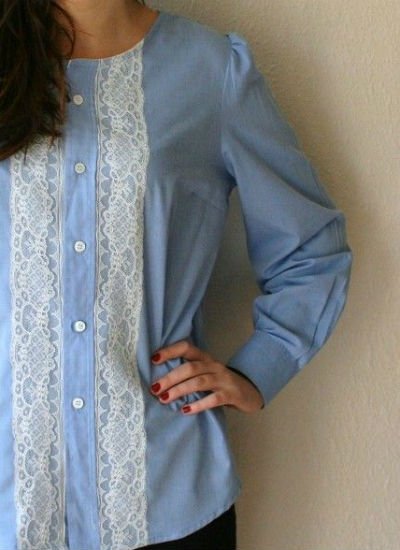
And I cut off the collar, sleeves and flaps on the pockets from the shirt. Decorated with lace neckline and sleeves. In place of the valves (they did not look at all with lace), I sewed beads. I wore such a blouse with pleasure!
What a pretty one!
Oh
cool option!
Wonderful transformations!
I liked all the ideas presented very much, Thank you!
Victoria, you have very interesting ideas, thanks, it will come in handy. But a skirt from a shirt never crossed my mind.
Lord, where to get so much time to sew / knit / remake everything that you like and want ?! 
now if the body did not need to sleep Inna, I support! Why are there only 24 hours in a day?
A very interesting topic. I'm going to dispossess my husband for a couple of shirts. 

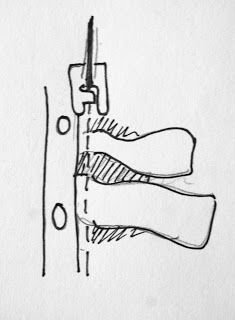
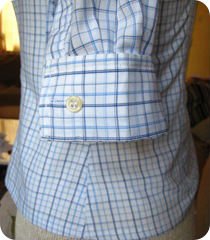
Everyone is familiar with the situation when a men's shirt is in good condition, and the collar or cuffs wear out faster than the shirt, loosen up and look worn out. This makes the shirt unusable. However, using some tricks, you can return the men's shirt to its previous look. To do this, we will carry out a simple repair of the cuffs and shirt collar. How do we fix the cuffs? If their edge is tousled, then we will simply cut them off, to a whole place, and tucking the edges inside the cuff, first sweep them, and then stitch them back from the edge 0.2 cm and then sew again, backing off 0.5 cm from the edge. After such a repair, the cuffs will last a long time.
If the cuffs are worn out thoroughly, they must be replaced. Old cuffs we will unscrew from the sleeves and cut new ones along them, as in a pattern. The fabric for the cuffs should be matched to the shirt. If it is smooth, for example light blue, the cuffs can be supplied in blue or gray. If the shirt is in a cage, then the fabric can be taken in any color suitable for any of the cells. You can rip off the cuffs from an old shirt that has become small or out of fashion.
Sewing the cuff to a men's shirt is easy if, with one side, attach it to the bottom of the sleeve with the right side, aligning the cut on the sleeve with the edges of the cuff, leaving a seam allowance. Baste and stitch. Then fold the cuff in half as it should look finished and sew on the sides. Then turn out to level the corners if they are sharp and tuck the free edge inward. Sew on with inconspicuous stitches, or neatly stitch along the very border with the sleeve. The cuffs can be stitched around the edges. On the newly set cuffs, make buttonholes and sew on buttons.

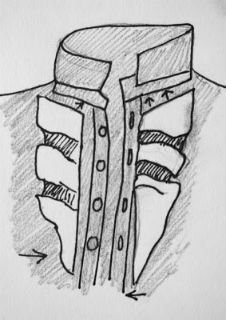
How to fix or replace a worn shirt collar. Collars often deteriorate faster than the shirt itself, so they are repaired or replaced. If the collar only shows signs of fraying, then it can be repaired. The collar must be unscrewed from the counter and, picking up threads to match the shirt, mend the worn out place. You can put a strip of fabric under this place and darn with it. Sew the collar into place.
If the collar is already badly frayed, you can replace or repack it. To re-turn the collar, it must be ripped off along with the stand, darned the worn-out place and, turning it over with the other side, sew into place. The patched side will be under the collar, and the whole will be outside. When reworking at the collar, the loop and the button will change places, so you need to darn the old loop and sew a button in its place. And on the other side, sew a loop.
With another method of repairing a worn collar, we make a complete replacement. To do this, unpick the collar with a stand and use it as a pattern for a new one. For a new collar for replacement, we also select the fabric to match the shirt. You can cut a collar out of the same shirt if you cut off its sleeves and use them to make a collar. The shirt will be short-sleeved, but with a whole collar. Such a shirt will be quite possible to wear. When cutting the collar, make an increase in the seams. Cut out sew on collar to the shirt.
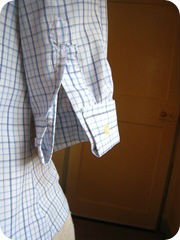
On men's shirts, the sleeves on the elbows are wiped. To prevent the appearance of a hole on the elbow, it is also necessary on a new shirt from the wrong side, with imperceptible stitches, to hem pieces of satin or twill, or any sliding material. This will protect the sleeves from chafing.
If scuffs have already appeared on the elbows of the shirt, then the patch can be applied from the front side, making it in the form of an applique. These are usually rectangles, rhombuses or ovals.To make the patch look harmonious, replace the shirt cuffs with cuffs of the same fabric. If the cuffs are worn and the sleeves are frayed, the long sleeve can be cut off and made short. It's very simple, take a measurement for the short sleeve, put it on the shirt, cut it straight. Fold the sleeve 5 cm to the wrong side and another 0.5 cm to the inside of the lapel and sew with inconspicuous stitches. The hem of the sleeve can be sewn.
You can leave a response, or trackback from your own site.
In this section you can see the completed sewing and repair
All males wear shirts, because this is an indispensable item in everyone's wardrobe. This type of clothing emphasizes the man's business style, his seriousness and sense of style. But, as with any other clothes, various difficulties often arise with the shirt: somewhere the product is caught and torn, clues are formed, or a button has come off, it is necessary to shorten the sleeves or sew the product itself. There are no hopeless situations, so if you want to return your favorite shirt to its original appearance, or even better than it was, then the “Kostyumchik” atelier is the place to go.
Atelier for repair and sewing of shirts in Moscow "Kostyumchik" will provide you with the highest quality service for the restoration of not only men's shirts, but also any other clothing. The shirt does not sit on the figure, as we would like, or the collar is worn out, or maybe a small gap has formed - we can easily fix this, because real professionals work in our workshops who will put even the most complex order in order.
Special high-tech equipment allows us to work with all types of fabrics, European accessories and the professional flair of our tailors and technologists will help to achieve the desired result. We work seven days a week and are located in the very center of Moscow, not far from the Belorusskaya, Barrikadnaya and Mayakovskaya metro stations. In addition, if you are in a hurry, you can always use the services of ironing, fixing minor defects and urgent repair of men's shirts, even on the same day.
We are not at all afraid of flashy brands, variations in treatments, and the complexity of shirt defects. We have vast experience in working with any fabrics, we know a lot of types of processing, we have wonderful employees who will help you solve any of your problems. We will select several options for you and do our job perfectly and on time at an attractive price. Need to shorten the sleeves with slot transfer or shorten the shirt itself? Maybe you misunderstood the size and need to fit the figure? Or do you need to sew chevrons or applique on the shirt? Or punch a loop? Come to the “Kostyumchik” clothing repair atelier and be convinced of the quality and fast terms of order execution. Remember, our main and priority goal is to constantly improve the quality of our work and leave our customers satisfied.
In the Sewing.Ru atelier you can always repair almost any shirt, blouse, T-shirt or jumper.
If this is a new thing, then the usual task boils down to the following works: hem a shirt, sew in, shorten the sleeves, adjust the cuffs, in general - fit a new thing on the figure. Our masters will cope with these works efficiently and quickly. Extensive experience and qualifications allow the employees of Sewing.Ru not only to adjust the item to the customer's size, but also, if necessary, to sew a blouse, shirt or T-shirt individually.
As for the repair of a favorite men's shirt, which, according to the customer, was new only yesterday, but today there is such a misfortune ... we usually carry out the following work: re-facing worn collars or cuffs. If the left cuff of your shirt has worn out earlier than the right one, this means that you are a man of business, time is precious for you and you wear your watch on your left hand, and if the watch bracelet is metal, then the cuff wears out an order of magnitude faster.
In the Sewing.Ru studio you can change the model of the corners of the collar of your shirt according to the latest fashion, make undercuts (fit), sew up burst seams, and mend burnt or torn places. On knitted jumpers and T-shirts, we raise the loops and stitch.
Unfortunately, it is not always possible to restore your favorite thing to a new state, therefore we strongly invite you to a free consultation with the master. Come and you will not regret it!
We are waiting for you and will be very glad to meet you!
Register to get an account. It's simple!
Already Registered? Sign in here.
Today we introduced you to the British Room classic style store. In fact, these are several online stores about various English and not only wardrobe items. All of them are united in offline spaces in Moscow at ul. Lev Tolstoy, 23/7 and Petersburg on Ligovsky prospect, 92d
Using the pronin25 promo code (it is enough to indicate the promo code in the comments to the order on the website or when buying at the checkout) the first 10 subscribers will receive a 25% discount on all products of the store!
Further and always, there is a 10% discount for the pronin10 promo code!
- clothes, shoes and accessories from the UK
- online store of classic handmade men's shoes
- tweed clothing store
- English naval duffle coats and pea jackets
- classic leather satchel bags from Britain
- Scottish costume online store
Coat GORD:
What the guys say about themselves:
We are fans of coats, masters of our craft. A young brand, we sew men's coats, raincoats according to individual measurements and with maximum personalization (it is possible to make personal embroidery on the product).
We work in the middle price segment, we sew from good natural fabrics and of high quality.
We are located in Izhevsk, Udmurtia.
In order for the client to choose a coat for their tasks, we have a large selection of versatile coat models (currently about 25 models), suitable for various tasks. For business style, casual with sneakers, bright eye-catching models, models with fur, winter models, demi-season models, models with removable insulation. We are constantly developing new coat models, new items are often released, taking into account a thorough analysis of the fashion market.
We sew absolutely on any shape. Guaranteed 100% we achieve the perfect fit of the product, if we do not fit the size, then we will alter it at our own expense until the client is satisfied.
The process of taking measurements is simple and optimized, there is a clear video instruction on which you can easily and quickly take measurements off yourself. Much more time is spent on shopping trips and numerous fittings in search of the right size.
We have a great offer for new clients. Order a coat for a trial period for free. That is, a person (a new client) orders a coat, we sew it for him according to his figure for free, we send it to him in his city for free (we work all over Russia). He receives it, assesses our quality, fit, if everything suits him, he buys it, if not, then sends it back without risking anything. He has a week for all this.
Today at STREET-STORY we look at clothes for spring and collect bows for spring! There are many interesting brands here, including everyone's favorite Japanese denim! You asked me to tell you about a clothing store in Moscow!
STREET-STORY STORE: 10% DISCOUNT ON PRONIN PROMO CODE
The store is good, it has the following advantages:
Originality guarantee - STREET-STORY against fakes and replicas.
Best price guarantee - if you find a lower price, STREET-STORY will refund the difference and pay 100 rubles more.
Large selection of clothes, shoes and accessories.
Constant replenishment of the assortment with new products and new brands.
Some brands in Russia are represented only by STREET-STORY.
A lot of things in the SALE section with discounts up to 70%.
Possibility to order an item for pickup from STREET-STORY stores with free shipping.
Delivery all over the world, even to small villages.
STREET-STORY is always in touch - you can contact by phone, email, social networks and instant messengers.
Didn't fit the size? STREET-STORY can be exchanged for another without any problems.
Didn't like the color? Return the item within 14 days and STREET-STORY will return the money.
Brands represented:
Adidas Originals, Alpha Industries, Blue Sakura, Carhartt, Closer Than, Most, Converse, Diadora, Erik & Sons, Fjallraven, Fred Perry, Hanwag, Happy Socks, Herschel, Iron Heart, Japan Blue Jeans, K-Way, Kamikaze Attack, Karhu, Lumberjack, Ma.Strum, Marshall Artist, Napapijri, New Balance, Outskirts, Penfield, Pikobello Casuals, Poler, Pure Blue Japan, Saucony, Solemate, Surplus, TCB Jeans, Tellason, Thor Steinar, Three-Stroke, Vans, Warrior Clothing, Weekend Offender.
This master class: “How sew a hole in a shirt“I didn’t do it myself, I just made a description of it, it was sent to me by my friend, who worked in a clothing repair shop for some time. She, like me, could not help but share such a well-known problem with you, because a hole under a button can be found not only on a shirt, but also on a dressing gown or dress. On my dressing gowns, the bottom two or three buttons are always torn out, as they say: "From the roots!" Nobody! We wear, we are not going to mince, and therefore we darn.
Here is the long-suffering silk acetate shirt.
The first thing to do is rip off the buttons at the top and bottom of the hole.
Fold back the line, if there is one, that holds the edge. You should not cut off the spilled threads of the shirt.
Steam off the break with an iron.
Glue a piece of adhesive non-woven fabric to the place of the gap or apply an adhesive spider web, and then a piece of fabric of a similar color.
Sew back the hem.
From the front side, with threads in the color of the warp, zigzag stitch at the break. I would recommend taking silk threads, they are thin and you can zigzag more tightly.
Next, sew the buttons into place. Of course, this will not be a new shirt, but our darning will not be noticeable when closed. If appropriate, you can sew some kind of cartoon of a well-known brand on the place of the gap, and then certainly no one will guess that there is sometime here, someone told how sew a hole in a shirt.
Neat shirts for your wardrobes, dear needlewomen!
There is some special magic in reworking old things. A little inspiration - and now the annoying shirt turns into a stylish pillow, a fashion accessory or a cute dress for a girl.
We are in We love to give a second chance to old things and bring cool options to life. Grab your old shirt, our selection of ideas, do a little bit of effort, and get creative.
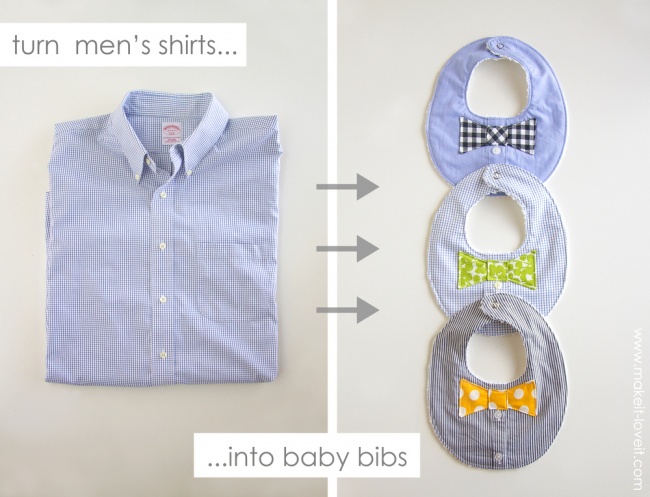
Serious bibs for the future businessman were made by the author of this blog.
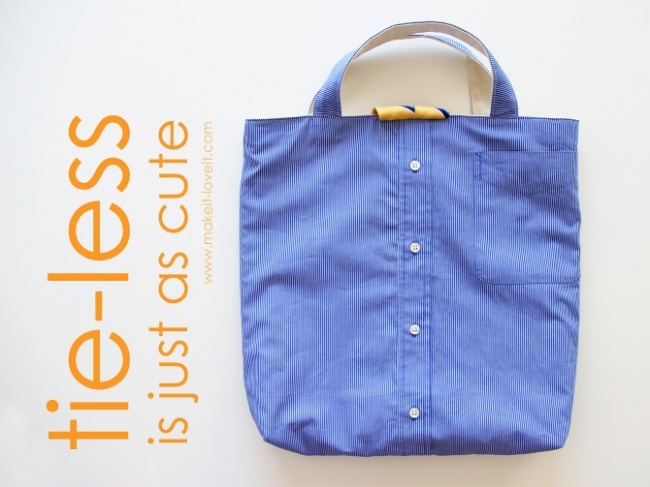
This roomy bag is perfect for the beach.
| Video (click to play). |
It’s hard to believe that this stylish dress is made from a regular shirt.


