In detail: do-it-yourself Lancer 10 steering rack repair from a real master for the site my.housecope.com.
Do you hear an unpleasant knock in the front of the car when driving over small potholes? The beats are given to the steering wheel and over time their amplitude increases? These are clear signs that it is urgent to pay attention to the condition of the steering rack.
Also, one of the signs of its malfunction is that large potholes of the car pass almost silently, but small shagreens - on the contrary. In this case, it is not necessary to enroll in the queue at the service station.
Primary diagnostics of serviceability, as well as do-it-yourself steering rack adjustment on a Mitsubishi Lancer, is quite easy. Is it possible to repair or replace, and what is the cause of this malfunction, let's try to figure it out.
The reliability of the steering mechanism in Japanese cars is designed for 150-200 thousand km. But these are only approximate indicators, which can change in one direction or another.
The steering mechanism fails for the following reasons:
- high speed on rough roads;
- untimely inspection of the rubber anthers of the steering rack leads to the ingress of small particles, with subsequent destruction of the rubbing elements;
- replacement of hydraulic fluid, which is carried out from time to time or a low-quality mixture is used.
Paying attention to the above reasons leading to premature repairs should also be because the steering rack is a very expensive part for Japanese cars. Replacing with a used part is a temporary solution to the problem, it costs a little less to restore it, but it is also quite expensive. When driving on uneven roads, seals, a rod and a slider are developed.
| Video (click to play). |
In order to accurately determine the cause, it is necessary to contact specialists and check the condition of the steering tips and rods. It is difficult to do this without a special tool and relevant experience. Elements of the steering mechanisms (tie rod ends) also become a frequent cause of knocking when driving through small pits.
You can check the condition of the ball joints yourself, to do this, alternately jack up the left and right front wheels and shake them, holding them with both hands. If the knock is not heard, then everything is in order.
Lancer steering rack adjustment is carried out in order not to aggravate the situation, which can result in the replacement of seals and even a major overhaul of the entire assembly. In this case, it is cheaper to prevent the problem than to fix its consequences.
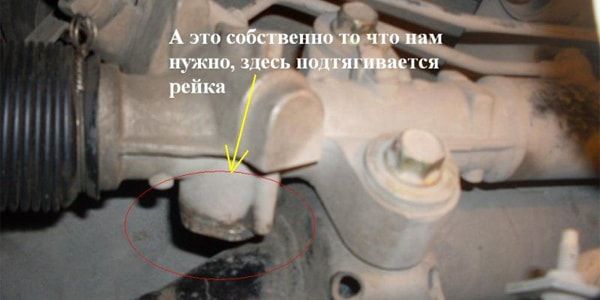
The Mitsubishi Lancer steering rack is tightened with an adjusting bolt holding the bearing. During the operation of the car, the bearing mount weakens and its tightening is required.
Adjustment procedure:
- Position the vehicle in the pit and block the front wheels with wheel chocks.
- Set the steering wheel straight.
- Remove dust and dirt from the mounting point of the adjusting screw on the steering rack (located at the bottom).

- With a white marker, draw a vertical line along the factory locknut and adjusting screw.
- Using a non-sharp chisel and a hammer, use gentle counterclockwise strokes to loosen the locknut.
- While holding the locknut with a 41mm wrench, insert the hex key into the adjusting screw and turn (clockwise) to 23 N/m on the torque wrench, then back off the screw 30 degrees.
- Make sure, by easily turning the steering wheel 15-20 degrees, that the knock is not heard.
- If the knock remains, reduce the loosening of the screw to 20 degrees, to achieve the disappearance of extraneous sounds.
- Start the engine and scroll to the extreme positions until it stops, thus checking whether the rail is biting.
- Tighten the lock nut, paying attention to the fact that the adjusting screw remains stationary (be guided by the vertical marks left during disassembly).
It is important to carry out this adjustment in such a way that the adjusting screw is not overtightened. The wobble of the steering wheel will stop, but the effort when turning the steering wheel will increase significantly. In this case, it is not worth counting on the fact that the problem will disappear and it will become easier to turn over time. The screw needs to be released immediately.
You need to be prepared for the fact that it will be difficult to make adjustments due to limited space and the lack of a special tool. In the first case, it is better to remove the steering rack along with the subframe, although you can not resort to this, and in the second, make a device from a 17 mm bolt 10-15 cm long that turns the desired screw, having previously processed the hat with an angle machine to the same shape, like the adjusting screw.
In order not to look for information on how to tighten the steering rack on the Lancer, use simple tips: watch out for rubber anthers. For long-term use, after washing the car, treat them with a protective silicone spray. If cracks appear on the protective products, immediately change them with a mandatory change of lubricant.
Do not hold the steering wheel in extreme positions for more than 5 seconds. This leads to an additional load on the hydraulic booster. In winter, when starting to move (especially on a cold car), turn the steering wheel smoothly, while avoiding driving the car in extreme positions.
If the material was interesting or useful for you, publish it on your page on the social network:
It is clear that due to factory flaws, even on fresh cars with low mileage, the rail constantly reminds of its existence. But in this case, the defect progressed rapidly due to the intervention of the human factor. Here is the movie:
.. Who this person is is a mystery, most likely in the past he worked as an electrician, otherwise how can one explain the use of plastic clamps for fastening the anthers of the steering rods.
. resulting in severe corrosion of the rack shaft.
. and here are the consequences of a torn tie rod boot. "megarust"
. in the latter case, irreversible wear of the gear pair. conclusion - a simple operation of replacing the anthers of the steering rods, in the presence of "crooked hands", can turn into a purchase of a new steering gear for you. price.
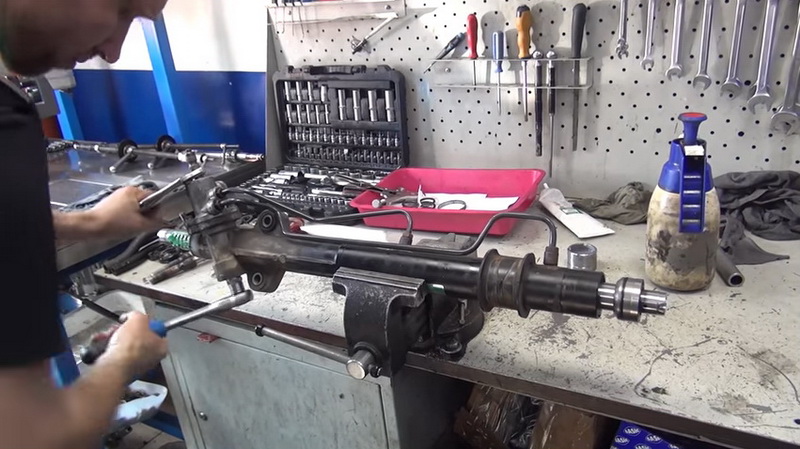
. Let's start disassembly. bolt in the cabin.
. massive subframe with a longitudinal beam.
. lower the subframe on the rack.
. dismantle the rear engine mount.
. remove the plastic clamps holding the wiring harness el. amplifier motor. the harness goes into the cabin and it is not clear whether there is a connector on the power wires - they didn’t look, it’s easier to unscrew the motor from the rail in place and hang it on a hook to the body.
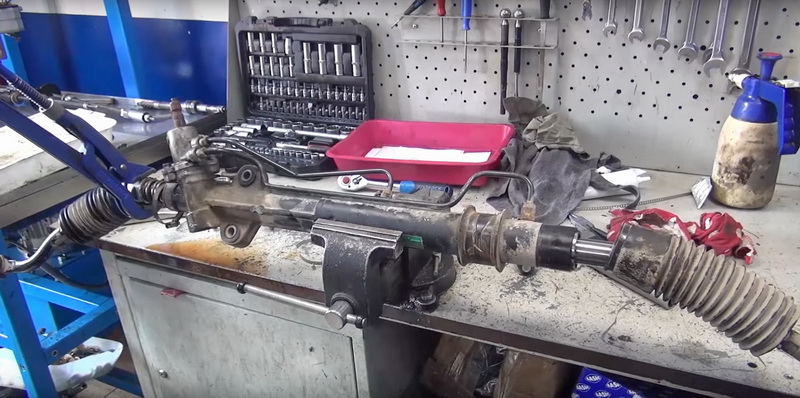
. we carefully disassemble the mechanism - we restore the shaft - we make all the necessary improvements so that the rail does not knock.
Consider what the Lancer 10 steering rack consists of, signs of a steering rack failure, the main causes of breakdown and wear of the racks, how best to diagnose a steering rack malfunction and repair the steering rack. 
Motorists say: "Without a steering wheel, a car is a caterpillar tractor." And the steering rack, together with the steering gear, is the most important part of the car. So it should be ok. And listen to stories: “I drove 40 thousand with a knocking rail”, at least carelessly. Just imagine the situation: speed 90 km/h, sharp turn. Your steering wheel - your wheels. And this can easily happen if the steering rack is faulty - the mechanism that transmits the steering force to the wheels, which means that the steering rack needs to be repaired or replaced.
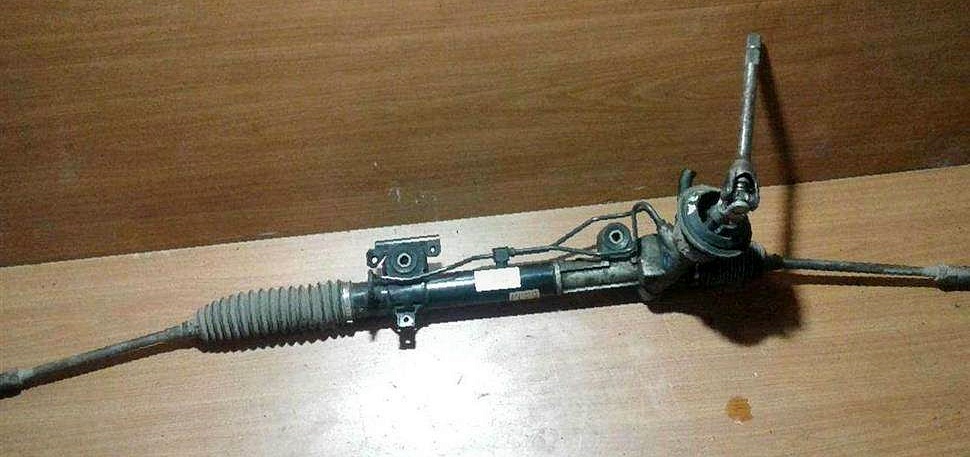
The steering rack of any car, including mitsubishi steering rack, - not the most complex mechanism in a car, consists of three main parts:
- Power steering gearbox - it transfers the steering force to the wheels;
- Tie rod - a rail is attached to it;
- Movable hinges - on wheels.
And due to its simple and reliable design, it rarely fails. But our roads can "kill" everything, especially if you add an aggressive driving style to bad roads in the style: "More speed - fewer holes."
Even more than the driving style, the life of the rack depends on the brand of car.
It’s time for you to go to a car service if, according to your feelings, the steering rack:
- knocking
- steering wheel does not turn well
- during rotation, play occurs or a whistle is heard
- on a bad road, the steering wheel starts to "beat"
- a hum is heard
- steering rack leaking
You can, of course, spin it yourself and look visually, but experts will do it faster and better using high-precision devices than you can by touch. Therefore, if you are going to carry out, for example, the repair of the L200 steering rack, then to save time and effort, it is better to contact the service.
Sometimes the problem is solved by adjusting the steering rack. But there are three reasons why it is better to entrust the procedure to a car service.
1) It is impossible for one person to adjust the steering rack.
3) You need equipment that is not available in every garage.
To adjust the machine, put it on a flyover and tighten the adjusting screw, which is located in the end cap.
The screw must be tightened slowly, while checking the steering wheel travel and play. According to GOST, the backlash should not exceed 10º. The master uses a special device - a backlash meter. After adjustment, the car is tested on the move, and if the steering wheel is tight, the screw is loosened.
A complete replacement of the Mitsubishi steering rack will cost a lot. Therefore, many economical drivers prefer branded spare parts either Chinese counterparts, or spare parts from parsing and even remanufactured spare parts. Such a repair, of course, will cost a penny, but after 3 months, at most, after six months, it will have to be repeated.
By entrusting the Mitsubishi steering rack repair to a car service, you will be sure that the repair kit (including bushings, anthers, oil seals, etc.) is of normal quality and the repaired mechanism will last a long time, even if analog spare parts for Mitsubishi were used. A car service, unlike a car flea market, provides a guarantee for its services and is interested in the quality of the repair.
To repair the steering rack will have to be completely disassembled, washed and cleaned of rust. During garage repairs, the wear of parts is determined "by eye", in a car service - with the help of high-precision instruments, so repairs can be even cheaper than garage ones. After all, you can make a mistake and recognize an unusable part that can still serve.
During service repairs, all parts will be checked for runout, consumables will be replaced, anthers will be diagnosed and the condition of the steering rods will be determined.
Mitsubishi steering rack repair in a car service, whether it is a Lancer 10 steering rack, a Mitsubishi Carisma steering rack or another Mitsubishi model, will not take much time. If the rail has already been removed from the car, then the repair will not last more than 2 hours. If dismantling is needed, then repairing the steering rack will take no more than eight hours.
Our regular customers do not have such questions. They contact us because:
- Professionals work here who do not "breed" motorists for money, but honestly diagnose and fix breakdowns.
- There are all three types of spare parts: branded, analog and auto-disassembled, so you can choose the repair that suits you best.
- We give a guarantee for our work.
- Regular customers receive a discount on repairs and maintenance.
And if you are with us for the first time, and have not yet decided why you need to become our regular customer, we will give you just one reason:
The masters of our car service are always happy to help you repair or replace the Mitsubishi steering rack!
Many Mitsubishi Lancer 10 owners are faced with the problem of knocking front suspension parts.And although many people most often suspect ball, strut or tie rods, very often the steering rack is the culprit of the knock. How to determine its breakdown and replace it, if necessary, we will talk a little later, but now let's analyze the prices for this part.
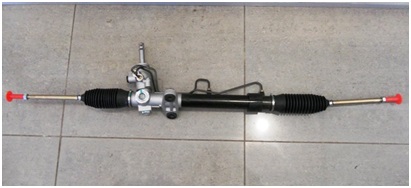
One of the most expensive options is to replace the rail with the original one. Of course, if you decide to buy the original, you can be sure of its quality, but it will cost you about 250 USD. The price is considerable, but another plus is that you can be sure of its full compliance, you don’t have to customize and adapt something.
ATTENTION! Found a completely simple way to reduce fuel consumption! Don't believe? An auto mechanic with 15 years of experience also did not believe until he tried it. And now he saves 35,000 rubles a year on gasoline! Read more"
Article of a new rail for lancer x mr491876.
Another option to solve this problem is to purchase a new, but non-original part. You can pick up a rail of a reliable, proven brand, at a good price-quality ratio.
In this case, the price can range from about 5,500 rubles. up to 8,000 rubles In order to order exactly what you need, use the sites on which, as accurately as possible, you can enter the data of your car.
You need to know exactly the data of the motor and box, otherwise you run the risk of ordering the wrong thing, and being doomed to a remake or to buy another rail, both of these options will be expensive.
Well, the most economical option is to replace the rail with a contract one. Many services or Internet portals offer to install used rails and even assure that they have been diagnosed, restored and are fully functional. To believe them or not is your business, but if possible, it is better to find an offer in your city or in its outskirts. So, you will have the opportunity to see with your own eyes what you are giving money for before buying. And you will have to pay approximately 5,000 rubles.
The first thing that can indicate a broken rail is a knock when driving over bumps at low speed. This knock is quite strong and gives vibration to the steering wheel. There may be play or the steering wheel will not be as smooth. Another symptom is a decrease in the level of hydraulic fluid in the EUR. Although the Lancers are equipped with electric, not hydraulic boosters, you still need to carefully monitor the fluid level.
How to determine what exactly is causing the crunch or knock in the steering rack? There are two ways.
- First, diagnostics is carried out on a stand or visually, on a removed rail. Of course, this method is more accurate and informative, but also more expensive and laborious.
- The second option is to visually inspect the rail with an electric amplifier in the pit and, by clicking on the parts one by one, try to determine the source of the sound.
Checked should be: steering tip, tie rod, left and right bushing and bearing. Of course, if the funds allow, and you are not a fan of doing everything yourself, then it would be good to contact a reliable service center so that the masters would carry out a complete diagnosis and give clear recommendations.
If you managed to accurately determine the cause of the breakdown of the steering rack, and you found the source of the knock, then you need to replace this part and the knock should disappear. In the case where no play can be found on the parts, the next step is to try to tighten the rail. This should be done on the installed part. The tightening bolt itself can be found on the steering rack through the hood of the car. The problem is that it is in the under-thaw, and when the rail is installed, it is quite difficult to get to it with the head.
Alternatively, you can grind a ring key on the machine, and then you will get access. Pulling should be done gradually. Having pressed it a little, it is necessary to drive the car, if the knock has not disappeared, you need to tighten it up again. If the steering wheel is no longer free to return the wheels to a level position, and the knock has not disappeared, tightening will no longer help you.In this case, it makes no sense to repair the rail; most likely, you will have to change it.
In the event of a fluid leak, a common remedy is to replace all seals, which deteriorate and dry out over the years. All of these seals can be purchased as part of a repair kit that matches your car. The price of a set of oil seals is, on average, about 2,000 rubles. It is very easy to order it on many sites selling auto parts. It is up to you to replace them yourself or contact the service, but it is very difficult to do it yourself and without a special puller.
If your heroic efforts to save the old rail did not help and the knock or leak remained, then there is only one way out - to change it to a new one. A detailed video and a diagram of how to do it online. You should start from the salon. It is necessary, by removing the plastic plug, to disconnect the shaft that leads from the steering wheel to the rack. After that, it is necessary to dismantle the front mudguard and crankcase protection, and then remove both wheels. Then carefully disconnect the wiring of the electric amplifier, trying not to damage it. We unscrew the bolts of fastening to the pillow and proceed to the removal of the electric motor.
We disconnect the tips further, remove the subframe from the front side, so that it begins to sag in front and stays behind. Then you need to unscrew the rail from the pillows. After all the mounting bolts have been removed, the rail will be completely removed. You will have the opportunity to more closely examine the cause of the breakdown, as well as inspect all the parts of this assembly for wear and, if necessary, replace everything at once. If the part number is kept on the old rail, then this will serve as a guarantee that the new rail will fit perfectly.
After installing a new part, which is done in the reverse order, it is worth considering how to extend its life. Many experienced masters give one simple but important advice. Since moisture, water, dirt and dust from the road, when it gets inside the rail, leads to rapid wear of the part's mechanisms, it is important to monitor the condition of the protective boot. If you notice that it is torn or the clamps are loose, it is important to fix it as soon as possible. So, this node of your car will last much longer.
Zodiac:
Registered: 13.03.2013
Posts: 23
From: Msk
Thanks: 0
Zodiac:
Registered: 13.03.2013
Posts: 23
From: Msk
Thanks: 0
Brownie Lancer X
Zodiac:
Registered: 12/23/2010
Messages: 10607
From: Zel. JSC Moscow
Thanks: 1022 pcs.
Zodiac:
Registered: 04/16/2014
Posts: 15
Zodiac:
Registered: 06/21/2011
Messages: 18
From: Irkutsk
Thanks: 1 PC.
Brownie Lancer X
Zodiac:
Registered: 12/23/2010
Messages: 10607
From: Zel. JSC Moscow
Thanks: 1022 pcs.
Zodiac:
Registered: 04/16/2014
Posts: 15
Zodiac:
Registered: 06/21/2011
Messages: 18
From: Irkutsk
Thanks: 1 PC.
6. We order a new PTFE bushing from the turner
[img]
[/img]
7. We press in a new bushing should go tight. then insert the shaft. With a new bushing should go tighter than with the original. We expose the shaft according to marks or measurements and put the gearbox in place. We assemble the mechanism of the clamping cracker, tighten the plug until it stops and release it by 1/4 turn, lock it
8. Putting it all in reverse order
Bottom line: the roar in the steering decreased by 70%, the steering wheel became tighter (it returns back when exiting the turn). But the knocks when the steering wheel rolls and the rumble in the gearbox remained in the near future, I think to delve into it and find the cause
Brownie Lancer X
Zodiac:
Registered: 12/23/2010
Messages: 10607
From: Zel. JSC Moscow
Thanks: 1022 pcs.
Modern cars are often the height of a design masterpiece. The Japanese auto industry is especially proud of this, in particular, the Mitsubishi concern, which over and over again produces the most reliable cars.One of these was the Mitsubishi Lancer 10. But, as in all human creations, nothing is eternal. Unfortunately, sooner or later the moment comes when even the most perfect car needs repair. The whole question is what this repair can cost.
For the driver, the most terrible sound is a knock from the front. And it doesn't matter where it comes from: from under the hood or below. We will not consider the first option, but in the second case, a knock may well mean that a terrible thing has happened - the Mitsubishi Lancer 10 steering rack has been covered.
How does this happen? First, a small noise appears, at first barely noticeable on small potholes, which gradually intensifies and already noticeably hits the steering wheel. And after some time, any rough road is perceived by you with such a feeling as if you are driving on a large grater or are in a washing machine. The steering wheel begins to constantly “sausage”, the wheels cheerfully emit a real drum roll. And this appears, as a rule, only on small road irregularities, but the car will pass deeper holes calmly, without noise and knocks. And if, even after parking, large oily spots of transmission fluid appear under your car, then there are all signs that the Mitsubishi Lancer 10 steering rack has died. Of course, you should not despair right away, the steering rack can be repaired.
The main reason for early wear of the rack is, of course, the condition of the roads, especially if you like to ride on forest or rural potholes and bumps or diligently do not miss a single city hole or especially dusty streets and do not check the integrity of the anthers on the steering rack. In any of these cases, dirt gets inside the steering rack, it begins to wear out faster, to leak, in general, unpleasant consequences.
Another factor may be the love of some drivers to leave their car with the wheels turned out in winter. Or it is forgotten that it is necessary to change the hydraulic fluid of the hydraulic booster system in a timely manner. This is clearly the fault of the driver.
Most often, the stem, slider or seal fail. But it may well turn out that the ball joints on the tip or tie rod are worn out. If so, you're relatively lucky, as steering rack repairs are not cheap. But the Lancer X tie rod is relatively inexpensive, so you should not be upset before the diagnosis of a car service.
But if the problem is still in the steering rack itself, then this is already a reason to think. For Lancer X, the steering rack from official dealers can cost, according to the owners of these beauties, up to one hundred thousand rubles. What is it?
True, there are analogues. They can cost you less, "only" thirty to fifty thousand. In general, sloppy trips can hit the wallet well. Fortunately, often the steering rack can be repaired. So, a repair kit can cost from three to five thousand rubles. Another option may be to search for a steering rack at autodismantling. True, here the chances, as they say, are fifty-fifty, you need to look carefully, and it’s better with a knowledgeable person. But for repair work, unless, of course, you yourself are an expert, you can safely save at least ten thousand rubles. In this case, the car will stay in the service for a day and a half, at least. Suspension work, as a rule, is very time-consuming and financially expensive.
And the advice here, in fact, is the same: drive as carefully as possible. Lancer 10, for all its reliability, clearly does not claim to be an SUV class. This is a powerful, stylish car, but still a sports car, off-road and dusty streets are not for him. At least not with great frequency. And always pay attention, that is, regularly check the anthers on the rail. You know that it is easier to prevent a problem than to eliminate it later, otherwise it is painfully expensive to eliminate it in this case.
The owners of such reliable 
Cars like Mitsubishi rarely experience problems in the first years of a car's life. The steering rack, in this sense, is no exception, since its working life is 200 thousand kilometers, and with proper operation, often even more.
However, if this unit still fails, the replacement will cost the car owner dearly, primarily due to the high cost of the element itself.
In most cases, a damaged rail can be repaired without loss of performance and, most importantly, road safety.
The main reason for the breakdown 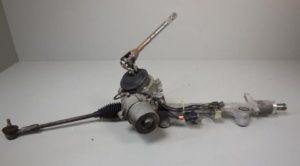
is the unsatisfactory quality of our roads - a pit, in front of which it is impossible to have time to slow down, can easily be encountered even by the most experienced driver. Overcoming any road roughness and obstacles at high speed leads to an increased load on the rail and, as a result, accelerates its wear.
Another reason is the lack of timely preventive maintenance of the node. So, it is necessary to constantly monitor the power steering fluid level, replace oil seals and other wear parts in time, and perform other necessary operations.
To determine that this unit needs extraordinary diagnostics and, possibly, repairs, the driver can do it on his own - it is enough to carefully monitor the car's handling, noticing even minor changes.
The most common signs of a rail failure are
:
- Typical car suspension noise. At first, it is barely noticeable and occurs when driving through bumps, therefore it is constantly heard and gives off a “beat” in the steering wheel.
- In order to turn the steering wheel, you need much more effort than before. The source of the problem is usually corrosion.
- The vehicle pulls to the side when driving at high speed. If you turn the steering wheel hard in any direction, it does not return back.
- The presence of oily smudges of power steering fluid on the pavement if the car has been in one place for a long time.
It is usually impossible to determine exactly what the cause of the malfunctions is without a comprehensive diagnosis of the node. For this, several methods are used:
- Visual assessment of the integrity and performance of the unit before its dismantling.
- Computer diagnostics on a high-precision stand that alternately simulates several modes of vehicle operation. Allows you to identify even the smallest malfunctions.
- Troubleshooting of each individual element.
Removing the steering rack is accompanied by certain difficulties, as it requires the dismantling of nearby components to ensure free access.
In the process of disassembly, the craftsmen carefully clean each element with the help of chemical compounds and sandblasting. This allows you to remove traces of corrosion, if any. Often this operation replaces the repair, if the unsatisfactory controllability of the car was associated precisely with corrosive damage to the elements.
Quite often you can meet 
Mitsubishi cars that have become “victims” of poor-quality steering rack repairs. The reason is that CTR tie rods are used as a more budgetary counterpart of spare parts. In general, they are of fairly high quality, but their diameter in the places where the anthers are attached to them is somewhat smaller than that of the original part.
The result of this subtle discrepancy is that the clamps do not tightly compress the anthers. The tightness is lost, and dirt gets into this gap. All this leads to the fact that after repair the shaft is very quickly affected by corrosion - about six months of operation is enough.
In most cases 
the performance of the rack can be restored. Sometimes for repair it is enough to clean the elements from corrosion and flush the system. In other cases, it will be necessary to replace the repair kit, which includes all the most damaged elements of the assembly - oil seals, anthers, etc. As in the case of traction, it is better not to save on the repair kit.The reason is that during operation, very serious loads fall on it, and if not very high-quality analogues are used, the elements will wear out very quickly. As a result, other parts of the rack will suffer, the cost of which can be several times higher than the original repair kit.
Repair of this unit is impractical in only two cases:
- When the rail has received severe damage, for example, in an accident, fire or extremely poor-quality repairs. In this case, it is not worth risking traffic safety by trying to restore such a node, it is better to replace it with a new one.
- If the parts are badly worn out and a more profitable option would be to install a new assembly rather than change a lot of spare parts, restoring the resource of the old one.
It is possible to develop the node resource to the maximum without replacing it if the following recommendations are observed:
- Observe the speed limit when driving over obstacles and uneven road surfaces, try to maneuver smoothly without very sharp steering turns.
- Come to the car service for preventive diagnostics of the system at least twice a year.
- Change consumables in a timely manner and monitor the quantity and quality of power steering fluid in the tank. It is completely necessary to change it every three hundred thousand kilometers.