
In detail: do-it-yourself repair of the steering rack of a vaz oka from a real master for the site my.housecope.com.
When parts of the steering mechanism are worn out, knocks appear and the free play of the steering wheel increases. With the appearance of these signs, first check the tightness of the nuts securing the steering mechanism and other steering assemblies, and then make sure that there are no backlashes in the joints of the steering rods and the intermediate steering shaft.
To repair and adjust the steering mechanism, special tools and devices are required, in addition, this unit directly affects traffic safety, therefore, in case of malfunction, we recommend replacing it with a new one or repairing it in a specialized workshop.
You will need keys "for 10", "for 13", "for 19", a barb, a hammer.
1. Place the front of the car on supports and remove the front wheels.
As you know, on the Oka car, the steering rack must be adjusted (tightened) only when it is removed from the car. If, after the repair, the rail looses and knocks appear, the rail will have to be removed from the car.
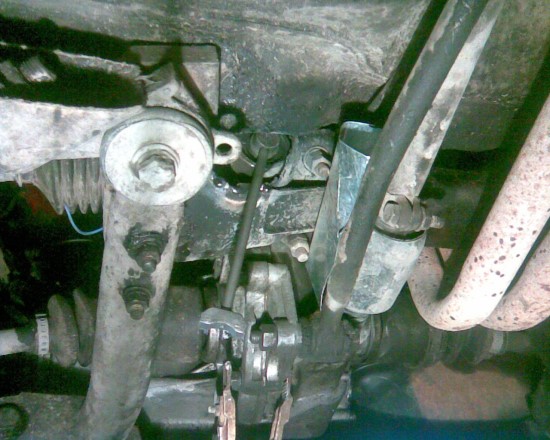
What prevents the adjustment directly on the car, because in the 08th family this operation is performed without removing it and the adjusting threaded bolt is available in the engine compartment? At Oka, the rack is located in the crankcase on the subframe, and this crankcase covers the adjusting bolt.
However, the problem can be solved by making a cutout in the crankcase with a grinder. See the photos below - the cutout had to be widened in place with a welding electrode, after which it became possible to adjust it with a conventional wrench designed to tighten the rail. When digesting a piece of crankcase with an electrode, do not forget to throw off the terminal from the battery and protect the rubber corrugations of the wings and steering rack rods from splashes of molten metal with tin shields. We keep compressed air and a blow gun close at hand - this is a means of extinguishing if something catches fire =)
| Video (click to play). |
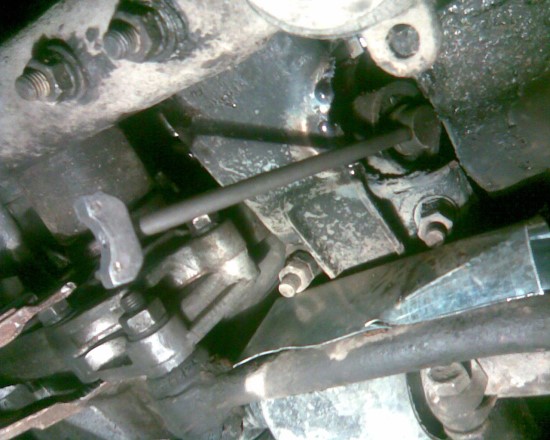
After this revision, the procedure for tightening the rail is simplified so much that it is not even interesting.
Article written: March 6, 2013
Place the steering wheel in a straight ahead position. When parts of the steering mechanism are worn out, knocks appear and the free play of the steering wheel increases. With the appearance of these signs, first check the tightness of the nuts securing the steering mechanism and other steering assemblies, and then make sure that there are no backlashes in the joints of the steering rods and the intermediate steering shaft. To repair and adjust the steering mechanism, special tools and devices are required, therefore it is recommended to do the work in a specialized workshop. 1. From inside the passenger compartment, unscrew the nut of the intermediate shaft universal joint yoke pinch bolt. Please note: there is a spring washer under the nut. 3. Disconnect both outer tips from the swivel levers (for more details, see subsection 6.4.). 4. Remove the mounting bolt and. 5. ... disconnect the ground wire from the steering box housing. 6. Unscrew two nuts on each side of the stepladders securing the steering gear to the bracket. 7. Please note that there is a flat washer under each nut. 8. Unscrew two nuts on each side of the bolts securing the steering bracket to the subframe. Please note that the nuts are self-locking. 9. Remove the bracket mounting bolts. 10. Lift the steering gear and remove the bracket from under it. 11. Withdraw the drive gear shaft from the intermediate shaft universal joint yoke and remove the steering gear through the left wheel well. 12. Remove the two steering rack bushing brackets. If necessary, knock them down with a goatee. 13. Remove the two steering rack support bushings.Replace torn or loose bushings. 14. Before installing the steering gear, check that the ladders fit freely into the holes in the bracket. Bend the ladders up if necessary. 15. Align the marks on the steering box and boot. 16. Install the steering gear by inserting the drive gear shaft of the mechanism into the hole in the bulkhead. 17. Reinstall the bracket and insert the left rear bolt of the bracket fastening into the holes of the bracket and the subframe, since after connecting the shaft to the fork, this will not be possible. Then. 18. ... an assistant must insert the drive gear shaft of the mechanism into the yoke of the intermediate shaft universal joint. Next, install the steering gear in the reverse order of removal. The article is still under development. Attention! I want to note that the information presented here is not a guide to car repair. This information is only an answer to the question: "How did I do it?" The author of the material is not responsible for any consequences arising from actions taken by persons who are guided by the material presented. Let me remind you once again that car repair is potentially dangerous to human health and life. Therefore, when repairing a car, it is necessary to observe safety precautions, use a serviceable tool to be guided by official publications on repair. Or you need to contact a specialized service station. NEW! I still filmed the steering rack assembly! I invite you to marvel at this at [https://my.housecope.com/wp-content/uploads/ext/3449/rul-oka/]... Posted on November 01, 2004. It was not necessary to disassemble the entire rail. The fact is that for the backlash of the “pinion-rack” assembly, I took the slightly loosened joint of the steering column cardan and the spline end of the rack pinion. The bolt just loosened. So it needs to be monitored from time to time. The clearance in the rail was normal and I didn't bother it again. By the way, it should be noted that the design of the "pinion-rack" type of steering is relatively reliable. On my first car, AZLK 2141, the rail departed 160,000 km (8 years) and never understood, adjusted or lubricated. Of course - this is not good, but all the same. Installation. As a rule, installation (careful) takes longer than dismantling. It took an hour to rent, two hours to bulkhead and lubricate the hinges, and two hours to install the rail. I screwed on the counter nuts on the rods. The tips together with the fist levers had to be removed, since it was not possible to screw the rod into the tip in place with a small 10 key - the hinge was tightened too tightly - and it took longer to detach the ball joint pin from the lever in my opinion. I screwed the removed tips onto the rods (along with the levers). The rail was carefully pushed into place. He secured the knuckle rods, attached the rail to the transverse bracket and screwed the subframe into place, making sure that the splined end of the gear fits correctly into the boot hole in the floor. The hardest part for me was getting the steering wheel right. So that the steering spoke is horizontal and at the same time the marks of the middle position of the rail coincide. A year and a half ago, for the first time, I somehow managed to do it alone. In this case, it was necessary not to damage the wiring and make sure that any connectors did not disconnect. At the same time, I managed not to remove the steering column. After two days of running in the steering rack, I adjusted the suspension angles. This time myself. 🙂 As it turned out, this is a useful and not so troublesome activity. The engine in the Oka is mounted at three points. For me, the first is at the location of the generator, in front. The second is in the gearbox shank.The third is at the location of the oil filter. They are tripled quite simply. The engine is attached to a subframe. The engine has threaded holes for mounting brackets. Rubber-metal elastic elements resembling silent blocks are pressed into the brackets. A bushing is pressed into the elastic element, with the help of which it is fastened by means of one long bolt to the brackets welded to the subframe. The first two supports (the front one, which is under the generator and for one serves as its fastening and the second one, which is on the gearbox) I changed on the ground. To replace the support of the gearbox shank, I only needed to lift the gearbox up (for example, with a jack), unscrew the support fastening nuts (bracket with pillow assembly), unscrew the nut of the support bolt to the subframe and calmly remove it, and put on a new one, and then put fasteners and tighten the nuts. To replace the front support, it was necessary to remove the front end decor (radiator grille) and the bumper, as well as the generator itself. In this case, things just went faster and hands with the instrument were applied at the right angle. But I had to struggle a little with lifting the power unit in order to get to the bolt securing the support to the engine. In general, the problem is solvable. (However, without using a set of heads, nothing would have happened.) It would be nice to change the rear support in the pit. but by the will of fate it had to be changed on the floor (a warm box is great!). Although everything turned away from the floor. It's almost impossible (almost) to crawl with the heads here. But everything is well turned away with spanners. However, the oil filter had to be removed. He made it difficult to remove the support. He took the support to the top, pulled it out of the hood. And he unscrewed all its fasteners (two bolts to the engine and one to the subframe) from below. If you analyze the time spent on replacing the supports, then a couple or three hours of measured good work is worth it. Place the steering wheel in a straight ahead position. When parts of the steering mechanism are worn out, knocks appear and the free play of the steering wheel increases. With the appearance of these signs, first check the tightness of the nuts securing the steering mechanism and other steering assemblies, and then make sure that there are no backlashes in the joints of the steering rods and the intermediate steering shaft. To repair and adjust the steering mechanism, special tools and devices are required, therefore it is recommended to do the work in a specialized workshop. 1. From inside the passenger compartment, unscrew the nut of the intermediate shaft universal joint yoke pinch bolt. Please note: there is a spring washer under the nut. 3. Disconnect both outer tips from the swivel levers (for more details, see subsection 6.4.). 4. Remove the mounting bolt and. 5. . disconnect the ground wire from the steering box housing. 6. Unscrew two nuts of the stepladders securing the steering gear to the bracket on each side. 7. Note: There is a flat washer under each nut. 8. Unscrew on each side two nuts of the bolts securing the steering bracket to the subframe. Please note that the nuts are self-locking. 9. Remove the bracket mounting bolts. 10. Lift the steering gear and remove the bracket from under it. 11. Remove the drive pinion shaft from the intermediate shaft universal joint yoke and remove the steering gear through the left wheel well. 12. Remove the two steering rack bushing brackets. If necessary, knock them down with a goatee. 13. Remove the two steering gear support bushings. Replace torn or loose bushings. 14. Before installing the steering gear, check that the ladders fit freely into the holes in the bracket. Bend the ladders up if necessary. 15. Align the marks on the steering box and boot. 16. Establish the steering mechanism, inserting the shaft of the drive gear wheel of the mechanism into the hole in the bulkhead. 17.Reinstall the bracket and insert the left rear bolt of the bracket fastening into the holes of the bracket and the subframe, since after connecting the shaft to the fork, this will not be possible. Then. eighteen. . an assistant must insert the drive gear shaft of the mechanism into the yoke of the intermediate shaft universal joint. Next, install the steering gear in the reverse order of removal. 1. Description of the vehicle 1.0 Description of the vehicle 1.1 Appearance 1.2 Underhood space 1.3 General data 1.4 Technical characteristics 1.5 Passport data 1.6 Doors 1.7 Hood lock 1.8 Luggage compartment 1.9 Increase in the volume of the luggage compartment 2. Safety requirements 2.0 Safety requirements 2.1 Safety requirements 2.2 Preparing the car for operation 2.3 What you need to have in the car 2.4 Operating the car during the warranty period 2.5 Running in the car 2.6 Preparing the car for departure 2.7 Checking the wheels 2.8 Checking the coolant level 2.9 Checking the oil level in the engine crankcase 3. Maintenance 3.0 Maintenance 3.1 Checking the tightness of the cooling system 3.2 Checking the tightness of the cooling system 3.3 Checking the tightness of the fuel system 3.4 Checking the tightness of the brake system 3.5 Replacing the coolant 3.6 Checking the thermostat 3.7 Changing the engine oil and oil filter 3.8 Replacing the filter element of the air filter 3.9 Removing and installing the air filter 4. Car storage 4.0 Car storage 4.1 Maintenance during storage 4.2 Removal from storage 5. Running gear 5.0 Running gear 5.1. Forward suspension bracket 5.2. Rear suspension 6. Steering 6.0 Steering 6.1 Removing and installing the steering wheel 6.2 Replacing the intermediate steering shaft 6.3 Replacing the steering shaft bearings 6.4 Replacing the tie rod end and the protective cover of the ball joint 6.5 Removing and installing the steering gear 6.6 Replacing the steering rod 7. Brake system 7.0 Brake system 7.1. Forward brake mechanism 7.2. Back brake mechanism 7.3. Brake system drive 7.4. Parking brake 8. Electrical equipment 8.0 Electrical equipment 8.1. Fuse and relay block 8.2. Generator 8.3. Ignition system 8.4. Lighting and signaling 8.5. A combination of devices 8.6. Switches and switches 8.7. Windscreen wipers and washers 8.8 Replacing the cooling fan motor 9. Body 9.0 Body 9.1 Removal and installation of the front buffer 9.2 Removal and installation of the rear buffer 9.3 Replacement of the front wing 9.4 Removal and installation of the radiator lining 9.5. The hood 9.6. Side door 9.7. Back door 9.8. Rear-view mirrors 9.9. Seats 9.11. Heater 10. The engine and its systems 10.0 The engine and its systems 10.1 Installation of the piston of the first cylinder in the TDC position of the compression stroke 10.2 Adjusting the backlashes in the valve drive 10.3. The camshaft drive belt 10.4. Replacement of parts of the seal of the engine 10.5. The head of the block of cylinders 10.6. Removal and installation of the power unit 10.7. Repair of the engine 10.8. Lubrication system 10.9. Cooling system 10.10. Power supply system 10.11. Exhaust system 11. Transmission 11.0 Transmission 11.1. A transmission 11.2. Coupling 11.3. Front wheel drives 12. Appendices 12.0 Appendices 12.1 Appendix: Tightening torques for threaded connections 12.2 Appendix: Fuels and lubricants and operating fluids 12.3 Appendix: Basic data for adjustments and control 12.4 Appendix: Filling volumes 12.5 Appendix: Lamps used in the car 12.6 Appendix: Bearing arrangement rolling 12.7 Appendix: Oil seals 12.8 Appendix: Service book 12.9 Appendix: Car electrical diagram PPS Instrumental control of the rail passed Open your online store today! 2x2CMS Oki valves adjustment procedure The procedure for adjusting the oki valves is as follows. At the beginning, we set the crankshaft and camshaft according to the marks, then we adjust the gap in the first valve, turn the crankshaft 90 degrees, set it in the second, turn it again 90 degrees, adjust it in the fourth, turn it again, and adjust the third. The gaps in the outlet should be 0.35 in the starting gaps 0.25 mm. When replacing the VAZ 2107-2199 fuel pump, you need to pay attention to the protrusion of the pusher from the heat-insulating spacer. This distance should be 0.8-1.3 mm. If this is not the case, then, with a large outlet of the pusher, excessive fuel pressure will be created, with a lower one, there will be not enough fuel under load. Instrument arrows suddenly froze on the way. What to do if the speedometer does not work, does not show the temperature, it is not clear how much fuel. What to do? See fuses which are indicated in the instruction manual. But it was not there. Everything is whole. And fuse number 6, responsible for carrying, is to blame for everything. So it was conceived by the manufacturer. The work on removing the steering rack is carried out "above the pit". In terms of time, the whole process, together with all the preliminary actions, is a little over 40 minutes. It is easy to unscrew a couple of bolts that attach the lever to the knuckle and remove the rack with this steering lever, but it is even easier to remove the whole thing without touching the end hinges at all. We will describe the last option. Initially, one of the front wheels is removed in order to completely remove the rack. With a 19 key, the locknuts are further lowered, after which the rods are unscrewed from the tips with a 10 key. Only after that it is already possible, while in the passenger compartment, to loosen the fastening of the clamp, which is responsible for the steering shaft, towards the gear of the rack being repaired. Then the bolts on which the subframe is attached to the body are carefully unscrewed. In order for your subframe to drop to the desired level, namely, to hang on the gearbox levers, you should perform the appropriate actions with the crowbar from the passenger compartment in order to release the rack shank. Now you have the opportunity to release the rail from the side. Disconnect the steering rack from the bracket using a 13mm socket wrench. The ladders should be pushed to the upper side, the end of the gear of this rack is removed from the corrugation, and the rack itself is removed to where the wheel is missing. You will need an octagonal socket wrench for the next steps. Remove the boot. You should unscrew the lock nut from the support nut of the hinge you discovered, the support together with the rod is also unscrewed from the steering, the spring of the stop together with the stop itself is removed and, finally, the locknut is removed. Having lubricated the whole thing, you can screw it back. Locknuts are screwed onto the ends of the rail, springs are inserted into the nearby holes, followed by stops made of cermets, after which we put the support nut on the rod. In order for the support to twist to the end, the thrust should be swung in different directions, twisting the support with it on the end of the rail. The cam levers should be removed so as not to interfere with assembly. Install the rod in its original place. Insert the steering rack back as it was and do not neglect accuracy in this difficult matter. Make sure that each element fits into place correctly. The hardest part is getting the steering wheel in the correct position. It is important not to damage anything here. Photo report on the assembly and disassembly of the steering rack of the Oka car: Before disassembling the steering rack of the Oka car, it should be removed from the car. Removal work is carried out on a flyover or lift. The process is not complicated, so everything will take less than one hour in time, including preparatory work. The rail can be removed in two ways: together with the steering knuckle lever, or without any tips at all. Disassembly and assembly of the steering rack is often not worth doing completely. Sometimes it is enough to perform some operations. For example, remove joint gaps and lubricate.Disassembly and adjustment are carried out using special socket wrenches with an octagonal head. A set of keys from a VAZ 2108 is quite suitable. Having removed the corrugation, you can see the hinge itself, the device of which is described in detail in the repair manual. The device is quite simple. For disassembly, the locknut is unscrewed from the support nut, then the support is unscrewed from the rail along with the rod. The stop is taken out together with the spring and the lock nut is removed. The assembly is carried out in the following sequence: locknuts are screwed onto the ends of the rail, springs are installed in the holes at the ends of the rail, and behind them are metal-ceramic stops. The support nut is put on the rod. Beforehand, it is worth lubricating all the details well. Further, the support with the rod is twisted onto the end of the rail. In this case, sometimes you should wiggle the rod in different directions, otherwise it may not twist to the end. It is worth noting that the “pinion-rack” steering, which is installed in the Oka car, is quite reliable if it is adjusted in time. In such cases, complete disassembly is not required. However, if the steering gear fails, it is much easier to buy a new steering rack than to completely disassemble the old one and try to restore it. Without proper maintenance before a breakdown, its repair, most likely, will not allow it to operate for a long time, and replacement will be inevitable. Repair shop "Auto-Reika" is replacing steering racks VAZ (Lada) 1111 Oka. The price on it is based on a number of works. VAZ (Lada) is very popular in our city. In all cars, the steering rack has a feature to deform. In this regard, urgent repairs must take place, otherwise the complication will spread to the hodovka. Call us - service specialists will cure your steel horse. Additionally: the car on the move! about the good. ... ... replacement steering rack, steering tips, not bad Velcro rubber, heating 220V, music, bad news. ... ... I poured the rinse into the tank and blunt it a little, that is, sneeze puff and smokes. ... ... and so it starts going. ... ... PA body is not big, not dachety in the photo can be seen. ... not a lot of bargaining on beer. . for cash a good bargain .. The article is still under development. Attention! I want to note that the information presented here is not a guide to car repair. This information is only an answer to the question: "How did I do it?" The author of the material is not responsible for any consequences arising from actions taken by persons who are guided by the material presented. Let me remind you once again that car repair is potentially dangerous to human health and life. Therefore, when repairing a car, it is necessary to observe safety precautions, use a serviceable tool to be guided by official publications on repair. Or you need to contact a specialized service station. NEW! I still filmed the steering rack assembly! I invite you to marvel at this at [https://my.housecope.com/wp-content/uploads/ext/3449/rul-oka/]... Posted on November 01, 2004. It was not necessary to disassemble the entire rail. The fact is that for the backlash of the “pinion-rack” assembly, I took the slightly loosened joint of the steering column cardan and the spline end of the rack pinion. The bolt just loosened. So it needs to be monitored from time to time. The clearance in the rail was normal and I didn't bother it again. By the way, it should be noted that the design of the "pinion-rack" type of steering is relatively reliable. On my first car, AZLK 2141, the rail departed 160,000 km (8 years) and never understood, adjusted or lubricated. Of course - this is not good, but all the same. Installation. As a rule, installation (careful) takes longer than dismantling. It took an hour to rent, two hours to bulkhead and lubricate the hinges, and two hours to install the rail. I screwed on the counter nuts on the rods. The tips together with the fist levers had to be removed, since it was not possible to screw the rod into the tip in place with a small 10 key - the hinge was tightened too tightly - and it took longer to detach the ball joint pin from the lever in my opinion. I screwed the removed tips onto the rods (along with the levers). The rail was carefully pushed into place. He fastened the knuckle rods, attached the rail to the transverse bracket and screwed the subframe into place, making sure that the splined end of the gear fits correctly into the boot hole in the floor. The hardest part for me was getting the steering wheel right. So that the steering spoke is horizontal and at the same time the marks of the middle position of the rail coincide. A year and a half ago, for the first time, I somehow managed to do it alone. In this case, it was necessary not to damage the wiring and make sure that any connectors did not disconnect. At the same time, I managed not to remove the steering column. After two days of running in the steering rack, I adjusted the suspension angles. This time myself. 🙂 As it turned out, this is a useful and not so troublesome activity. The engine in the Oka is mounted at three points. For me, the first is at the location of the generator, in front. The second is in the gearbox shank. The third is at the location of the oil filter. They are tripled quite simply. The engine is attached to a subframe. The engine has threaded holes for mounting brackets. Rubber-metal elastic elements resembling silent blocks are pressed into the brackets. A bushing is pressed into the elastic element, with the help of which it is fastened by means of one long bolt to the brackets welded to the subframe. The first two supports (the front one, which is under the generator and for one serves as its fastening and the second one, which is on the gearbox) I changed on the ground. To replace the support of the gearbox shank, I only needed to lift the gearbox up (for example, with a jack), unscrew the support fastening nuts (bracket with pillow assembly), unscrew the nut of the support bolt to the subframe and calmly remove it, and put on a new one, and then put fasteners and tighten the nuts. To replace the front support, it was necessary to remove the front end decor (radiator grille) and the bumper, as well as the generator itself. In this case, things just went faster and hands with the instrument were applied at the right angle. But I had to struggle a little with lifting the power unit in order to get to the bolt securing the support to the engine. In general, the problem is solvable. (However, without the use of a set of heads, nothing would have happened.) It would be nice to change the rear support in the pit. but by the will of fate it had to be changed on the floor (a warm box is great!). Although everything turned away from the floor. It's almost impossible (almost) to crawl with the heads here. But everything is well turned away with spanners. However, the oil filter had to be removed. He made it difficult to remove the support. He took the support to the top, pulled it out of the hood. And he unscrewed all its fasteners (two bolts to the engine and one to the subframe) from below. If you analyze the time spent on replacing the supports, then a couple or three hours of measured good work is worth it. We wash and inspect the parts of the steering mechanism - we replace the damaged ones. The ball bearing must rotate without binding. Protective covers and caps must be free of cracks or tears. The ball spheres of the inner tip, the spheres of the ball joint and the thrust stops must be free from signs of wear and damage. When assembling, the roller bearing is pressed in with a soft metal drift. We align the protrusions of the rack bushing with the recesses of the steering gear housing and press the bushing through a suitable length of pipe. Having liberally lubricated the rack teeth, drive gear and bearings with FIOL-1 grease. we collect the node in reverse order. After tightening the ball joints so that the inner tips can swing (in the absence of gaps), we tighten the locknut belt into the groove of the ball joint and into the groove of the rail. Reinstall the protective cover. The boot on the inner rod end should be 195 mm from the threaded end of the rod end. Install the clamp and tighten it slightly. Finally, the clamp will be tightened after wheel alignment adjustment. Steering: & nbsp Steering - crash-proof (steering shaft with two cardan joints) with a gear-rack mechanism. & nbsp Steering gear assembled with steering rods attached in the engine compartment through rubber pads and clamps to the support, and that, in turn, to the subframe. & nbsp Steering gear housing - cast, made of aluminum alloy.In it, a helical drive gear is installed on two bearings, which is in constant engagement with the rack. The front bearing (at the end of the drive gear) is roller, the rear (closer to the steering shaft) is ball. The shaft is fixed from axial movement through a ball bearing: its inner cage is held on the shaft by a retaining ring, and the outer cage is pressed against the end of the bearing housing in the steering gear housing with a nut on the drive gear shaft. The nut is covered with a protective cover (boot) mounted on the drive gear shaft. & nbsp Right (cylindrical) part of the rail rests on a plastic sleeve in the steering gear housing, and its toothed part is pressed against the drive gear by a spring through a stop sealed in the crankcase with a rubber ring. The spring, in turn, is compressed by an adjusting nut (internal octagon “17”) with a retaining ring, which creates resistance to its unscrewing. To compensate for the thermal expansion of parts and tolerances for their manufacture, a gap of 0.12 mm is set between the nut and the rail stop during assembly (the maximum allowable gap during operation is 0.2 mm), after which the crankcase thread is punched (crumpled) at two points (without damaging nut) and apply paint marks fixing the position of the nut relative to the crankcase. The moment of resistance to rotation of the gear wheel of a serviceable steering mechanism in the entire range of travel should be in the range of 6.1-17.3 kgf-cm (0.06-0.17 kgf-m) at a rotation speed of 30 min-1. & nbsp For lubrication FIOL-1 (approximately 20-30 g for the entire mechanism) is used for the drive gear, rack and pinion bearings, and the cavity above the drive gear bearing nut (under the boot) is filled with UNIOL-1 grease. & nbsp At the ends of the slats internal hinges of the steering tips are installed, consisting of a ball bearing and a locknut screwed onto the threaded end of the rack, a thrust stop with a spring and a ball head of the inner tip. From the inside, the ball head is pressed in by a spring-loaded metal-ceramic stop. The ball joint is fixed on the threaded end of the rack with a lock nut, which, in turn, is locked by pressing its belts into the grooves of the rack and support. The steering housing is protected from dust and dirt by two rubber bellows, through which the inner steering rods are passed. & nbsp On threaded ends the inner tie rods are screwed on the outer tie rods - also with a ball pin and a spring loaded liner. With their tapered surfaces, the pins fit into the corresponding holes in the swing arm. & nbsp Turning the inner rod relative to the outer (screwing in or out), adjust the toe-in of the wheels (see "Front suspension"). When rotating the internal link, it is necessary to ensure that the protective cover does not twist or break. To do this, loosen the clamp. After adjustment, the connection is secured with a lock nut. & nbsp Steering shaft - composite, three-link (the lower link is a short spline tip, put on the drive gear of the steering mechanism), with two cardan joints. The upper (tubular) part of the shaft is supported by two radial ball bearings installed in the bracket tube. The steering wheel is secured with a nut on the tapered splines of the upper end of the shaft. Remove the steering gear (see subsection 6.5.). An increase in the free play of the steering wheel is possible due to the wear of the parts of the ball joint of the steering rod. Be sure to replace the torn protective cover of the steering rod. Otherwise, dirt and water trapped in the steering gear will quickly disable it. You can replace the cover without removing the steering gear from the car. 1. Loosen the outer tie rod lock nut. 2. Unscrew the tie rod end, counting the number of revolutions. This will help to keep the wheel alignment approximately when installing the tip. 3. Remove the tie rod end lock nut. 4. Remove the clamps from the inner and. 5. ... outer landing rims of the protective cover. 6. Using a screwdriver, gently pry off the inner rim of the cover from the steering box. 7. Remove the protective cover from the rod. 8. Open the shoulder of the ball joint locknut. 9. ... by inserting a key between the locknut and the end of the crankcase for the stop. 10. Loosen the lock nut and. 11.... unscrew the ball joint from the steering rack (thereby disconnecting the rod). 12. Remove the ball joint from the link. 13. Remove the thrust stop and from the hole in the rail. 15. Remove dirt and old grease from the rail bore and any removed parts. 16. Replace parts if the steering rod spherical surfaces are worn or damaged. 19. Replace the torn or lost elasticity of the protective cover. 20. Put 10 g of grease (the manufacturer recommends SHRUS-4) in the ball joint and the hole in the rail. 21. Install the spring and thrust stop (spherical part outward) into the hole in the rail. 22. Install the ball joint on the rod and turn it so that there is no play, but the rod rotates freely in the support. 23. While holding the support from turning, tighten the lock nut.
The author of the article, photo-video materials: 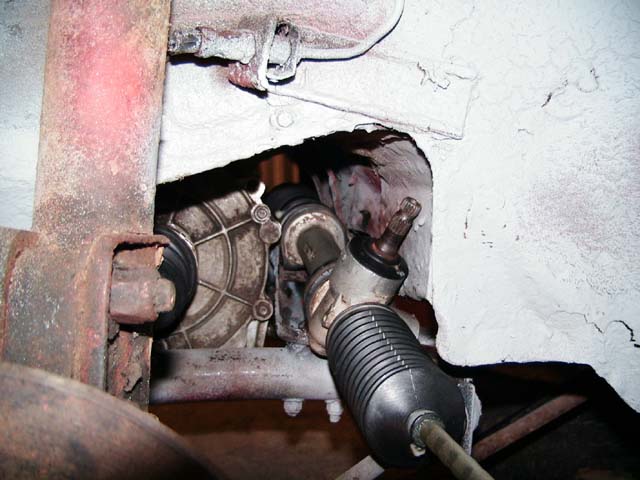 The need to repair the steering rack arose when, after adjusting the angles of the front suspension, the protective anther covers broke. They broke as a result of the fact that the young master, adjusting the toe, twisted the rods together with the anthers and tore them. In addition, there was a slight backlash in the internal hinges of the steering rods.

 The need to repair the steering rack arose when, after adjusting the angles of the front suspension, the protective anther covers broke. They broke as a result of the fact that the young master, adjusting the toe, twisted the rods together with the anthers and tore them. In addition, there was a slight backlash in the internal hinges of the steering rods.
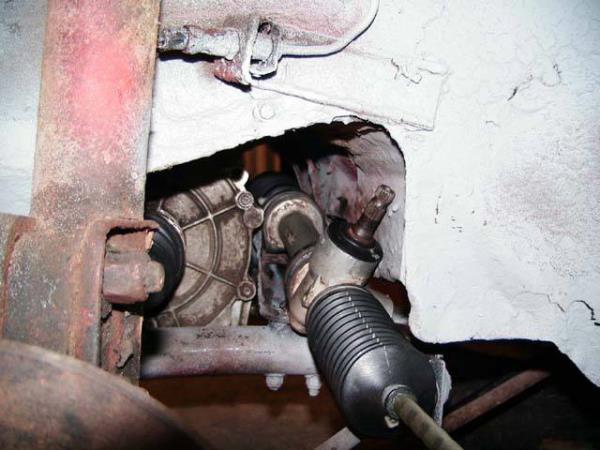
1 - ball joint pin; 2 - outer tip of the tie rod; 3 - lock nut; 4 - inner tip of the tie rod; 5 - protective case; 6 - support of the steering mechanism; 7 - steering gear housing; 8 - a clamp for fastening the steering mechanism; 9 - rail bushing; 10 - cover clamp; 11 - spherical bearing; 12 - lock nut; 13 - rail; 14 - nut retaining ring; 15 - stop nut; 16 - stop O-ring; 17 - spring; 18 - rail stop; 19 - roller bearing; 20 - drive gear; 21 - ball bearing; 22 - retaining ring; 23 - protective washer; 24 - bearing fastening nut; 25 - anther; 26 - sealing ring; 27 - stop spring; 28 - thrust stop; 29 - shaft seal; 30 - intermediate cardan shaft; 31 - upper facing casing; 32 - bracket for fastening the steering column shaft; 33 - steering column bearings; 34 - wheel; 35 - steering column switches; 36 - lower facing casing; 37 - steering column shaft; 38 - a pipe of a steering column.
![]()
Video (click to play).


