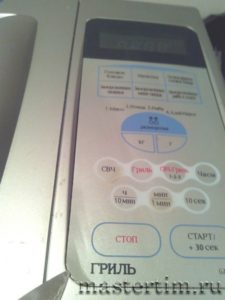
In detail: do-it-yourself Samsung g2739nr microwave touch panel repair from a real master for the site my.housecope.com.
In this article, we will consider the causes of the malfunction, and we will also repair the panel membrane with our own hands. On the example of a microwave oven Samsung G2739NR.
If your microwave oven behaves strangely, turns on by itself, increases or decreases the heating or cooking time during operation, the buttons do not respond to pressing, most often the problem lies in the membrane of the microwave touch control panel.
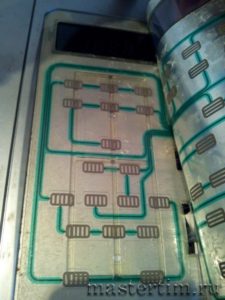
The keyboard consists of two films on which conductive tracks and pads are applied.
The cause of the malfunction is often in the sensor membranes squeezed from physical impact, which come into contact with each other from the slightest vibration.
Let's start with the fact that you need to make sure that it is the sensor that is faulty and not the control unit or the microwave microcontroller. To do this, you need to ring the board with a multimeter for failed components (this is a topic for a separate article).
After we are convinced of the correctness of our assumptions, we move on to repairing the microwave sensor. For this you will need:
- Phillips screwdriver or five-pointed screwdriver with a hole inside (Torx Tamper Resistant).
- Utility knife or scissors
- Tweezers (optional but will make the job easier)
- Scotch tape or duct tape.
- PVA glue or Super glue
Before you start self-repairing equipment such as a microwave oven, you must remember that high voltages up to 5 thousand volts pass through it even when it is turned off (there are components in the microwave oven that accumulate electricity), which of course is life threatening.
| Video (click to play). |
Disconnect the oven from the 220V network
Using a screwdriver, unscrew all the bolts securing the stove cover (in some models they are even on the bottom)
Carefully disconnect the sensor membrane cable from the control board, terminals from the relay, etc. (at the same time, we either remember, or record or photograph the connections, so that later we can return everything to its place)
We unscrew the plastic panel from the oven frame
We unscrew the control unit board from the plastic panel
Carefully (hooking it with a knife and not damaging the cable) peel off the sensor film from the plastic
We delaminate the film with the membrane
On the inside of the membrane, along the contour of the buttons, it is necessary to glue adhesive tape or electrical tape (the main thing is that the material is not conductive) in order to increase the distance between the film and the membrane and prevent unauthorized closing of the buttons
After the operation, it is necessary to glue both halves and, after inserting the cable into the slot of the plastic panel, carefully glue the film in place, if there is not enough glue, then you can smear the places of poor connection with PVA glue or “Superglue” (in case of using “superglue”, the repeated procedure may damage the film)
Screw back the control board
Insert the cable into the board connector
Attaching the panel to the microwave
We connect the terminals in their places
We dress and fasten the lid of the microwave oven
Put a glass of water in the microwave
We turn on the network 220V
Checking all buttons
If all buttons work only after pressing them (and not by themselves), then the operation to restore the sensor's performance was successful and the oven can be used further.
This method does not guarantee long-term operation of the touch control panel, as the film will be pressed further, which will cause a malfunction again.
Practice says that this kind of recovery lasts from two weeks to six months.
Good luck with the repair!
If you doubt your knowledge of electrical engineering, want your microwave oven to serve you longer, or simply do not want to bother with self-repair, you can use the services of our specialists who will be happy to help you solve this problem at your home or in the workshop.
Today we will try to extend the life of the Samsung G2739NR microwave oven. A malfunction usually occurs after 3-5 years of operation and is expressed in the failure of the control buttons with the display of the error “5E” or “SE” on the display. In this case, cases of spontaneous switching on and off of the furnace are also possible.
With this problem, the author turned to the nearest service for the repair of household appliances, where the master repaired in 1 hour for only 1000 rubles. However, when he returned home, the author found all the same problems. The microwave was returned to the service, where the master again performed some ritual actions. Taking the stove after a while, the same errors were discovered. To a fair question: what exactly was the repair, the master answered - I repaired it! You see - it works! Indeed, the furnace at the master behaved properly. The author even showed a video where the stove stopped working, to which the master admitted that apparently the touch panel needed to be changed. Order the panel, and we will change it, he concluded.
Oven errors and failures are most likely due to sticky touch keys. Having taken his hard-earned 1000 rubles, the author decided to try to restore the functionality of the touch panel with his own hands, because in case of failure, he did not lose anything.
So let's get started with the repair. Unplug the microwave. The touch panel consists of a front cover with button patterns and two membrane films with tracks and contacts.
With a small sharp knife with a thin blade, we pry off the sensory film, trying to exfoliate the membrane without damage. You need to start from the lower or upper left corner. There is no need to rush here, it is important not to damage the train.
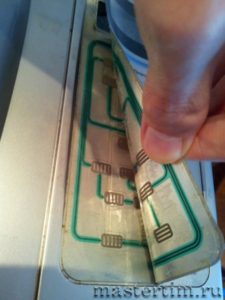
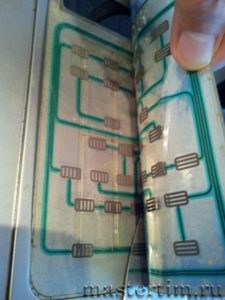
Having pasted the membrane, we need to check the operability of the panel, for this, using a small wire, we sequentially close the contacts and look at the operation of the microwave. Don't forget to put a glass of water inside the oven. If everything functions as it should, proceed directly to the restoration of the touch panel.
We disconnect from the network. We wipe the contacts with alcohol, you can additionally process them with a soft pencil. To increase the distance between the contacts, glue the places around with pieces of electrical tape. Here the author, it must be admitted, was reinsured, and pasted two layers of electrical tape on top of each other. After checking, I had to remove one layer of electrical tape.
We carefully return the upper part of the membrane to its place, turn it on and try to press the buttons. If some buttons do not respond or are pressed with difficulty, turn off the network again, exfoliate the membrane, remove the electrical tape around these contacts.
Thus, we achieve that all the buttons work as they should. We did not glue the panel with superglue, we fixed the edge of the bottom panel with a small self-tapping screw.
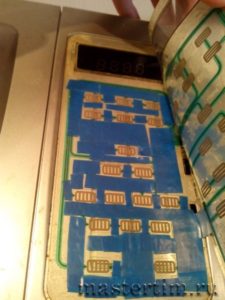
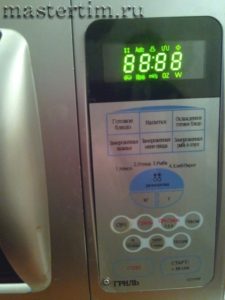
The membrane will continue to push through over time, which can lead to repeated repairs, but we hope it will last for six months. Thank you for reading to the end!
The repair of the microwave oven keyboard, which I describe in this article, is not my invention. I read it myself on the Internet. My contribution is how to disassemble the "microwave", because each of them has its own characteristics when repairing.
The strange behavior of the microwave oven forced me to start repairing. At one point, when I came home, I found her in a working position.Who turned it on is not clear! But right away I did not consider it necessary to take any measures. I thought it wouldn't turn on anymore. No matter how! And when the oven spontaneously turned on several times, and then it didn’t turn off at all (you close the lid - it turned on!) I had to take action.
On the Internet, on all sites, there is a talk about a magnetron, about high voltage, etc. I read it, and I was afraid, I thought - why not give it to the workshop? I found the material about the keyboard malfunction quite by accident, when I had already disassembled the microwave and already checked the high-voltage fuse, high-voltage capacitor and high-voltage diode. Well, at least I didn’t get to the magnetron!
Microwave ovens that have so-called "touch" keyboards do not actually have any touch keyboards. There are, however, no buttons. They have two films, on each of which conductive paths and contact pads are applied opposite each other. When you press the panel, it bends, and these areas are in contact. A closure occurs. If you approach the issue fundamentally, this is not a touch switch, since the capacitance of the human body is used in touch devices, which makes the switch. And here, the same closure as in a regular button.


Of course, it all looks very modern, cool. But there is one disease. Over time, when these films are deformed, the closure occurs by itself. At the same time, microwave ovens begin to live their own lives and either stop responding to keystrokes, or vice versa, they can start working spontaneously. Therefore, with the introduction of so-called "touch" switches in microwave ovens, keyboard failure is one of the most common problems.
- The first is the replacement of "touch" devices. Pretty easy and fast way. If you can find these very devices, and, unfortunately, they are not so easy to find. Now people themselves are trying not to repair anything, but to hand it over to workshops. Therefore, there are no spare parts in stores.
- The second is to mount conventional buttons instead of "touch" panels. In this case, you have to tinker, but there will be no more of these malfunctions. But again, the difficulty remains in finding these same buttons. They are not in stores either, as there is no demand for them.
- And the last. It turns out that the inquisitive mind of the "Kulibins" is able to come up with original solutions. As the saying goes: "There is a lot of need for inventions!". You just need to put, for example, adhesive tape between these two films, then the gap between them will increase, and there will be no short circuit.
So. First you need to remove the "touch" panel. To do this, unscrew the screw that secures the panel from the inside (in the figure above). I don't describe how to remove the shroud here, because I don't think it's difficult - unscrew the screws you can see!

Then you need to open the door and then the panel rises freely (see above). All wires, before disconnecting them, sketch (or photograph). Remove printed circuit board. Before that, disconnect the cable that goes from it to the "sensor". To do this, pull the top of the block up. It will rise by about 1 mm, after which the cable can be freely removed (see below).

And here is the panel in your hands. Now you need to "unstick" the keyboard. Carefully, with a sharp knife, lifts the lower corner opposite the train. "Tear off" the keyboard. In this case, you need to pay attention to whether the film with conductive paths has separated. It is necessary to make sure that it is separated and removed along with the keyboard. But the second film should remain in place. There is no need to "tear off" completely. Where the cable goes to the PCB, it is desirable that the keyboard with the film on the edge hold onto the panel, as shown in the figure below.

Now you need to glue some gaskets in between the contacts. For this, some craftsmen use rather thick sheets (for example, stickers from old compact cassettes).Then you have to diligently push the keyboard so that it starts working. Therefore, it is enough to stick double-sided (or even ordinary) tape. We cut it into strips (or squares) and glue it between the contacts. In this case, the gap between the films increases.

After that, you need to glue the outer film together with the keyboard to the panel, rolling your fingers over the surface. We collect everything. And turn on the microwave.

View of the "touch" panel from the inside.
The author of the article “Do-it-yourself microwave touch panel repair” Sanych
Sometimes technology starts to behave strangely. It turns on when it should not, switches modes or does not respond to commands. Of course, if you doubt your knowledge of electronics, it is wiser to contact a specialist. But what can you do if the buttons on the microwave do not work?
The touch buttons are arranged in such a way that tracks with current are applied to two films. If you push the button, then it can create a contact closure.
Before embarking on an independent microwave repair, it is important to make sure that the button does not work, and not the control system itself. There is a separate technology for this. Let's assume that we are sure that it was the "Start" button that broke. For repairs you will need:
- Phillips screwdriver to open the panel.
- Thin knife or strong scissors.
- Well, if you have tweezers. This will greatly simplify the repair work.
- Regular tape or special insulating tape.
- Good glue.

Before you start repairing, do not forget turn off the power microwaves. True, in the microwave there are parts that can accumulate electricity, so working with equipment is not always safe. It is better to entrust the repair to specialists.
If the equipment needs repair, and you decide to disassemble the touch panel yourself, then start by unplugging the microwave from the outlet and follow the instructions:
- Unscrew the bolts that hold the lid of the microwave oven.
- Slowly disassemble all the available connections. At this point, it is important to remember which part is connected where. It will be good if you take a picture of all available contacts.
- We find a special protective panel and unscrew the bolts on it.
- We take out the control unit from the panel.
- Using a knife or a thin blade, disconnect the sensor plate.
- We divide the plate into two parts.
Inspect the plates for the integrity of all conductive tracks. The problem may lie in the violation of one of them. If all the tracks are intact, then the problem is in the closure of the contacts.
So, we got to the problem area. All of the following steps must be taken as carefully as possibleto prevent further damage to your microwave:
- To increase the distance between the plates and avoid shorting, it is necessary to stick adhesive tape or insulating tape on the inside of the plate.
- Now we connect two plates and connect a cable to them.
- Glue the sensor in place.
- We assemble the microwave in the reverse order.
- We check your device for the functionality of the buttons.
It must be understood that such manipulations with technology are only temporary solution Problems. The buttons of the microwave oven will continue to push in further, creating a new circuit. To get rid of this problem for good, you need to completely replace the sensor.
Repairing buttons with your own hands is a labor-intensive and not entirely safe process. It is better if you address your problem to the master, who will completely change the sensor on your microwave and carry out its full diagnostics. In case of serious breakdowns, it will be cheaper to buy a new microwave oven.
Found on the Internet. Proven working.
Often the following malfunction is observed in microwave ovens, the oven begins to “live its own life”.It does not respond to keystrokes, starts spontaneously, and all this manifests itself chaotically and randomly, it can recover and work normally for some time.
The reason for this disgrace is that the insulation between the conductors of the keyboard is deteriorating. It is impossible to check this with a multimeter, the test voltage is too low, but for some reason the controller has enough.
Often, the masters decide that the processor is faulty, and in vain. The best solution is to replace the membrane keyboard, if there is, if not, then you can restore the old one. The keyboard consists of two films, on which conductive tracks and contact pads are applied, opposite each other. There is a mask between them, with slots opposite the contact pads, it is still very sticky and sticks together the films.
For repair, it is necessary to glue the keyboard, the main thing here is not to make sudden movements, and not to pull unevenly and too hard. We remove the electronic unit.
We take a table knife with a round tip and gently pry off the edge of the films so that you can grab the top with your fingers, and then the main thing is not to bend or pull. The outgoing cable of conductors does not need to be glued or torn off, and be careful with it. You need to glue it so that the top film separates, and the sticky mask and the bottom film remain on the case. After several attempts, it will turn out nice and neat.
Next, next to the case, we put a book of a suitable thickness, on it we turn off, as if opening, the peeled off film with the contacts up (a book for ease of use). We take adhesive tape and seal the entire surface of the film, except for the contact pads, it is better to use a narrow 6-8 mm, it is more convenient to work.
We return everything to our place, put the electronic unit in place, assemble it, check it and, hurray, everything works.
More than a dozen of all kinds of microwave ovens were restored in this way, most of all Samsungs (they are simply in use the most), there were DEUs and Shivaks.
All of the above does not apply to GoldStar ovens of models MA 651 and MA 851; COP444 really dies in them, however, it is successfully treated by “roasting” (in 50% of cases), but that is another story.
eximdnepr, this method saves from 2 months to a maximum of a year - then you still need to change the keyboard.

Before opening the membrane, you should turn it off and use a piece of wire (preferably with a resistor of about 1 kOhm) to close the connector contacts to simulate pressing the buttons.
As a rule, the defect is in the cable-connector junction, or in poor insulation (less than a hundred MΩ) - leakage between the tracks. This can be checked using a conventional multimeter ( DT9208A, DT9502, etc.) with a low test voltage and a measurement limit of 200 MΩ.
Next, you should try to close with the membrane connected. It is useful to look at the waveforms with an oscilloscope to find a “pressed” button, which may be virtual and not present on the keyboard.
You can restore the connection with the broken track with the MGTF wire. To do this, I put the end of the wire stripped by a few mm between two films on the track of the panel itself, and solder the second to the connector. Up to five tracks can be corrected in this way. If everything is broken, it is better to put buttons under the film.
Paths with cracks in open areas are repaired with a conductive varnish.
Good afternoon, I have a lot of experience with microwave ovens.
Here's a specific piece of advice for you, laying out the keyboard (gently pry off the edge of the tip of the noh with the top maple on which the buttons are written, and pull it towards you slowly), after sticking the clave, we take the HARDEST SIMPLE PENCIL for example 4M and scribble on the contact pads, while removing excess graphite dust with cotton swab, glues everything back and try, everything works with a light touch and for a very long time. Use for health

Message serg_n » 09 Oct 2009 10:50
Message scbel » 10 Oct 2009 21:01
Message Di54 » 13 Oct 2010 17:05
Message ELERErepair » 13 Oct 2010 17:37
Message ivan7421 » Jan 23, 2011 19:20
Message alexx4227 » Jan 24, 2013 21:49
I just blew a fuse on the keyboard unit, it's 1.6 A there. Replaced it and it worked.
Message transform » Jan 26, 2013 02:03
Repairing a microwave oven requires special professional knowledge and skills. But with a little knowledge of the basics of electrical and radio engineering, knowing how to use an electrical tool, you can try to cope with this problem, even if you are a builder, musician or doctor. To make repairs with your own hands, just remember what you were taught at school in labor lessons. At the same time, you must follow the rules of electrical safety: do not make short circuits when connecting wires, and do not stick your fingers into the socket. If you are not sure of yourself, then it is better to contact the service center to specialists.

Before we understand the causes of the breakdown, first we will understand the design of the microwave oven. It is very simple and consists of 4 basic elements:
- Magnetron;
- Waveguide;
- Winding of the transformer;
- Food warming chamber.
It is this set of elements that is the engine of the microwave. And if it malfunctions, you should look for the cause in them.
After connecting the microwave to the network, a voltage of 220V is supplied to the first winding of the transformer. Voltage is automatically transferred to the secondary winding. The chamber heating system starts. Due to the fact that these two windings are isolated from each other, safe operation of the microwave oven is ensured.
The microwave oven allows you to heat food at high speeds by using double the voltage. In this circuit, the main role is played by a capacitor, to which a diode is connected by parallel connection. The duration and magnitude of the temperature regime helps to control the temperature sensor and the conventional timer.
For safe use, the oven has a built-in power protection relay, the function of which is to stop the operation of the microwave in case of high voltage drops in the network or when the door is open. If all this description seems complicated to you, then don't worry: we'll figure it all out in a moment.
Most often, the external signs of a microwave failure are the appearance of sparks, puffs of smoke, the cessation of rotation of the plate, and the lack of heating of food placed in the oven. Or the microwave just won't turn on. In this case, plugging it into the network is dangerous!
There are three main reasons for the failure of an electrical appliance:
- Fuses blown;
- Magnetron failure;
- Burnout of mica plate.
With this type of breakdown, you can repair the oven if you act strictly according to the instructions. First, consider the functional diagram of a microwave oven.
We take a functional diagram because it is easier to understand the principle of operation of a microwave oven, it is universal, regardless of the brand of the oven, it is simpler compared to the microwave circuit diagram.
And the location of the elements of the microwave can be seen in this figure:
If the backlight works in the oven, the plate rotates, but the microwave does not heat the food, then most likely the cause of the malfunction is a malfunction of the magnetron. In the diagram above, the magnetron is labeled "magnetron".
Magnetron is a device that generates microwave radiation. That is why in the event of failure of this part, the oven does not heat up.
The magnetron is located in a small rectangular metal case. First you need to clean it, and then make a visual inspection. Next, inspect the magnetron unit itself. Namely, the integrity of the wires connecting the terminals and the housing. Often the reason for the failure of the magnetron is the failure of the feedthrough capacitor. Watch the video below on how to repair a microwave oven magnetron with your own hands:
After that, be sure to check the microwave control unit. Again, pay attention to burnt, sooty and dirty places.It is these parts that will need to be replaced for further operation of the microwave.
A sure sign of a broken mica plate is the sparks that appear when it is turned on. The reason is improper operation of the oven, that is, heating food with an open lid. With this option, food drops are sprayed onto the plate. As a result, it gets wet and burns out.

Mica plate is inexpensive and can be purchased at specialized electrical stores. If you find a mica plate of other sizes, then you can make a plate of the desired size with your own hands from it.
If you cannot find a replacement for this part, you can reuse the burned-out plate. To do this, remove the plate and carefully clean it of dirt. Then turn it over with the damaged side inward and carefully install it in place. This repair option, of course, can hardly be called ideal, but it will fit quite well until the moment when you find a replacement for the damaged part. How to replace the mica plate, watch the video:
You can study the process of replacing parts in detail from our video. Experts describe in detail the troubleshooting methodology, how and in what sequence it is necessary to change the parts. Moreover, these recommendations are suitable for both Samsung microwave ovens and microwave ovens from other companies. After all, the design and principle of operation they practically do not differ.
If you were unable to fix the problem even with the help of our video, and the oven still does not heat up, you can repair the microwave oven from specialists or even purchase a new one. It all depends on the level of damage and the amount of money you are willing to spend.
Many of us have forgotten about various stoves, hobs and completely trust the process of cooking microwave ovens. And this is not at all surprising: microwave ovens take up little space, have a rich set of different functions and save time significantly. Naturally, we are very upset when our microwave oven breaks down. The causes of breakdowns and malfunctions can be different. Consider what breaks down in the microwave oven most often. Often, when a microwave oven breaks down, it is necessary to contact a specialized master. After all, this is not the easiest device, so the repair is quite complicated. But in fact, the design of a microwave oven is elementary and includes only a few basic elements. If you first familiarize yourself with the frequent breakdowns, then repairing the microwave yourself is not difficult.
Although the construction of a microwave oven contains a lot of elements, most of them do not play a special functional role. To repair this device, you need to know only the main elements of the circuit that ensure its operation. Among them:
- Magnetron.
- Transformer.
- High voltage fuse.
- rectifier diode.
- Capacitor.
- Control block.
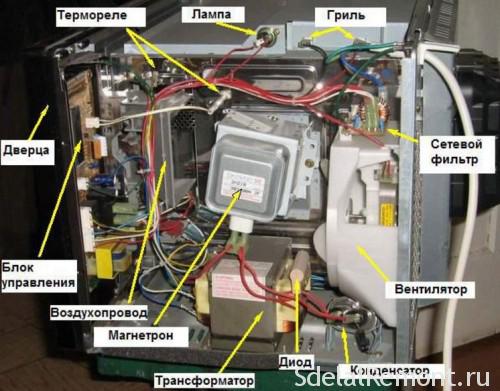
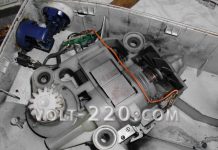
It is easy to distinguish them, because outwardly the design is not very complex. The magnetron is always installed in the middle, directed to the food heating unit. The transformer is located under it, representing a massive box with a protruding coil. The capacitor, diode, and fuse are located to the right of it, and the control box is often located near the input panel.
When the device is turned on, a voltage of 220 V enters the transformer. Passing through the primary and secondary windings, a current of 2 kV is already flowing from the element. Further, the negative half-wave goes to the diode, and the positive one charges the capacitor, which again leads to a twofold increase in voltage. After that, the generation of microwaves by means of a magnetron begins. The power of the magnetron is regulated by the control unit.
Therefore, in the event of a breakdown, it is worth paying attention to these elements. They carry the greatest load, so often the problem occurs in them.
When disassembling the microwave, be sure to unplug it from the mains.
The search for a breakdown in the microwave oven is carried out on the basis of "symptoms". This allows you to gradually eliminate possible causes and find the real one. So, if the oven does not turn on at all, then it is worth checking the following points:
- Integrity of the power cord.
- Door position and closing system.
- Status of the mains fuse and thermal relay.
In the first case, the situation is elementary - there is no power due to damage to the power cord. A similar situation occurs when the outlet is damaged or overloaded. In this case, it is enough to replace this element, everything is in order with the microwave itself.
Next, it is worth checking the operation and position of the door. The fact is that the operation of the microwave oven with the door open is dangerous for others. Therefore, the design provides for the possibility of work only when it is completely closed. If the latch, locking system or checking element is broken on the door, then the protection system will not allow the device to start.
The last points also concern the protective systems of the furnace. The fuse prevents damage to the device due to power surges in the network, and the thermal relay ensures a complete shutdown of the system when the door is open. Both can fail, replacing them is quite simple.
It is also worth checking the voltage in the network and the number of devices connected to the outlet. The microwave is very demanding on power, so its slight deviations can interfere with the operation of the device.
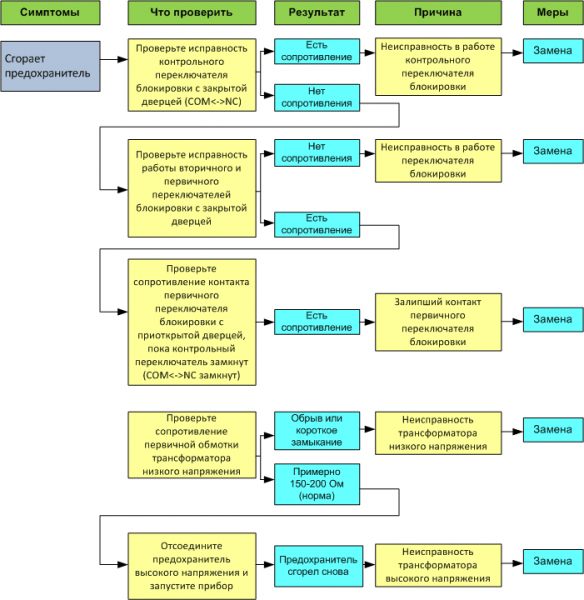

Most models suffer from common problems and have similar, typical faults. For example, if the microwave is working, but not heating, then this indicates a malfunction of the capacitor, diode or magnetron. For self-repair of a microwave oven, you will need a simple set of tools: pliers, wire cutters, a screwdriver, an adjustable wrench and a five-point wrench, as well as a soldering iron with the necessary inventory.
When self-repairing a microwave microwave, you should remember about safety measures. The two most important factors that pose a danger when repairing a microwave oven are high voltage in the oven components and microwave radiation. You can not turn it on if the door lock is faulty or the mesh on the viewing window is damaged. It is impossible to make independent holes in the body and introduce any conductive objects into the nodes and elements of the furnace. Never touch the internal parts and assemblies while the microwave oven is in operation. Be sure to use a tester or other electrical measuring instruments to measure DC and AC current.
If the above reasons are not confirmed, then you need to disassemble the device to troubleshoot. Before this, be sure to turn off the oven from the network and wait a couple of minutes.
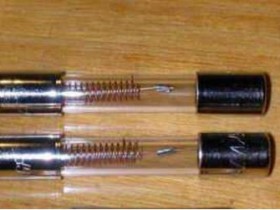
What should I look for when looking for breakdowns? There are several basic elements that often fail:
- Circuit breakers.
- Capacitor.
- Diode.
- Transformer.
- Magnetron.
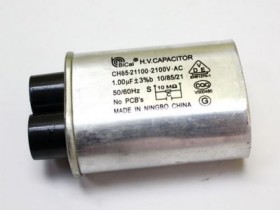
These elements are directly involved in the operation of the device and were mentioned earlier. First you need to check the health of the fuses. Their breakdown is immediately visible, because during combustion, the conductor inside collapses. If this does not happen, then it is worth looking further.
For further verification, you need to take a multimeter, because outwardly it is extremely difficult to find a breakdown on other parts. To check the capacitor, you need to switch the device to ohmmeter mode, and then connect it to the part. If there is no resistance, then the part must be replaced.
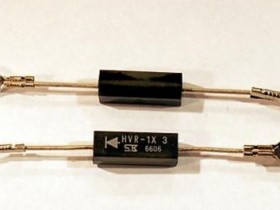
It is impossible to check a high-voltage diode with a tester. It is recommended to replace it in case of breakage of other parts, because often a blow falls on it. It can be checked by a slightly different method - by connecting to the network on the way to the light bulb. If the light is on weakly or blinking, then the part is working.If it burns brightly or does not turn on at all, then the diode must be replaced.
The next step is to test the transformer.
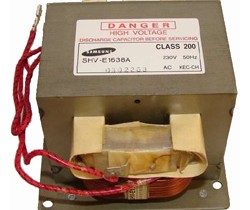
It is important to observe safety precautions, because
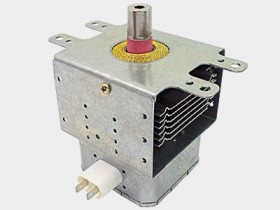
This element is able to hold a charge for a long time. It will take several minutes to discharge a working transformer, and much longer if the discharge resistor breaks down. It is worth discharging it against the case or not touching it at all if there is no experience with such equipment.
Next, the transformer windings are checked. It is necessary to remove the terminals and check the terminals of the device one by one with an ohmmeter. First, the primary winding is checked, for which the norm varies from 2 to 4.5 ohms. For the secondary winding, the limits are 140 and 350 ohms. It is also worth checking the filament winding by connecting the terminals leading to the magnetron to the multimeter. The norm here varies from 3.5 to 8 ohms.
All previous tests have failed, then the problem may lie in the magnetron.
To test the magnetron, just connect the tester to its power terminals. The tester switches to ohmmeter mode. If the resistance is 2-3 ohms, then this means a breakdown of the device. The situation is the same if the tester shows infinity. In both cases, the device must be replaced.
These items are the most common culprits for a microwave oven failure. However, often the failure of the device is associated with other problems, such as problems with the electronic control unit, timer, and other electronic parts. Here, simple checks with a multimeter will not help; the help of a qualified craftsman is needed. Although it is much easier to simply replace the part if you are sure it is broken.
There are frequent cases of breakdown associated with the destruction of the cap on the magnetron. The thin aluminum case simply does not withstand loads and is destroyed under the influence of microwave waves. This problem is often found in older devices that are more than a few years old. Obvious symptoms in this case are noise and sparks during the operation of the device.
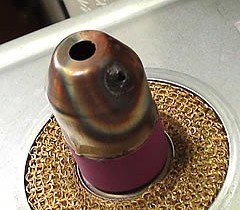
To check, it is enough to remove the transformer, because the cap is located towards the food chamber. If the cap is destroyed, then there are 2 options:
- Cap replacement.
- Cap flip.
The first option is a priority, it is enough to order a replacement or give the magnetron for repair. The second option is considered a temporary alternative that allows you to extend the life of the device indefinitely. It is enough just to scroll the cap 180 degrees around the axis, because the load falls on only one half.
Microwave repair is a feasible task for a novice electrician. If the problem lies in the breakdown of one of the constituent elements of the furnace, then the simplest and most correct solution is to replace it. The bottom line is that most of the parts of this device cannot be repaired, but only completely replaced with a new one. This is especially true for fuses, diodes and capacitors - the main reasons for the failure of the device.
Replacement of parts is carried out in several steps:
- The microwave is unplugged.
- The transformer is discharging (5 minutes).
- The terminals are disconnected from the defective part, it is removed.
- A workable part is connected to the same place.
There are two important factors to consider when replacing a part. The first one is schema compliance. It is important to remember that each part has its own characteristics, selected for the performance of the entire electrical circuit. If after replacement this nuance is not taken into account, then this leads to new breakdowns. This is especially true for the transformer and capacitor.
The second important factor is the connection of the part. It is necessary to connect the replacement correctly, retaining the previous terminal arrangement. If you connect the device in reverse order, it can damage it, as well as several other parts in the system.
This will restore your microwave in most cases. If the breakdown is related to the electronic part of the device, then you should contact the professionals. This will ensure high-quality repairs and extend the operation of the device for a long time.
The most common malfunction is the failure of the waveguide cover in the microwave oven chamber. The reason for this is the ingress of splashes from cooking. From this, sparking begins between the magnetron antenna and the protective cover. Untimely removal of burnt products leads to local burnouts of the lid and to complete destruction.
Local burnout of the mica plate of the lid can be removed with alcohol or thinner 646. It is enough to gently wipe the burnout area.
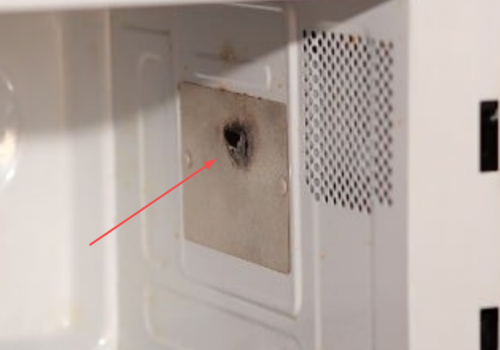
If the mica plate of the lid is in a clearly bad condition, is oily or has begun to paint, then it should be replaced. Removing the diffuser plate is quite easy. This can be done with an ordinary sharpened knife. Usually the mica plate is mounted on a self-tapping screw or on rivets. Carefully place the old record on the new template and cut out the new one. It is best to do this with a knife - scissors can break the mica. We make holes in the new plate with a sharp screwdriver and process the edges of the plate fields with sandpaper. Install the new plate in place of the old one.
Often the question arises, how to replace mica for microwave? For these purposes, any dielectric with a similar characteristic of dielectric constant is suitable. For example, PTFE or Teflon.
Common failures in the microwave are also malfunctions associated with other elements of the oven. For example, such as the keyboard of the oven control unit, the electronic microwave control unit and the dissector. The high-voltage capacitor and transformer, the microwave waveguide plug and the rotating tray fail less frequently. The power supply and microwave oven magnetron are subject to wear.
Knowing how to troubleshoot your microwave will save you a lot of money on repairs. However, if you do not know how to repair the microwave yourself, then it is best to contact the experts. Repair microwave microwave will help in specialized service centers. In addition, watch a video on microwave repair, perhaps there is exactly the breakdown that will help fix your favorite household assistant.
| Video (click to play). |

