In detail: do-it-yourself bicycle tire repair from a real master for the site my.housecope.com.
From ancient times it was believed that the one who follows the advice of the old Russian proverb "prepare the sleigh in the summer and the cart in the winter", without any doubt, can be considered a good, zealous owner. Having taken a great interest in cycling tourism for almost ten years, I have always been engaged in repairing my "iron horse" and completing it with spare parts in the winter.
However, over the past couple of years, it has become almost impossible to do this either in winter or in summer, since it is possible to purchase the required parts in the store only in the case of a lucky chance. The problem of tires is especially acute for cyclists. The last of the tires at my disposal was worn out in several places to the fabric cord, and its further operation became very doubtful.
Remembering that many motorists use welded tires, I decided to try to do such a "restoration" Looking ahead, I will say that the result exceeded all expectations: the restored tire, put on the rear wheel, "rolled" 1.5 thousand kilometers with minimal wear of the pattern tread, no peeling of the welded rubber layer was observed.
I think that the resource of such tires is at least three seasons of active driving. I suggest other cyclists to take advantage of my experience, especially since there is no special wisdom in it. The proposed method for repairing a bicycle tire consists in restoring a worn out tread not only in places of defects, but also over the entire surface in contact with the road surface.
For work, you will need an electric vulcanizer (preferably with a large area of the heating element, for example, a stationary type, having a working surface of 150X200 mm, as a way out, you can recommend “installation” from an iron with a thermostat and clamps or locksmith's vice) You will also need raw rubber and not complicated equipment made by yourself. The latter consists of a matrix that forms a protector, and a back copying spacer. The matrix, as a heat-conducting part, is made of metal.
| Video (click to play). |
It can be both steel and cast iron. But it is best to give preference to aluminum alloys, since, along with good thermal conductivity, they have an important feature that allow an amateur who does not have machines at hand to use the most common locksmith tools for processing. So, in accordance with the radix of the wheel of your bicycle (for my "Sputnik" of the Kharkov bicycle plant it is equal to 340 mm), the profile surface of the matrix is made.
The type and shape of the "new" tread are determined by the diameter, depth and number of holes of notches and grooves on the body of the matrix. The rear copying pad is easy to make from a wooden block. The specific dimensions of the entire tooling depend on the dimensions of the vulcanizer and can accordingly change, "adjusting" to the existing model. Preparatory operations include "aiming" the roughness and obtaining a matte, "velvet" surface on the tire.
For this, a file with a large notch is used (it is advisable that it has not been used before for working on metal). After sanding, the surface is degreased with a cloth soaked in gasoline. By cutting off a piece of raw rubber with a thickness of 1.5. 3 mm, remove the protective fabric or film stickers, moisten with gasoline and apply to the prepared section of the tire.
Having installed a matrix on top, and a copying pad from below, we clamp the package into a vulcanizer, preheated to a temperature of 140 ... 150 ° C. In this case, the parts must not be displaced relative to each other.Do not forget during work and about safety precautions, try to protect your hands from burns. The duration of the vulcanization process is determined by the thickness of the rubber used: for the specified, it lies within 15.25 minutes.
As a result of correct heat treatment, the welded layer should become elastic, in no case should it be stretched "like chewing gum", or vice versa, be brittle and brittle. C), leading to burnout. Having moved the matrix and the gasket, we make the next bookmark, the vulcanization process is repeated, and so on until the updated protector closes
(
Tire restoration: 1 - vulcanizer heating element, 2 - matrix, 3 - raw rubber layer, 4 - welded layer, 5 - back pad, 6 - tire section requiring repair.
Everyone knows and knows how to glue a camera on a bicycle, but few people glue a torn tire. Today will give the bicycle rubber a second life.
Actually, the first time I cut a tire on my road bike and was already thinking about throwing it away, but there was no money for a new one, so I decided to save it at any cost.
Also, this method is suitable if you just pierced the wheel with a large nail, a twig, glass - in general, any object that could leave a hole in the tire through which sand and small stones can get inside. This little thing can rub between the tube and the tire, resulting in an unexpected puncture of your wheel.
To restore the tire, we need:
- Piece of an old camera
- Plastic bottle
- Glue
- Scotch
- Lighter
- Scissors
Let's break down our actions with tire repair point by point:
1. Let's start with a plastic bottle. Cut out a rounded rectangle from the bottle. For example, if you have a cut of 1-2 cm, then you need to cut a rectangle 2 times larger than 2-4 cm.
Next, we need a lighter. We need it to melt the edges of the plastic patch. This is to prevent the plastic from cutting through the tire and making it worse.
2. Old camera. It is necessary to cut a rectangle from the camera, which will be 1-2 cm larger on all sides of our plastic patch, which was cut out a little earlier.
3. We glue the camera and plastic. We take super glue, if it is not available, you can use the one that comes in the bicycle first aid kit for gluing the cameras, but it will take longer to wait for the glue to set. It turns out a kind of blank, which we glue in the tire.
It is necessary to glue to the outer side of the camera, as the inner side will not glue due to the white coating.
4. We glue the "blank" to the inner side of the tire, where the cut is. We spread the “blank” around the edges and in the center and glue it to the tire.
Then we take the scotch tape, it is advisable to use the scotch tape with reinforcement and glue it on top. If there is no scotch tape, you can glue it with electrical tape.
That's all! You have sealed the cut tire. Now you can ride your bike further and when the money appears, buy new tires. Such a tire lasted a long time for me, until the tread was already worn out. Therefore, the method works 100%
In the event of a puncture or other damage, it is rare that professionals help to seal the bike's camera, and the riders have to do everything with their own hands.
As with any accident, there is a “routine procedure” for repairing a camera at home. It assumes that you have all the necessary tools, and behind your shoulders - at least a couple of cases when you had to remove and disassemble the wheels.
It will be difficult for beginners the first time, but no fundamental problems should arise during the repair process.
So, what are we working on. Mandatory set:
- keys and hexagons (for wheels without an eccentric);
- disassembly, or assembly, is a small tool for bending the tire from the rim, easily replaced with a screwdriver or even keys, allows you to work a little more quickly;
- a basin, jar or other vessel with water - to diagnose the site of damage;
- vise - for pressing the surface of the camera and the patch together.
As you can see, the required set is very limited, which makes it possible to carry out repairs in almost any conditions.
The repair is carried out according to the standard procedure, after passing which, at least once, the gluing will not cause any questions.
The first thing to do is to remove the wheel with the damaged tube. To do this, you will have to do the following:
- Disconnect the brakes, if they are rim, the fenders, if they can interfere with the work with the wheel.
- We turn the bike over.
- We unscrew the retaining bolts on the bushing or eccentrics.
- We carefully take out the wheel. If there is a problem with the rear wheel, it is most effective to hold the chain by first moving the axle of the wheel towards the saddle, and then lifting it up and pulling it out.
Now nothing interferes with working with the wheel, you can proceed to further steps.
Usually the most difficult step is to get the camera out of the assembled wheel. With the skill and the right tool, it’s very easy.
The wheel can be disassembled using edgers or any flat objects - screwdrivers, keys, even coins:
- We completely lower the camera on the bike. To do this, unscrew the spool from the nipple. On good rubber, this can be done using a groove in the cap; on cheap models, you have to hold the spool with your hands until all the air is released. In some cases, this step will have to be done before removing the wheel, as the wide XC tires will cling to the brakes and frame.
- We select a place on the back of the bicycle wheel from the nipple to start the dismantling.
- We drive the bead between the rim and the tire vertically downward, trying not to hurt the camera inside.
- We retreat 10-15 centimeters from the first, we drive the second.
- Carefully, like levers, lift the tire until a small segment is behind the outer part of the rim.
- Next, we remove the rest of the tire with our hands.
- Carefully remove the valve from the groove in the rim, take out the camera.
The result of all actions is a disassembled wheel, with the tire "put on" over the edge of the rim, and a free tube, ready for repair.
Damage search is a creative thing, albeit rather primitive. Almost everyone recommends using a basin or other container of water to determine the point of damage by the bubbles, but this is not the easiest way, because you have to dry the camera and risk water getting inside through the nipple in order to save a few seconds.
The definition is much simpler and more accessible by ear:
- We pump up the bicycle camera.
- We bring it to our ear and look for a point where air etching is heard.
- We localize the puncture site of the chamber by air flow or visually.
Everything is very simple. It is only necessary to check for damage around the valve. With such damage, it will no longer be possible to seal the breakdown without special tools.
Further, the repair kit comes into its own:
- We clean the surface from grease with acetone or gasoline, in the field - with a clean cloth.
- We go around the surface with sandpaper (not necessary, but a step useful for gluing quality).
- Remove the protective film from the patch.
- We apply the glue, according to the instructions on the tube, on one or two surfaces at the same time.
- Press the patch firmly against the camera and hold it, trying not to move the parts relative to each other.
Then it remains to wait for the "setting", which occurs, depending on the description, either immediately or within 5-15 minutes. In modern repair kits, the glue is usually quite fast, but at home you can also use the classic "Moment", which will take several hours to harden. How to glue it correctly is described in detail on the packaging of the tubes inside the repair kits.
In addition to using non-specialized adhesives, the patch itself can be made from an old camera.The main thing is that the rubber is undamaged and well cleaned.
After checking the tube (it should be fully inflated outside the wheel to make sure that any damage has been repaired), the wheel can be reassembled and reinstalled.
- We check the insulating tape inside the rim (usually it is not fixed or it is easy to move during manipulation).
- Carefully place the bike tube inside the rim, starting at the valve and making sure that no kinks appear.
- With the help of assemblies, similar to removal, we "fill" the tire in place. Before doing this, it is recommended to inflate the camera a little so that it does not press against the rim.
The wheel is assembled, we pump it completely for testing and proceed with the installation. For the front wheel, you should pay attention to the marking on the tire in the form of an arrow, which is sometimes supplemented by the inscription Drive. This is the direction in which the wheel should turn. Install with the appropriate side so that the protector works correctly.
There are situations when there is no repair kit with you. It is impossible to predict everything, but we will give a couple of recommendations:
- The patch can be made from any rubber, including old camera, automotive or technical rubber.
- What kind of glue to use is not very important, as long as it is intended for rubber. It is better not to use hardening industrial and household compounds.
There is also an extreme case when in a problem situation the rider is left without glue and tools, for example, a puncture was received while riding around the city, but you still need to get to the house. In such situations, there are also ways out. For example, the chamber is cleaned and a patch is applied to it in such a way that when the inflation is strong, the pressure presses the patch.
Otherwise, if there is no patch, tape or a wetted plastic bag is used. In situational repairs by "applying" the surfaces are not cleaned with emery, but, on the contrary, are wiped as smoothly as possible so that there are fewer gaps.
Of course, all these methods are temporary, and they only work for a short time, subject to strict restrictions:
- The contact surface must be clean and smooth.
- Shock loading of the wheel is prohibited.
- The pressure must be constantly monitored and kept to the maximum.
The glueless method that comes from the automotive world is vulcanization, which is also used on a bicycle. Requires special equipment, but reliably repairs punctures. The essence of the vulcanization process is that the stripped patch and the chamber are pressed against each other with great force and heating, in fact, they are fused, forming a single structure.
Vulcanization is much more reliable than any adhesive patches, but requires skill and additional equipment. By the way, there are “household” or home-made vulcanizers, consisting of a vice with a cylinder and a chamber for burning, for example, gasoline or other fuel. The only advice that can be given is to be careful with fire.
It is easy to work with the repair kit, but there are several techniques that allow you to repair cameras without it.
Perhaps the most interesting products in this area are self-adhesive cameras. Their secret is that a special gel or resin is poured into the dense chamber. In the event of a breakdown, this substance flows into the rupture and seals it. Thus, self-adhesive models allow you not to think about repairs for some time, however, such cameras cost at least twice as much as their conventional counterparts with a weight of 1.5-2 times more.
Otherwise, puncture prevention is very simple:
- Inflate the wheel correctly. An under-inflated or over-inflated wheel is prone to bursting from biting or pressure, respectively.
- Choose clean roads. The most common cause of punctures is iron screws, nails and glass. They can be easily avoided by simply observing the surface you are moving on.
- Do not storm obstacles head-on.The impact of even the shock-absorbed front wheel on the sharp edge is guaranteed to result in damage, even if the breakdown did not occur the first time.
- Use "anti-puncture tape", which is an extra layer of synthetic rubber that is placed between the tire and the tube inside the wheel.
Home repair of a camera is quite real. To implement it, you need a minimum of tools and knowledge. It is enough to take a responsible approach to the issue and study all the steps. Of course, it is much more useful to monitor the wheels and the road before the accident, but in the event of a breakdown or damage, there will be no problems and going to a workshop or a tire fitting service to seal the hole is almost never needed.

Recently I cut something very sharp on my slick tire (continental city contact, not folding). The cut on the sidewall, through, cut the camera too.
Now it is definitely impossible to pump up the chamber in this tire to the nominal pressure of 5-7 atm - a hernia will come out of the hole.
How to reanimate an item?
By now aRoma » 25.6.08 15:42
Roma, I will clarify: is this method also suitable for high-pressure tires?
By now Tibor » 25.6.08 18:56
Sergio,
Wouldn't it be dumb for you to ride on such rubber? On a level, it may roll, but you will enter the trap and it will burst nafik. Especially if you pump up atmospheres to 5. It's not even travel contact with reinforced sides.
In my opinion, 100 grams for a new tire is an adequate price for calm nerves. in my humble opinion
Of course I don't care. Aby shoto write 
By now Tibor » 26.6.08 07:09
If you can simulate a 50TPI stitch (tires per inch, i.e. 2 threads per millimeter), or whatever the tire has, tying them to cut threads (cord), it is normal to vulcanize the cut (and not use the surface tension of a thin glue film), you probably won't create a potential damage spot on the tire. By sewing the cut, you are actually sewing the rubber. Cord tends to stretch out of rubber such as wire insulation. And the rubber does not hold very well.
Sorry for the wild imagination. I am clean
think twice
By now M i k » 26.6.08 09:35
How to reanimate an item?
By now M i k » 26.6.08 16:26
This word in this context scares me :)
It's no secret that motorists do not know pressures above 2-2.5 atm, and the usual pressures of bike slicks are nonsense for them :)
Of course, the pressure there is less, but the tested loads depend not only on pressure. But in any case, with this TZ. self-made gluing is unlikely to be more reliable.
There is also a moment that sometimes the coating compound has such a composition that it is not very strong to it and is glued in the usual way.
ps personally, I consider it justified to restore and use a dead tire only as a necessary and temporary measure.
ps2 here's another temka
Sticking cameras and tires
By now aRoma » 27.6.08 14:06
100 kg, I did not risk putting it on the back.
Seryoga, since the topic has already been raised, let's fix the tire in some way, try to put it on the front wheel and swing it a little less than normal, and then tell us how it behaves (just test it somewhere near Kiev).
By now Tibor » 27.6.08 14:18
I looked at the Rema TipTop reinforced car patches for car tires. They have several significant disadvantages:
1) Dear;
2) Very large, thick, rough and inflexible;
3) Requires native special glue (blue).
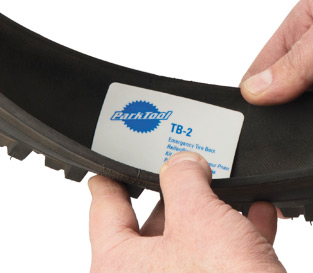
However, it's not all bad. As it turns out, Park Tool makes self-adhesive patches for TB-2 bike tires.

Emergency tire protection patch.
The fastest, most convenient and safest way to patch a cut or bead wear. TB-2 is made from a durable, waterproof vinyl membrane with woven fiber reinforcement. The heavy-duty, pressure-sensitive adhesive ensures the patch stays in place in any tube tire, road or mountain, high or low pressure. A true keeper on the trip.
TB-2 measures approximately 76 mm x 45 mm (3 ″ x 1.75 ″).The kit includes three patches. The thickness of one patch is about 0.5 mm.
Accompanying text on packaging:
Designed to get you back on the road or trail, the TB-2 Safety Patch is quick and easy to install to patch cuts, scrapes and holes in any tire size.
A thin, reinforced film of protective patch adheres to the inside of the tire and prevents the tube from creeping through the cut or hole. Find a cut or hole, then clean and dry the adjacent surface to help adhere the patch. Peel off the protective tape from the back of the TB-2 and apply, allowing the TB-2 to sufficiently cover the damaged area.
Note: TB-2 is designed for emergency use. A patched tire should be replaced as soon as possible.
Modern bicycle models have become a conglomerate of new materials and technologies. First of all, the innovations concern the frame and the drive mechanism.
Only the spoked wheels with a rubber tire and a metal rim remained unchanged. Eights, torn spokes and worn out wheel hubs are already meeting the XXI century ... Therefore, the skill of straightening and repairing bicycle wheels is useful to every man.
There are many easy ways to save a wheel. Any repair to bicycle wheels begins by flipping the bike and placing it on the ground, resting on the handlebar and seat.
The easiest way correct the resulting figure eight Is to bend the rim over the knee. I have used this simple Russian technique many times. Turning the bike over and spinning the wheel, I find the most convex place on the rim. I rest against this place with my knee, and with my hands I grab the tire with the rim to the left and right of the stop and straighten the rim with effort. Again I spin the wheel several times and correct it. Usually, such manipulations are enough to reduce the curvature of the rim, and the wheel has already entered the frame fork.
The second step is to tighten the spokes taking into account the remaining curvature of the rim. Spin the wheel and mark the rim places that are most curved towards the side. Then, in these places, the tension of the outer 2-4 spokes should be loosened, and on the inner row, the spokes should be tightened by 1-2 turns of the nut. By gradually loosening and tightening the corresponding spokes, you can make the rim fairly flat without disassembling the bike. To facilitate the work, the threaded part of the spokes is moistened with plain water.
After several similar repairs, in some areas, a radial displacement of the rim and the appearance of its ovality are possible. Before the next spring-summer season, you should carry out a more thorough straightening of the wheel by removing the tire from the rim. The wheel, freed from the tire, is mounted on the frame of an inverted bicycle, and when it is slowly scrolled, the curvature and ovality of the rim are determined. To eliminate ovality, loosen the knitting needles in the area of a smaller radius and tighten in a convex place. We repeat this operation several times. pairwise changing the tension of all spokes in the left and right rows.
As a result of this work, you can get a completely flat wheel with well-stretched spokes. It is the spokes that hold the rim and transmit the shock loads from the road through the hub to the frame.
The most difficult and time consuming wheel repair is their complete disassembly and subsequent assembly. On the knee, such a thing cannot be done. An assembly jig is required for accuracy (fig. 1). The simplest jig is made on a sheet of thick plywood or chipboard, in the center of which a hole is drilled along the diameter of the wheel axis (photo 1). Then the radius of the rim is marked out, and persistent bonds are attached along the line of the resulting circle. Their height from the surface of the conductor to the rim is selected according to the dimensions of the rim and sleeve (photo 2). Bonds must be placed symmetrically to the axis and evenly around the circumference.
Rice. 1. Assembly tool for wheels
Among the possible damage to a bicycle tire, there are those in which replacing the tube does not help. In this post I will share my experience in repairing the sidewall of a Michelin Pro4 Service Course V2 bicycle tire.
A couple of years ago I was choosing tires for a road bike, more details here: Tires for a road bike, I want to go fast and not break through. I chose Michelin Pro4 Service Course V2 tires (for two bicycles on the farm). As for puncture resistance, I was confident that there would be no regular problems on those roads on which we ride. 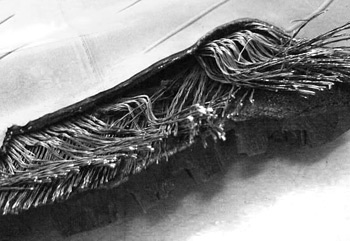
Indeed, for a season and a half, not a single puncture. Even such an insidious option as a metal cord from truck tires (resembling a small needle) was not caught. More precisely, I got caught once, but after a side cut.
But there were no illusions about the side wall. In half of the cases, tires of this level of rolling fail not due to wear, but due to a side cut. This is due to the fact that the side wall is soft, thin, elastic. Otherwise, it will not roll, too much energy will be taken for compression-straightening of the tire near the "contact patch".

On the side, the tires are usually cut with pebbles, which are often washed out onto the road from the side of the road after rain. Or they are simply scattered there in some places. The interaction of a pebble with a tire is worthy of a separate study. If in such a place along the road there is a metal bump, then the stones sometimes hit it quite loudly, as if they were fired from a slingshot at close range.  That is, the pebble is, as it were, captured by the sidewall of the tire when the wheel hits, and then, when released, it is fired with very decent energy. Probably, if something goes wrong and the energy of the pebble is directed to the sidewall of the tire, and the pebble itself turns out to be with a sharp edge, then the tire may not withstand. And this will not be a puncture, but a "bullet wound"
Whenever possible, I try not to run over the stones on purpose, but since I am number two, this is not always possible. 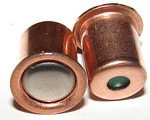
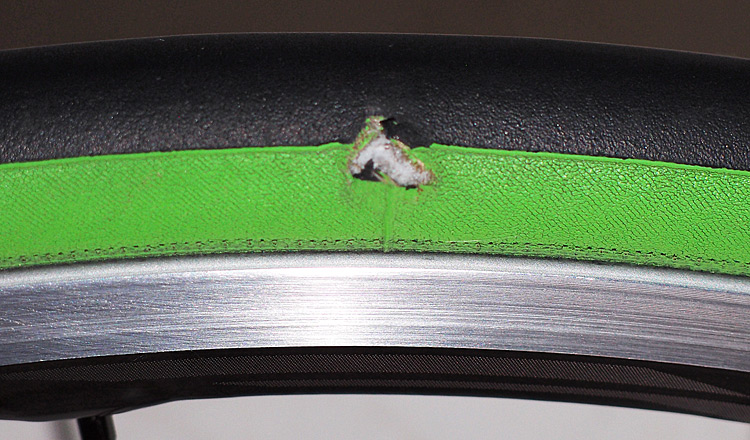
In general, one fine day, at the 18th kilometer out of the planned 70, a shot rang out from under the rear wheel, as if it had run over a capsule. There is a 7.62 mm hole in the sidewall of the tire, and, of course, in the tube, which tore.
Note that the tire was inflated almost to the maximum allowed.
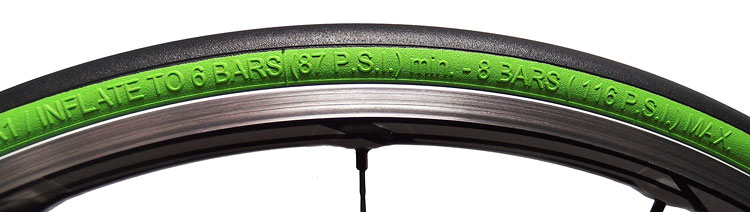
Maximum pressure - 116 psi
At a maximum of 116 psi (marked on the sidewall), the Tire Pressure Calculator gives my current "curb weight" the required pressure of 115 psi, which has been hammered in. The tire itself ran for one season on the front wheel (that is, in a sparing mode), we can say that it did not even square. This is her second season in which she works on pushing her weight from behind.

What if I caught a side cut? On the Internet, this is chewed in more than detail, so I was well prepared for this. Just in case, I will list three options in descending order of reliability of control over the situation.
- Carry a spare tire with you. Of course, this is necessary in important races, so in my case there was no tire.
- Keep a set of Park Tool TB-2 patches (or similar) in the repair kit. It is a durable adhesive-backed Velcro strip that sticks on from the inside. Unfortunately, I had the sad experience of storing self-adhesive regular camera patches in a repair kit, and a repair kit with glue. The fact is that punctures are rare for me. And when it happens, it turns out that the glue in the tube has dried up, and the glue layer on the patches has dried up long ago. Probably because of the summer heat. Judging by the forums, Park Tool patches really help, but instead I carry with me a “simplified” version, reinforced tape.
- Reinforced tape. So silver. It can also be different, I use the one, on the packaging of which all sorts of options are drawn for "skipping" the car. By the way, my car is really covered with such tape in many places.
 It is a durable adhesive-backed Velcro strip that sticks on from the inside. Unfortunately, I had the sad experience of storing self-adhesive regular camera patches in a repair kit, and a repair kit with glue. The fact is that punctures are rare for me. And when it happens, it turns out that the glue in the tube has dried up, and the glue layer on the patches has dried up long ago. Probably because of the summer heat. Judging by the forums, Park Tool patches really help, but instead I carry with me a “simplified” version, reinforced tape.
 So silver. It can also be different, I use the one, on the packaging of which all sorts of options are drawn for "skipping" the car. By the way, my car is really covered with such tape in many places.
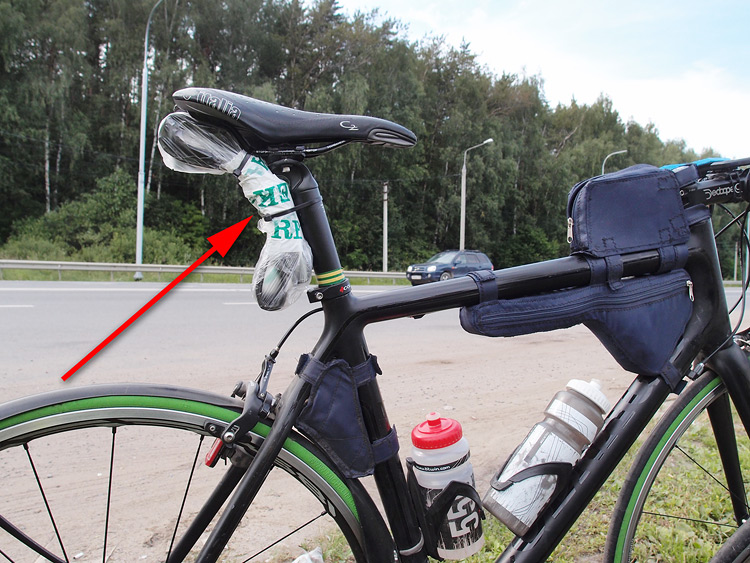
 I stuck three layers of tape to the tire from the inside. When filling the necessary "psychos", a small hernia appeared in place of the hole, but the camera was not exposed to risk. 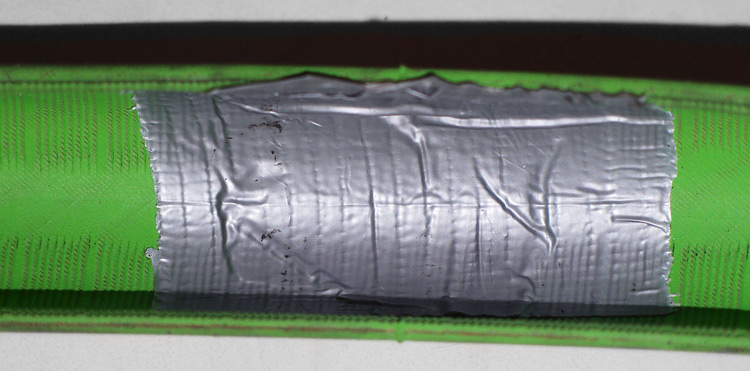
 One could say that he drove perfectly to the planned 70 km, but no, as already mentioned, he also caught a wire-needle.I drive two cameras (because we ride together), so there were enough cameras for this trip "just right"
Bicycle tire sidewall repair is described quite well on the Internet, so I’ll hardly be original. However, there are a number of points to pay attention to. The general principle is that during the repair, a sufficiently strong patch is glued inside, which should not allow the camera to squeeze out the hernia. But at the same time, of course, you need to say goodbye to the softness of the side in this place. That is, the wheel will roll clearly worse. And the patch from the inside can fall off, because all the time it will bend and then unbend. Therefore, generally speaking, such repairs are not recommended. Probably you can say so about a bicycle. And on a car, in my experience, such repairs are simply prohibited, the tire is discarded.
I chose the patch from durable rubber that was found on the farm. I think that ordinary patches for punctures in chambers are categorically unsuitable, because they are easily stretched. Ideally, the rubber for such a patch should be reinforced with fabric, but I couldn't find one. The one that was found to the touch is much denser than the patch for the cameras, it looks like the rubber of the side of the tire. For some reason she was attached to a ski helmet
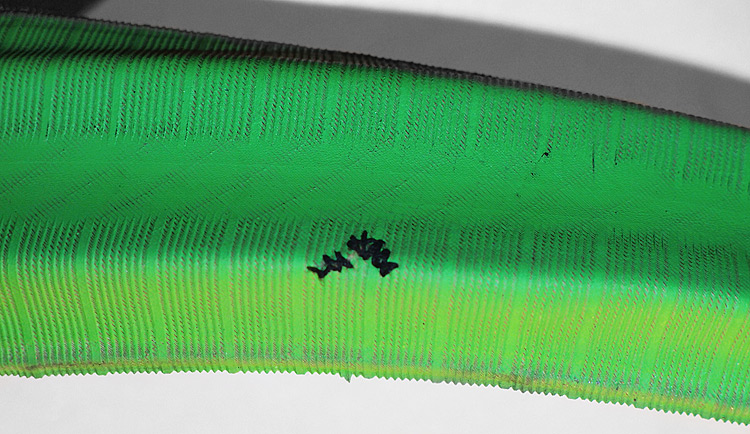
Before gluing the patch, the hole must be sewn up. Not so that the threads hold the gap, but so that the entire problem area is evenly glued to the patch, which will hold the load. The threads can be frayed later during operation, this is no longer important.
I glued it as usual (I smoked it, degreased it, the first layer of glue was dry, the second one was a worker, I pressed it for a day). It turned out that the glue did not stick to the Michelin compound, everything remained on the patch. Maybe the glue was bad, it was universal based on gasoline, judging by the smell. I repeated the procedure with cyacrine glue (superglue). 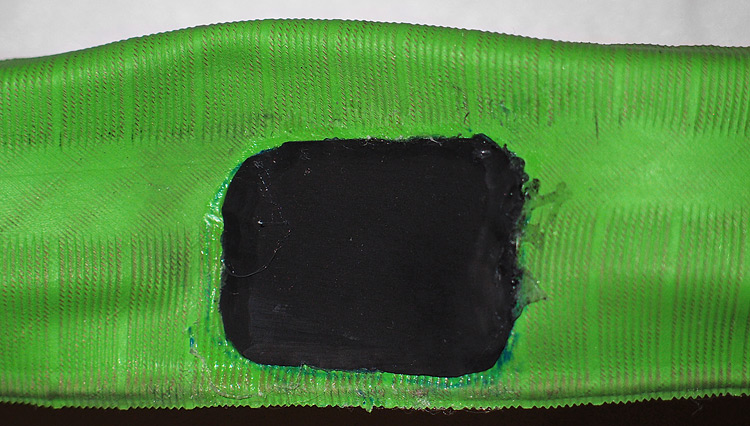
It stuck great. The edges of the patch were brought to naught by a drimeler with an attachment of the “skin circle” type. Just in case, I missed the threads outside with cyacrine glue.
So far so good, but just in case I carry a spare tire with me.
Spare tire
I did not notice the deterioration of the roll, although in addition to the deterioration of the rolling parameters due to the internal blotch, I have so far installed a conventional butyl camera instead of a latex one. Even speaking, I suspected, but now there is something to think about additionally
Tire failures can be caused by mechanical damage and manufacturing defects. Mechanical damage includes punctures and cuts caused by foreign bodies that have entered the tire. Manufacturing defects result in the following damage: thread delamination, thread rupture, seam rupture in a single tube, tread peeling.
Significant damage penetrating the outer surface of the tire is easily detected by inspection. Other damage is determined by checking the tire after removing it from the wheel rim. To speed up the detection of the location of small punctures, in which air from the chamber gradually escapes, the tire mounted on the wheel is immersed in water. Traces of air escaping from the tire will be visible at the puncture site. It is not necessary to immerse the entire wheel in water, but only part of the tire so that the surface of the water barely covers the inner surface of the rim.
Having found the puncture site, it is marked on the tire with a chemical pencil, one edge of the tire is removed from the rim and the camera is removed from under the tire. Having slightly pumped up the camera, they find the puncture site by ear or by immersion in water and mark it with a pencil, and the camera is freed from air. At the puncture site, the surface of the chamber is cleaned with a rasp, a file with a coarse notch or sandpaper with a coarse grain. On a separate piece of rubber 1-1.5 mm thick (cut from the old chamber), a surface equal to the section of the cleaned surface of the chamber is cleaned, and a patch is cut out of it with scissors, giving it a round or oval shape.Remove dust and traces of emery from the camera and patches with a brush or a clean cloth. A thin layer of rubber glue is applied to the surface of the camera and the patch. The glue is allowed to dry for 15-20 minutes, and then a second layer is applied, which is also allowed to dry. After drying, the patch is applied to the damaged area of the camera, pressed firmly and rolled with a roller, or slightly pierced with a wooden mallet, placing the camera on the palm of your hand.
If the camera has large gaps, gluing of which presents significant difficulties; the best way is to repair it by inserting a piece of the old chamber with the same cross-sectional profile. To do this, a piece with a length of at least 120 mm is cut out from the camera being repaired, on which there is a gap. A piece 60-100 mm longer is also cut from the old chamber (an allowance of 30-59 mm for each joint).
It is most convenient to glue the joints with the help of two mandrels, which are (Fig. 68 a) sections of a thin-walled steel pipe, the diameter of which is selected so that the chamber to be glued is put on the mandrel with a slight tension. The length of each mandrel is taken equal to 80-100 mm. The mandrel wall is cut through along the generatrix of the cylinder.
The end 1 of the rubber tube of the abutting chamber is first passed inside the mandrel 2, and then turned outward with its inner surface and pulled onto the mandrel so that the latter is under the lapel. The same is done with the end 6 of the inserted piece of the chamber and the second mandrel 7. (Fig. 68 b). The end of the chamber, which will be the inner after gluing, is turned out again with the outer surface up.
The length of the cuffs should be equal to the allowance provided for gluing.
The outer surface 3 of the first end and the turned outward inner surface 4 of the second end of the chamber are thoroughly cleaned. An even layer of rubber glue is applied to the cleaned surfaces, and after drying, a second layer is applied, which is also allowed to dry for 15-30 minutes. After that, the ends of the chamber and the insert are joined end-to-end and, using a thin wooden plate 5, placed under the lapel of the rubber tube, carefully twist it back so that it lies on the surface of the second end greased with glue over the entire area without folds and wrinkles. When the gluing process is complete, one end of the rubber tube will be inside the other. The place of gluing is pressed by hand.
After gluing the first joint, the mandrels are removed and the second joint is glued in the same way, connecting the chamber into a closed ring. After that, the mandrels are easily removed from the chamber thanks to the cut.
If the hole from the puncture is significant and several threads of the tire thread are damaged, the hole in the latter must be sealed. In this case, the patch is made of rubberized fabric, which is available in the bicycle first aid kit. On the damaged area on the inner side of the tire, the surface is cleaned with emery paper, several layers of rubber glue are applied at intervals of 15-20 minutes to dry. After that, a greased and dried patch is also applied to the place of damage and well rolled onto the tire.
If the tire has significant cuts, it is best to have it repaired by hot vulcanization in the workshop doing the job.
Repairing a damaged racing one-tube is somewhat different from repairing a road tire and requires more care and attention. It is not recommended to immerse the racing tube in water to locate the puncture site. The puncture is determined by ear, or, if this is not possible, they prepare soapy foam, like for shaving (but not hot), and apply it with a brush to the sides of the single tube along the entire circumference; foam will begin to bubble at the puncture site. The puncture site is noticed, and the foam is removed from the tire beads with a dry cloth.
The single tube is released from the air and removed from the rim.To remove the camera from the tire, you need to carefully tear off the keeper tape glued to it from the tire frame, which covers the butt seam. The tape is torn off the tire over a fairly large area. Taking care not to cut through the chambers, cut the threads of the butt seam; the incision is made so long that the camera can be freely removed. After that, the edge of the safety tape is steamed enough so that the camera can be freely removed and repaired.
The damaged fabric of the tire frame must be glued during a puncture, since otherwise the thin wall of the chamber, drawn into the hole of the puncture, in contact with the surface of the road along which the wheel is moving, will be pinched or rubbed. The puncture hole in the frame of the tire is sealed with a piece of biketraed from an old one-tube; you can also seal the hole with a dense cloth from a parachute or aerostat.
The method of gluing the inner tube of a racing tire does not differ from the described method of gluing the road tube, but since the walls of the inner tube and the patch are only about 0.3 mm, and sometimes even less, they must be cleaned with fine-grain sandpaper.
After the repair of the tire and the camera, the latter is put into the tire and sewn up end-to-end with a cross stitch. The stitching process is shown in Fig. 69. Then the seam is sealed with keeper tape.
If it is necessary to reinforce the tread, a rubber strip 22-24 mm wide is glued onto its surface, and a length equal to the circumference of the wheel, cut from a piece of rubber or from a tube of a road tire. The strip, before sticking, is cleaned on one side, and then coated with rubber glue several times.
| Video (click to play). |
The tread is also cleaned and greased with glue. After the last applied layer of rubber glue has dried, the rubber strip is glued. When gluing, the strip must not be pulled, otherwise the single tube removed from the rim will sharply shorten in length and the tire frame will be covered with many folds, which adversely affects its safety.


