If you remove individual sticky buttons while cleaning the panel, you can take a snapshot of the keyboard before starting work to avoid confusing the keys when reinstalling.
Basically, nothing is impossible. Many users of modern computer devices have long mastered the skills of repairing home equipment. Moreover, changing components, fixing some of them is not as difficult as it might seem at first glance.
If the efforts of a home craftsman are crowned with success, this provides not only an opportunity to save money, but also gain a useful experience that will always come in handy in the future.
Good night. I am sorry if such a topic passed, I just saw it somewhere in the net, but now I can't find it. That's the problem. There is a keyboard from a laptop, today I accidentally made a small hole on the cable with a knife and after that several keys stopped working .I want to cut off the contacts and cut out a piece where the hole is and after all this, connect the rest of the normal part of the loop with the contacts. Is it possible and how to do it? What is needed for this? Thank you in advance.
You can scrape from the side with which there are contact pads - they can be seen from the contact edge of the cable. although it is possible with the opposite, that it will be easier to scrape.
If there is a break at a bend, then it is enough to use pictures 2 and 4, but use a different type of contact, like conductive rubber, but where you can find it.
Location: St. Petersburg
Apparently it depends on how you rivet the plastic rivets.
I will tell you, but this also requires a workout and a hairdryer. A “rivet” or a series of them warms up to 80..120 degrees, then, in fact, the keyboard is removed “hot”. So that blanks for riveting are formed from “Rivets”. Here it is important not to disfigure the rest of the plastic of the case.
Location: St. Petersburg
Location: Leningrad region, town. Siversky
Location: Leningrad region, town. Siversky
When I cleaned my laptop, I took off the keyboard. Several tracks on the train came off. The keyboard doesn't work at all.
I had to solder cables from mobile phones. I do not think that the loop from the cellular is very different from this loop.
I don't think graphite was used to create the loop.
I don't understand why all this is. Now is not 2007, when there was nothing here at all. It's easier to buy Klava, which is in the photo, for 450r
Sometimes it turns out that when disassembling a laptop through negligence or due to insufficient strength, the latch for the connector for the keyboard cable breaks.
After it breaks down, it becomes impossible to fix the keyboard cable.
It is best to replace the connector, but finding it is problematic, and you will need special equipment to replace it, which not everyone has.
Therefore, we will analyze the way how this problem can be solved with the help of improvised means that everyone has.
Before starting work, it is recommended to de-energize the laptop by disconnecting the power supply and removing the battery.
Next, we take a regular plastic bottle and cut a plastic plate out of it. You need to cut a plate with a train width.
Then install the ribbon cable and insert the cut-out plate between the ribbon cable and the connector pins. The plate should enter with force, securely fixing the train.
In our case, the thickness of the plate was not enough, so we bent it twice and insert it into the slot in this form.
After that, we fix the train with masking tape in order to avoid accidental disconnection of the train during shocks and vibrations.
However, this procedure will have to be performed every time the laptop is disassembled to clean and replace the thermal paste.
This method works not only for laptop connectors, but also for similar connectors of tablets, smartphones, cameras and other devices.
VIDEO This guide describes how to secure a broken keyboard connector to the laptop motherboard. I am not claiming that my recommendations will work on any type of connector in any laptop brand, but if I can help at least a few people, I will consider my mission accomplished.
Let's say the keyboard in your laptop stops working properly and you decide to install a new keyboard yourself. You disassembled the laptop, removed the keyboard, tried to unlock the connector to disconnect the loop, etc. ... ... here is the YOKLMN part of the loop retainer broke!
What can you do? Unfortunately, you don't have many options. The keyboard connector is firmly soldered to the system board and cannot be replaced at home.If the connector is damaged, you will have to replace the entire motherboard, use a laptop with an external USB keyboard, or try the following trick ... Hopefully this works, or alas ....
The keyboard cable is blocked in a connector on the system board. To remove the keyboard, you must unlock the connector and remove the keyboard ribbon.
In the image below, you see one of the most common connectors. It has a base (white in my case) and a locking clip (brown in my case). The keyboard cable is clamped between the locking clip and the base contacts.
To unlock the connector, you must slide the clip approximately 2 millimeters in the direction indicated in the figure by the two yellow arrows.
IMPORTANT! The locking clip must remain attached to the base of the connector.
If you are not careful enough, you may move the clamp too much and break it.
In the following image, both sides of the clip are broken.
IMPORTANT! Don't throw away a broken clip, even if it looks completely useless.
Here's how to fix a broken clip in place and make it work.
Carefully insert the keyboard ribbon cable into the connector. Note, in this type of connector, the ribbon cable goes above the interlock terminal.
Carefully slide the broken clip back into place and use a small screwdriver to insert the clip behind the ribbon cable.
Secure the connection with adhesive tape, for security. The keyboard should work fine.
The keyboard connector shown in the following image is very similar to the previous one. The only difference is that the keyboard cable is under the clip. Install it in the same way as the previous connector.
In the following image, you can see a different type of keyboard connector. The ribbon cable is inserted vertically.
To unlock the connector, you will need to lift the locking clip (brown part) about 2 millimeters (two yellow arrows). Then you can remove the keypad loop (green arrow) and remove the keypad.
If you exert too much force, you can break it.
Insert the keyboard ribbon cable into the connector, then insert the broken locking clip correctly (behind the ribbon cable in my case) and gently press down on it.
Here is the same connector on the opposite side. You won't even be able to tell if the lock clip is broken.
Repair of the laptop keyboard may be necessary if one or more keys in different rows, numbers or letters do not work for you. Many people think that repairing a laptop keyboard with their own hands is something unreal. However, everything is quite feasible.
First of all, you will need to remove the keyboard. It is installed differently in each model. It is usually attached to the front with bolts. The bolts are closed by the front cover under the screen; it is quite easy to remove this cover with a minimum of effort.
To facilitate assembly at the end of the entire process, to quickly replace the keys, it is necessary to take a picture of the keyboard. If you ignore this advice, after repairing your laptop keyboard, you will spend a lot of time trying to get everything back in place.
Each key is attached to special lifts.The elevators are equipped with 4 attachments: to the keyboard platform and the key itself. To remove the key, slide a small tool (for example, a thin screwdriver) underneath it as carefully as possible and slightly lift it up. Now the key can be easily removed, because it is freed from the elevator. Please note that you need to be extremely delicate here: the parts are made of plastic and can be easily broken.
We continue to repair the laptop keyboard with our own hands, move on to the film. When all the keys are removed, we take out the film and also carefully separate it. Most often, the film is made in the form of a book, on one side of which there is a transition. To facilitate separation, preheat the film with a hair dryer.
Now the fun begins - repairing the laptop keyboard cable. First, you will need to identify the damaged tracks, and then restore them. Using a multimeter, we find damage: we solder the needles to the probes of the device, and then pierce the tracks in turn. After you have found the damaged area, we clean it and draw a path with a special glue containing silver and a high degree of conductivity. And then we wait for the glue to dry. You can buy such glue at an electronics repair shop or on the radio market. This completes our repair, it remains only to assemble the keyboard.
If you spill liquid on your laptop (coffee, sweet tea, soup, etc.), you will need to repair the flooded laptop keyboard, which has its own characteristics. It is quite possible that it will be enough to be limited to cleaning the laptop.
If you make repairs in specialized workshops, its cost will be 500-1000 and more, depending on the model. If you do it yourself, you just need to spend money on glue (50-75 rubles).
You need to be logged in to write a comment.
This material is dedicated to those of you who really want to learn how to repair laptops using your hands, brain and improvised tools. So let's go!
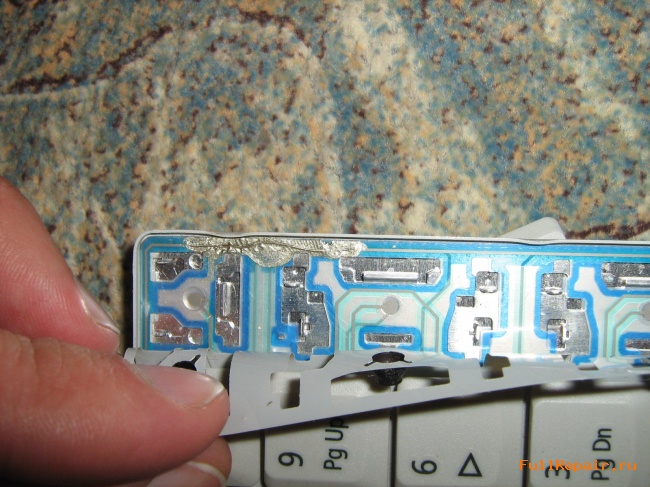
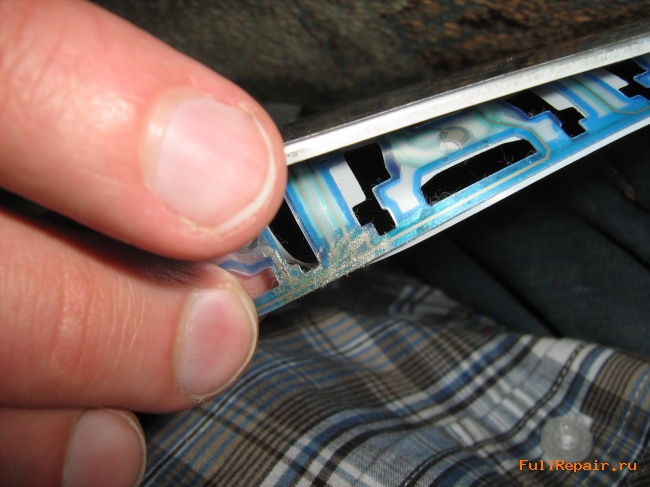
Problems with laptops are as varied as problems with their older brothers - computers. For example, overheating, failure to boot the system, glitches on the monitor, etc., etc. In general, there is plenty to choose from. More seriously, one problem that can be very expensive to fix is the problem of dry laptop flex cables. The cables dry out for two reasons: the high temperature inside the laptop and the poor-quality material from which they are made. Actually, the most negative factor that affects the trains is the time. In general, you opened the laptop and saw that the cables were dry and deformed. Deformation, as a rule, occurs at the very base of the train: at the bend point. Of course, you can contact the service, but then get ready money: it will be expensive, since getting the right cable for a laptop is a troublesome business. But the train can be repaired and it is done this way.
You will need scissors, a tube of super glue, and a scalpel (or a utility knife or blade). There is? Then let's move on.
Determine exactly the contact side of the loop: this is very important. The contact side is the side of the loop that was soldered (in short, it's not difficult to guess). We put the loop on the table and carefully, without fanaticism, begin to peel off the insulation from the contact point of the loop, exposing the conductor tracks. Attention: remove the insulation within a radius of 1 centimeter, no more! Your task: to completely expose all track-conductors. Cleaned out? Fine! Now you need a piece of cable seal. Cut a suitable piece and glue it to the back of the train to stiffen it. Everything! Now put the cable back in place and check the quality of your work: everything will work.
As a result, you have gained invaluable repair experience plus saved a lot of money. With which we congratulate you!
Laptop keyboard repair | Replacing laptop keys - Simple and uncomplicated do-it-yourself laptop repair
Replacing and repairing the keyboard of a laptop ASUS, ACER, Lenovo, HP, MSI, Samsung, Toshiba, PacardBell, SONY, Dell, Compaq, Fujitsu at the Service Center or with your own hands?
Laptop Repair :
There are several reasons why a laptop keyboard fails. Let's consider the most common reasons.
1) Most often, the keyboard breaks down if, as a result of careless actions of the user, liquid gets on it. As a rule, this happens when the owner of the laptop is drinking various drinks in the immediate vicinity. A large amount of moisture spilled will cause serious damage to the keyboard, which requires laptop repair or replacement of the keyboard.
2) Another common cause of breakdown is mechanical damage. The keyboard in a laptop is the primary input device. It is through her that a large amount of information comes from the user to the display. Because of this, heavy loads are obtained. Despite the fact that laptop manufacturers immediately create keyboards with heavy loads in mind, in some cases damage does occur. If this kind of breakdown occurs, then repairing the laptop keyboard is simply inevitable.
3) Another reason is the Russification of the keyboard. In this case, various stickers with Russian letters, engravings, or the keyboard are changed to the buttons. If a non-specialist does this, it can also lead to damage to the laptop.
The process of replacing and repairing a keyboard on a laptop
Replacing the keyboard on a laptop is carried out as follows:
The first main point is to de-energize the equipment - the laptop must be turned off, the mains supply turned off and the battery turned off.
Keyboard repair is usually applicable in the following cases:
lost button,
Replacing the button / buttons of the laptop keyboard Replacing the button and the mount is not a difficult manipulation - you need to remove the adjacent button, look at the button mount and the main mount and install it in the same way. But there is also an L-shaped mount on the main (metal part of the keyboard) if it is broken, then it cannot be restored and you only need to replace the laptop keyboard completely.
The membrane is repaired as follows:
You need to take another keyboard (donor), remove the button and the plastic mount and cut off the rubber membrane,
Increase font A A A
Let me show you on the example of an Acer laptop. So, the problem: on the keyboard about 10 keys in various places stopped working.
When the computer is turned on, we remember or write down all non-working keys, turn off the computer and remove the battery.Next, unscrew the screws from the battery compartment that hold the top panel, remove the panel itself:
Then we take out the keyboard, disconnect it (it is connected with one loop).
And also for troubleshooting, as I did not try to avoid it, I had to remove more than a hundred keys. Now the membrane of the keys is available to us and the conductors of the keyboard are visible (there are no photos, since I took it after the repair, I did not want to pick it again).
We select one of the non-working keys and follow the conductors from it. For convenience, the author of this text drew with a marker along the desired conductive track. Thus, I came to the next non-working key, and then I found out that all the disabled keys are sitting on the same track, I tracked to which contact this track leads, then I built a testing device - two needles connected by a wire. I stuck this needle device (not through and through, if only the needle touched the conductor) into the tracked track near the connector and in an arbitrary place. I checked the keyboard - all keys work. Now we carefully examine the damaged track and look for a place where it could break. As a result of a thorough examination, one such place was identified, not to say that it looked terrible, it just was not perfect. I stuck my connector from the needles on the sides of the suspicious place and made sure that it was in it that the contact disappeared.
The conductor in the film board is not metal, I don’t know from what, but it’s definitely not possible to solder it. Therefore, this method was tested: I take a thin copper wire, put it on the conductor at the point of the break and, while heating it with a soldering iron, lightly press on it. Thus, the copper connector was fused into the foil at the break. Testing the keyboard has proven that this method is simple and effective.
We varnish the corrected track, dry it, assemble the keyboard, install it in the computer and that's it, the keyboard is restored.
Share the article with your friends on social networks! I would be very grateful to you.
Unfortunately, this article is not a step-by-step instruction on how to repair a flooded keyboard, since the process, firstly, is very individual and the result is highly dependent on skills and luck, and, secondly, this described case does not take into account many nuances that can significantly complicate this procedure (for example, breaking "live" tracks at the stage of pasting the films). Therefore, if you came to this link not with the aim of spending several hours of time experimenting, it is better not to waste extra time and immediately contact us in any way convenient for you.
Before that, you can read the article "Replacement (repair) of a laptop keyboard in Kiev", which will give you an understanding of typical keyboard malfunctions and the cost of repairing them. If you have problems with your keyboard (for example, you doused it with water, buttons do not work, etc.), and are determined to figure out how to repair it - read on.
Let's make a reservation right away that all the information provided is of a purely informative nature and cannot be regarded as technical documentation. The author of the material is not responsible for the possible negative consequences that may be caused by your actions. In addition, please note that any repairs not performed by an authorized service center will automatically remove your laptop from warranty service. Also, to repair a laptop keyboard with your own hands, you need to have a special tool and knowledge.
With this in mind, we strongly advise not to risk your laptop, but to seek help from our service center, whose specialists will diagnose, find out the reasons for the failure of the keyboard, quickly repair or replace it, depending on what is more economically feasible.
More detailed information on the repair of the keyboard can be found in the article "Replacement (repair) of the keyboard for a laptop".In addition, you can find out the cost of new keyboards in the "Keyboards for Notebooks" section.
Before you find out whether it is worth changing or repairing the keyboard, it is worth finding out the reasons for its failure.
Most often, the keyboard requires repair or replacement due to the spill of liquid on it, which gets inside the films and causes corrosion (decay) of the conductive paths inside the keyboard, followed by their opening or vice versa by closing.
In the first case, some button / buttons / row of buttons stop responding to pressing, in the second - the button / buttons are constantly pressed. There is an express method for repairing a flooded keyboard, which consists in rinsing it with distilled water in order to wash out the salts in the liquid with which the keyboard was flooded. The method is quite risky, since, firstly, the laptop must be disassembled on its own in order to remove the keyboard, and, secondly, it does not guarantee that after this procedure the consequences will not turn out to be more dire than before. After that, be sure to use a hair dryer to dry your hair, but do not forget that the temperature of the hot air in it is sufficient to melt the buttons. Then you need to give the keyboard the opportunity to finally get rid of moisture, leaving it to dry in the sun or wrapping it in a bag with rice, which is a good adsorbent of moisture.
If after this procedure the keyboard does not work, you need to disassemble the laptop keyboard and try to restore the tracks. To do this, you need a special conductive varnish or glue (you can use conductive glue to restore heating tracks for the rear windows of the car).
Getting started, first you need to figure out how to remove the keyboard on a laptop and pull out the keys. The key is a dual structure consisting of an elevator and a key pad (some models additionally have a spring-loaded element). It is convenient to reach the key with a dental hook or special tools similar in shape (a thin watch screwdriver is also suitable for this purpose). The elevator and the key pad are interconnected by latches having three or four connection points (in this case, respectively, one or two connections are movable).
Consider a fixed connection. In this case, the hook is placed between the fixed joints themselves in the groove between the platform and the lift. Typically, the fixed connections are at the bottom of the key. In the photographs, you can see the attachment points (upper movable, lower fixed), which are visible when the elevator is in the raised position. Also, for comparison, see what a lowered elevator looks like.
Remove all elevators, and, as a rule, it is more convenient to remove from fixed mounts (of course, there are exceptions). The photos show well where the connections are located, so this step shouldn't be a problem.
In some modern models of keyboards, elevators are more mobile: they can be raised, lowered, and also shifted relative to each other when folded. If you come across such a keyboard, then you need to do the following: pull out the movable part of the elevator to the limit (in this case, the connection point will go beyond the border of the holding frame), lift the elevator, disconnect the stationary part.
After you have separated all the elevators, you can start removing the part of the keyboard (along with the spring-loaded elements) and the polyethylene board with the tracks painted on them. These elements are located on a special aluminum base.
In the case of keyboard models with frames (frames), sometimes another method of disassembly can be used, which involves the process of removing the edging with plastic. To complete this step, you need a hair dryer or temperature controlled soldering iron to melt the plastic on the back of the keyboard.When the time comes to reassemble the entire structure, it will be necessary to melt the fasteners again, as an alternative, you can use "moment" glue or something similar. Keyboards, which have plastic edging, contain only rubber caps, which in this case play the role of spring-loaded elements. This can be seen quite clearly in the third photo from the top: there are no spring-loaded elements on the keys.
Having finished with the keys, we turn to the main element of the keyboard - plastic films with applied conductive tracks. There are usually two or three polyethylene parts with tracks and one blank (to provide a gap). Very often, parts with tracks have a line of contact along one of the edges and represent a single structure. At the same time, it can be folded in half, bending at the points of the connecting tracks. However, another situation can also be observed. So, in the photo you can see that all three parts are autonomous, but at the same time they have a contact pad for connection.
Very often, on older models of keyboards, the parts are not connected to each other, but only in a few places have spot gluing. In this regard, in comparison with them in modern keyboards in which the parts are glued together, the disassembly process is more difficult. So, if you pull on the parts, you can easily break the tracks at the points of their contact with the glue.
For this procedure to be successful, you will need a hair dryer and scalpel (utility knife). Warm up the glue well with a hairdryer (almost always the glue is blue), and then slowly begin to separate the layers of polyethylene parts (you need to start from the corner). It's best to take your time at this stage. If you break a lot of tracks, then it will be almost impossible to restore them (if you damage 1-2, then this is fixable).
After separating the layers, check that there are no residues of the spilled liquid anywhere (if found, rinse and dry again). You can almost always see tracks that have been damaged. However, it is still better to play it safe and check with a tester. In principle, the damaged parts of the track can be redrawn, but in practice this is not always feasible due to a number of reasons: a small distance between tracks, etc. As a rule, if you have thoroughly washed and dried all areas of the keyboard, then the oxidation and corrosion process stops.
Please note that the resistance of the tracks should have a value close to zero (the tester should ideally display "short circuit". Sometimes the device shows 1-2 Ohms, this is due to the large distance of the measured points from each other. The damaged track can also have high resistance or even “do not call.” In such a situation, we recommend to run the path over the destroyed one.
Sometimes it happens that the track rots right up to the contact pad. In this case, it is necessary to clean a small area close to the platform with a knife or scalpel. After all the tracks are drawn and the glue has dried (this will take about 1-1.5 hours), check its resistance with a tester.
The photographs clearly show the drawing process to make it easier for you to navigate.
Then assemble the polyethylene part to be placed on the aluminum backing. Lay the structure with spring elements on top. After that, we advise you to connect your laptop and check the keyboard (keys) are working. To do this, you can use a notepad or a special program: KeyboardTest (662.61 kilobytes)
If everything is in order and the keys are fully functional, then turn off the laptop to complete the entire assembly process. Pay attention to one more point related to the installation of the site. When you install the elevators, the platform must be lowered onto the spring element in the center, and then gently push vertically on it until it clicks.
P.S.Dear readers, the author who wrote this material has considered several types of fastening (photos were provided from the Internet), but he simply physically cannot remember all the laptop models and the nuances associated with them. In this regard, we do not guarantee with 100% probability that we will be able to answer all questions regarding the disassembly of the laptop. But still, if you specify the exact model of the laptop, and also formulate a correct and detailed question, then you will have a better chance of getting the most accurate and useful answer.
Thanks to your service! I found the coolest office that will help with the repair of individual parts of the keyboard. Now there will be no need to change the whole. Plus they have almost all laptop models.
Zababulen, thanks for your feedback! We can select buttons for almost every laptop. Or suggest replacing the entire keyboard if the metal mounts are broken on it.
Hello. I spilled some coffee on the keyboard (Asus K40AB) and now some keys do not work, can you please tell me if you can manually clean the plastic board or buy a new one and change it ?! Thank you. My email - s ****
Sergey, tapes for keyboards are not sold separately. If you flooded the keyboard and some buttons stopped working, there is a 99% chance that the keyboard needs to be replaced. It is fast, reliable and relatively inexpensive (297 UAH today + cost of work). Contact our managers or leave your phone number and you can find out all the information you are interested in.
Hello. There is a problem with the spacebar, it is slightly deformed from the factory, bent towards the board, and perhaps the central button under the key is in an almost pressed state. This is manifested when working as follows: the cursor itself begins to move to the right, and in all applications, temporarily solved the problem by placing a small sheet of paper folded in two in the center under the space key. What do you advise? In the warranty service, according to customer reviews, there are no normal specialists. Almaty city
Eduard, if you are determined to resolve this issue on your own, then for a start we would advise you to carefully remove the button and inspect it and the rubber caps under it. If the caps are damaged, replace them. If the button is bent, you can very carefully try to bend it by gently heating it with a hairdryer. But remember that too much temperature will instantly lead to the fact that it will curl up like a dry leaf. Well, in the end, find the donor keyboard for this button and replace it. All this requires certain skills and tools, so be careful and careful.
A very long time ago, the space bar was worn out to set it up, the nozzle could no longer and the loops themselves npklava broke. Used without plasmaski pressed on the rubber pad. Now it is torn and the whole keyboard has stopped working. Can I somehow change it?
Artem362846, the fact that the keyboard stopped working is clearly not connected with the torn rubber part of the button. Most likely, there was some liquid in the keyboard, which over time corroded the tracks or the absence of the space bar led to the fact that you damaged the films under it. In any case, with a 99% probability, the keyboard must now be changed entirely. Contact us in any way convenient for you and our manager will advise you on the price and availability of this keyboard.
Video (click to play).
Here you can ask any question that interests you.