Such a chuck is used for clamping bits with a cylindrical shank. This cartridge features ease of installation. It is installed literally with one movement of the hand. It is used for drills with a diameter of one to ten millimeters. It is a movable structural member in the tool and therefore breaks frequently. To disassemble it, you need to read the tips described at the beginning of the article for disassembling the cartridge using a hex wrench and a Phillips screwdriver. The price of this product is about $ 20. e.
The material in this article is voluminous.Here we described all the possible problems that arise during the operation of Makita screwdrivers, told how to eliminate them on our own, separately talked about the various structural elements that make up the basis of any screwdriver. The materials of the article show the diagrams of the gearbox and the general device of the screwdriver. We hope that the information will be useful to you.
VIDEO
Some lyrics first
It is decided, the device is purchased, the possibility of "money-back" is discussed
Already at home, having undressed the battery, the first discrepancy was found - weight, by weight, the battery was worn by 75-80%, but in fact 5-10 (here friends, don't blame me on exact weight figures, this is my bread, and besides the initial weight differs greatly from the batch and the release date of the battery cells, I will only say the heavier - the better, the difference between new and completely dead batteries is about 80-60g in old releases, in new ones it is even less.
Let's deal with the surgery of the apparatus, in this example it will be easy to learn how to service your instrument yourself.
In order not to get into the corner of horrors, the screwdriver was first disassembled, purged, and the first stage of the gearbox was disassembled earlier, washed and reassembled.
Makit's most of the tools are easy to open, there are no latches, wedge hooks and other unnecessary things like other manufacturers
Pay attention when removing the trigger mechanism - it simply pulls out of its grooves, but still try to release it more gently from the reverse switch (lower arrow) and take a closer look at the small piece of iron (on the upper arrow) - this is the tightening torque lock spring, it is easy to lose it
Gently grabbing the cartridge and the engine, we remove, we try to be more attentive to the speed switch (arrow) and it is recommended to immediately unfasten it from the branch on the gearbox by prying the rear spring (there are two of them) under the switch with a thin object
the motor is connected to the gearbox by a simple bayonet method, we turn the engine and gearbox towards about 10 degrees and everything is unfastened
stripped from the body, a screwdriver without a gear: a reverse switch, a motor-trigger-block, a speed switch (when removing, do not lose both springs, it is difficult to lose them, but it is possible)
engine rear view
we put the gearbox "on the bottom" and see the gearbox cover, it is also fixed by bayonet and can be easily removed by unscrewing it counterclockwise by 10-15 degrees, taking the holes with tweezers
removed the cover, we see 3 satellites, planted on the carrier and the ring gear with X-shaped hooks on the body, the positions of the gears do not need to be recorded, this is a high-quality tool
we remove 3 satellites and a carrier, we already see 5 satellites of the next gear stage
remove the ring gear with X-shaped hooks, and we see the same 5 satellites closer, pay attention to the pins (there are 4 of them at 90 degrees) 2 clearly visible are marked with arrows, the extension of the speed switch is marked with a circle
we pull out the rim along with the ring gear sliding along it on the pins by the extension of the speed switch (do not lose the pins, they are small, hardened - you will not get off with wires), the loss of only one pin leads to the purchase of a new gearbox), we also see removed 5 satellites and their carrier
We figured out the first stage of the gearbox, it was washed in advance, but starting with the second, trash starts already, nothing was prepared in advance from this unit and below, we see 5 satellites and old dirty grease
screwing the plastic case of the 1st stage, we see the worn teeth of the stopper of the gear selector carrier on the case - this indicates either an accidental gear change on the go or a systematic non-engagement of gears until it clicks
after removing the case of the first stage, one spacer ring is visible (the fewer of them, the better, there were 5 rings of different thicknesses), as well as 5 satellites, a crown
we remove the carrier and 5 satellites, it is already clear that the carrier from the other end has an X-shaped hook instead of a gear, the roller blocker mechanism opens up to the eye, by the way - the roller blocker is considered the simplest and most reliable, but not the cheapest - a precision thing, other manufacturers have blockers on a rocker made of a strip of springy steel or on spring-loaded pawls
remove the spacer ring and ring gear, which already has 6 teeth from below and is a power element of the tightening torque regulator, inside the gearbox we see pusher balls (they are paired, there are only 12 of them)
we remove the balls, 2 rollers and the pusher of the blocker, inside we see only the shank and the 6-beam glass of the blocker body
remove the blocker glass and get to the base of the screwdriver gearbox - the internal support bearing
we wash the extracted household (well, already 2-stage parts) with warmed up white spirit, for this I recommend cutting a plastic bottle in half, pouring white spirit on a centimeter, holding it in boiling water, throwing in the details and covering with a napkin to wander for a short time without fanaticism, washed the details and take out the pins rinse it, also flopping, in another glass with nefras (or better with galoshes) it is not necessary to heat it, without removing the washed glands from the spirit, we clean it with a natural brush for artists, dry it on a napkin
we assemble it back, the domestic Litol is quite suitable for lubrication (in the correspondence, the manufacturer reluctantly recommended any non-aggressive grease for gears corresponding to the operating conditions, provided the mechanism is tight), you cannot put a lot of grease, the screwdriver will start to “sweat” or, even worse, snot, attracting all the dirt, apply with a flattened cotton swab without cotton at the end, little by little - it is important to lubricate only the heads of the teeth, in no case shove the grease with tablespoons
remember the moderation of lubrication and do not forget the reverse assembly order
unscrew the baoinet flange from the engine and also wash the flange with soap (all dirt from the flowing air accumulates on the flange from the inside during operation), dry it, I wash the shank with nefras at an angle with a brush, preventing gasoline from getting inside the engine, there is no need to lubricate the shank
we check the gaps and below - everything should be as accurate as possible, lastly we tighten the screws on the handle
A screwdriver can be safely ranked as a tool that quite often has to be used not only in everyday life, but also for work on construction sites. But, like any complex technical accessory, the product can break. We will consider how to repair a screwdriver on our own in this text.
The equipment in the construction market, where screwdrivers take a separate place, is quite large. Many models have individual criteria, assembly quality and cost. However, most of the models are characterized by basic principles of operation and internal execution.
The basic elements of any screwdriver include:
the presence of an electric motor;
planetary reductor;
adjustable function button "Start";
reverse switch;
effort regulator;
power unit.
The electric motor is powered by a direct current network, structurally represented by a cylindrical shape. Inside is an anchor with brushes and magnets.The peculiarity of the electric circuit of the motor assumes that the direction of the supply voltage flow will be directed to the brushes. When the supplied polarity changes, the motor reverses.
The planetary gearbox is an important element capable of converting the high-frequency vibrations of the electric motor shaft into the low-frequency revolutions of the chuck shaft. Typically, these parts are manufactured from wear-resistant plastic or metal. Many screwdrivers are equipped with 2 speed gearboxes. Switching to the first speed mode is necessary for working with self-tapping screws, and at the second speed you can drill in wood, plastic base or metal.
The "Start" button starts the device. It is able to control the number of revolutions, providing the ability to select the optimal rotation speed for the chuck shaft. Correspondingly, pressing forcefully will power the engine at high rpm, and as the pressing force decreases, the power criterion will weaken.
The reverse switch is required to carry out operations to change the rotational direction of the screwdriver motor. This functionality is convenient to use not only for tightening, but also unscrewing screws.
Regarding the force regulator, we can say that it determines the speed of tightening the screws. In current models, a 16-step adjustable graduation is provided, which allows you to determine with maximum accuracy and convenience what tightening speed is relevant when working with various materials.
The power supply for the screwdriver is oversized rechargeable batteries, where the power supply voltage (depending on the model device) can vary from 9 to 18V.
VIDEO
the breakdown is associated with the electronics of the device;
breakage may be mechanical.
Understanding the objective causes of electrical breakdown, one can note its characteristic signs:
the product stops responding to switching on;
the device has ceased to regulate the speed;
the reverse operation failed.
Mechanical problems with a screwdriver include problems with wear of internal parts, for example, a characteristic ratchet of the mechanism is heard. As a rule, a faulty screwdriver will begin to make characteristic sounds, where, for example, bushings have been worn out or a bearing has collapsed. This often happens on a hummer instrument.
VIDEO
For example, if the tool stops turning on, then initially you need to check the health of the battery. If, when basing the device on charging, the breakdown has not disappeared, then you will have to arm yourself with a multimeter and start scanning the device in search of the root cause. First of all, take a look at the voltage value indicated on the device case and compare it with the measurement readings on the battery. The data should be roughly the same. If the voltage is too low, then most likely the problem is hidden in the charger or battery pack.
For example, the charger can be checked using a multimeter, plugging it into the network, and taking measurements at the terminals of the device at idle. It is important that the voltage criterion is slightly higher than the nominal one. In a situation where there is no voltage, then, unambiguously, the culprit of the breakdown is the charging unit. Interskol screwdrivers "suffer" from this rather frequent problem. In general, fixing the defect will require specific knowledge of electronics or a new unit will need to be purchased.
If you find a battery problem, for example, with a Makit screwdriver, you can open this block with your own hands, where the supply elements are located. As a result of opening, research of the connecting wires should be carried out and the quality of the soldering should be ensured.If no visible defects are found, then using a scanner, you should measure the voltage in each element. Values should indicate 0.9 - 1V voltage power. If a block with a low voltage indicator is found in a row, then it must be replaced.
VIDEO
Quite often, problems with buttons are associated with poor contact at the terminals. You can simply perform the procedure for cleaning the contacts with sandpaper and the problem will be solved. The main thing is to do everything carefully in the process of disassembling and assembling the device, without losing parts.
A broken gearbox is one of the mechanical problems with a screwdriver. Some of the most common problems with the reduction unit include:
physical curvature of the axis of the reduction shaft;
obvious defect of the working surface of the gears;
failure of the shaft support sleeve or original bearing;
breakage of the pin where the satellites are fixed.
To correct these defects, it will be necessary to physically replace the defective parts, therefore, this type of repair should be entrusted to qualified specialists who are able to correctly and accurately diagnose the breakdown and eliminate it.
VIDEO
One of the most sought-after tools for home craftsmen is the screwdriver. However, this device sometimes breaks like any other. If this happens, in some cases you can replace this tool with an electric drill. If work cannot be done with an electric drill, you will need to take the screwdriver to a service center in order for specialists to repair the tool. However, this can be time consuming and expensive. Therefore, you can use another option - do it yourself repair the screwdriver.
Screwdrivers are commonly used to assemble furniture both at home and in production.
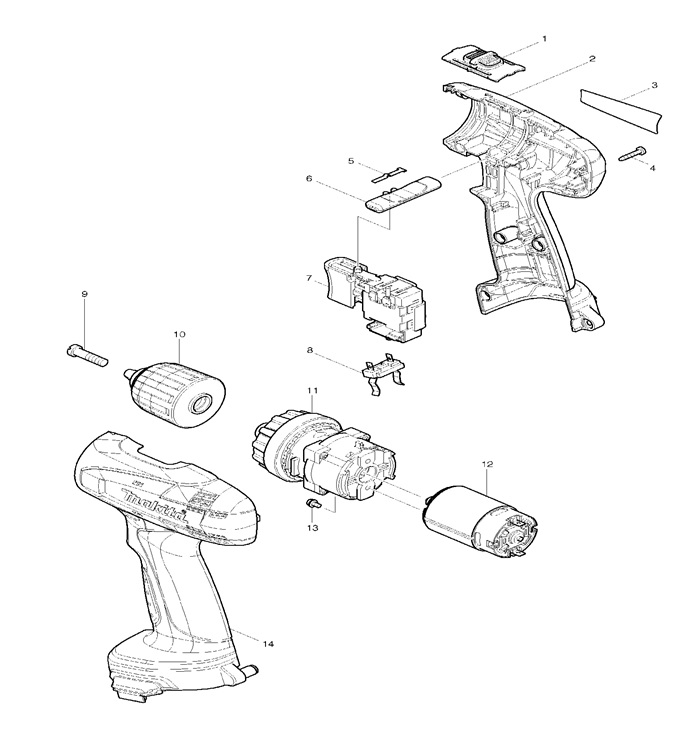
Before making repair work, you will need to familiarize yourself with the design of this device. In fig. 1 you can see this tool exploded.
Elements that are needed in order to make a screwdriver:
multimeter;
clamps;
sandpaper;
spare parts.
Figure 1. The device of the screwdriver.
The main element is the start button, which performs several functions: switching on the power supply circuit of the electric motor and the speed governor. If you press the button all the way, the motor power circuit will be closed by contacts, as a result of which the maximum power will be provided. The number of revolutions in this case will also be the maximum possible. An electronic regulator is installed in the device, which consists of a PWM generator. This element is located on the board. The contact that is placed on the button will move along the board depending on the pressure on the button. The level of the adjustable impulse per key will depend on the placement of the element. A field-effect transistor is used as a key.The principle of operation will be as follows: the more the master presses the button, the greater the value of the pulse on the transistor and the more it will open and increase the voltage on the electric motor.
The reverse of the rotation of the electric motor will be carried out by changing the polarity at the terminals. This process is carried out using contacts that will be thrown by the master using the reverse handle.
Charger device for cordless screwdriver.
In screwdrivers, in most cases, single-phase continuous current collector motors are installed. They are reliable and easy to manufacture and maintain. An ordinary screwdriver consists of the following elements:
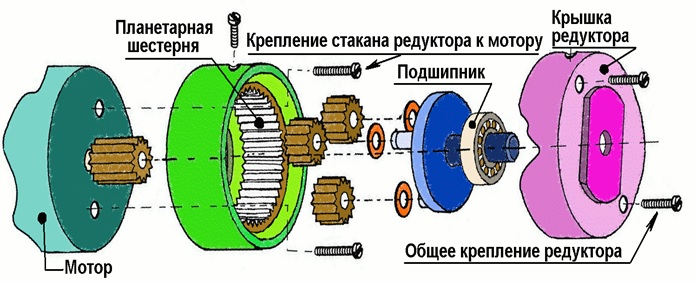
The gear structure will convert the high speed of the electric motor shaft to the low speed of the chuck shaft. Screwdrivers can have planetary or classic gearboxes. The latter are rarely used. Planetary devices consist of the following elements:
ring gear;
sun gear;
satellites;
drove.
The sun gear works by means of the armature shaft, its teeth drive the satellites that rotate the carrier.
A special regulator is used to regulate the forces that will be applied to the screw. Most often, 15 adjustment positions are used.
The main signs of a malfunction in this case will be:
the screwdriver does not turn on;
it is impossible to switch the reverse mode;
it is impossible to adjust the number of revolutions.
Diagram of the gearbox of the cordless screwdriver.
The first step is to check the battery of the screwdriver. If the tool was put on charge, but this did not help, then you will need to prepare a multimeter and try to find the malfunction with it. First you need to measure the voltage on the battery. This value should approximately correspond to the one indicated on the case. If there is an underestimated voltage, then it will be necessary to identify the faulty element: a battery or a charging device. To do this, you will need to use a multimeter. This device must be plugged into the network, and then measure the no-load voltage at the terminals. It should be several V more than that indicated on the structure. If there is no voltage, then it will be necessary to repair the charging unit. If there is no knowledge in the field of electronics, then it is recommended to purchase a new one.
If the battery is faulty, then you will need to disassemble the unit, inspect all the places where the wires are fastened and check their quality. If there are no damaged connections, you need to measure the voltage on all elements with a multimeter. The voltage should be 0.9-1 V or more. If there is a part with a lower voltage, then it will need to be replaced. The capacity and type of the element must necessarily correspond to the installed parts.
Diagram of the internal structure of the screwdriver.
If the charger and the rechargeable battery are in good working order, but the screwdriver does not work, then this device should be disassembled. Several wires go from the battery terminals, you need to take a multimeter and measure the voltage at the input of the button. If voltage is present, then you need to remove the battery, use the clamps to short-circuit the wires from the battery. The device should show a resistance value that tends to zero. In this case, the element is OK, the problem lies in the brushes or other parts. If the resistance is different, then the button will need to be replaced. To repair the button, in some cases, it is enough just to clean the contacts on the terminals with sandpaper.
In the same way, you will need to check the reverse element. Repair is carried out by cleaning the contacts.
If the electric motor runs at high speeds, and the speed cannot be adjusted, then the problem may be in the button or transistor that is used for adjustment.
The device of the gears of the screwdriver reducer.
If the chains to the engine are in good order, but the screwdriver does not work, then the problem is in the brushes. If these elements are worn out, they will need to be replaced.
The problem may be directly in the engine. To test the electric motor, you will need to disconnect the wires that are connected to the button. Next, using the same tool, you need to measure the resistance value at the wires fixing contacts. If the value tends to zero, then the winding has broken. In this case, you will need to rewind or install a new motor.
You will need to check the condition of the armature windings, since this element can be purchased and changed by yourself. To check the anchor, it will be necessary to measure the resistance on the adjacent collector plates, along the entire perimeter. The value should tend to zero. If, during the check, plates with a resistance that differs from zero are found, then it will be necessary to repair the armature or replace it.
Mechanical problems can be identified as follows:
In the process of work, the screwdriver makes extraneous sounds that were not there before.
The tool vibrates strongly during operation.
Fight of the chuck for the clamp.
The tool turns on, but it is not possible to use it due to jamming.
VIDEO
If during operation the device emits extraneous sounds, this means that the bushings or the bearing are worn out. To fix this, you will need to disassemble the electric motor, and then check the integrity of the bearing and the level of wear of the sleeve. The anchor should rotate freely, there should not be any friction or distortion. These devices can be bought at a construction supermarket and replaced by yourself.
The most common failures of the gear structure include the following:
shaft malfunction;
abrasion of the working base of the gears;
break of the pin on which the satellite is fixed.
VIDEO
In all cases, it will be necessary to replace the defective gearbox elements. All the above steps must be followed carefully. Disassembly of the screwdriver must be done in a clear sequence, otherwise any of the parts may be lost.
Anyone can repair a screwdriver, you just need to correctly identify the faulty element.
Hello everyone.! Today we have a video “The Makita 6271D screwdriver does not work. Engine repair." ...
In Makita 6271, the gearbox has failed, in this video I will show you how to restore it. For this we need.
Gearboxes constantly break down in Makit screwdrivers. What is the reason ??) My affiliate program is on You.
Come on in, friends! a lot of interesting, including the opportunity to buy at a good price.
The screwdriver has lost power.
Battery power supply 12v Number of speeds 2 Chuck diameter 1 - 10 mm Revolutions 1-400 rpm 2-1300 rpm Maximum.
Heading T.O. (Typical mistakes) Short videos where I try to tell about the common mistakes of benz users.
Every owner of a MAKITA screwdriver should know this. How to extend the service life of the gearbox, and therefore itself.
Replacing brushes on a screwdriver.
Chuck GEKO G00521 2-13mm 1 / 2-20UNF Makita 6271d 12v NiCa.
How to repair Makita screwdriver (Makita) 6281D.
Gears of the reducer are licked.
Assembling the gearbox of the makita 8280d screwdriver.
After the repair of the gearbox, 7 months have passed and again the 1st speed does not work. I open it and find the reason, at the same time.
Video (click to play).
Makita 6347D Screwdriver Button Repair