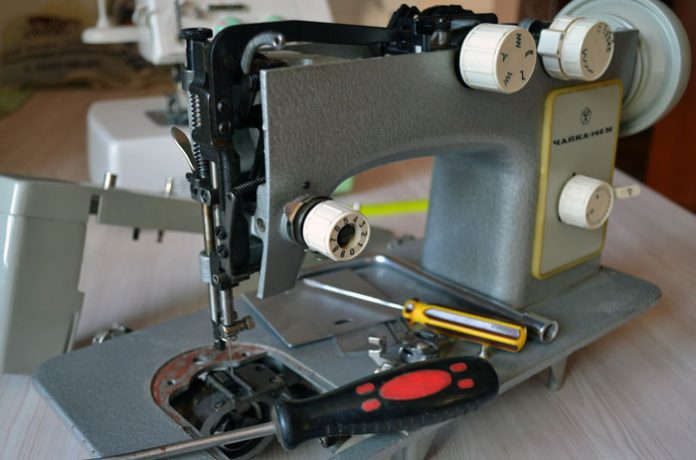
In detail: do-it-yourself sewing machine repair seagull 143 from a real master for the site my.housecope.com.
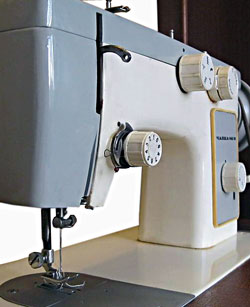
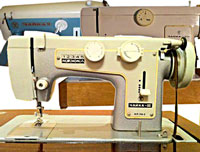
The Chaika sewing machine is perhaps the most popular model of the home sewing machine, despite the abundance of imported home sewing machines in stores. At one time, I had to buy it for a lot of money, and it seemed like recently it was still sewing well, but it just began to twist. It is almost impossible for her to really break. The body is made of aluminum, the parts are all metal, the components are strong and reliable - everything is in the style of Soviet technology. But here, unfortunately, she dodges almost "from birth" and knocks when sewing, like a machine gun.
Many other "charms" were provided by the plant together with instructions for the device and use, where almost 5 pages describe how the pedal works, an electrical diagram of the engine is given, but not a word about how to set up and carry out repairs sewing machine seagull.
The Chaika sewing machine has many models, practically not much different from each other: Chaika 2; 3; 142m; 132; 134; 143, etc. The sewing machines of the Podolsk plant: Podolsk 142, Podolsk 125-1 others, as well as the Malva sewing machine, have approximately the same device as the Chaika. Therefore, the instructions for one of these machines are quite suitable for any model of a full zigzag sewing machine, such as the Seagull.
Setting up, adjusting and repairing sewing machines Chaika is practically the same for all models mentioned above, except for the repair of the copier (depending on the model of the machine) and setting some parameters of the shuttle course. But since our task is to learn how to customize only a line, we will omit the repair of many nodes in this article. In addition, such repairs cannot be done with your own hands, without professional knowledge and experience, and even at home.
| Video (click to play). |
Before proceeding with the repair and adjustment of the Chaika sewing machine with your own hands, it is advisable to do a routine inspection, cleaning, and lubrication. To do this, disconnect the electric motor from the mains, remove the top cover (it is fastened with two screws from the top). Detach the foot, remove the needle and stitch plate, and the hook cover. Detach the clipper from the wooden stand or table. Disassemble the bobbin: bobbin case, locking ring, hook. Now remove dust, dirt, fleece from the machine (especially in the shuttle section) and lubricate all rubbing accessible places with machine oil well. The places that need to be lubricated can be found in the instructions for the machine or all accessible rubbing metal parts and assemblies can be lubricated.
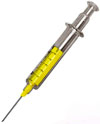
It is very convenient to use a medical disposable syringe for lubrication, just select such a size that it fits in the neck of the container with oil. The needle must be removed when “filling” with oil.
The main malfunction in machines of the "Seagull" type, performing a zigzag stitch and on its basis several types of finishing stitches - these are gaps, looping of the lower and upper threads, as well as thread breakage at the top and bottom. It is these malfunctions and ways to eliminate them that we will consider in this article.
Thread breakage most often occurs with sewing machines such as the Seagull. The first reason that leads to thread breakage is the bent point of a blunt needle, which breaks the thread during its movement. With the help of a magnifying glass, the condition of the needle point is very clearly visible.
Use correct sewing machine needles and the Chaika sewing machine, in accordance with the instructions.
Thread breakage can be the result of many malfunctions, for example, if the needle touches it when entering the needle hole, then the thread will periodically break.When sewing a straight stitch, the needle should be in the center of the hole in the needle plate, evenly spaced from its sides, and when performing a zigzag operation, the needle position L should be the same with R.
The longitudinal installation of the needle in the center of the needle slot is carried out by displacing the needle bar frame, fixed with two screws on the rocker, in the upper part of the machine (scroll the handwheel on the zigzag line and you will see this attachment).
Loosen these screws and set (on a straight stitch) the needle exactly in the center (by moving the needle bar frame). Then check the position of the needle at the left and right pricks. Hopefully the entry of the needle (at the maximum zigzag width), on the right and left, will be evenly spaced from the center. If it touches the edge of the hole at the maximum width of the zigzag - contact the expert, this case is already for him.
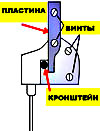
The transverse position of the needle is adjusted by a rod, fixed on a plate with two screws, and a plate that presses the needle bar frame to the rod of the bracket. Adjusting this unit is quite complicated and requires experience, but, unfortunately, it is this mechanism that can spontaneously get lost during operation, especially the Chaika electric sewing machine. Therefore, if you decide to repair your sewing machine yourself, you should learn how to adjust the position of the needle, since the forward shift of the needle is the cause of its breakage, and the shift away from the seamstress is the cause of omissions.
Adjusting the needle position requires professional knowledge and experience. If you are not sure that you can do it yourself, contact the wizard, as it can cause other nodes to malfunction, the repair of which cannot be learned from a boring book stuffed with technical terms and diagrams.
It can be added that when using a curved needle, notches can form on the nose of the shuttle, which "loosen" the thread and break. The nose of the shuttle should be perfectly smooth and sharp, without roughness. Its condition can be determined by running your fingernail along the edge of the nose or using a magnifying glass. The pressure plate tightening screw must not be serrated, the latch handle must be clearly fixed and its surface must be clean and smooth. The shuttle itself must also be perfectly clean, free of chipping and rusty spots.
When sewing rough fabrics, the needle sometimes moves upward with the needle bar. Skipping stitch appears. In this photo, arrows indicate where the needle bar screw and the upper thread tensioner screw are located.
Incorrect sewing machine hook position leads to thread breakage and other stitching defects, including gaps. Skips usually appear due to the wrong position of the shuttle at the moment of meeting the needle - the nose of the shuttle does not catch the formed loop, it passes by and a skip is formed. Many other factors can be the cause.
In order to correctly set the position of the meeting point of the shuttle and the needle, it is necessary to adjust the position of the shuttle stroke. Loosen the two bolts that secure it and carefully, using a powerful screwdriver, move or delay the stroke together with the shuttle in relation to the needle. The shuttle travel rotates on an axis rather than moving back and forth. This is a very important point. It is not necessary to pull it out with a nail puller or hammer it in with a hammer, it easily turns on its axis. It is difficult for an inexperienced person to immediately understand what is at stake, but it is also very difficult to explain in more detail. Anything else that can be added, sort it out carefully before twisting something, and even more so unscrewing it. There should be no remaining parts after repair.
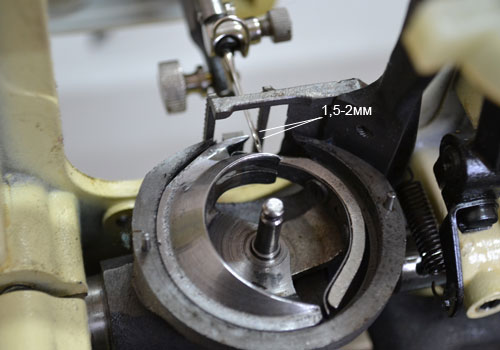
At the moment of meeting the nose of the shuttle and the blade of the needle, the following parameters must be observed: the gap between the nose and the blade is approximately 0.15 mm; when the needle comes out of the lower position to a height of 1.8 - 2.0 mm, the nose should come up to it above the needle eye by 1 mm, at least, but not more than 3 mm.
By the way, a very important point is lifting the needle from the lower position (1.8 - 2.0 mm). This parameter affects the formation of the needle loop and should be paid special attention to. In order for the spout to grab the thread from the needle, it is necessary that a loop is formed, where it goes, hooking it. That is why the needle must first go down and then, rising a little, already meet the nose of the looper.
The position of the needle is also regulated by the needle bar, for this there is a screw for attaching it to the bushing under the front cover (see above).
If you set these shuttle adjustment parameters, then sewing machine "Seagull" will work relatively fine. But, unfortunately, this is not the end of the repair. There are also many other shuttle settings, which are quite complex and necessary for the Chaika sewing machine. It is there that the reasons for thread looping and such a rare phenomenon for sewing machines are hidden - a breakage of the lower thread. The complexity of the presentation of this material is that for almost any model of the sewing machine "Seagull" engineers have provided their own specifics of setting up this unit and, moreover, requiring a lot of experience from the performer. For which I thank them, at least from the sewing machine repairmen. They will not remain without work as long as there are sewing machines "Chaika".
Sometimes you have to remove the flywheel from the machine. There are only three parts in this node, but many cannot assemble it correctly. This is due to the fact that it would be more logical to insert the friction washer petals inside the shaft slot, therefore they do this. As a result, the machine starts spinning empty.
The petals should be directed not towards the machine body (shaft), but towards you. Moreover, they can be delivered in “two versions”, choose one in which the stop screw will not interfere with tightening the flywheel mount.
For many who are going to learn how to sew, the question often arises "What to buy a sewing machine", preferably inexpensive and good. In this article, we will figure out whether such a combination is possible - "an inexpensive and good machine" and how an inexpensive sewing machine that costs 3-4 thousand rubles differs from a machine that costs 30 thousand.
The most reliable and easy-to-use sewing machine, as well as the Chaika sewing machine, is "originally" from the USSR, but unlike Chaika, it almost does not break and is capable of sewing any thick and rough fabrics, including leather.
The thread looping in the stitching is perhaps the main difference between sewing machines with a zigzag, such as Chaika, Podolskaya of all models, as well as a characteristic knock when working. In short, the looping in the stitching occurs due to uneven tension of the thread along its path: broken compensation spring, rusty sole of the foot, incorrectly set shuttle, etc.
In the article on repairing a sewing machine Chaika, not all recommendations are given on how to set up a sewing machine. Many questions are discussed in other articles on the site. For example, in this article you will find out what is the importance for a sewing machine, including seagulls, sewing threads and needles.
Many who tried to sew knitwear on an ordinary sewing machine noticed that the machine often refuses to make a beautiful and even stitch. There are gaps in the knitted stitching, the lower thread loops and sometimes breaks. Why is this happening and how can you fix it?
Sometimes it is required to make a perfectly even decorative stitching on a product, but you cannot draw a line with chalk - traces will remain, and there is not enough experience to scribble "by eye". Simple tips on how to sew on “difficult” areas.
Read this article if you do not know how to hem a skirt, including chiffon. Blind stitching on the bottom of the skirt.
This is a intricate zigzag machine for special and decorative stitches. Version with electric drive.
Malfunctions typical for "Seagull" machines: breakage of the bobbin thread, looping of the bobbin thread from the bottom, strong weakening of the bobbin thread in the line, skipping stitches when sewing nylon, etc.
In terms of structure and parameters, this model of the machine differs from the machine. "Chaika" -142M class PMZ one design change that needs to be discussed in more detail here.
The needle bar frame is connected to the presser foot bar frame (rice. 78). The needle bar frame at the top is located on the axis 5 swinging during a zigzag, and at the bottom it has an oblong horizontally located hole, inside which a guide rod is located 11secured with a locking screw in the presser bar frame hole. In the lower connection, the needle bar frame is structurally unsuccessful, since it is protected from lateral play by four gaps: two of them are located on the rear side of the frame, and two on the front.
Considering that the gap between the hook nose and the needle at the moment of seizing the thread is 0.1 mm, and when sewing nylon - 0.05 mm, then such a connection design (with four gaps) does not in any way meet the requirements for reliable operation of the machine. The total backlash in the transverse direction of this joint reaches 0.2 mm. And this means that with a normally adjusted machine, skipped stitches in the line and breakage of needles are quite possible.
Rice. 78. Needle bar frame and presser foot assembly
(cars "Chaika" -143 class, "Chaika" -134 class):
Adjusting the position of the needle in the slot of the needle plate, do as follows: loosen screw 2 and move the upper part of the block of both frames backwards - the needle will move forward; if you feed the upper part of the block forward, the needle will move back. The axis of rotation of the entire block is the screw 15... Do not touch it.
But the same adjustment can be done like this: loosen the locking screw 14 and feed the needle bar 12 backward or forward, i.e., place the needle in the center of the stitch plate (see fig. 15) so that A = B on the needle point (at the beginning of the needle entry into the plate).
Then tighten the screw 14... This adjustment is simpler, but unreliable due to the small size of the screw. 14.
The position of the needle (center) relative to the back and front walls of the needle hole is the main adjustment. She most of all parameters gets lost and, naturally, most often puts the car out of order. Therefore, it is necessary to pay attention to it more often than to other parameters.
Some owners of sewing machines like "Seagull" would like to transfer the drive of the machine from electric or foot to manual. But the trouble is that there is no hole on the flywheel of the "Chaika" machine for a manual drive leash. In a state workshop, work related to the transfer of the machine to a manual drive cannot be done - the instructions are prohibited. We have to contact a private master.
It would be better if the manufacturer made two such holes on the flywheel (due to balancing balance).
At the end of 1992, the manufacturer began to produce machines "Chaika" with an electric drive made in Belarus. A characteristic feature of this drive is the presence of an electronic regulator for limiting the maximum flywheel speed on the electric motor. It is an extremely valuable, practical and much needed innovation when working with a sewing machine.
When setting the gaps (distances), be guided by the material described in part 3, "Sewing machine "Chaika" -142M class PMZ "... How to troubleshoot - see parts 1 and 2, as well as part 3, "Sewing machine "Podolsk" -142 class PMZ ".
Fault: zigzag stitching; the right prick deviates to the left. Cause: The pin connecting the needle bar to the connecting rod is long and interferes with the pusher of the release washer in the upper thread adjuster. The knot must be disassembled and the finger must be shortened by 1.5-2 mm.
All the best, write
We have 27 guests and no registered users on the site
Before us is a sewing machine of the late 20th century, produced by the Podolsk Plant named after Kalinin. The car, like the previous models, is completely made of metal. The automatic equipment consisted of 5 copiers and remained with the same quantity. True, almost 100% of machine owners sewed the program selection knobs in one position.
Upper thread tension dial (Thermometer) is made in a metal case, the compensation spring works from right to left, which is not particularly successful, see fig. 2
After removing the top cover, we see that all the parts of the car are the same as in class 142, see fig. 3:
1. Knob for sewing program selection;
2. Knob for setting the stitch width;
3. Needle bar position switch (left, center, right);
4. The body of the automation mechanism;
5. Copier removers;
6. Copiers
In fig. 4 you can see the main thing difference from class 142 cars, namely the mechanism of the needle bar and the presser bar.
So, in order to correctly adjust the position of the needle bar, you first need to make the correct installation withpresser bar... Loosen screws 1 and 2 and set the foot relative to the slot in the needle hole and tighten the screws.
By loosening screw 3, we set the position of the needle bar relative to sewing, do not forget that the point of the needle No. 100 should enter exactly in the center of the hole.
Adjusting washer remove the needle bar play, for this we release two screws 7, press the washer against the frame and tighten the screws. Screws 4 and 5 are used to fix and adjust the position of the foot height and the position of the needle bar, respectively.
We fix the position of the thermometer with the screw 6. This screw must be tightened periodically. Thread take-up mechanism the same as in a class 142 car.
Figure 5 shows correct installation of the toothed sector and the shuttle gear... The third tooth of the gear must enter between the first and second teeth of the sector.
The bottom of the machine has not undergone any changes (see Fig. 6):
1. Guide;
2. Cam (lifting eccentric);
3. Regulator of stitch length;
4. Lower end of the drawbar;
5. Crank;
6. Screw for fastening the crank (by loosening it, adjust the stroke);
7. Screw for fastening the back handle;
8. Screw (advance setting);
9. The lower end of the plug;
10. Crank;
11. Fastening bolt (setting the position of the feed dog teeth).
Figure 7 shows the bottom of the machine on the left:
1. Knob for selecting the lifting height of the conveyor teeth;
2. The fastening screw, with its help, the height of the teeth is adjusted;
3. Guide;
4. Screws for fastening the lift eccentric;
5. Lift eccentric;
6. Shaft of fabric conveyor;
7. Shuttle device;
8. Screw fixing the clamping bracket;
9. Toothed sector;
10. Shuttle gear;
11. Adjusting washer.
Adjustment of all units and parts, travel and advancement, elimination of backlash in units is exactly the same as for machines of cl. 142, therefore, after watching the film, it will not be difficult for you to disassemble, assemble and adjust the sewing machine.
When copying an active link to the site https://my.housecope.com/wp-content/uploads/ext/2549/ required.
To leave comments, you must register.
You have no rights to post comments
The instruction of the Chaika sewing machine can be used as an operating manual for any model of sewing machines that perform a zigzag stitch of the Chaika type: Chaika 2, Chaika 3, Chaika 134.
This instruction for the Chaika sewing machine is also suitable for the Malva sewing machines and the Podolsk brand: Podolsk 142, Podolsk 142M, etc.
These operating instructions for the sewing machine are given in abbreviated form, based on the manufacturer's instructions.
The operation and device of the Podolsk and Chaika sewing machine is practically the same type, therefore this operating manual is suitable for all models of these sewing machines, including the Malva sewing machine.They have the same structure and differ only in the presence of additional types of zigzag stitching. Some Chaika and Podolskaya models have an additional device (copier) for this and, accordingly, a lever for switching modes of its operation. The shuttle device, threading and adjustment parameters of the units and mechanisms of these sewing machines are practically the same, with the exception of setting some settings for the shuttle operation parameters (depending on the machine model).
For details on how to set up and perform minor repairs of sewing machines like the Seagull, see other articles in the section dedicated to repairing sewing machines.
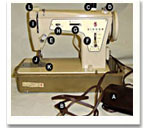
1. Shuttle device. 2. Platform. 3. Stitch plate. 4. Pressing foot. 5. Needle bar. i6. Presser foot lifter. 7. Upper thread tension dial. 8. Top and front covers. 9. Thread take-up lever. 10. Tension washers. 11. Index of the type of stitches. 12. Zigzag width indicator. 13. Spool pin. 14. Winder. 15. Flywheel. 16. Needle bias lever. 17. Zigzag handle. 18. Lever for reverse feed. 19. Knob of the stitch length regulator. 20. Knob of the comb lift regulator. 21. Material engine. 22. Panel of figures. 23. Knob for switching the copier unit.
Bed linen, calico, chintz, satin, silk, linen fabrics - needle No. 80, thread - 65
Heavy cotton fabrics, coarse calico, flannel, thin woolen fabrics, heavy grades of silk - needle No. 90
Woolen suit - no. Needles 100
Thick woolen coat fabrics, broadcloth - needle No. 110
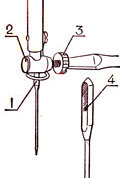
Needle 1 must be inserted into the needle holder 2 (at the upper position of the needle bar) up to the stop and secured with the screw 3.
The flat side of the flask 4 (flat) on the needle should be facing in the opposite direction from the working person (Fig. 4)
Pull the spool pin 13 up to the stop from the sleeve cover.
Bring the thread take-up eye to the upper position by turning the handwheel.
Raise the presser foot.
Place a spool of thread on spool 13.
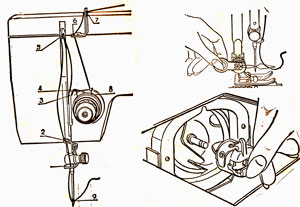
Thread the upper thread in this sequence. Into the holes 7 and 6 of the thread guide, between the washers 8 of the tension adjuster, then upwards into the eye 4 of the take-up spring, down under the thread take-up hook 3, up through the hole of the thread take-up lever 5, down into the thread guide 2, into the thread guide 1 on the needle bar and insert into the eye needles 9 from the side of the worker.
Threading the bobbin thread
Before threading the bobbin thread, you need to remove the bobbin case with the bobbin from the bobbin, for which it is necessary to turn the handwheel to bring the needle up. Pull out the slide plate, grasp the bobbin case latch lever with two fingers of your left hand, and remove the bobbin case.
Slide the bobbin onto the bobbin spindle 2 so that the spindle spring enters the bobbin slot. Place the spool 1 with thread on the spool pin. Thread the thread from the spool between the tension washers 4, as shown in Fig. 9, and then wind a few turns on the bobbin by hand. Press the winder against the flywheel. Next, wind up by rotating the flywheel using the drive.
When the bobbin is fully wound, the rubber ring of the winder stops contacting the flywheel and winding stops. Before removing the bobbin, the winder must be swiveled to the left of the stop 3.
Thread the wound bobbin into the bobbin case and thread under the tension spring as shown in fig. 10. Leave the free end of the thread 10-15 cm long.
Insert the bobbin case with the threaded bobbin into the hook. In this case, the needle should be in the upper position.
Push the bobbin case with the bobbin onto pin 3 of the bobbin as far as it will go. In this case, the pin 1 of the bobbin case must enter the slot 2 (fig. 11).
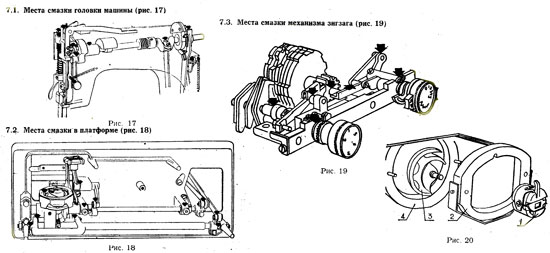
Machine head lubrication points (fig. 17)
Zigzag lubrication points (fig. 19)
Cleaning and lubricating the shuttle (fig. 20)
Heavy movement of the machine, and sometimes jamming, can occur from contamination of the shuttle stroke. The course is clogged with scraps of thread, fleece, dust.
See also Sewing Machine Lubrication
To clean the shuttle stroke, the needle bar must be in the upper position. Pull out the bobbin case 1, by turning the spring lock towards you, remove the trim ring 2, take out the hook 3. Carefully clean the nest of the hook 4 with a brush-brush from dust, dirt and threads. In this case, it is not allowed to use metal objects for cleaning, so as not to damage the cleanliness of the working surface. The direction for the hook in the travel housing and the winder spindle are also lubricated with 1-2 drops of oil.
The Chaika sewing machine is perhaps the most popular model of a sewing machine for the home, despite the abundance of imported household sewing machines in stores. At one time, I had to buy Chaika for a lot of money, and she seems to sew well, but only sometimes she twists, otherwise everything is safe and sound. Indeed, it is almost impossible to break the Chaika sewing machine. The body is made of aluminum, the parts are all metal, the components are strong and reliable - everything is in the style of Soviet technology. But here, unfortunately, the line loops
almost “from birth”, sometimes gaps appear in the line, especially on the zigzag and knocks when sewing like a machine gun.
The manufacturer encloses instructions for the Chaika sewing machine in the kit, where it is detailed how to use the machine and perform various operations, there is even an electric motor circuit, a pedal device, but not a word on how to set up and perform at least minor repairs of the Chaika sewing machine. We will try to fill this gap in the instructions and give several recommendations on how to repair the Chaika sewing machine with our own hands.
Sewing machine needles must be in perfect condition. The condition of the needle can be determined by running your fingernail along the tip of the needle or using a magnifying glass. Often it is the needle that causes gaps in stitches, needle breakage and other stitching defects.
Select the needle number according to the thickness of the fabric and thread. Do not use home sewing machine needles with a round bulb. Household sewing machine needles have a saw cut on the flask.
For sewing various fabrics and materials, use the appropriate type of needle, for example, for sewing leather, the needle has a four-sided point, which makes it easier to pierce the material and contributes to the formation of a loop on the needle when it is gripped by the nose of the shuttle.
Longitudinal installation of the needle in the center of the needle slot is carried out by displacing the needle bar frame, fixed with two screws on the rocker, in the upper part of the machine (turn the handwheel on the zigzag line and you will see this attachment). Loosen these screws and set the needle on a straight stitch exactly in the center (by moving the needle bar frame). Then check the position of the needle at the left and right injection. The entry of the needle (at the maximum zigzag width), on the right and left, will be evenly spaced from the center. If the needle touches the edge of the hole at the maximum width of the zigzag, contact the master, this case is already for him.
The adjustment of this unit is quite complicated and requires experience, but, unfortunately, it is this mechanism that can spontaneously get lost during operation, especially with electric sewing machines. Therefore, if you decide to repair the Chaika sewing machine yourself, you should learn how to adjust this position of the needle, since the forward displacement of the needle is the cause of its breakage, and the displacement towards the seamstress is the cause of omissions.
Adjusting the crosswise position of the needle requires professional knowledge and experience. If you are not sure that you can do it yourself, contact the master, since the wrong position of the needle can be the cause of misalignment of other nodes, the repair of which cannot be learned from a boring book stuffed with technical terms and diagrams.
Pay attention to the condition of the stitch plate. Hole e must not be “broken” or jagged. It is better to replace such a plate.
Does anyone have an instruction for the CHAYKA - 143 sewing machine?
I really need it, I want to master the overlog and other functions. send it to your email. or give a link from where you can download. Thanks in advance
DEAR BUYER!
We express our gratitude to you for purchasing a sewing machine from our company.
Please read this manual and the manual of the electric drive carefully before starting to sew on the machine. You will find everything you need to know about the sewing operations that your machine performs.
RETAIN THIS MANUAL.
Before plugging in the machine, make sure that there is no disturbance.
insulation in connecting wires. If the cord is defective
power supply needs to be replaced.
The machine can only be connected to the mains with a voltage of 220 V.When on-
voltage of a network of 127 V must use a transformer.
Disconnect the mains plug from the mains socket if the machine is
left unattended and during repairs, cleaning, lubrication and
replacing the lighting lamp.
Maximum power of an incandescent lamp, W - 15.
Correct needle placement is one of the main conditions of work.
cars.
Turn the flywheel only towards yourself,
Before you start sewing, you must first insert the needle into the material,
hold the ends of the threads, then lower the presser foot and do 2-3
by turning the handwheel manually.
At improper threading machine will not sew.
Keep the machine clean and lubricated regularly. It is impossible for
lubrication machine to use vegetable and animal oils, which are hardened
do, causing the machine to run hard.
Sewing machine oil must be used to lubricate the machine
or oil type I-20A GOST 20799-88.
Do not pull and push the material while sewing,
Working with a sewing machine requires a certain skill. So
beginners need to learn operate the machine with the presser foot raised
without threaded threads.
If the fabric is jammed, it is recommended to raise the presser foot and slightly advance the fabric by hand with the needle out of the fabric.
It must be remembered that start up the machine without under-pressing foot no material, otherwise, the feed teeth and the surface of the presser foot will deteriorate.
Below is the link to the instruction in pdf format
Despite the modern assortment of sewing equipment, Chaika household sewing machines do not lose popularity. This technique is striking in its resource. However, given its age, especially during intensive use, certain malfunctions that occur are not uncommon. Fortunately, the repair of sewing machines Chaika 143 and other models does not present any particular problem.
Users of this model and sewing equipment repairmen note that among the frequent problems they encounter are such as breakage and curvature of needles, breakage of the upper or lower thread, skipped stitches, and poor-quality stitching.
Having opened the user manual, you can fix a simple malfunction yourself. As a rule, for this you need to select, insert and secure the needle correctly, set up the mechanism that controls the movement of the needle and thread feed.
However, the problem may lie deeper, requiring a serious professional repair of the units and mechanisms of the sewing machine:
- if the electric drive is faulty, then only the master can fix the problem;
- if there is a spontaneous change in the transverse position of the needle, then it is also better to entrust the technician to experienced specialists, since a malfunction can lead to a breakdown of other nodes.
In addition, it is worth remembering that Chaika-143 imposes quite strict requirements on the selection and use of needles and threads. So, only the needles recommended for this brand of sewing machines are acceptable, and their number is selected in accordance with the type of fabric and the number of the thread used for sewing.
If replacement requires a stitch plate or a shuttle socket, then you need to use original parts designed for this machine, which are always in the arsenal of a professional master of a specialized service for repairing sewing equipment of the ARS-Master company.
- Experienced ASR-Master specialists repair the Chaika 143 sewing machines onsite to the customer. There is no more need to deliver equipment to the workshop. It is convenient and saves time and effort.
- In addition, the master comes to the call in a short time, and the diagnostics, repair and debugging of the sewing machine will not take more than two hours.
- In addition to eliminating the immediate malfunction, the specialist will assess the technical condition of the machine, give the necessary recommendations or prevent the occurrence of malfunctions (cleaning the units of the sewing machine, lubrication, etc.).
- A guarantee is provided for the result of the work. If the malfunction reappears during the warranty period, the company will eliminate it at its own expense.
Trust the experience of professionals, and your Chaika 143 will be able to delight you with its functionality for more than one year.
What are you going to fix in the sewing machine? With regards to products from the time of Stalin, nothing ... It works to this day. Modern breakdowns will torment, a bunch of settings get confused, requiring correction to get the desired result. We have nothing against progress, but historians consider a society preoccupied with consumption as an intermediate stage. Like a tax on bridges erected by medieval feudal lords to impose tribute on pedestrians. It got to insanity: buildings were built out of the blue for profit. Low-quality things are akin to ancient savagery and will become a thing of the past. Do-it-yourself sewing machine repair is a pleasure! The weak half is strong in needlework, when a strong helper is at home.
In 1953, Clifford Simak's story, The Ring Around the Sun, was released. The meaning of the plot: in orbit there are countless myriads of Earths located in parallel universes. Events developed against the backdrop of the curious invention of the eternal light bulb. Then the ever-mobiles appeared. Clifford described the fall of the consumer society, the goods were bought once, used a whole life, remember Stalin ... A revolution happened, working people, fearing to lose their jobs, began to destroy modernized factories, the most interesting thing was built by people moving between dimensions. In a ring around the sun.
Until 1829, inventions in the field of sewing machines would be called unsuccessful, although Leonardo da Vinci created the first drawings that would be equal to future generations. During the era of manufactories, the French tailor Timonier created a wooden model, which they immediately began to copy and reproduce. One replaced several apprentices. There were massive demonstrations of artisans who saw a threat to existence (I wonder what the rulers will do, if scientists create a computer that makes decisions, can grimace, they will immediately destroy it?). The matter went far: 200 local tailors destroyed the workshop of new mechanical sewing machines, Timonye had to flee, fearing for the safety of his life. Not the first time: the inventor of the loom suffered a similar fate.
The surviving fruits of the technological revolution
During his life, Timonier created a billion modifications of the sewing machine. Some technical solutions are still used by household, industrial modifications. 300 stitches every minute were made by machines, today's electric models are capable of producing three times more. For 200 years! The frequency of computer processors doubles every two to three years (growth has slowed down since 2010). Timonier's sewing machine worked with silk and other delicate fabrics.
In parallel, in 1834, Walter Hunt invented a model with a shuttle, reminiscent of modern ones. By 1848 Elios Howe created the first sewing machine containing the features of the present. The fabric feeder appears. The sewing machine is equipped with a horizontal curved needle, makes 300 stitches per minute, replaces three tailors. The workers of the USA revolted and destroyed the shop. The inventor had to flee, fearing for his life. The last stitch was probably made by Singer. Gives the needle a vertical motion, introducing the modern look of the toothed strips pressed by the foot. In 1900, a workshop in Podolsk was built, where 5000 people worked for the October Revolution. Initially, Singer parts were imported from the United States, then they began to be manufactured in Russia.
Brother, Janome, Bernina, and other brands of sewing machines appeared. People are afraid of change, but change is inevitable. Revolutionaries hinder progress. Imagine if inventors stopped producing promising technologies. Humanity will continue to explore caves and trees instead of cities with multi-storey buildings.
I immediately remembered modern economical light bulbs.I had a chance to talk to an old sewing machine, it became clear, probably, since the time of invention, the technology retained the principle, settings. The quality of the parts was not right. Although they discovered smooth surfaces (nanotechnology), they created strong alloys. A main shaft with a crankshaft is introduced inside. Moving parts of the sewing machine work from it. What will be stated below affects the repair of hand sewing machines:
- The needle is directly connected to the shaft. To ensure the forward movement up and down, a crankshaft is held inside. An eyelet is made in the needle where the thread is threaded. When moving down, the fabric is pierced, the loop is captured by the shuttle moving in a circle, in one direction, in the other. For 1 revolution of the main shaft it manages to run back and forth.
- The shuttle is driven by a separate shaft connected to the main one by means of a knee. The phase of movement is regulated by a screw. You can rotate the auxiliary shaft relative to the main one. Synchronization of movement is achieved. Let's discuss repairing the sewing machine shuttle.
- The third component, which ensures the movement of the fabric along the seam in the desired direction, are the toothed strips. Made of steel, they move like the legs of a person when walking. They go down, go forward, go up, go back. There is one cycle per stitch.
It is important to correctly set the vertical position of the toothed strips. When the needle plunges into the fabric, the top edges of the teeth will be level with the sewing machine table.
Unlike other devices, the toothed strips are driven by two shafts. One is responsible for horizontal movement, the other for vertical movement. The adjustment method is the same. A screwed screw on the axis of the corresponding shaft, which changes the position of the segment relative to the phase of the main shaft. Correct adjustment of the toothed strips is achieved.
It is important to ensure the correct position of the needle in relation to the hook. Remember three landmarks to look up to. Please note: for modern models, the old ones are arranged differently, and adjustment is required once every hundred years (twice since the invention)!
- In the lower position, the eye of the needle is 4 - 6 mm below the nose of the vertical hook.
- The nose of the hook is compared with the edge of the needle - the distance from the top edge of the nose-hole is 1 mm.
- When the top edge of the tab is aligned with the bottom edge of the hook nose, the hook nose should extend 1 mm beyond the needle.
Approximate guidelines, you can use it, decorating the horizon, the need to repair sewing machines with your own hands.
Wise mom instructs daughter correctly
Repairing the electric sewing machine is not the only thing to do. The heel clamp is adjusted so that the fabric stops crawling. Made with a special screw. There is a spring inside, so the setting can be approximate, it will rarely be required. This applies to stitch lengths. For thin fabrics, more frequent are recommended, for thick fabrics, rare. In mechanical machines, the reverse is often turned on with a handle, it is inconvenient when you need to sew a patch, it is better to forget about the inscriptions altogether.
It is much more important to set the upper and lower thread tension correctly. If done incorrectly, a number of unpleasant effects will occur when using a sewing machine:
- When the upper thread tension is loosened, there will be loops at the bottom of the seam. It is corrected by a special adjustment mechanism until the result is satisfactory. You can loosen the bobbin thread with the bobbin screw. It is important to know: too little tension is not allowed - the seam will not work at all - too strong - the thread may break. The last two cases are malfunctions, take note.
- Pull the upper thread too tight - the fabric begins to pull together. Seen from jagged, billowing edges. You can release the upper thread, pull the lower one. Please note that you should not be too zealous. The pulled thread breaks, as mentioned above.
Ideally, the interweaving of the two threads takes place within the material. When the needle rises from the down position, the loop is caught by the hook.A turn is made, an interlacing is formed. The needle rises, tightens the stitch. If the thread is not inserted correctly, it breaks. YouTube demonstrates a video: a working sewing machine was taken for repair, the master did nothing, took 1,000 rubles, returned the product. Then the situation surfaced, disgruntled clients harassed the guru. The money was returned, accompanied by small verbal parting words.
| Video (click to play). |
With a blunt, thin needle skipping stitches occurs. The thread number corresponds to the needle number. There is one feature in modern sewing machines that needs to be considered. For each needle, a guide stop was placed under the surface of the table, which did not allow the point to go to the side. The thicker the fabric, the greater the distance to it. Unfortunately, we cannot give any signs of a malfunction, just keep in mind: a similar setting has been noticed. Repair of a foot sewing machine has a special feature: the drive is switched on remotely. Except for the button, there is little difference. Repairing a sewing machine pedal is more akin to carpentry, soldering art.

