In detail: do-it-yourself repair of an old wooden ceiling from a real master for the site my.housecope.com.
Answer specialists. House of the 80s. It seems P-44 (like Mitino, Solntsevo.). First floor. The drain is constantly clogged. The water in the toilet also takes a long time. It feels like the drain in the toilet is clogged. We do not shit more than others. Very weak outflow of water in the toilet. We bought an apartment half a year ago. The plumbers were called. They poked, twisted, shoved, twisted. They said that everything is fine THERE. What's this? Construction flaw? Is it possible to do something during the renovation of the bathroom, bath and kitchen?
Answers of users and experts of the forum to the question: What is the best way to repair the ceiling in an old house if its base is made of shingles7
There are many options. Correct, simple: pick out the cracks, clean the ceiling from the plaster, which itself falls off. Plaster holes, putty, whitewash / paint
Correct, difficult: knock off all the plaster, check the fastening of the shingles, the condition of the rafter system, if necessary, repair, plaster the ceiling, then see earlier :)
Correct technological 2: Tear off the shingles and plaster, fix the metal profile, sheathe with gypsum plaster. Incorrect technological: immediately fix the metal profile, sheathe it with plaster: - we lose in the height of the room. Clueless and simple: cover with polystyrene foam tiles.
... an old house. If you make just a cosmetic repair, then repair ...
… Align the wooden ceiling. Probably for some ... the ceiling. ...
Tear off the old plaster all over again.
Smooth out with vitonite and then paint.
Knock off the plaster and make a suspended ceiling from gypsum plasterboard
Retreat 5cm. and zishit with drywall, and then do what you want, paint, level, glue, etc. etc.
| Video (click to play). |
Tear off the plaster and shingles and make a plasterboard ceiling.
Knock down the old plaster and sew up with plasterboard.
Several ways to remove or non-removable plaster
1. We sheathe the ceiling with sheets of fiberboard on a self-tapping screw for wood 3, 6x10⁵ with a washer so that the fiberboard does not vomit, it is better to get into the sub-ceiling beams that go in increments of 1, 2 - 0.9 m. substandard cheap fiberboard can be used, cladding is less time consuming than plaster stripping. - purchase of material (costs)
2.beat off the plaster, tear off the shingles
By order of ceiling repair
At the cost, I would advise you to sheathe with plastic white panels quickly and inexpensively, the ability to disassemble the very access to the ceiling space - the limited size of the panel 2, 75 m leads to the fact that if the room is wider in width you will have to make it like a frame, well, there are a lot of all kinds of design solutions
2 tension option - you cannot remove it yourself and put it in place in case of damage, it is difficult to repair
Option 3 hcl - labor intensity, load on sub-ceiling beams
4 variant amstrong suspended ceiling + the cheapest1 quick-assembled. - design faster for the office than for the home
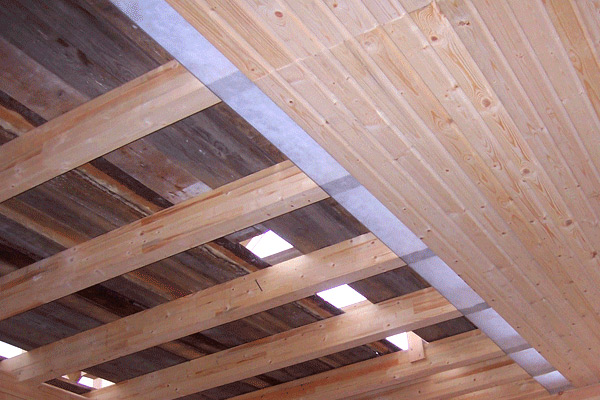
Long before the advent of modern materials, the method of plastering on shingles was widely used for finishing ceilings. Such coatings are faced by those who have apartments in the so-called "stalinkas" or who live in their own old buildings. Until a certain time, the shingle perfectly holds the plaster, but over time everything deteriorates and the ceiling no longer pleases with its appearance, which means that repairs are needed.
Such ceiling structures are a grid of wooden slats - shingles, attached to wooden floor beams. The shingle serves as the basis on which the plaster is applied.The design is quite reliable and after finishing it looks great, however, exposure to moisture and mechanical stress can render such a coating unusable.
The shingles begin to sag, and in cases of leaks from above, it may simply begin to rot. A thorough repair is required, which will take a lot of time and effort. Basically, this is due to the fact that you will not only have to clean and plaster the damaged area, but also replace part of the wooden mesh, which always creates a lot of problems.
The complexity of the work is due to the fact that it is necessary to thoroughly clean the floor. In brick and concrete houses, you just need to remove a rather thin layer of material and that's it, but more work will be required here. The old coating is thick enough and takes a long time to completely remove. A lot of debris is generated.
In addition, it is necessary to gain access to the upper part of the ceiling - from the attic side, in order to eliminate the causes of the leak. If you are flooded by neighbors, then it is necessary to make all the repairs from your side, which is always more difficult. Repair work is carried out in the following order:
- The first step is to eliminate the cause of damage - leakage
- After elimination, all debris is removed from the upper side of the floor, and the gaps between the floor beams are sealed with mastic or another compound that provides protection against leaks.
- From the side of the room, loose pieces of plaster along with damaged slats are removed
- In their place, either new slats are attached, or a plasterboard sheet of a suitable shape and size is mounted
Tip: rebuilding a ceiling from a shingle base is a long and difficult task. Therefore, it is better to completely replace the ceiling covering throughout the room with a more modern drywall, saving yourself from similar problems in the future.
- Next, the joints of the repaired area are sealed and the entire surface of the structure is plastered.
- After the repaired area has dried, the entire ceiling area is painted or pasted over with wallpaper
To figure out how to repair the ceiling, if it is based on shingles is not difficult. However, a very large scope of work awaits you. Partial restoration of damaged areas will not completely eliminate the problem. Over time, other fragments of the coating will require repair. Therefore, it is better to immediately save yourself from further troubles by replacing the entire ceiling covering.
Much more work remains to be done than with a partial restoration of the coating, but this method allows you to once and for all forget about sagging ceilings and possible rotting of shingles due to moisture ingress. The main difficulty will be getting rid of the old structure. It will happen like this:
- All the plaster on the floor must be knocked down. For this, special softening compounds are used, and just brute force, knocking it down with a hammer and chisel. Particular attention should be paid to the junction of the structure with the wall.
- Further, the entire damaged one is replaced and the rest of the crate made of wooden slats is strengthened. Here the best assistants are a nail puller and a hammer.
- The beams are treated with an antiseptic and a primer to remove mold and eliminate the possibility of its occurrence in the future.
- After that, the gaps between the floor beams are sealed and, if necessary, layers of sound and thermal insulation are laid.
- The final of the work will be the construction of a new ceiling structure. It can be a stretch coating or a drywall composition.
Each wooden structure undergoes changes during operation. Cracks appear, knots fall out, paint and varnishes lose their gloss. Therefore, repairing a wooden ceiling is as necessary a process as repairing a plasterboard, stretch or concrete one.
If there is a need to repair a wooden ceiling, the first thing to do is to carry out visual inspection of surfaces... If there is information about how and from what the structure was erected, it can be assumed what happens behind the outer skin. But in most cases, one can only guess.
Repairing the ceiling in a wooden house can be done in several ways. It all depends on what this structure is made of. There are few options, but they are.
- Sheathed with clapboard.
- It is a false ceiling.
- Sheathed with curved boards.
- From the outside, it is built of longitudinally or transversely laid beams, between which it is sewn up with boards.
OSB and chipboard boards also made of wood, but ceilings are not used in the device... Or they are a base that requires external finishing.
Reasons for starting renovation work
- A visual inspection revealed cracks in the boards.
- Gaps between the boards have appeared or enlarged.
- The boards "led", they bent, and their geometric shape changed.
- There is a massive loss of knots.
- The outer finish fell into disrepair: the paintwork peeled off and cracked.
To complete the picture of what is happening with the ceiling, you need it embroider on one side... One way or another, but it will have to be done. Otherwise, it will not be possible to identify and eliminate the cause of the troubles that have occurred.

Do-it-yourself repair of a wooden ceiling is done using tools familiar to each owner. Expensive and professional is not required. To work with wood you need:
- screwdriver (preferably with rechargeable batteries);
- jigsaw;
- a plane (it is better to have an electric one);
- screwdrivers;
- hammer;
- hacksaw for wood;
- mount;
- pliers.
If the renovation is large-scale, and the ceiling is sheathed with curved boards, it may be necessary thickness gauge... With this tool, all structural elements are aligned so that they have the correct geometric shape and were the same size.
In the case of wooden ceilings, this will greatly simplify the work. By driving the boards in a thickness gauge, they remove a thin layer of shavings from them, and they become like new. But for this purpose, those in which no cracks and holes from fallen knots... Having disassembled the structure, you can always find wood suitable for re-installation. This will help to significantly save on lumber.
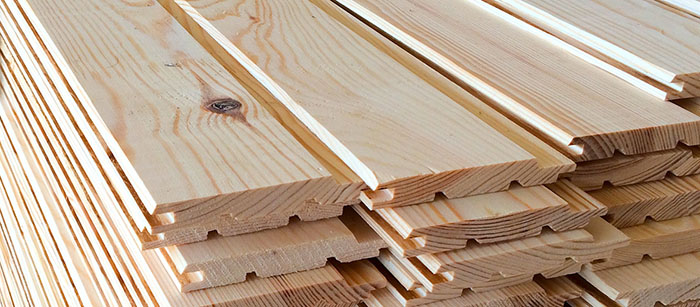
Lining is the most popular material for wooden ceilings. There are several types of these boards:
- standard or "peasant";
- block house;
- "Under the bar" or "American";
- "Euro": "classic", "calm", "soft line".
All these products differ in two ways:
Regardless of what type of lining was used for lining the ceiling, the problems are always the same:
- natural wear and tear of materials;
- violations of installation rules, devices for steam and waterproofing of the upper floor;
- drying out of wood;
- decay (the appearance of black spots, fungus, mold);
- the appearance of cracks.
Step 1. Repair of the ceiling of a wooden house begins with the dismantling of the cladding.
- Find the attachment points.
- Using a screwdriver, unscrew the screws or, using the tools at hand, pull out the nails.
- Remove the first, extreme lining strip from the grooves.
- All the rest are taken apart one by one.
Each bar is inspected, sorted into suitable for further use and unusable.
Step 2. Inspect each ceiling beam. If there is insulation between them, remove it. Conclusions are made about whether one, several or all of the beams need to be replaced. The design of wooden ceilings can be different. The beams to which the lining is attached can be an integral part of the upper floor, or be attached to these load-bearing beams.
The process of joining and replacing the timber depends on the method of fastening. But in any case, you will need to do the following:
- using a drill or screwdriver, remove the fasteners that hold the beams (these can be metal corners or wooden bars);
- if the beams are set on "pins", a mount is used in dismantling works;
- inspect the wood and, if it is suitable for further use, eliminate deficiencies (remove mold, cover with 2-3 layers of antiseptic);
- dry in the sun or in a room with normal air humidity;
- install the beam in its original place.
Unsuitable for further use beams with long longitudinal cracks, bent, rotten.
Step 3. Replacement of thermal insulation material.
DIY ceiling repair in a wooden house requires a high-quality thermal and vapor barrier... Most of the problems with wooden structures arise from the low vapor permeability of the materials used in the installation. For this reason, high humidity forms inside the cake, which is detrimental to the wood.
Most often, decay processes begin in structures insulated with materials on fibrous base (glass wool, stone wool, mineral wool). All these insulation have high degree of hygroscopicity... After moistening, they become heavy and lose their thermal insulation properties. This is not surprising, since wet cotton wool is not able to retain heat.
Therefore, many craftsmen who are familiar with the disadvantages of fiber insulation recommend using it as a replacement. Styrofoam... Rumors about the harmfulness of this material are greatly exaggerated. If they were true, polystyrene foam would not be used as packaging for food products, household appliances and other goods.
Cloths of the selected insulation are laid in the openings between the load-bearing elements of the upper floor - beams. If polystyrene is mounted, it is attached to the rough ceiling with special glue or plastic dowels with a wide head, which are otherwise called "fungi" or "umbrellas".
If it is necessary to fix mineral wool slabs to the ceiling, use thin wooden slats, which are nailed to the beams, laying in a direction perpendicular to them.
Step 4. The device of a vapor barrier layer.
Repairing a wooden ceiling requires a device high-quality vapor barrier... It is a protective barrier between the load-bearing structural elements and the outer cladding (lining). Thus, it protects the base of the frame from excess moisture. This ensures the durability of the entire ceiling structure.
What materials can you choose:
- reinforced or perforated polyethylene film (the second is used for rooms with high humidity);
- polypropylene film;
- foil materials;
- membrane films;
- glassine.
Requirements for the work performed:
- The vapor barrier material must be stretched evenly, without sagging.
- There should be an overlap of 10-15 cm between the canvases.
- The perimeter allowance must be at least 10 cm.
- Roll materials are kept from sagging with thin strips or crate of bars with a section of 30/10 or 20/30.
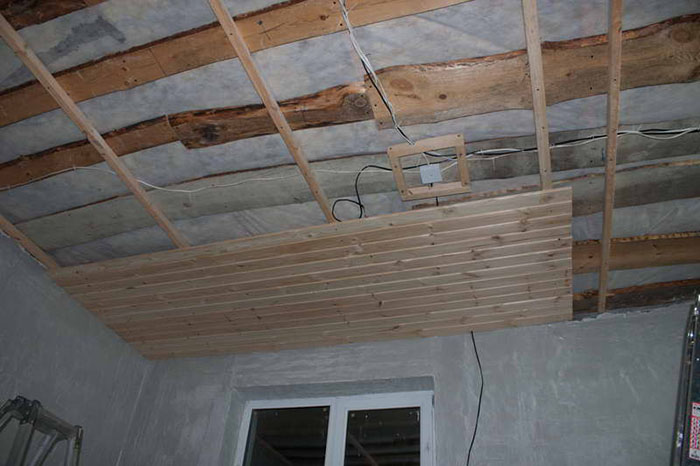
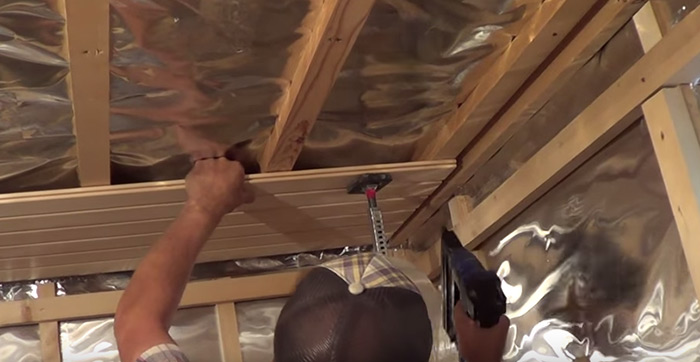
Step 5. Installation of lining.
First of all, the boards are prepared: they are leveled, treated with a transparent antiseptic.
If it is decided to varnish the lining, it is most convenient to do this at the stage of preparation for installation.
Lathing boards can be fastened in any direction. But first, they choose the fixing method. There are two of them:
- on nails or screws;
- for kleimers.
- install the first board in the place chosen for it;
- put a nail at an angle, stepping back 7-10 cm from the edge of the board, but focusing on the location of the lathing bar;
- take a hammer and drive in a nail 2/3 of its length;
- take the doboinik and drive the nail into the cap.
It is advisable to choose nails galvanized and with a flat head. Such fasteners will be more convenient in the installation of the lining. In addition, galvanized hardware is not exposed to moisture and rust will not appear on them.
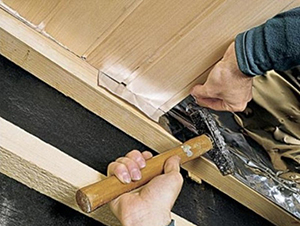
Fastening to cleats is the best way, as it avoids holes in the wood, which minimizes the risk of cracking.Stages of work:
- along the lathing line, a part of the metal clapboard is inserted into the groove of the lining;
- finishing nails nail it to the sheathing bar;
- repeat the first two steps at all points of intersection of the lining with the crate.
When installing boards, do not fit them close to each other. It is necessary to leave a damping gap of 2-3 mm. It will compensate for the movement of the wood caused by the compression-expansion forces. They arise under the influence of temperature changes in the room.
If it is decided to sheathe the ceiling with clapboard, the first thing to do is choose the right type of wood and type of profile... There are only three standardized grades: A, B and C. If the financial possibilities do not allow you to buy the lining of the first grade (A), you can choose the second (B). They differ mainly in the number and size of knots.
There are lumber manufacturers who offer class paneling "Extra"... You should know that this kind is not in the state standard. It (grade) was invented by manufacturers in order to sell high-quality, but inappropriate first grade, lumber.
It is recommended to choose wood with low resin content... For an economy option, the best choice is spruce. This lining is distinguished by its light color, beautiful texture and durability. Spruce boards have much fewer knots than other conifers.
In the video, let's see a master class on upholstering a wooden ceiling:

Repairing a ceiling in a private wooden house is not an easy and time-consuming task. The success of the event depends on how correctly each stage of work is performed, starting with the process of selecting hardware and lumber.

(1 estimates, average: 5,00 out of 5)
If there is a need to repair the ceiling, this means that its surface is cracked, yellow spots have appeared on it, and possibly streaks from leaks, the old decorative coating is moving away from the base. Be that as it may, first you need to assess its condition, and then make a decision: do cosmetic repairs to the ceiling, or you need a major one.
It is possible that you just wanted to update the interior, and there are no special problems with the ceiling surface. Your task is to refresh the decorative coating.
Usually it is complicated by the fact that there is no way to free the room from furniture and things, especially in a one-room apartment. You have to constantly move the furniture, cover it so as not to get dirty, but nothing can be done about it.
The dirtiest job is stripping the old whitewash from the ceiling. The operation is time consuming and requires careful execution.
To do this, use a roller with a long handle, which is moistened in water and rolled over the ceiling, allowing the whitewash to moisten. After that, it will be easy to clean off with a spatula.
- But not all paint can be removed so easily! This cleaning method is well suited for lime, chalk and water-based whitewashing. All other paints are removed with a special cleaner. Each type of paint has its own remover.
- Further actions will depend on how exactly you want to finish the surface. All types of painting and gluing works require preliminary priming of the surface, which improves the adhesion of the decorative layer to the base.
- The cleaned surface is treated with a universal primer using the same roller. This tool is simply irreplaceable in the repair. It is necessary at all stages of repair: cleaning, priming, painting.
- Preparation for painting requires the most thorough surface preparation. Even if you did not touch the old layer of putty during cleaning, and it is relatively even, there may still be small cracks and scratches from the putty knife on it. Therefore, they need to be putty.
If the volume of work is small, you can take a ready-made gypsum putty paste, which is sold in plastic buckets of different packaging.Close up all the grooves with a spatula, let the putty dry, grind it with fine sandpaper and apply another layer of primer.
After that, you can start coloring. Depending on which room the ceiling is in, you can choose from acrylic or latex paint. Modern water-dispersion paints are not only matte, but can also have varying degrees of gloss.
- If you think a little about design, then you can implement several options with your own hands. For example, stick a polyurethane rosette with a beautiful relief around the chandelier, which can be in tone with the paint, or make a contrast to it. In this case, a frieze can also be glued along the perimeter.
- And in general, polyurethane stucco molding can even make repairs in the hallway unforgettable, not to mention other rooms. Together with a beautiful chandelier, such a ceiling will look very rich, especially if the volumetric relief on the stucco elements is covered with gilding.
- You can decorate the surface in another way. Take a stencil, fix it in the right place with masking tape, and apply a drawing with paint of a different color, which can be in harmony, for example, with the shade of the wall covering, or home textiles.
- The picture above is a great example of such a finish, and its price will definitely not go beyond your budget. By the way, to make a stencil pattern in the corners, or along its perimeter, you can take fluorescent paint, and then the contours of the ceiling will stand out in the dark.
- You can also decorate the ceiling with paintable wallpaper. In this case, you will also have a beautiful relief on the ceiling.
- You can also combine several of the above options. For example, wallpaper can be glued only in the center in the form of a panel, using a frieze to frame it. Wall murals will look even better as a panel.
Such repair of the ceiling in the corridor can visually correct the configuration of the room. The longitudinal or transverse arrangement of a contrasting "carpet" can make an overly spacious room more compact, or vice versa.
If your apartment has not been renovated for a long time, and the plaster is falling off in places, you have been flooded by the neighbors from above, or you just bought an old house that needs to be tidied up. Overhaul of the ceiling is indispensable.
Your actions, in this case, will depend on the specific condition of the ceiling surface. Be that as it may, the first step is to clean the ceiling down to the floor slab. It is quite possible that you will see such a picture as in the photo below.
- In addition to such huge gaps, there may be gaping holes in the places where the communication pipes pass through the ceilings. Cement plugs also tend to fall out. And no matter what kind of repair of such a ceiling was planned: plastering, pasting, or filing - the holes and cracks need to be repaired.
- To do this efficiently, as they say: once and for all - you need to hollow out pieces of the old solution from the cracks, freeing them completely. What if you live on the top floor and the dampness comes from the side of the ever-leaking roof?
- After all, a bedroom or living room is not a bathroom where you can install an aluminum slatted ceiling and not worry about anything. In living rooms, the ceiling area is larger, therefore it is more difficult to make repairs, and it hits harder on the budget.
- So, the damp ceiling must be insulated from moisture, so treat its surface with penetrating soil. These compounds tend to crystallize in the thickness of concrete, preventing moisture from penetrating into it, and also displace existing ones. Therefore, even damp surfaces can be treated with deeply penetrating primers.
Note: Conventional concrete contact has no waterproofing properties. It is used only on dry surfaces. After the soil is dry, you can start filling the cracks.
For sealing large recesses in the ceiling, it is better to use a cement-based filler. Filling the seam with it, you can drown expanded clay granules, brick fragments, gravel pebbles in the solution - what is at hand.
Remove excess mortar with a spatula and let it grab, and then once again pass along the seams with a primer.
So that the seams are strong and never crumble, they are glued with a fiberglass reinforcing tape-serpyanka, and primed again. Now the ceiling can be considered reliably insulated and ready for further repairs.
Such manipulations can be spared, perhaps, by repairing the ceiling in the corridor. Rooms up to two meters wide are usually covered with a solid slab. And since there is only one stove, then there are no seams on the ceiling.
Ceiling plastering is a rather laborious process, and if you have never done this before, no instruction or video will help you. You need to learn to plaster on vertical surfaces. But in general terms, this process looks like this.
- You will need two types of plaster (or cement, if it is a bathroom or unheated veranda) plaster mixes: starting and finishing.
- Starter plaster has a coarser dispersion and is designed to level the surface. After drying and priming this layer, the second layer is performed - with the help of a finishing solution.
- The finishing layer of plaster will be denser and smoother, especially after it has been treated with an abrasive mesh.
- After sanding the surface, the resulting dust is removed with a vacuum cleaner, the last layer of soil is applied - and the ceiling is ready for decorative finishing in any of the ways that we suggested to you in the first part of our article.


