In detail: do-it-yourself repair of an old gas boiler from a real master for the site my.housecope.com.
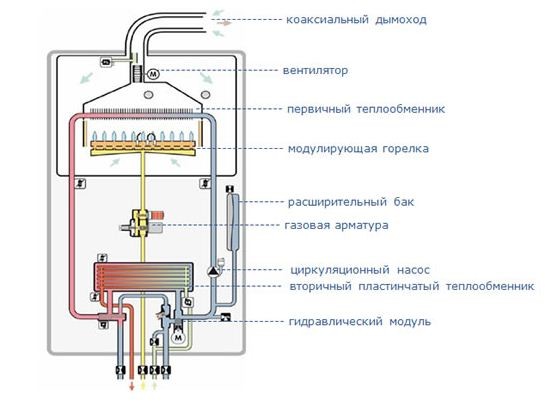
Gas boiler complex mechanism... It can be divided into 3 main parts: electronics, gas pipes and burners, heat exchange unit (pump, tank, fan). Only the last part can be repaired on your own.
Attempts to restore the first two parts, without proper skills, will lead to final breakdown boiler, gas leakage and other negative consequences.
Gas boilers rarely break... This is due to natural wear and tear equipment, or because of factory marriage... Other cases of breakdowns are necessarily associated with the following factors.
The boiler can break down due to water. At risk, first of all, there are two-circuit devices used not only for heating, but also for hot water supply.
The fact is that rust from the pipeline, other fractions, clog the thin tubes of the heat exchanger during the year.
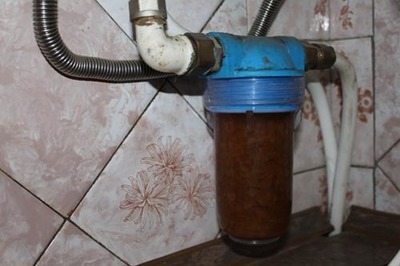
Avoiding troubles with water quality can help coarse filter... It is installed during installation per feed pipe liquids. For greater security, you can add to the system fine filter, or install a complete cleaning system.
Household appliances are resistant to power surges and shutdowns electricity. But a gas boiler is a finer piece of equipment. A power surge will cause the boiler to shut down or damage the electronics. A malfunction of the device or a power outage will lead to freezing of the heating pipes.
In order to avoid sad consequences, they establish at least one of the additional devices.
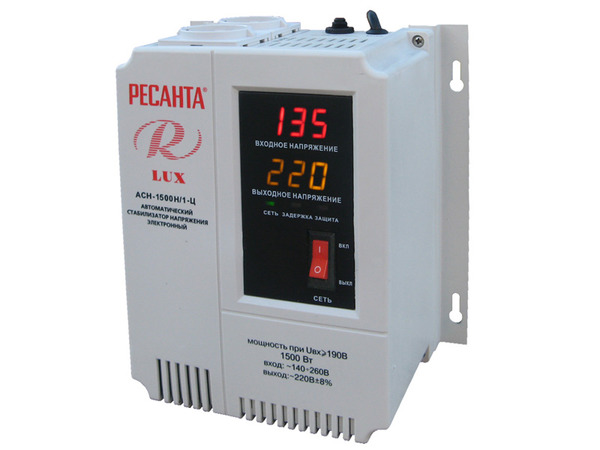
- Stabilizer - a device that will solve the problem of power surges. Its size is small, it is installed both in an apartment and in a private house.
| Video (click to play). |
Photo 1. Electronic voltage stabilizer Resant Lux for a heating boiler. The device is wall-mounted.
- Uninterruptible power system. Will equalize the input voltage. Allows the boiler to work for a while in the absence of electricity. Suitable for use both in the apartment and in the house.
- Gas generator. It does not affect the stability of the network in any way, but it can save with a prolonged power outage. Used only in the private sector.
Attention! When buying a generator, check if it really is single-phase.
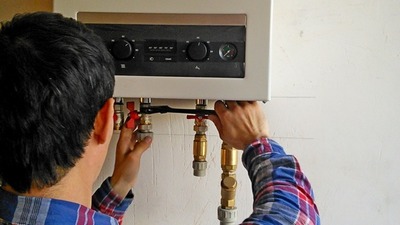
Installation of complex equipment layman will entail serious consequences. In frequent cases, the following problems occur:
- During installation neglected grounding... This leads to a build-up of static on the body of the device. When an electric arc occurs, the boiler automation often fails.
- After installation did not release air from the system... The resulting plug will lead to rupture of the coolant pipes and damage to the pump.
- Harness violations a gas boiler system, with a cast iron heat exchanger, will cause a split in an important part of the apparatus.
If the installation of the gas boiler is carried out correctly, operational problems arise only due to weather conditions... In cold winter, the desire to keep warm pushes people to use the boiler at maximum mode. The equipment withstands such conditions, but the gas system does not. A decrease in fuel pressure leads to interruptions in the operation of the apparatus. The automation starts to turn off the boiler. The problem is that this cannot be called a breakdown and it will not be possible to eliminate it.
Any malfunction of the gas boiler must be dealt with by a specialist. However, the opportunity to use the services of a master is not always there, and breakdowns are trivial... Let's consider the problems that can be solved on our own.
Usually the smell of gas appears when it leaks from the threaded connection of the supply hose... If there is a smell in the room where the boiler is installed, you need to open the window and turn off the boiler... Then follow the instructions:
- Prepare the necessary things: soap solution, FUM tape, open-end wrench or adjustable wrench.
- To apply mortar on all threaded connections. If bubbles begin to inflate, the leak has been found.
- Close the gas valve.
- Key expand the connection. Rewind on the external thread of the FUM tape and collect everything back.
- Reapply solution and restart the gas supply.
- If the leak has been repaired and the gas smell has disappeared, remove leftovers solution.
Attention! When the leak cannot be found, turn off the gas, call a specialist.
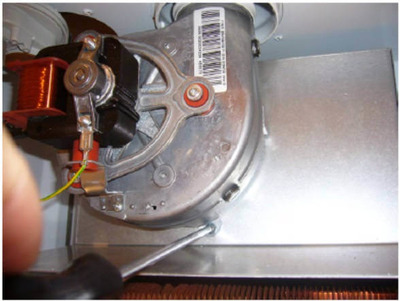
If during the operation of the boiler the sound emitted by the turbine has disappeared or has decreased - indicates a malfunction of the blowdown fan. For repair you will need: screwdriver, new bearing, cloth, grease.
- Necessary turn off boiler and turn off the gas.
- Remove the turbine.
- With a rag to clear with turbine blades dust and carbon deposits.
- Inspect Electric Coil fan for blackening. If everything is in order, move on or replace the fan.
- Disassemble the fan housing. Inside the turbine shaft is installed bearing, his needs to be replaced. Some fans have sleeve instead of a bearing. In this case, her need to be lubricated.
The turbine may also not work due to undervoltage or malfunction of the control board. The first is eliminated with the help of a stabilizer, but the second only by calling a specialist.
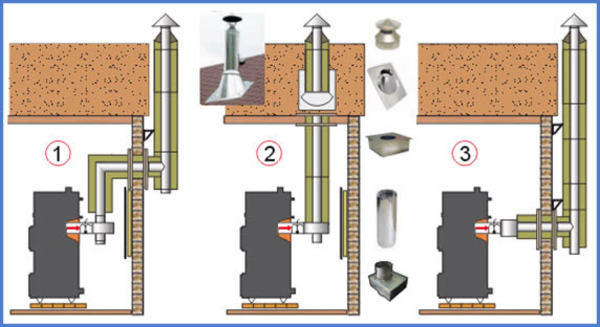
Chimney problems arise only at boilers floor type... This is due to its size and vertical position. Hinged devices do not need to clean the chimney.
Chimney consisting from metal parts, cleaned with a metal brush. It must be disassembled and the accumulated soot removed mechanically. Whole the chimney is cleaned with special vacuum cleaners or chemicals. But for this you need to call a professional.
Photo 2. Three ways of arranging a chimney for a floor-standing gas boiler. The first option is the hardest to clean.
Boiler overheating is associated with contamination of the heat exchanger... To clean the device you will need: special hydrochloric acid solution, adjustable wrench, FUM tape, metal brush. Then follow the instructions:
- Turn off the boiler, shut off gas and water.
- Remove heat exchangerusing an adjustable wrench.
- Clear it with a brush.
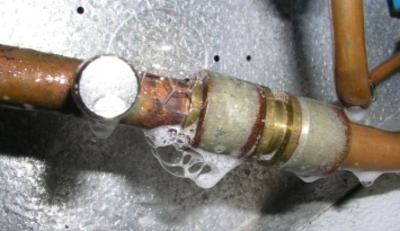
- Through the pipe pour over into the heat exchanger acid solution... If foam appears, it means there is a lot of scale inside.
- Pour out solution and repeat procedure.
- Rinse.
- Install back, beforehand wrapping all threaded connections with FUM tape.
Problems usually arise with combustion electrode. If the flame of the burner goes out after a few seconds, and the boiler gives an error, then the problem is in the combustion sensor. We turn off the boiler, turn off the gas.
To repair the electrode, you will need sandpaperwith the help of which the probe probes are cleanedwithout removing it. If the breakage remains, the sensor changes.
Exists two problemswhich lead to spontaneous boiler shutdown. The combustion sensor is broken or chimney clogged... The repair of both faults is described above in the article.
Watch the video, which tells about the malfunctions that occur during the operation of the boiler.
Most boiler breakdowns are repaired on their own, but this does not mean that you need to neglect the help of a specialist. Gas equipment is potentially life-threatening.
And also do not forget about maintenance... Cleaning the heat exchanger and chimney will save you from possible breakdowns.
Many malfunctions of a gas boiler can be eliminated with your own hands, without resorting to expensive services of the gas service or no less expensive private specialists for the maintenance and adjustment of gas equipment. The only rule that we will immediately make a reservation about is that you need to understand what you are doing and for what purpose.
Seasonal maintenance of a gas boiler consists in cleaning it from contamination and checking its functionality. To access the boiler elements, it is necessary to dismantle the casing or casing. To do this, we decide on the method of its fastening, for different models of boilers this can be done in different ways. Most often these are several self-tapping screws and several latches in the upper part of the casing.
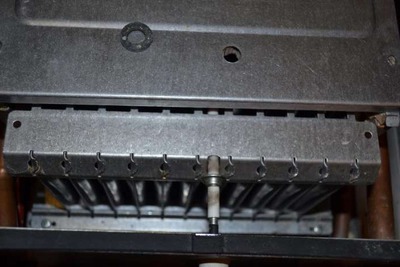
Having gained access to the internal parts of the boiler, we do not remove anything else when performing seasonal maintenance. Using a soft metal brush, a toothbrush and fine-grained sandpaper, we proceed to remove carbon deposits from all parts of the boiler:
- heat exchanger;
- burners;
- igniter, if available.
We use the aforementioned tool wherever it is convenient, without especially leaning on the brush for metal. Next, blow out the collected dust with a compressor. You can use a rubber tube or a medical dropper tube by simply blowing into it and guiding the other end into the boiler.
Important! Any work on the boiler is carried out with the gas valve closed.
Using a thin awl or a strong needle, you need to clean all the holes on the burner and igniter, and then, after cleaning them again, for example, with a toothbrush, blow again. If there are overhead sensors, the places where they fit to the parts of the boiler should be lightly cleaned with emery paper and then wiped with a soft woolen cloth.
The ignition and flame control electrodes are well cleaned only with a woolen cloth, without the use of cleaning agents. If there are immersion temperature sensors, it is necessary to remove them from the sleeves, select the liquid present there from the sleeve, thoroughly clean the sleeve inside using a small metal brush or a loose piece of steel cable of a suitable size. After rough cleaning, the sleeve is cleaned with a cloth wound on a screwdriver, then the sleeve is filled two-thirds with machine oil and the sensor is installed.
After completing these works, the boiler is thoroughly vacuumed. In accessible places, dust and dirt are cleaned with a damp cloth. We put the trim in place. We check the presence of draft in the chimney by attaching a sheet the size of a notebook to the chimney opening, or by throwing a stream of smoke into the ignition ignition hole, the gas valve at the lowering to the boiler must be closed.
We check the seals and possible gas leaks using the soaping method. In the presence of normal draft, a test run of the boiler is carried out, which must be filled with a coolant. In parallel with the work on cleaning the boiler, it is visually inspected for mechanical damage and coolant leaks. At this point, the seasonal service can be considered complete.
It is produced with a solution of hydrochloric acid, purchased in the trade network and designed specifically for this purpose. Cleaning is carried out for the main heat exchangers of wall-mounted gas boilers and heat exchangers for hot water preparation. The channel cross-section of such heat exchangers is small, which is why they are susceptible to contamination with salt deposits.
Cleaning of the water jacket of floor-standing gas boilers, as a rule, is not performed. The heat exchanger must be removed for cleaning. To do this, remove the boiler casing, unscrew the supply pipes to the heat exchanger, after draining the water from the boiler.
We take out the heat exchanger from the boiler. Wear rubber gloves and use a plastic container to collect the used acid. The method is not complicated. Carefully pour the acid solution inside the heat exchanger until it is completely filled. In the event that the heat exchanger is clogged with scale, active foam will be released. Let us leave the heat exchanger for 10-15 minutes.
We drain the spent acid into a container and re-fill the heat exchanger with a new portion. We are waiting for the same ten minutes. We drain the solution and rinse the heat exchanger with running water. We put on a piece of hose on the nearest water tap and spill the heat exchanger with water. Let's fill the heat exchanger with the acid solution again. If there is no active foam generation, and when the heat exchanger is spilled with water, no significant resistance to the flow is visible, then the heat exchanger is flushed and you can reinstall it in the reverse order.
The method of cleaning the burner from carbon deposits has already been described above. However, with strong soot, it is not always possible to cope with only mechanical cleaning. For such cases, special chemicals are used. It makes no sense to recommend anything, all tools are quite effective. The cleaning method boils down to applying the agent in the form of a solution to the surface to be cleaned, holding it for a certain time and then removing the exfoliated carbon deposits, usually mechanically. In more detail, you must familiarize yourself with the cleaning method by this or that tool when purchasing it.
In especially difficult cases, for example, when a heat carrier gets on the burner, it must be completely removed from the boiler, immersed in a cleaning solution for several hours. Then remove the burner, ignite in the flame of a portable gas burner. After another application of the solution, using a metal brush or a brush, remove the remaining carbon deposits.
The flue gas duct is checked using a mirror. We introduce the mirror into the channel at a slight angle. In the mirror, we should see a light at the end of the chimney. When performing this operation, it is convenient to use the so-called selfie stick, with a mirror attached to it.
To eliminate the leak, it is necessary to unpack the connection, clean the threads from the old tow and paint. Then, using FUM tape, thread sealing or thread lock, seal the connection again. Check the quality of work by filling the pipeline and the boiler with water.
All accessible areas of gas leaks must be washed with a soap solution or a special gas leak checker. The solution for soaping is prepared from laundry soap by shaving it into a container with warm water and stirring until a thick foam is obtained. If gas leaks, a soap bubble will blow out on the foam. The leak can be repaired in the same way as the water leak through the threaded connections.
Replacing a gas boiler burner will require more attention and care. The purchase of a new burner should be exactly the same model as the one installed on your boiler. Never install a burner not designed for your boiler model.
The beginning is the same - we remove the boiler casing. Having gained access to the burner, we carefully inspect the tubes and sensors connected to the burner. Their location should be remembered so that when assembling a new burner you do not confuse which one to connect to.
Due to the wide variety of boiler models, it is impossible to give specific recommendations, but in any case, there will be:
- a tube for supplying gas to the burner;
- gas pressure sensor to the burner;
- gas valve.
It is possible that there is a control tube from the draft sensor or electrical connection (wires) from the same draft sensor or temperature sensor. When using a burner of the same model as yours, remembering and connecting all the wires and tubes will not be difficult.
Replacing a horn burner installed in a wood-burning stove is even easier to cope with. We unscrew the screws of its fastening to the plate and two tubes: gas supply and gas supply to the igniter. We take out the old burner, insert a new one, screw on the tubes, tighten the burner mounting bolts.
It is not worth repairing the primitive automation of such a burner, the result may lead to unsafe operation of the boiler. The most difficult thing is to replace the burner of a wall-mounted gas boiler, stuffed with electronics and a large number of sensors. But do not panic here, the principle is the same: it is good to remember the location of all connections to the burner.
Trying to increase their importance, gas specialists say that such a burner should be "tied" to the boiler by flashing the electronic unit or by adjusting the boiler. The burner is just iron, which cannot be adjusted in any way. The settings may require combustion as such, but this is no longer relevant to the replacement of the burner itself. If the burner is made for the model of the boiler on which it is installed, then the combustion will be correct, however, provided that no attempt was made to regulate it on the old burner.
The need to replace the temperature sensor arises when, when setting a specific temperature mode of operation, the boiler either does not comply with it, or, even worse, goes into boiling mode, which can lead to rupture of the water jacket of the boiler or its heat exchanger.
Temperature sensors, according to the method of installation in the boiler, can be overhead and submersible. Clamp-on sensors are installed on the boiler pipes with clips that press the sensor against this pipe. Replacing them is very simple. Disconnect the old one - put the new one. We put the chip (electrical contact) in place of the old one.
Immersion sensors can be of two types: direct immersion and located in a well filled with oil. When replacing the first, it is necessary to drain the water from the boiler, unscrew the sensor. Pay attention to how the threads were sealed at the sensor mount. This can be simply a tapered thread, using a thread lock (adhesive), gaskets, or O-rings. Sealing with flax and other materials is not used. Install a new sensor using the same sealing method.
When replacing the sensors installed in the sleeves, there is no need to drain the water from the boiler. After loosening the fixing nut, pull out the sensor, check for the presence of oil in the sleeve, install a new sensor, fixing it with the nut. The simplest version of such a sensor is an alcohol thermometer installed in the sleeve for visual monitoring of the temperature in the boiler.
According to safety rules, the repair of all equipment dangerous in operation, which includes gas heating units, must be carried out by specially trained qualified specialists. However, in remote areas, the arrival of a specialized repair team can be expected for a very long time. Therefore, in case of emergency, if the matter does not concern automation and the gas pipe, you can do it yourself and repair the gas boiler yourself.
Modern gas heating systems are complex systems. Control of their work is carried out using a whole range of automatic devices, which must be familiarized with before starting an independent repair of gas boilers.
The main elements of the security group:
- Draft sensors designed for 75 0 C. This device makes it possible to monitor the state of the chimney. If the normal flue gas discharge fails, the temperature rises and the sensor is triggered. Optimally, in addition to the traction sensor, a gas alarm is acquired.
- The monostat protects turbocharged gas units from impaired removal of combustion products due to a clogged chimney or heat exchanger.
- The limit thermostat is designed to control the temperature of the heating medium in the heating system. When the water boils, the overheating sensor turns off the device.
- When the flame is detected, the flame control electrode switches off the operation of the heating unit.
- A blast valve is used to control pressure.With an increase in pressure above the critical value, a portioned discharge of excess coolant occurs.
Attention! The wear of the stuffing box leads to a constant flow of the coolant from the valve. The remedy is to replace the valve.

