In detail: do-it-yourself gas 3309 starter repair from a real master for the site my.housecope.com.

Gas 3307-3309 starter parameters
The starter does not require any special maintenance. The reliability of nuts, bolts and connectors of electrical contacts is periodically checked and the outer surfaces of the starter are wiped.
Starter technical data,
minimum collector diameter
Diameter of bushings and bearings in covers, mm:
Tightening torque for screws and nuts, Nm:
brush holder screws …………… 3.2 ± 0.5
Bearings and moving parts are lubricated with the following lubricants:
- bearing bushings - Ехtra НD 20 oil;
- shaft groove, projection on the bendix bushing, lever axis - with LIS 2 grease;
- relay core - with a thin layer of LIS 3 grease.
The rotor, the end gap of which changes after the groove in the range from 0.2 to 0.5 mm, is adjusted with washers 0.2 mm thick. The rotor extends towards the manifold and the gap between the manifold cover and the lock washer is checked with feelers. The screws and nuts are tightened. For the tightening torque, refer to the starter technical data below. 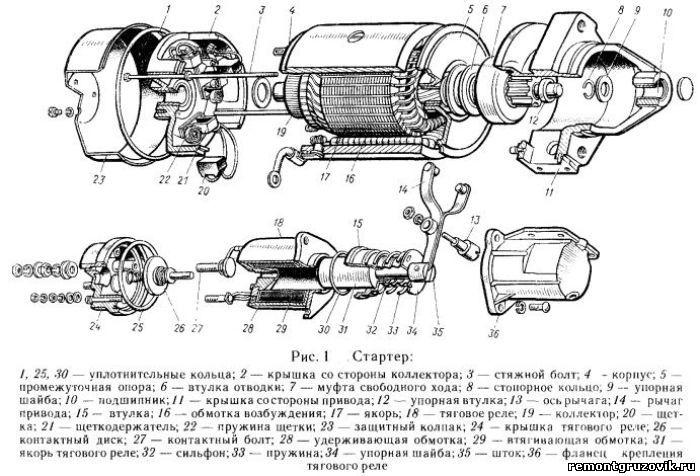
starter check is carried out according to the following parameters
- counter of the number of revolutions up to 1200 rpm;
- ammeter with a measuring range up to 100 A, accuracy class 1.5;
- ammeter with a measurement range of up to 1500 A, accuracy class 1.5;
- a voltmeter with a measurement range up to ZOV, accuracy class 1.5;
- a tool for connecting a starter I to a power source;
- a power source corresponding to the tested starter. 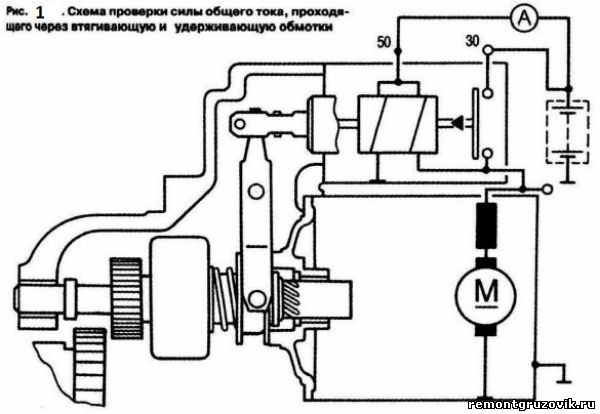
A starter on the Volga is a very reliable thing, and some kind of trouble does not happen often with it. As a rule, during operation, it does not require any attention to itself at all, but we all know that anything can be broken, even if, as in the known case, it is pure hydraulics.
So, the starter is based on a DC motor. At the front end of its shaft there is a sliding sleeve and a gear, which, at the moment of starting, meshes with the teeth of the engine flywheel. The movement of the clutch is provided by a solenoid relay located on the starter housing. The relay rod at the moment of starting moves and pulls the plug, which pushes the clutch with the gear to the position of engagement with the flywheel.
| Video (click to play). |
The traction relay coil has two windings.
- Retracting. It is connected when the key is moved to the "start" position. It provides movement of the relay rod. After the first winding is triggered, the rod moves and shifts the contact "penny", closing the contacts, including the starter motor and the second, holding the winding.
- Retaining. It is needed in order to keep the stem retracted until the key is in the "start" position.
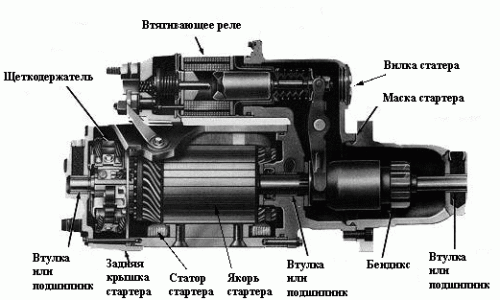
Accordingly, all malfunctions are reduced either to problems with the retractor, or with the electric motor itself, or with the clutch.
As a rule, the starter refuses to start the car at the most inopportune moment and completely unexpectedly. That is, everything was fine yesterday, but today we turn the key to the "start" position, but it does not turn ... or turns it somehow not as it should, or makes extraneous sounds. In any case, there is no need to wait for a miracle, it will not pass by itself. Let's try to find and fix the problem.
As a rule, undervoltage in the on-board network is to blame. So start by checking battery charge.
If everything is normal with the battery, and the voltage on it is 12 V or more, check the condition of the terminals. The most common cause is poor contact. Clean the terminals well from oxides, lubricate them with grease (lithol, grease, etc.) and fix well. Pulling the terminals too much is not worth it, since this will deform the battery terminals made of lead, and the wire terminals themselves, which are now being made from what is generally not clear.
Check body and engine for earth.To do this, simply select the resistance measurement mode on the multimeter and measure it between the negative terminal of the battery and the motor, and then between the terminal and some unpainted bolt on the body. Resistance should be close to zero. If not, inspect the negative lead to the engine and check the integrity of the "pigtail" connecting the engine and body. It is attached to the clutch bell.
- in the wiring;
- in the retractor;
- directly in the starter motor.
Let's start looking for a problem simple.
- Check the anti-theft systems. Perhaps they are joking at you.
- Perhaps you have a trite discharged battery.
- If there is a fuse for the starter circuit, check it for continuity.
- Let's check if the +12 V voltage appears at the control contact of the starter (this is a thin screw on the solenoid relay). If there is no voltage, then check the additional starter relay and the ignition switch.
- Ask an assistant to turn the key to the "start" position and listen. Does the starter make any sounds at the same time. Perhaps your solenoid relay stem wedges. It works, a click indicates this, but its movement is limited.
If the voltage comes to the control contact of the retractor relay, the mass is not broken, but the starter refuses to cooperate with you and does not twist, we do the following.
- Be sure to remove the car from the gear and put it on the handbrake;
- We translate the key to the "ignition" position;
- We take a 17 wrench and bridge the power leads of the retractor with it.
If the starter spins briskly at the same time, then our problem is in the retractor relay itself. The easiest way is to simply replace it with a new one, but you can try to fix it.
Remove the starter and unscrew 3 screws (2 screws for ZMZ 406), retractor fastening. We unscrew the screws securing the contact group and study the state of the contact "nickle" and the contact pads of the bolts. Most likely, we will find strong burning on them. We clean the contacts and make their surface absolutely smooth and flat. We carry out a similar operation with a nickel. A heavily eaten penny can simply be turned over, if this has not yet been done before you.
Also, with a tester, we will check if there is a short circuit of the relay windings to the case and if there are any breaks in them. If everything is normal, put everything in the reverse order and try to start.
If the problem is not in the retractor, check the starter motor itself.
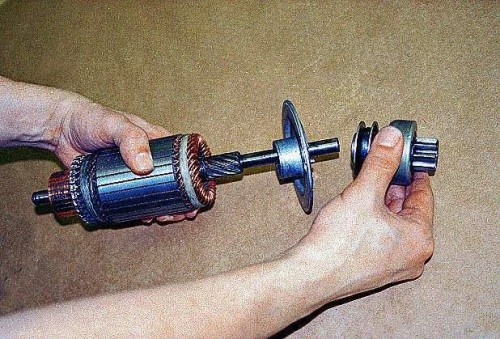
We remove it from the car and disassemble it. There is nothing particularly difficult here.
- Unscrew and remove the retractor.
- Remove the retractor rod.
- Remove the starter rear cover by unscrewing the two screws securing it and removing the retaining half ring in the center.
- Slide the motor stator together with the housing off the studs.
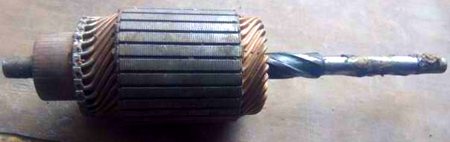
Now you need to carefully inspect the condition of the collector contact pads. If they are badly worn, you can try sanding them to a level surface.
We look at the wear of the brushes. We change them if necessary.
We check with a multimeter whether there are any short circuits of the windings on the case, and the absence of internal short circuits and breaks in the windings. If any, we carry the starter for repair or replace it with a new one. You can't do anything on your own.
Crackling or grinding noise when starting the engine
This sound occurs when the starter gear is not fully engaged with the flywheel rim teeth. There can be several reasons, and most of them can be easily eliminated.
- Loose starter to clutch bell. It happens. Just try to jiggle the starter by hand, if it does not fit tightly, tighten the nuts of its fastening to the required torque and try to start the engine. The scary sounds will most likely disappear.
- Insufficient movement of the starter sliding clutch. The gear just doesn't snap into place. Usually a shaft overgrown with mud is to blame. To restore performance, remove the starter from the car. Next, clean the shaft and lubricate it with good grease. Check the movement of the gear, there should be no binding.
- The fork moving the sliding clutch may be to blame. It happens that it breaks or deforms, although rarely. In both cases, the plug must be replaced.
- Flywheel crown eaten up. You can easily see this problem by removing the starter and simply looking into the hole in the clutch bell. There are several solutions to the problem: replacing the flywheel, replacing the crown (the old one is knocked down, and the new one is heated and hot pressed onto the flywheel), you can try to turn the old crown over (we heat the crown and press it off the flywheel, reheat it and press it with the back side).
The fastening of the retractor to the starter housing is loose. The result is incomplete gear movement. Tighten the fasteners.
A metallic ringing from the clutch bell when the engine is running and an occasional grinding noise when starting
Most likely, by removing the starter, you will find it. that his "beak" was chipped off. This happens for various reasons. The starter may have been poorly pulled to the bell or pulled skewed, there may be a casting defect, or there may have been excessive gear movement. It makes sense to weld the "beak" with argon in place only in the case of free access to the welding machine, in all other situations, it is better to replace it. But since you are unlikely to be able to find the "beak" separately, you will most likely have to change the starter assembly.
As a rule, this behavior indicates that you need to get to know the Bendix better.
For those who do not fully understand what it is, let us explain.
Bendix is nothing more than a freewheel. Its meaning is that when the starter rotates, it rigidly connects the drive gear with the electric motor shaft, and at the moment when the engine starts and its speed increases, it begins to slip, preventing the internal combustion engine from rotating the starter motor. A similar thing is present in the rear wheel of a bicycle, it makes a characteristic chirping sound when coasting. That is, it is not at all the drive gear itself, but exactly the thing to which this gear is attached.
This part is removed quite simply, but you will get very dirty. Although, if you removed the starter, you should not worry anymore.
- We press the thrust bushing off the axle.
- Pry on with a screwdriver and remove the snap ring.
- Remove the bendix assembly with the gear.
- We change to a new one and put everything in the reverse order.
- Like
- I do not like

krea2003 14 Oct 2013
tell me where to look for the key of the problem
sometimes it starts with half a turn, and sometimes.
you turn the ignition switch, you start turning the starter, it can hardly turn the battery, the battery is dead, you turn off the ignition and the starter continues to turn .. and even remove all the clamps from the ignition switch and the starter turns for some reason.
then again once and started up.
- Like
- I do not like

Toyota007 14 Oct 2013
krea2003, Change the solenoid relay. The nickels there all burned out .. The contact is bad on the nickels, so everything is welded like welding .. At the same time, check the springs to make sure they are not broken.
Post has been edited Toyota007: 14 October 2013 - 17:28
- Like
- I do not like
krea2003 14 Oct 2013
krea2003, Change the solenoid relay. The nickels there all burned out .. The contact is bad on the nickels, so everything is welded like welding ..
and this part cannot be repaired?
- Like
- I do not like
Toyota007 14 Oct 2013
and this part cannot be repaired?
Better to put a new one, it is not so expensive.
- Like
- I do not like
krea2003 14 Oct 2013
Better to put a new one, it is not so expensive.
Better to put a new one, it is not so expensive.
Well, anyone else, it costs 800 rubles, and it takes half an hour to sort it out if there is a spare part.
- Like
- I do not like
krea2003 16 Oct 2013
I took it apart, the nickels burned badly, cleaned it up, and it all worked.
- Like
- I do not like

it was necessary to put new dimes. cleaned it not for long. from a week to a month.
Well, as anyone, it costs 800 rubles, and to sort it out in half an hour if there is a spare part.
- Like
- I do not like
Toyota007 16 Oct 2013
I took it apart, the nickels burned badly, cleaned it up, and it all worked.
- Like
- I do not like
krea2003 16 Oct 2013
it was necessary to put new dimes. cleaned it not for long. from a week to a month.
I will buy new pennies and put on a spare starter. lies in the garage
- Like
- I do not like
Toyota007 16 Oct 2013
I'm sure more than 1200
The retractor is not much different from 402. At 402,600 rubles and gas-53 is twice as expensive. I don't want to argue about this, but the price of 1200 rubles is too high.
Moreover, on the ZMZ-53 they can easily install a starter from the ZMZ-402, the main thing is to find long bolts with nuts. This is where they win at the price of the starter.
- Like
- I do not like
all the gas pipelines would live in the lower one. prices are different everywhere. we drool far on your prices.
- Like
- I do not like
Toyota007 16 Oct 2013
all the gas pipelines would live in the lower one. prices are different everywhere. we drool far on your prices.
We do not have more than one starter plant, the nearest plant is in Cheboksary.
- Like
- I do not like
krea2003 16 Oct 2013
We do not have more than one starter plant, the nearest plant is in Cheboksary.
there seems to be a company in Moscow
They make SOLLERS, although the plant is probably not in Moscow
Post has been editedkrea2003: 16 October 2013 - 20:56
- Like
- I do not like
I will buy new pennies and put on a spare starter. lies in the garage
I doubt they are sold separately
- Like
- I do not like
there seems to be a company in Moscow
They make SOLLERS, although the plant is probably not in Moscow
Sollers never had a starter manufacturer, and Cheboksary used to produce starters for tractors.
All are brought from China, hang their tags. The only question is, who controls the quality?
Regarding the heels. now it is unlikely to be found separately, but starter drives are on sale. Price around 236 rubles.
I don’t know where how, but in our "pedal of cars" you can buy pyataks, and we have a starter plant. And we make tidy and ECUs.
- Like
- I do not like
Toyota007 17 Oct 2013
and Cheboksary used to produce starters for tractors.
Actually, there is a very powerful tractor plant, caterpillar tractors.
and we have a starter plant. and we do the tidy, and the computer.
Lucky you !! And we have a gas plant, but we do not do that.
And guys in general. We all and I also dirtied the topic with a great flood. I will clean it.
Good day! help with the problem! the problem is this! in the morning starts up on a cold engine. after warming up to xx everything is fine but! after the movement, the gas starts to disappear, the electric pedals are installed! already worn out to the edge! so even as soon as it starts to get stupid, I do a peregazovka at 2100 about all the gas at all! stop, turn off the beaten track and start again! all the norm! we go further when accelerating to 60 km / h again disappears as if someone threw an anchor from behind! what's the matter a? the fine filter has been replaced. but on the panel the injector sensor is on and the oil level is critical! thanks in advance
I have exactly the same problem only the oil level sensor does not light up. tell me what to do?
look at the brake pedal - there is an emphasis on the sensor - you must remove the pedal - otherwise you will not see it - it sits on the bolt - or is weakened or the brake pedal itself dangles and, when moving, presses on the brake sensor and the ecu drops speed - most likely the reason is this
Good evening! Help PLZ. GAZ 3309.D-245 E3 electric gas pedal does not respond when pressed, idle is more than normal (not much)
Good day! help with the problem! the problem is this! in the morning starts up on a cold engine. after warming up to xx everything is fine but! after the movement, the gas starts to disappear, the electric pedals are installed! already worn out to the edge! so even as soon as it starts to get stupid, I do a peregazovka at 2100 about all the gas at all! stop, turn off the beaten track and start again! all the norm! we go further when accelerating to 60 km / h again disappears as if someone threw an anchor from behind! what's the matter a? the fine filter has been replaced. but on the panel the injector sensor is on and the oil level is critical! thanks in advance
try to change the air filter
Good day! help with the problem! the problem is this! in the morning starts up on a cold engine. after warming up to xx everything is fine but! after the movement, the gas starts to disappear, the electric pedals are installed! already worn out to the edge! so even as soon as it starts to get stupid, I do a peregazovka at 2100 about all the gas at all! stop, turn off the beaten track and start again! all the norm! we go further when accelerating to 60 km / h again disappears as if someone threw an anchor from behind! what's the matter a? the fine filter has been replaced. but on the panel the injector sensor is on and the oil level is critical! thanks in advance
Good! I had this! took off the rubber heat from the turbine and it's all gone! nashol plastic and go
Gas 3309 engine d-245.7. At idle, everything is normal in motion, it starts to fail in revolutions, press on the sneaker, he does not go, you have to jerk his foot !! (press the pedal with jerks repeatedly) while he does not run up after at the same speed goes without problems, slowed down all the new failures! ran away again going! In the first second gear, the third and fourth are constantly less often! I thought about air leakage in the fuel line and replaced all the hoses! didn’t help went to the diagnostics specialist checked said two errors the gas and brake pedal in the process of diagnostics the brake pedal was dropped and the gas remained changed the gas pedal (it costs 5000 r) but the problem did not go where to climb don’t know !! The diagnostician said if the lamp (check the engine) does not light, then you do not need to go to us! yes, and I myself would have disassembled the error in the glare codes, but it does not show anything! please tell me if it's easy thanks in advance !!
Friends, everything is just the brake pedal, or rather the frog in it, dismantled it, cleaned it, put it in place, adjusted it to AND EVERYTHING is OK.
how to adjust the brake pedal sensor
when the gas is pressed sharply, it shoots a white muffler
- Posts: 736
- Location: Sverdlovsk region Kamensk-U
- Daewoo Matiz 0.8 Mx
First, check all the fuses, especially those that go to the ignition switch, here the signaling may also be involved.
Turn on the low beam or high beam (when the ignition is turned on, the headlights should light up, then we can assume that the contact on the lock is working). Then you need to look for why there is no power on the instrument panel. I understand that all problems are due to electricity. Check the terminals and wires from the battery, maybe somewhere the conductors in the braid of mass are broken (this happens with long-term operation), try throwing an additional wire from the battery to the engine.
Avtoshnik, October 22, 2013, 06:20, # 12
First, check all the fuses, especially those that go to the ignition switch, here the signaling may also be involved.
Turn on the low beam or high beam (when the ignition is turned on, the headlights should light up, then we can assume that the contact on the lock is working). Then you need to look for why there is no power on the instrument panel. I understand that all problems are due to electricity. Check the terminals and wires from the battery, maybe somewhere the conductors in the braid of mass are broken (this happens with long-term operation), try throwing an additional wire from the battery to the engine.
all this is in order and the lock and power and fuses and the mass have been checked and everything is normal with the indicator and the sisters on the panel. The bottom line is that the Bosch block blocks the starter and why I can't understand.
Good vsem.Pomogite with the repair of a / m gas turbodiesel euro3 2008, a week has already cost I do not understand what is the matter. in the evening I put the car on, everything was mormalo in the morning I try to start the mass, there is a small pop on the left side under the hood, the fuse blown. again clap, looked through all the wiring, there is nothing, I put another fuse on, turn on the mass, turn the ignition switch normally, the panel burns as expected, only the check does not burn, strange turn the starter does not turn. I try to directly close it twists but does not start. gathered all the electricians in the city, someone can’t solve the problem, someone really doesn’t take to repair it, and whoever does it then shrugs off they say don’t know. What’s the matter is not really brain burned out why.help the car is dead weight, and where you can give brains if that
- Posts: 736
- Location: Sverdlovsk region Kamensk-U
- Daewoo Matiz 0.8 Mx
mansur, October 31, 2013, 00:35, # 14
Good vsem.Pomogite with the repair of a / m gas turbodiesel euro3 2008, a week has already cost I do not understand what is the matter. in the evening I put the car on, everything was mormalo in the morning I try to start the mass, there is a small pop on the left side under the hood, the fuse blown. again clap, looked through all the wiring, there is nothing, I put another fuse on, turn on the mass, turn the ignition switch normally, the panel burns as expected, only the check does not burn, strange turn the starter does not turn. I try to directly close it twists but does not start. gathered all the electricians in the city, someone can’t solve the problem, someone really doesn’t take to repair it, and whoever does it then shrugs off they say don’t know. What’s the matter is not really brain burned out why. help the car is dead weight, and where you can give brains if that
It seems that there is a short circuit in Brains, because two fuses have burned out, and on the third, the closing jumper inside Brains has blown. So that you can open the box itself and see where it has burnt out.
Avtoshnik, November 1, 2013, 07:34, # 15
It seems that there is a short circuit in Brains, because two fuses have burned out, and on the third, the closing jumper inside Brains has blown. So that you can open the box itself and see where it has burnt out.
kind to everyone. thanks Yuri, the mazgi were opened, the experts say that everything is clean there, you can even hear the brain collectors swearing
- Messages: 3973
- Location: Belgorod region
mansur, 5 November 2013, 23:02, # 16
kind to everyone. thanks Yuri, the mazgi were opened, the experts say that everything is clean there, you can even hear the brain collectors swearing
that's crap damn it
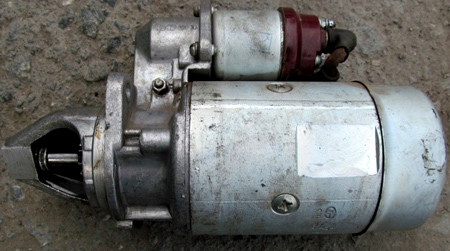
The GAZ 53 starter is used to start an internal combustion engine. It is put into operation with the ignition key turned to the extreme left position (clockwise).
An example of a new model of the GAZ-53 truck
The ST-230 model starter is installed on the GAZ 53 truck, it is screwed on with two nuts on the clutch housing on the left side of the internal combustion engine in the direction of travel (closer to the driver). The circuit is very simple, in principle it does not differ in any way from the circuit of a similar device on another model of a car or truck.
Detailed diagram of the starter device for GAZ 53
- Frame. It is metallic, cylindrical;
- Stator winding. Installed inside the case and placed along its walls;
- Anchor (rotor). It is a moving part in the launcher.The armature shaft rotates in 3 bearings (one in the front cover, two on the intermediate support);
- Brush assembly. 4 brushes are in contact with the rotor collector, setting it in motion;
- Front cover. It closes the brush assembly, protecting it from dirt, water and oil;
- Bendix. Gear device, the gear engages with the engine flywheel and sets the motor in motion;
- Back cover (bendix body). It is a protective cover of the bendix, the rear end of the body serves as a support for the entire axis of the rotating shaft;
Appearance of the starter for the GAZ 53 truck
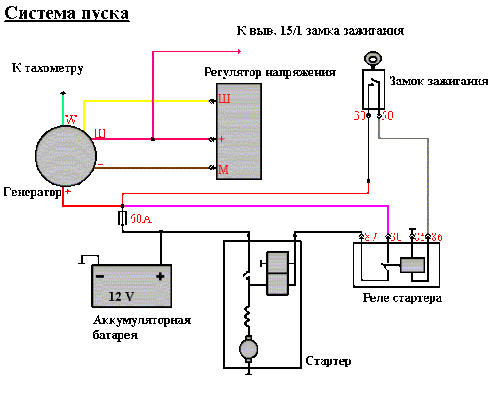
The wiring diagram of a simple mechanism is simple, the connection goes through a retractor relay. One contact of the relay is supplied with a constant voltage of 12 volts, the other contact is supplied with power from the ignition switch.
At the moment of turning the key under the influence of an electromagnetic field, the core in the relay moves and drives the bendix.
Almost simultaneously, the core closes the contacts on the relay, turning the electrical circuit into operation. The starter turns, starting the engine. It is important to release the ignition key in time to avoid damage to the trigger.
The ST-230 starter has the following characteristics:
- Rated power of the device - 1500 W;
- Rotation - right;
- Current consumption in no-load mode - up to 85 Amperes;
- Current consumption at full load - up to 530 Amperes;
- Poles in the excitation winding - 4;
- The number of teeth of the bendix gear - 9;
- Torque - does not exceed 2.25 kgf / m;
- Rotation frequency - 40 rpm.
Back to the table of contents
The GAZ 53 starter is a rather powerful device, but it can still be overloaded. For example, drive the starter for a long time without interruption if the engine does not want to start in any way. With very early ignition, the engine spins with tension, there is a reverse recoil.
This also overloads the starting device, leading to various breakdowns (the aluminum back cover may burst). Turning the ignition key to turn on the retractor relay when the engine is running, gas 53 can damage the starter, first of all, the bendix gear will suffer.
It looks like a starter bendix GAZ 53
- A dry click is heard when the ignition key is turned, but the engine does not start. There are usually two reasons - the electrical relay does not work, or the contacts at the starter retractor relay are burnt out.
- When you try to start the internal combustion engine, a buzzing is heard (the noise of a bendix running idle), but the engine does not turn. The reason is a faulty bendix, its gear on the axle does not lock and rotates in both directions (the gear wheel of a working mechanism should only rotate in one direction). The teeth on the flywheel rim can also be worn out, they often wear out unevenly, somewhere in one place.
- The starter barely twists, at the place of its attachment it smells of burnt winding. Closes the stator or rotor winding.
- The starter does not turn at all and does not show any signs of life. More often, the rotor winding burns out like this, or the electrical relay is faulty.
- The winding does not burn, but the rotation is difficult. The rotor bushings in which it rotates are worn out. Also, there may be a reason not in the starter, but in the poor mass of the engine with the body.
Medium-duty trucks manufactured by the Gorky Automobile Plant are equipped with an on-board electrical network designed for 12 or 24 volts. The electrical circuits of GAZ 3307 and 3309 have many common solutions, but are not interchangeable. The elements of the system of diesel machines are designed for increased voltage.
The main difference between GAZ 3307 and GAZ 3309 is observed in the engine compartment. On the latest releases of diesel cars, power units manufactured by YaMZ and MMZ, equipped with electronic components with a CAN bus, began to be used. Additionally, an anti-lock braking system is included in the circuit.
The design features of the electrical system of the GAZ 3309 diesel truck include:
- The voltage in the on-board network is 24V, which ensures a confident start of the power unit at low temperatures.
- To supply power, four rechargeable batteries with a capacity of 55 A / h each are used. The devices are connected in pairs in parallel circuits, which are then crossed in series. When using a YaMZ diesel engine, two 110 A / h batteries are installed.
- The engine is equipped with a synchronous three-phase generator with an electromagnetic excitation principle. The device is equipped with a built-in rectifier unit and a voltage regulator with an adjusting screw. Switching of the unit ensures the operation of the generator in winter and summer. On delivery from the factory, the screw is unscrewed to the stop, i.e. it is in a condition for operation in the warm season.
The GAZ 3307 gasoline truck was created on the basis of the GAZ 53A model car, but has changes in the design of the electrical circuit:
- an alternating current generator with increased power is installed;
- the integrated relay-voltage regulator is used, which ensures the stability of work;
- an upgraded high voltage pulse distributor and an ignition coil were used;
- introduced contactless ignition with a transistor switch.
The general concept of the on-board network has remained unchanged. The DC source with a voltage of 12V is a battery and a generator. The negative terminals of the instruments are attached to the body or to the housings of the units.
The features of the electrical circuit are described in the operating manual attached to each GAZ truck.
A detailed diagram of the electrical equipment of the GAZ 3307 in maximum equipment includes elements and assemblies:
Color designations of wires in the diagram:
- B - white;
- K - red;
- F - yellow;
- З - green;
- Kch - brown;
- H - black;
- G - blue;
- O - orange;
- P - pink;
- F - purple;
- C - gray.
The above diagram should be used with caution when repairing used GAZ 3307 trucks. Due to the low corrosion resistance of wiring, owners often replace entire areas with products with different insulation. As a result, difficulties arise during subsequent maintenance.
The connection diagram of these nodes does not differ from other cars. A relay and a separate wire are installed in the circuit to ensure the operation of the ammeter built into the instrument cluster. The photo shows the circuits for connecting the generator to the battery (accumulator) through the unloading relay.
Schematic diagram of the installation of a generator on a GAZ 3307
The truck is equipped with a battery-operated contactless ignition system with a transistor switch, consisting of nodes:
- coils;
- distributor of impulses;
- individual candles;
- connecting wires.
The ignition is activated by turning the key in the lock. The distributor provides the sending of impulses to the candles after 45 degrees. with a deviation of the moment of signaling within 1 degree. The components include elements that reduce the level of radio interference during operation.
Components of the ignition system for a gasoline car GAZ 3307
- permanent magnet;
- noise suppression resistor R in the tip of the candle (5.5 kOhm);
- additional resistances R1-R15 with different ratings;
- capacitors C1-C11;
- transistors VT1 and VT2;
- diodes and zener diodes;
- control microcircuit КР1055ХП1 or КС1055ХП1 (marked D in the diagram);
- switch D1;
- choke L;
- primary winding L1 of the ignition coil;
- secondary winding L;
- coil;
- protective fuse for 60A (on the shield of the engine compartment);
- candles;
- ammeter P;
- ignition switch S;
- battery breaker S1;
- battery G;
- pulse sensor (designated B in the diagram).
Checking the operability of the switch is shown in the video from the HF Autoelectric channel.
On trucks with gasoline engines, there are two pads of the PR-121 type located in the cabin. The nodes are located in the central part of the dashboard, fixed to the frame with two self-tapping screws.The pads are designed to use outdated cylindrical inserts.
The layout of the fuses in the passenger compartment GAZ 3307
Rating of fuses in the upper section with a description of the units and circuits to be protected:
Full lineup: GAZ-3307, 53, GAZ-3309, GAZ-66, 3308, 33081, 33086, GAZ-33104
1 - СТ230-3708041 Protective casing
2 - СТ 230-3708300 Cover from the collector side, assy
3 - СТ230-3708304 Brush spring
4 - Washer 5Т GOST 6402-70 Washer 5Т GOST 6402-70
5 - Screw 2M5x12 GOST 17473-80 Screw 2M5x12 GOST 17473-80
6 - FE-3.599.164-02 Brush, assy
7 - СТ230-3708042 Sealing ring
8 - СТ230-3708009 Adjusting washer
9 - ST 230-3708200 Starter anchor, assy
10 - СТ230-3708050-А Bearing, assy
11 - СТ230-3708600-01 Drive assembly
12 - СТ230-3708602 Spring ring
15 - СТ 230-3708601-01 Branch sleeve
16 - СТ230-3708610-01 Drive clutch, assy
18 - СТ230-3708014 Lever axis
19 - СТ230-3708020 Drive engagement lever, assy
20 - СТ 230-3708003 Tie rod
23 - 291579-P29 Bolt М12-6hх140
25 - СТ230А-3708400 Cover from the drive side, assy
26 - СТ230-3708007 Lock ring
27 - Nut М6 GOST 5927-70 Nut М6 GOST 5927-70
28 - 45 9816 0045 Washer 6Т GOST 6402-70
30 - Screw 2M6x20 GOST 17473-80 Screw 2M6x20 GOST 17473-80
31 - Screw М6х16 GOST 17473-80 Screw М6х16 GOST 17473-80
32 - СТ 230А-3708805 Relay base
33 - СТ230А-3708810 Anchor, assy
34 - ST 230A-3708800 Starter relay, assy
35 - СТ230А-3708808 Sealing ring
36 - СТ230А-3708820 Yoke with cover, assy
37 - Washer 8 GOST 10450-68 Washer 8 GOST 10450-68
38 - Washer 8Н GOST 6402-70 Washer 8Н GOST 6402-70
39 - 250510-P29 Nut М8-6Н OST 37.001.124-93
40 - CT230-3708002 Tip
41 - СТ230А-3708100 Housing, assy
42 - CT230-3708105 Pole screw
43 - ST 230A-3708101 Housing
45 - СТ230А-3708180 Output assembly
46 - СТ230-3708106 Insulating bushing
47 - Vkkt 2M5x8 GOST 71473-80 Vkkt 2M5x8 GOST 71473-80
48 - CT 230-3708110 Excitation coil, assy
49 - СТ230-3708001 Special washer
50 - СТ230-3708003 Tie rod
51 - 45 9816 0003 Washer 4 OST 37.001.115-75
52 - Screw for fastening the casing 2M4x8 GOST 17473-8 Screw for fastening the casing 2M4x8 GOST 17473-80
| Video (click to play). |
ST 230-3708041, ST230-3708300, ST230-3708304, ST 230-3708042, ST230-3708009, ST230-3708200, ST230-3708050-A, ST230-3708600-01, ST 230-3708602, ST230-3708606, ST 230- 3708601-01, ST230-3708610-01, ST230-3708014, ST230-3708020, ST230-3708003, ST230-3708005, ST 230A-3708400, ST230-3708007, ST230A-3708805, ST230A-3708810, ST230A-3708800, ST230A-3708800 , ST230A-3708820, ST 230-3708002, ST230A-3708100, ST230-3708105, ST230A-3708101, ST230-3708102, ST230A-3708180, ST230-3708106, ST 230-3708110, ST230-3708001, ST230-370800


