In detail: do-it-yourself largus starter repair from a real master for the site my.housecope.com.
Removing and checking the starter Lada Largus
We remove the starter for its repair or replacement, as well as when dismantling the engine and gearbox.
We carry out the work on a viewing ditch or overpass.
We show the operations for removing the starter on a car with an engine.
1.6 (16V). By car with an engine
Remove the 1.6 (8V) starter in the same way. Disconnect the terminal of the wire from the negative terminal of the battery.
Remove the protection of the power unit (see "Removing the protection of the power unit", p. 235).
Turn off the nut with the high head "8" (the nut is fixed on the tip of the wire).
Using the "13" head (without extension), unscrew the lower starter mounting bolt.
Use a screwdriver to move the drive gear along the shaft.
The gear should move easily along the shaft without jamming. If the gear sticks to the shaft, the drive must be replaced.
To check the starter, we connect the “positive” terminal of the battery with the upper contact bolt of the traction relay, and the “negative” terminal with the starter housing, by wires for “lighting” the battery.
... we connect with wires the "positive" terminal of the storage battery with the lower contact bolt of the traction relay, and the "negative" terminal - with the starter housing.
In this case, the shaft of the electric motor must rotate. Otherwise, the motor is defective.
To check the traction relay, we connect with wires.
... The "positive" terminal of the storage battery with the control terminal of the traction relay (shown by the arrow), and the "minus" terminal - with the starter housing.
In this case, the drive gear should move out. If this does not happen, the traction relay is faulty.
| Video (click to play). |
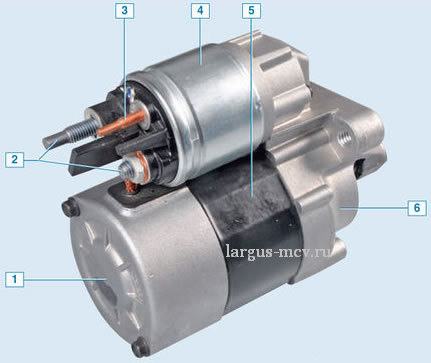
1 - back cover; 2 - contact bolts; 3 - control output of the traction relay; 4 - traction relay; 5 - starter housing; 6 - front cover
Place the car on a two-post lift (electro-hydraulic lift type P -3.2 G with a lifting capacity of 3.2 t). Brake with the parking brake.
Switch off the ignition, raise the hood, disconnect the ground wire terminal from the battery (spanner “10”).
Remove the cover (if equipped) of the ECM by pressing out the two latches (flat screwdriver).
Unscrew the two nuts 1, Figure 3-1, the expansion tank fasteners 2 (wrench “10”).
Figure 3-1 - Attaching the expansion tank:
1 - expansion tank mounting nut;
Remove the expansion tank and lay aside without disconnecting the hoses.
Figure 3-2 - Disconnecting the selection and shift drive cables:
1 - hinges of cables for selection and gear shifting
For vehicles equipped with a JR 5 gearbox:
- disconnect the hinges 1, Figure 3-2, of the selection and shift cables from the gearbox (flat screwdriver);
- press the clips on both sides and disconnect the stoppers of the sheaths of the selection and shift cables from the gearbox bracket.
For vehicles with JH3 gearbox:
- remove the cover 1, Figure 3-3, of the hinge of the gear shift drive;
- unscrew the bolt 2 securing the shift drive rod, remove the distance sleeve and disconnect the rod (wrench “10”).
Figure 3-3- Disconnecting the shift drive linkage:
2 - a bolt of fastening of a rod of a drive of a gear change
Unscrew three bolts 1, Figure 3-4, starter mountings (replaceable head 13, ratchet wrench, extension).
Figure 3-4 - Starter mounting:
1 - starter mounting bolt
Raise the vehicle to a height that is comfortable for the job.
Unscrew the nut 2, Figure 3-5, fastening the bracket 4 to the intake manifold 3 (replaceable head 13, ratchet wrench, extension).
Unscrew the bolt 6 securing the bracket 4 to the cylinder block 5 (replaceable head 17, ratchet wrench, extension).
Remove bracket 4 for intake manifold 3.
Figure 3-5 - Removing the starter:
2 - nut for fastening the bracket to the intake manifold;
4 - bracket for fastening the intake manifold to the cylinder block;
6 - the bolt of the bracket to the cylinder block
Unscrew nut 2, Figure 3-7, and disconnect the harness 1, Figure 3-6, of the ignition system wires from the starter 3 (replaceable head 10, ratchet wrench, extension).
Figure 3-6 - Securing the ignition system wiring harness:
1 - wiring harness of the ignition system;
2 - bracket for attaching the wiring harness;
Figure 3-7 - Disconnecting the wiring harness from the starter:
2 - nut of the bracket for attaching the wiring harness to the starter;
3 - nut for fastening the wire of the electromagnetic relay of the starter;
4 - starter wire fastening nut;
Unscrew the nut 4, Figure 3-7, fastening the starter wire 5 (the head is a replaceable ratchet wrench, an extension).
Disconnect the starter wire.
Unscrew the nut 3 securing the wire of the electromagnetic relay of the starter 5 (replaceable head 8, ratchet wrench, extension).
Install the starter in the reverse order to removal.
In this case, the tightening torques of the threaded connections:
- starter mounting bolt - 44 N.m (4.4 kgf.m);
- nut for fastening the starter wire - 8 N.m (0.8 kgf.m);
- nut for fastening the wire of the electromagnetic relay of the starter - 5 N.m (0.5 kgf.m);
- the bolt of the gear shift drive rod fastening - 27.5 N.m (2.75 kgf.m).
Connect the terminals to the battery
In one of the articles on our site, we have already talked about possible malfunctions of the starter of the Lada Largus car. More details about this in the article "Starter Lada Largus". In this article, we want to talk about how to audit and repair a starter. First of all, I would like to say that even a starter removed from a car should be re-checked before disassembling, perhaps this will save you a lot of time and effort.
Before disassembling the starter motor, verify that it is defective by the following simple checks.
1. Use a screwdriver to check for ease of movement of the drive freewheel along the shaft.
2. Rotate the drive gear. It should turn easily relative to the coupling hub in the direction of rotation of the armature and should not turn in the opposite direction.
3. Connect the wires for "lighting" the "minus" terminal of the battery removed from the car with the starter housing. Connect the second wire with one end to the positive terminal of the storage battery, and the other to the terminal of the control wire of the traction relay. If the traction relay is working properly, then a click will be heard and the drive clutch will extend. Otherwise, the traction relay must be replaced.
4. Disconnect the wire from the traction relay control terminal and connect to the lower contact bolt of the traction relay. The starter armature should start rotating at a frequency of more than 6000 minutes. Otherwise, repair the starter.
Next, we will talk about the repair of the Lada Largus starter.
You will need: a "8" wrench, a "13" socket, a Phillips screwdriver, sliding pliers.
1. Unscrew the nut on the lower contact bolt of the traction relay.
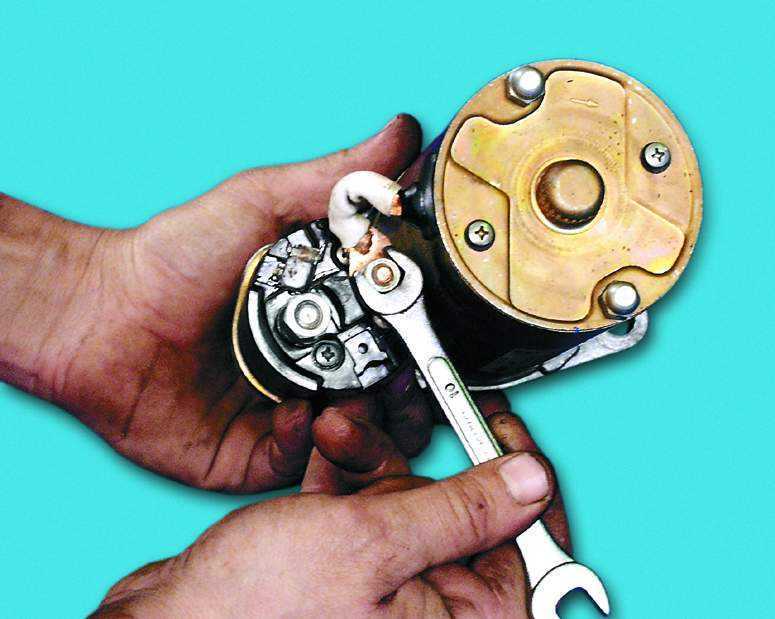
(The photo above shows a similar starter from another car model, but not the Lada Largus starter)
2.. and disconnect the tire from the traction relay contact bolt.

(The photo above shows a similar starter from another car model, but not the Lada Largus starter)
3. Remove the two screws securing the traction relay to the drive end starter cover.
4. . and remove the traction relay.
5. Remove the two drive end cover bolts.
6.. separate the cover and the starter housing, remove the lever support together with the rubber spacer.
8. Remove the drive end cover.
9. Remove the two screws securing the manifold side cover.
10. . and remove the cover.
11. Remove the armature assembly with the brush holder from the stator.
12. Remove the brush holder from the armature.
13. Slide the stop ring over the armature shaft using a suitable mandrel.
14. Using a screwdriver, remove the retaining ring.
15. Remove the stop ring from the armature shaft.
17. Inspect the brush holder. Check the height of the brushes in the brush holder. If the height is 7 mm or less, replace the brush holder with a new one. Check with an ohmmeter the insulated holders for a short circuit to the case. Resistance must go to infinity.
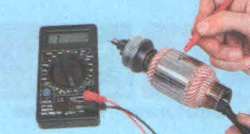
18. There should be no damage (nicks and tears) on the splines and pins of the armature shaft. The armature manifold must be free of burn marks. Remove minor burns with a cloth soaked in gasoline and fine-grained emery cloth. Check the armature winding for a short circuit with an ohmmeter. Resistance must go to infinity.
19. Check whether the armature of the starter traction relay moves easily, whether the contact bolts are closed by the contact plate (using an ohmmeter).
20. Check the drive. Drive gear teeth should not show significant wear. The gear should be able to easily turn relative to the coupling hub in the direction of rotation of the armature and should not turn in the opposite direction. If the gear teeth are worn or damaged or the gear turns in both directions, replace the drive.
21 There should be no cracks or signs of significant wear on the forks' grooves on the starter drive lever.
Assemble the starter in the reverse order to disassembly, taking into account the following.
1. Lubricate the splined surface of the armature shaft with General Electric CC321 silicon grease or equivalent.
2. Lubricate the bearings (bushings) in the starter caps with engine oil.
3. Use pliers to install the stop ring.
4. Before installing the traction relay, apply a thin layer of silicone sealant to the surface of the relay that contacts the starter cover on the drive side.
5. Before installing the brush holder on the anchor, spread the brushes and fix in any available way (for example, a suitable mandrel).
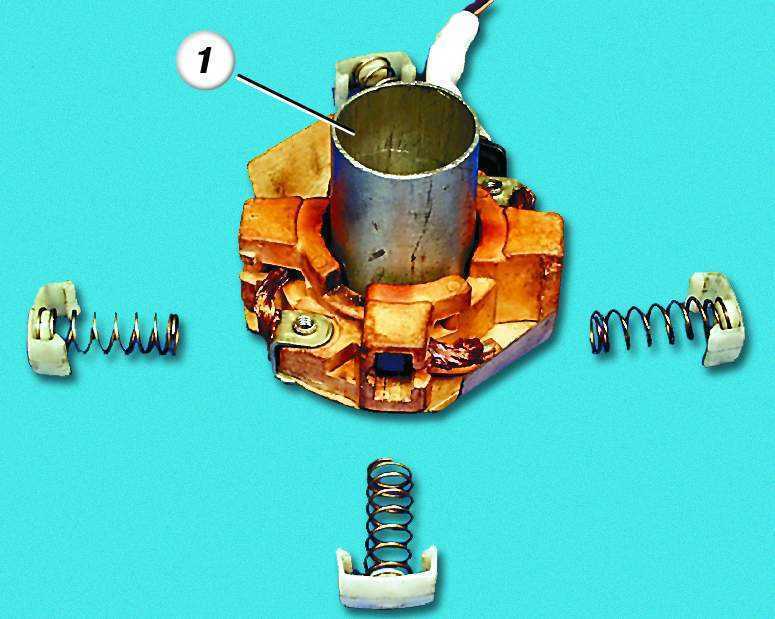
(The photo above shows details of a similar unit from another car model, but not from the Lada Largus starter)
Well, in general, the last replacement of the starter did not give results, it started at 50,000 t.km. mileage and the matter turned out to be in the wine, such a situation the crown on the largus is not sold separately, only with a flywheel in the largus center of Kropotkin, 24 thousand were announced, horror. At the car market, they finally said 25 pieces, and only a dealer who was familiar with spare parts read out 12 thousand for me, took a Loganavian crown in advance for 700 wooden ones, I thought it would fit and saw the difference, the thickness of the teeth is the same 119 but the inner diameter is different per millimeter. A file and a blowtorch went into battle and voila, everything grew together for two nights for a hundred spent but happy))) to remove the gearbox, you need to throw off the stretcher and change the oil in the gearbox. Clutch in good order disc good petals on the basket without development the bearing does not make noise
Yes, this is not a Zhigul, here the floor of the car needs to be scattered, by the way, the same must be done to replace the master cylinder.
Wow ... how is it that killed the crown?
Yes, I think the raw in my native Vince was a file on the old straight, I easily combed the tooth off (((
Is 75w-85 flooded for the first time instead of the native one?
Yes, it has nothing to do with oil
I also think that oil should not be associated
oh, what a logical chain)) the viscosity is not in the ABC book, so I'm interested, I also want
I also changed the oil, that's why I'm interested!
Now we will show you how to sort, disassemble and check the elements of the starter's performance.
This procedure is suitable for Renault Logan, Sandero, Lada Largus cars.
- First you need to unscrew the nut by 13 mm, release the contact.
- Then we can unscrew the 2 bolts securing the solenoid relay. Removing these bolts can often require a special impact screwdriver to avoid ripping off the edges if they don't fit.
- Then we unscrew 2 bolts 8 mm and 2 screws, remove the cover. The brushes remain with us, since we unscrewed them. And now you can use the head on the diameter of the armature, for example, 22 mm.We insert it and pull the brush assembly up.
- The brushes remain clamped for easy installation. Be sure to remember how everything is. Remove the remaining covers. We clean the contaminated anchor and, if necessary, change the bendix.
To remove the bendix, it is necessary to remove the stopper. To do this, you can use a 13 mm head and a hammer: knock down the stopper cover and tighten the retaining ring.
We clean all the working surfaces, remove the old unusable grease, blow everything out. Also, be sure to clean the anchor. What is the best way to do this? For convenience, we clamp the anchor into the drill with the part where the retaining ring is and, turning on the drill, clean it with fine sandpaper.
The question may arise what kind of lubricant to apply. The more expensive and better the lubricant and the more resistant to temperatures, the better. A lot of grease is undesirable, since at high temperatures it will liquefy and may leak.
Then we collect everything in the reverse order. You can choose a head by diameter. After we put the stopper on the groove, we put on the washer - we take the key, also picking up the head, and knock it out.
Then you need to put the anchor in the cover. To do this, first grease the fork and all rubbing surfaces, put it on the anchor. Also, on the anchor, we lubricate the part of the shaft that will enter the bushing.
Then we install the magnets. Before installing the brushes, we check their condition. If they are normal, we install them: we pull them from the head to the anchor in the cocked state. Apply a small amount of grease to the back and put on the cover. We put on the bolts and screws and tighten.
A very important point: be sure to dry and degrease the inside of the starter glass. Do not forget the spring and install the retractor.
After installation, the assembled starter must be checked. To do this, we need a working battery and ordinary wires for lighting cars. We turn on one to a minus, the other to a plus, we hang a minus on the starter case, and we close the terminals with a plus. The final check will be under load, since the bendix can only be checked under load.
Starter repair and revision for Renault Logan, Sandero, Lada Largus
Cool with brushes! +1
Disassembly and assembly are shown perfectly. Like any starter in principle. But how to check the armature winding? Is it repair or disassembly-assembly? By the way, the author vkurse that the armature bushings are lubricated with ENGINE OIL and nothing more?
Thank you for the video! I'll try to sort it out myself.
Is it possible to determine the malfunction if the starter clicks, does not rotate and after jerks at speed it catches?
save, the car starts up every other time, the starter does not turn, and after charging the battery everything is fine, the batteries changed but no sense, charging is fine on it ... the clock is reset every time ..
is the logan starter suitable for the 2001 clio?
And what kind of nasty stuff in a can, starting from 4:20, from which they sprayed on the starter parts? Washes too well!
Faced the problem of the starter brush assembly on Logan. Started up every other time, disassembled the starter, put things in order on the retractor relay. Installed, but the problem persists. I had to look for a video of the starter disassembly. Disassembled again for revision of the brush assembly. It turned out that there is good wear on the brushes, plus for some reason they are skewed (I looked at the non-perpendicularity of the end part adjacent to the collector). The residual size of the brushes is about 12-13 mm. Climbed into the Internet for the brushes and could not find it, tk. did not know the brand of my starter. And in my case there are two of them - VALEO and MITSUBISHI. Then I compared the starter on the pictures and found out that my MITSUBISHI. Now the number of the brush assembly in the catalog remains behind the small number. Can you tell me? By the way, how long does a node take before replacing it? Thank you!
The second time I had to disassemble the MITSUBISHI starter from my Logan, since after the first the start problem did not disappear, it started up once after turning the key and the retractor click was heard. I disassembled the brush, cleaned the collector, but the problem remained - to start every other time.Maybe there is another reason, not related to the starter, relay for example? Thank you!
We install the car on a lift or on a viewing pit.
Disconnect the negative terminal of the battery.
Use a flat screwdriver to wring out the clips and remove the cover (if installed) of the ECM.
With a 10 key, unscrew the two nuts 1 for securing the expansion tank 2.
We remove and set aside the expansion tank without disconnecting the hoses.
If a JR5 gearbox is installed, use a flat screwdriver to disconnect the joints 1, selection and shift cables from the gearbox.
We press the latches and disconnect the stoppers of the sheaths of the selection and shift cables from the gearbox bracket.
If JH3 gearbox is installed:
We remove the cover 1, the hinge of the gearshift drive rod. With a 10 key, unscrew the bolt 2 securing the gear shift drive rod, remove the distance sleeve and disconnect the rod.
With a 13 head, we unscrew the three bolts 1 of the starter fastening
If the car is installed on a lift, then raise the car to perform work from below.
Turn off nut 2 with the head 13, fastening the bracket 4 to the intake manifold 3.
With a 17 head, unscrew the bolt 6 securing the bracket 4 to the cylinder block 5.
Remove the intake manifold mounting bracket 4 3.
Turn off the nut 2 with a 10 head
Disconnect the ignition system wiring harness 1 from the starter 3
With a 10 head, turn off the nut 4 of the starter wires 5.
Disconnect the starter wire.
With a head of 8, we unscrew the nut 3 of fastening the wire of the electromagnetic relay of the starter 5
Starter installation
Install the starter in the reverse order of removal.
In this case, the tightening torques of the threaded connections:
- starter mounting bolt - 44 Nm (4.4 kgf.m);
- nut for fastening the starter wire - 8 Nm (0.8 kgf.m);
- nut for fastening the wire of the electromagnetic relay of the starter - 5 Nm (0.5 kgf.m);
- bolt of fastening of the gear shift drive rod - 27.5 Nm (2.75 kgf.m).
We connect the terminals to the battery.
The Renault Logan passenger car is a 5-seater sedan produced by Renault since 2004. In the summer of 2008, a restyling was carried out, and the next, second generation of cars appeared 6 years later - we will not consider it here. During the restyling, they decided not to change the motors, leaving them unchanged: under the hood of the sedan there can be an 8-valve 1.4 MPi, 1.6 MPi or a 16-valve 1.6 liter engine. The 1.0-liter version, as well as diesel engines, were not officially supplied to Russia. Note that an element such as a starter for motors with a different number of valves will be different.
Starters with 8-valve internal combustion engines do not fit 16-valve ones, and vice versa. And the fasteners in both cases will be the same. This is followed by two lists, each with numbers from the catalogs of a particular company. Each list contains the names of assemblies suitable for replacing the original starter. We do not vouch for completeness, although 15 and 9 items are a good choice.


The original item installed from the factory will be highlighted in a different font in the lists. It is worth remembering that Logans have been produced in the Russian Federation since 2005, and there may be several options from the factory.
8-valve engine K7M (1.6) or K7J (1.4):
- 8200 815 083 (Renault)
- 7700 274 303 (Renault)
- 8200 590 412 (DACIA)
- STV1276 or STV1276RB (KRAUF)
- STV1276RB (Motorherz)
- 220399 (Messmer)
- 220399 (ERA, Italy)
- IR9411 (Protech)
- ST11112 (FENOX)
- CS1276 (HC-parts)
- 113932 (CARGO)
- 458 179 (VALEO)
- 8EA 738 081-001 (HELLA)
- M000T46371ZT (Mitsubishi)
The starter power is 0.85 kW, if we talk about the original version.
16-valve engine K4M (1.6):
- 8200 266 777G (Renault)
- 438 163 or 458 179, also TS10E1, TS10E3 (VALEO)
- AXS9274 (Automotor France)
- 2-2873-VA (WAI, Taiwan / China)
- 220399 (Messmer)
- LRS02483 (TRW)
- A75328 (DELTA AUTOTECHNIK)
- 8080180 (FRIESEN)
- 0-986-022-810 (BOSCH)
- S80180N (QUINTON HAZELL, England)
The electric power of Renault starters will be 0.85 kW.

The following are the symptoms by which you can determine whether the starter itself is working or not:
- When the key is turned, a click is heard, but the shaft does not turn. The solenoid relay will be faulty in this case, although wear of the brushes or a short to ground causes the same symptoms.
- Shaft turns with difficulty and stops. Reasons: short circuit in one of the circuits (short-circuited loop), also general mechanical wear.
- If the starter rotates "idle", then its relay is in good order in any case. The problem is caused by broken mechanical parts connected to the solenoid relay.
- Let's say the starter doesn't turn off after starting. Such a malfunction is extremely rare, and the retractor relay needs to be repaired.
We recommend all those interested to study the drawing where the starter device is shown.
Electric starter circuit, its internal structure
The body is a ground contact. The contact "30" is energized all the time, and it is applied to the terminal "50" at start-up. Please note that if the retraction winding is faulty, the motor "M" will not receive voltage. In this case, the starter "clicks", but does not "twist", as indicated in "paragraph 1".
A defective starter can be repaired by finding and replacing the defective part in it. But it is easier to replace the complete assembly. In addition, breakage is more often caused by general wear and tear. And it will be pointless to change one or two details.
According to reviews, the durability of Renault starters is 280-300 thousand km, but this is if it is not operated correctly. The author of the review admits that he used too thick oil for the engine (article on choosing and replacing engine oil with Renault Logan). If you follow all the recommendations, we can assume that the service life of a branded starter is unlimited.
The engine starter is marked with 17 in the figure.
To perform a replacement, carry out the following steps:
- Disconnect the battery (only one “-” terminal);
- Unscrew the nut (copper) from the "50" terminal;
- Do the same with the nut from the 30th terminal;
- Unscrew the three mounting screws, remove the starter.
In the Logan sedans of generations I and II, these operations look the same, and the "preparatory actions" will differ depending on the type of engine (8kl. / 16kl.). Be aware that you can only get to the starter from below. And it is recommended to install the car in a pit: according to reviews, even high "Volgovskih" jacks do not help. Draw conclusions.
Solenoid relay numbers:
- 16 cl .: 594 188 (VALEO), 132977 (CARGO);
- 8 cl .: LRT-121 (Logem), 30226 (Asam), BK65033 (Breckner).
First of all, you need to turn off the negative contact of the battery: loosen the nut with a 10 key and remove the terminal by sliding it up. In Logan sedans, the minus terminal is located on the right.
Negative terminal in "Logan"
The network should not receive voltage, and then the closure of the cord "30" does not lead to something unexpected. When the terminal is removed, the car is placed in the pit. What to do next is discussed in the next chapter.
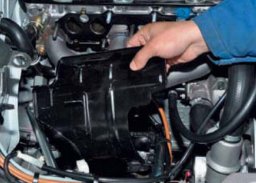
Find where exactly the starter is located. This step is illustrated in photo 1. You will need to follow the steps:
- With a spanner wrench "13" loosen the fastening of the bracket, as shown in photo 2;
- The bolt securing the bracket from below is loosened with a 16 key (photo 3). The bracket is removed by unscrewing the bolt and nut by hand;
- Using the spanner wrench "8" and "10", unscrew the fastening nuts of the terminals "50" and "30" (see Fig. 4). It is better to remove both terminals at once!
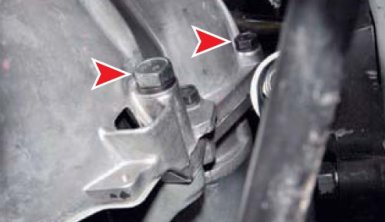
- After removing the car from the pit, find the three starter mounting bolts. Photo 5 shows two bolt heads. The third element is shown in Fig. 6.
- Using the key "13", also ring, unscrew the fastening bolts. You do not need to hold the knot itself from below. And also, if the gearbox rocker gets in the way, it can be dismantled - use the same key "on 13" (Fig. 7).
Replacing a starter with a Lada Largus is done only if it is not possible to repair a starter on a Lada Largus or it will cost more than replacing a new one.
First, we will make a diagnosis starter Lada Largus, without removal. If the diagnostics show a problem in the starter, we remove the starter and put it on a special stand for diagnostics.
After taking readings, the master will produce disassembly and troubleshooting... After determining the cost of repairing the Lada Largus starter, a decision is made on what is best to do: repair and replace the starter with a new one.
Service station on Grazhdanka - 603-55-05, from 10 to 20, no days off.
Service station in Kupchino - 245-33-15, from 10 to 20, no days off.
WhatAapp / Viber: 8-911-766-42-33
ATTENTION. We do not repair starters removed from a vehicle.We independently make diagnostics, make a diagnosis and give a guarantee that the problem is in the starter and that we will solve it.
When to replace or repair a starter:
- the car does not start, the starter does not show signs of life;
- when trying to start the car, noise is heard, the car will not start;
- after starting the engine, the starter is not disconnected;
Replacement warranty - 360 days.
Repair warranty - 180 days.
If necessary, we can help with the evacuation of the car to our service stations.
Removal of the starter is carried out in connection with its replacement, inspection or repair. On LADA cars, the starter is installed on the clutch housing in the front in the direction of travel. Before starting work, disconnect the negative terminal of the battery, drive the car onto the inspection ditch (overpass) and remove the engine protection.
On all modern LADA cars (Lada XRAY, Vesta, Largus, Granta, Kalina, Priora and Niva 4x4), the starter is removed in the same way. Installation is carried out in reverse order. The distinctive features of the process are presented below.
Remove the engine mudguard (instructions for Lada Vesta, XRAY).
For complete sets with manual transmission: Unscrew 2 bolts (No. 1) and remove the clutch hydraulic cylinder (No. 2) without disconnecting it from the hydraulic pipe (No. 3). Hang the cylinder on the technological hook (head "13").
For all complete sets: Unscrew the nut (No. 1) and disconnect the terminal (No. 2) and the block with wires (No. 3) (head "13") from the traction (retraction) starter relay (No. 4).
Remove the 3 bolts (no. 1), remove the clutch cylinder mounting bracket (no. 2) (for vehicles with manual transmission) and the starter (no. 3) (Torx E10).
Remove the cover (if equipped) of the ECM by pressing out the two latches (flat screwdriver). Unscrew 2 nuts (no. 1) securing the expansion tank (no. 2) (key "10"). Remove the expansion tank and lay aside without disconnecting the hoses.
For trim levels with JR5 gearbox:
- disconnect the hinges (No. 1) of the selection and shift cables from the gearbox (flat screwdriver);
- press on the clips on both sides and disconnect the stoppers for the sheaths of the selection and shift cables from the gearbox bracket.
For equipment with JH3 gearbox:
- remove the cover (No. 1) of the hinge of the gear shift drive;
- unscrew the bolt (No. 2) securing the gear shift drive rod, remove the spacer sleeve and disconnect the rod (key "10").
Unscrew 3 bolts (No. 1) fastening the starter (head "13").
Raise the car and unscrew the nut (no. 2) securing the bracket (no. 4) to the intake manifold (no. 3) (head "13"). Remove the bolt (no. 6) securing the bracket (no. 4) to the cylinder block (no. 5) (head "17"). Remove the intake manifold mounting bracket (no. 4) (no. 3).
Unscrew the nut (# 2), Figure 3-7, and disconnect the harness (# 1), Figure 3-6, of the ignition system wires from the starter (# 3) (head “10”).
Unscrew the nut (no. 4), Figure 3-7, fastening the starter wire (no. 5) (head "10"). Disconnect the starter wire. Unscrew the nut (No. 3) securing the wire of the electromagnetic relay of the starter (No. 5) (head "8"). Remove starter.
The process is also shown in the video: