In detail: do-it-yourself starter repair Niva Chevrolet from a real master for the site my.housecope.com.
Before proceeding with Replacing the starter, I disconnected the battery. First, I removed all the underbody protection of the engine.
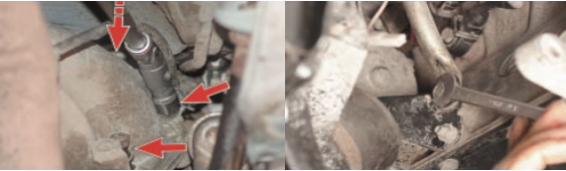
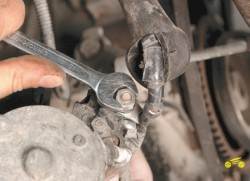
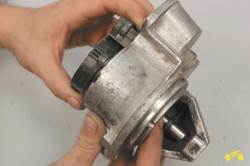
The starter is fastened with three bolts, after they are unscrewed, it can be pulled out from the bottom of the engine, only the rod will interfere with this. So I unscrewed it right away.
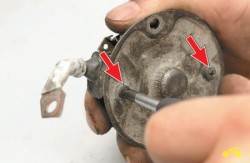
Now you can unscrew the starter. The bottom bolt is easily accessible from below. I unscrewed it with a small ratchet.
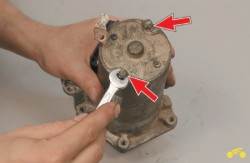
I unscrewed the other two bolts from above. This is what the starter looks like from above.
Here I have already used a spanner key. At the key, just the collar part is slightly bent, otherwise there would be no meanness to these bolts. The middle bolt is also more or less available.
The top bolt is the hardest of the three to reach. But in principle, the key was easily thrown on it, only the key stroke turned out to be very small and it took a long time to turn it.
When all three bolts were unscrewed, the starter easily moved out of its place.
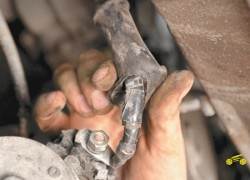
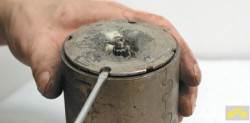
But in order to get it out of there, the starter protection from heat interfered. These are such sheets of metal around it. From the side of the box, the starter rested against the protection with its protrusions, into which the bolts are screwed. At this point, I just folded back the protection with my hands. On the other hand, the protection at the bottom is fastened with a nut. I tried to unscrew it with a large ratchet. She didn't give in. Then I pressed a little harder and she kind of turned around. And when I looked, I saw that the nut did not even think to turn away, but I just rolled the eyelet to which it was attached. True, at the same time, the protection bent back and allowed the starter to be removed and the mount itself did not break off at all and seemed to hold on tightly and did not rattle. I then left it all like that.
| Video (click to play). |
(It turns out that I was wrong here. The nut should not have turned away, it is welded to the mount. And you need to unscrew the bolt that goes into this nut on the other side.)
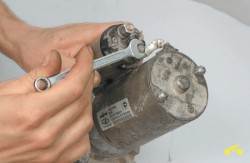
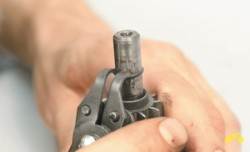
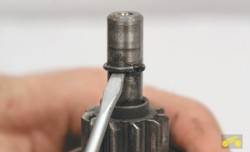
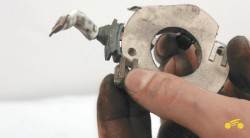
Now the starter easily pulled out of its place. The wires that fit the starter allow you to remove it without disconnecting them.
Only 2 wires fit to the starter. One small red one that's just plugged into the connector. We disconnect it calmly by pulling the connector. The second healthy one, screwed on with a nut, closed with a rubber nozzle, by unscrewing which I completely took out the starter.
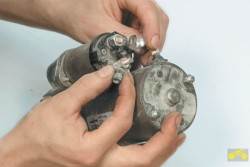
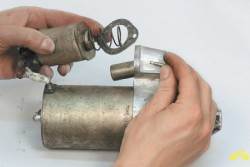
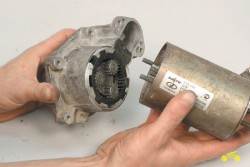
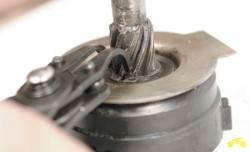
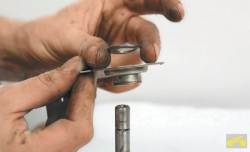
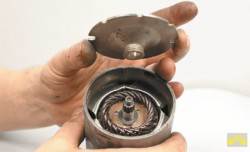
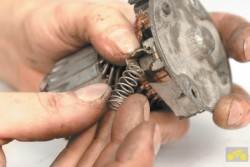
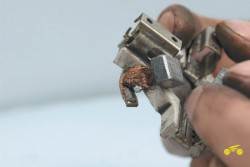
Having unscrewed two nuts from the back of the starter, I disconnected its two halves and saw this picture.
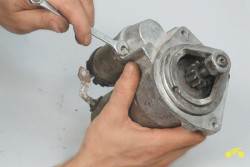
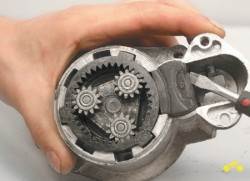
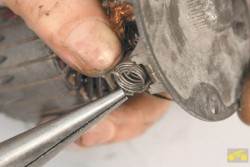
It turned out that inside it there is a plastic part in the form of a glass with teeth, on which three gears run. So it flew apart and these gears therefore did not run in a circle and therefore did not rotate the gear that meshes with the flywheel.
And the gear that turns them also lost one tooth, but most likely this is due to flying off plastic fragments.
This photo report shows in detail how to make with your own hands starter replacement by car Chevrolete Niva. It is worth noting that replacing the starter is quite a rare need. In 80% of cases, the starter can be repaired. In our case, there was a mechanical breakdown of one of the starter drive gears. This spare part is not sold separately, so I had to replace it with a new starter.
There is nothing complicated in the procedure for replacing a starter. He can do it himself. From tools you'll need:
- Ratchet wrench and heads for 10, 12;
- Phillips and flat screwdrivers;
- A penetrating lubricant like WD-40 may be needed;
Also we advise you to read with our video on starter malfunctions, the main possible causes.
Propeller
Participant![]()
Popularity:
Age: 49
Is registered: 20.10.
Posts: 50
Location: Tver
Before proceeding with the removal of the starter, I disconnected the battery.
First, I removed all the underbody guards.
The starter is fastened with three bolts, after they are unscrewed, it can be pulled out from the bottom of the engine, only the rod will interfere with this. So I unscrewed it right away.
First the nut from the bottom.
Now you can unscrew the starter. The bottom bolt is easily accessible from below. I unscrewed it with a small ratchet.
I unscrewed the other two bolts from above. This is what the starter looks like from above
Here I have already used a spanner wrench. At the key, just the collar part is slightly bent, otherwise there would be no meanness to these bolts. The middle bolt is also more or less available.
The top bolt is the hardest of the three to reach. But in principle, the key was easily thrown on it, only the key stroke turned out to be very small and it took a long time to turn it.
When all three bolts were unscrewed, the starter easily moved out of its place.
But in order to get it out of there, the starter protection from heat interfered. These are such sheets of metal around it. From the side of the box, the starter rested against the protection with its protrusions, into which the bolts are screwed. At this point, I simply pushed back the protection with my hands (in the photo it is already bent).
On the other hand, the protection at the bottom is fastened with a nut. I tried to unscrew it with a large ratchet. She didn't give in. Then I pressed a little harder and she kind of turned around. And when I looked, I saw that the nut did not even think to turn away, but I just rolled the eyelet to which it was attached. True, at the same time, the protection bent back and allowed you to remove the starter and the mount itself did not break off at all and seemed to hold on tightly and did not rattle. I then left it all like that.
(It turns out that I was wrong here. The nut should not have turned away, it is welded to the mount. And you need to unscrew the bolt that goes into this nut on the other side.)
Now the starter easily pulled out of its place.
The wires that fit the starter allow you to remove it without disconnecting them.
Only 2 wires fit to the starter. One small red one, which is simply plugged into the connector. We calmly disconnect it by pulling the plug. The second healthy one, screwed on with a nut, closed with a rubber nozzle, by unscrewing which I completely took out the starter.
This is what the place where the starter was installed looks like.
Having unscrewed two nuts from the back of the starter, I disconnected its two halves and saw this picture.
It turned out that inside it there is a plastic part in the form of a glass with teeth, on which three gears run. So it shattered into pieces and these gears therefore did not run in a circle and therefore did not rotate the little gear that meshes with the flywheel.
And the gear that turns them also lost one tooth, but most likely this is due to flying off plastic fragments.
The truth is somehow not very hard to believe that this happened only from the ingress of water into the starter. Most likely, the water aggravated the already begun process of cracking of the plastic from overheating, when even in winter I turned the starter a lot to start. I just do not understand why this part is plastic? After all, it should have a fairly large load.
As it turned out, they don't seem to sell spare parts for the starter. I had to buy a new one.
I installed it in the reverse order. First I connected the wires. Then he inserted it into place. I inserted the middle bolt first. At the same time, the bolt was inserted from above, with his left hand, and with his right hand he pushed the starter from the other side of the protection. Then he inserted the top bolt and tightened both of them. After that, I inserted and tightened the bottom bolt from below. After that, I screwed back the rod, which closed the starter outlet and the engine protection. And the starter protection was left in the bent position. I connected the battery and checked that everything works.
When everything was already collected, I was able to state that there is nothing super complicated in this operation.
Last edited by Propeller (Fri May 12, 2006 11:23 am); edited 1 time in total
It may happen that the Chevrolet Niva does not start, or it does, but with periodic interruptions. This may be due to a failure, for example, of the electrical or fuel system. The most common breakdown is when the starter fails. But in order to correctly and fully carry out the diagnosis, it is required to remove the starter, the Chevrolet Niva is no exception.
This device is a direct current electric motor, which comes into activity from a permanent magnet, which is combined with a planetary gearbox, plus a two-winding electromagnetic relay. Therefore, before dismantling, you should understand whether it is the reason that the engine does not want to start. This can be determined both visually and by replacing the battery.
It is necessary to do a number of actions:
- We check all the existing electrical connections that connect the starter and the battery, since it happens that poor contact between ground and positive leads to poor operation of the device, and a click of the retractor relay is heard, thereby there is not enough power to turn the crankshaft in the engine. This problem is eliminated by stripping the contacts of the starter, battery, various groups of contacts.
- We check the battery itself, it is necessary to replace the load plug itself with a proven one that is working. If there is no result, then it is necessary to remove the unit and replace it.
To make a replacement you need:
- We disconnect the terminals from the battery, if this is not done, then a short circuit may occur, which will lead to a complete replacement of the wiring

- Using a ratchet wrench, remove the crankcase protection
- We tighten the three bolts that secure the starter
- We dismantle thermal protection
- Together with the wires, carefully pull out the unit, pulling it out, carefully pull the wires towards you and disconnect from the device.
- The power wires that are connected can be cleaned, perhaps the reason for the unstable start of the engine lies in poor contact.

After it has been removed, you can make diagnostics and subsequent repairs.
When the starter is removed, you can try to repair it yourself or take it to a specialized service. If you have experience and an idea of how everything works and you, for example, are sure that the cause of the breakdown, for example, lies in the failure of the retractor relay, then you can start repairing yourself. But in any case, to be sure that this is the problem in it, it should be checked on a special stand where there is a load, since at idle it can work as needed, but not under load.
Another reason for poor ignition can be a malfunction of the planetary gear, which has plastic parts. You can understand in what condition they are by unscrewing the unit and disassembling it in half, for this, simply unscrew a couple of nuts in its back.
As the masters say, the Chevrolet Niva starter, unsuitable for repair, since spare parts for it are not sold, but time does not stand still and you can do everything yourself. After the repairs are made, everything is assembled and installed in place in the reverse order.
Dismantling the starter on a Chevrolet Niva car is performed to replace the failed elements. To carry out repair work, prepare a standard set of tools and perform the following sequence of actions:
- After removing the starter, unscrew the nut and disconnect the wires of the positive brushes from the contact bolt.
- We unscrew the two screws and remove the traction relay from the starter. A gasket will be installed between the relay and the gear housing. Replace it if damaged.
- Raising the loop of the traction relay armature slightly upward so that it disengages from the lever, remove the anchor.
- Now we unscrew the two nuts of the tie rods holding the starter housing with the gearbox.
- We take out the bolts and remove the starter cover from the drive end assembly with the gearbox.
- Prying off with a flat screwdriver, remove the gearbox with a drive from the cover.
- Remove the rubber seal from the starter gear drive lever. If it is damaged, replace it with a new one.
- Next, we remove three planetary gears from the carrier axles. Wash them in kerosene and inspect them for mechanical damage or excessive wear, replace them with new ones if necessary.
- Remove and disassemble the starter drive.
- Now we need to remove the circlip from the internal gear.
- Then remove the washer and support from the shaft.
- Remove the internal gear from the shaft.
- Next, remove the central gear from the armature shaft. Rinse it and inspect for mechanical damage and temporary wear, if necessary, replace it with a new one.
- We take out two tie rods.
- Further along the perimeter, we pry the armature shaft support with a small flat screwdriver.
- We remove the armature shaft support and the washer, which will be installed right there on the armature shaft.
- We take out the armature complete with the brush holder from the starter housing.
- Bend back the brush spring holders using a small flat screwdriver.
This completes the repair work on disassembling the starter on the Chevrolet Niva car. Carry out the necessary repairs, then reassemble the starter in reverse order.
The resistance should be very large (strive to infinity). Otherwise, replace the brush holder with a new one.
In case of strong wear of the brushes, we change the brush holder assembly.
We assemble the starter in the reverse order. We mount the brush holder before installing the armature in the starter housing. Before installing the brush holder on the armature collector, slide the brushes into the guides and tie them with wire. After installing the brush holder on the armature collector.
We install the stop ring of the drive gear on the stop ring using sliding pliers.
We install the traction relay so that its control terminal is located on the right side.
Chevrolet Niva Car Owners and Lovers Club
Before that, I read books to imagine how to shoot it, read the forum. In general, nothing too complicated, only inconvenient access to it. When I already on the car looked where it is really located and how it all looks, I even doubted whether it was worth doing this. But then I decided to try it all the same.
In the end, I can say that it is not that difficult. Therefore, I decided to make a photo report, maybe someone will come in handy.
It is true that I did not photograph how I shot the old starter, I only filmed the process of installing the new one, but I will give these photos in reverse order to show how to remove the starter.
First, I removed all the underbody guards.
Now you can unscrew the starter. The bottom bolt is easily accessible from below. I unscrewed it with a small ratchet.
I unscrewed the other two bolts from above. This is what the starter looks like from above
Here I have already used a spanner wrench. At the key, just the collar part is slightly bent, otherwise there would be no meanness to these bolts. The middle bolt is also more or less available.
The top bolt is the hardest of the three to reach. But in principle, the key was easily thrown on it, only the key stroke turned out to be very small and it took a long time to turn it.
When all three bolts were unscrewed, the starter easily moved out of its place.
On the other hand, the protection at the bottom is fastened with a nut. I tried to unscrew it with a large ratchet. She didn't give in. Then I pressed a little harder and she kind of turned around. And when I looked, I saw that the nut did not even think to turn away, but I just rolled the eyelet to which it was attached. True, at the same time, the protection bent back and allowed you to remove the starter and the mount itself did not break off at all and seemed to hold on tightly and did not rattle. I then left it all like that.
(It turns out here I was wrong.The nut did not have to turn away, it is welded to the mount. And you need to unscrew the bolt that goes into this nut on the other side.)
Now the starter easily pulled out of its place.
The wires that fit the starter allow you to remove it without disconnecting them.
Only 2 wires fit to the starter. One small red one, which is simply plugged into the connector. We calmly disconnect it by pulling the plug. The second healthy one, screwed on with a nut, closed with a rubber nozzle, by unscrewing which I completely took out the starter.
This is what the place where the starter was installed looks like.
Having unscrewed two nuts from the back of the starter, I disconnected its two halves and saw this picture.
It turned out that inside it there is a plastic part in the form of a glass with teeth, on which three gears run. So it shattered into pieces and these gears therefore did not run in a circle and therefore did not rotate the little gear that meshes with the flywheel.
And the gear that turns them also lost one tooth, but most likely this is due to flying off plastic fragments.
The truth is somehow not very hard to believe that this happened only from the ingress of water into the starter. Most likely, the water aggravated the already begun process of cracking of the plastic from overheating, when even in winter I turned the starter a lot to start. I just do not understand why this part is plastic? After all, it should have a fairly large load.
I installed it in the reverse order. First I connected the wires. Then he inserted it into place. I inserted the middle bolt first. At the same time, the bolt was inserted from above, with his left hand, and with his right hand he pushed the starter from the other side of the protection. Then he inserted the top bolt and tightened both of them. After that, I inserted and tightened the bottom bolt from below. After that, I screwed back the rod, which closed the starter outlet and the engine protection. And the starter protection was left in the bent position. I connected the battery and checked that everything works.
When everything was already collected, I was able to state that there is nothing super complicated in this operation.
Location: MOSCOW, Central Administrative District, Khamovniki
Like breast augmentation: here's the boob before. here in the process, but after!
One good punch in the ear replaces three hours of educational conversation.
food, rustling and swearing softly ..
Now it is clear why the starter needed an additional heat shield - in order to protect the entot plastic crown of teeth from heating and destruction.
Propeller, at the bottom attachment point of the screen, you need to unscrew not the nut, but the bolt. The nut is welded to the ear
Cause and effect should not be confused. First, the central metal gear collapsed. And then its fragments shattered the plastic. And the shield is needed to protect the wires from the collector. Hot, it is strong and radiates.
Helpful note. Propeller, pliz, correct this point in the report.
in comparison with the Niva engine, we have a 2-layer screen, you can see it on the photos: it consists of a former Niva screen and an additional one, riveted to the Niva bottom. Moreover, in a book of 2123 the screen is identical to a single layer. So I figure out the reason why the second layer was riveted. since to protect the wires, one Niva screen is enough. At the same time, upon direct examination, it is clear that the additional screen protects the wires, and the starter mounting bolts! Because of which? Are the bolts overheating? Unlikely. And then there is plastic inside.
By the way, because of this additional screen, the ears of the screen fastening break down: because the fish soup remains from the cornfield in terms of strength, and the weight of the screen has doubled. At myself, I uncleaned the additional screen and threw it away, and left only one layer (Niva). Right now, I think that maybe I threw it out in vain, the gear will melt.
Helpful note. Propeller, pliz, correct this point in the report.
You you can not reply to messages
You you can not edit your posts
Before proceeding with Replacing the starter, I disconnected the battery. First, I removed all the underbody protection of the engine.
The starter is fastened with three bolts, after they are unscrewed, it can be pulled out from the bottom of the engine, only the rod will interfere with this. So I unscrewed it right away.
Now you can unscrew the starter. The bottom bolt is easily accessible from below. I unscrewed it with a small ratchet.
I unscrewed the other two bolts from above. This is what the starter looks like from above.
Here I have already used a spanner key. At the key, just the collar part is slightly bent, otherwise there would be no meanness to these bolts. The middle bolt is also more or less available.
The top bolt is the hardest of the three to reach. But in principle, the key was easily thrown on it, only the key stroke turned out to be very small and it took a long time to turn it.
When all three bolts were unscrewed, the starter easily moved out of its place.
But in order to get it out of there, the starter protection from heat interfered. These are such sheets of metal around it. From the side of the box, the starter rested against the protection with its protrusions, into which the bolts are screwed. At this point, I just folded back the protection with my hands. On the other hand, the protection at the bottom is fastened with a nut. I tried to unscrew it with a large ratchet. She didn't give in. Then I pressed a little harder and she kind of turned around. And when I looked, I saw that the nut did not even think to turn away, but I just rolled the eyelet to which it was attached. True, at the same time, the protection bent back and allowed the starter to be removed and the mount itself did not break off at all and seemed to hold on tightly and did not rattle. I then left it all like that.
(It turns out that I was wrong here. The nut should not have turned away, it is welded to the mount. And you need to unscrew the bolt that goes into this nut on the other side.)
Now the starter easily pulled out of its place. The wires that fit the starter allow you to remove it without disconnecting them.
Only 2 wires fit to the starter. One small red one that's just plugged into the connector. We disconnect it calmly by pulling the connector. The second healthy one, screwed on with a nut, closed with a rubber nozzle, by unscrewing which I completely took out the starter.
Having unscrewed two nuts from the back of the starter, I disconnected its two halves and saw this picture.
It turned out that inside it there is a plastic part in the form of a glass with teeth, on which three gears run. So it flew apart and these gears therefore did not run in a circle and therefore did not rotate the gear that meshes with the flywheel.
And the gear that turns them also lost one tooth, but most likely this is due to flying off plastic fragments.
This photo report shows in detail how to change the starter on a Chevrolete Niva car with your own hands. It is worth noting that replacing the starter is quite a rare need. In 80% of cases, the starter can be repaired. In our case, there was a mechanical breakdown of one of the starter drive gears. This spare part is not sold separately, so I had to replace it with a new starter.
There is nothing complicated in the procedure for replacing a starter. He can do it himself. From the tools you will need:
- Ratchet wrench and heads for 10, 12;
- Phillips and flat screwdrivers;
- A penetrating lubricant like WD-40 may be needed;
Remove the starter protection - you can't crawl. I disassembled the floor of the car and pulled it out through the bottom.
Sometimes it happens that a motorist, having overcome some particularly deep puddle, discovers that the car has stopped starting. This can happen with any car, but this happens especially often with the Chevrolet Niva. How to independently remove the starter from this car, we will tell the reader in this article.
If you open the hood of the Chevrolet Niva, the starter motor will be to the left of the engine, just below the intake manifold. However, it will not be possible to see it, since it is covered from above by a heat-shielding casing. It is also impossible to see it from below, since there it is covered by a crankcase protection.So the only way to get to him is to remove all those protective gear.
- Flat blade screwdriver (medium).
- Ratchet socket set.
- Open-end wrench set.
- A set of spanner keys.
- The machine is installed above the inspection pit. The hood is opened, the negative terminal of the battery is unscrewed and removed with a 10 open-end wrench.
- From the inspection pit, using a socket head of 13, all the fastening bolts of the crankcase protection are unscrewed.
The crankcase cover is removed with a socket head
The lower rod mounting bolt is unscrewed
This cover must be removed
The fastening bolts are unscrewed, the starter is removed
Above is the sequence for removing the starter from a vehicle without air conditioning. On a Chevrolet Niva with air conditioning, the sequence is the same, except for two points.
- The heat shield of the starter on the Niva with air conditioning has a slightly different shape and is 3 cm shorter.
- In order to gain access to the upper mounting bolts of the starter, you first have to remove the hose of the warm air intake. The clamp that secures it to the engine is loosened with a flat screwdriver, and the hose is removed, revealing access to the starter mount.
As you can see, the main problem is not to remove the starter from the Chevrolet Niva, but to get to it. It should be noted here that the above method for removing the starter is not the only one. Some car enthusiasts prefer to remove the starter from the top without using a viewing hole. However, this takes more time, and a lot of experience is required to carry out this procedure. It is for this reason that the article contains a traditional version of the "lower" removal of the starter.
Chevrolet Niva starter diagram: 1 - collector; 2 - back cover; 3 - stator housing; 4 - retractor relay; 5 - relay anchor; 6 - cover from the drive side; 7 - lever; 8 - arm bracket; 9 - a sealing gasket; 10 - planetary gear; 11 - bendix; 12 - cover insert; 13 - a restraining ring; 14 - drive shaft; 15 - freewheel clutch; 16 - driving ring; 17 - drive shaft support with insert; 18 - gear wheel with internal gearing; 19 - carrier; 20 - central gear; 21 - armature shaft support; 22 - permanent magnet; 23 - anchor; 24 - brush holder; 25 - brush.
The Chevy Niva starter type 5722.3708 is a direct current electric motor with excitation from permanent magnets, combined with a planetary gearbox and with an electromagnetic two-winding traction relay. Covers and stator housing are tightened with two studs. The armature shaft rotates in two sintered inserts installed in the cover and support. Four permanent magnets are fixed in the stator housing. Rotation from the armature shaft is transmitted to the drive shaft through a planetary gearbox, which consists of a central gear, three planetary gears, a carrier and an internal gear. The planetary gears of the Chevy Niva starter rotate on needle bearings. 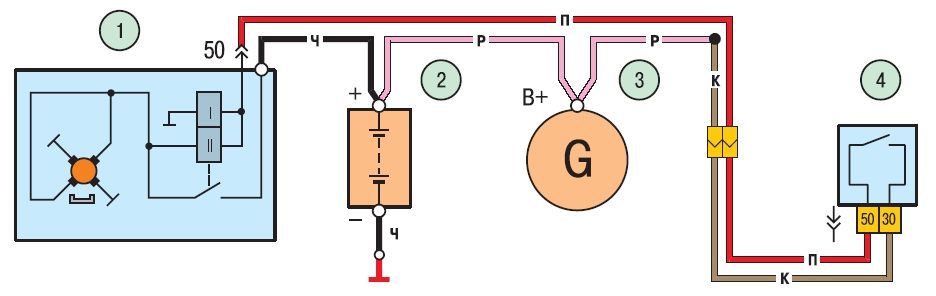
Wiring diagram of the starter Niva Chevrolet: 1 - starter; 2 - storage battery; 3 - generator; 4 - ignition switch.
The Chevy Niva starter connection diagram is shown when the starter is turned on, the voltage from the battery through the ignition switch is supplied to both windings of the starter traction relay (retractor II and holding I). After the contacts of the traction relay are closed, the retraction winding is disconnected.
Before starting work on dismantling the Chevy Niva starter, disconnect the negative wire from the battery terminal.
Remove the three bolts securing the Chevy Niva starter to the clutch housing
Remove the bolt of the lower mounting of the rear inlet pipe strut and move the strut to the side
Carefully so as not to twist the wires, remove the starter
Disconnect the wire block from the starter solenoid terminal
Slide the protective cover, unscrew the fastening nut and remove the wire from the contact bolt of the retractor relay of the Niva Chevrolet starter
Remove the starter from the car; installation of the starter on the Chevrolet Niva is performed in the reverse order of removal.
To disassemble the Chevy Niva starter, you will need keys for 8 and 10, screwdrivers with a Phillips and flat blades and pliers for removing retaining rings.
Unscrew the nut and disconnect the terminal of the wire of the "positive" brushes from the contact bolt
Remove the two bolts securing the traction relay and remove the Niva Chevrolet retractor relay. Pay attention to the gasket, remember to fit it when assembling
Remove the starter retractor armature by lifting it up to release the armature loop from the lever
Unscrew the two tie rod nuts and remove the drive end cover with gear and drive assembly
Pry with a screwdriver and remove the Niva Chevrolet starter gearbox with a drive from the cover
Remove the seal from the drive arm. Replace a damaged or badly worn seal
Remove the three planetary gears of the reducer from the carrier axles. Inspect the gears, if their teeth are damaged, replace the gears
Knock the stop ring off the retaining ring using a suitable mandrel
Using special pliers or prying it off with a screwdriver, remove the retaining ring, and then the limiting
Remove the actuator assembly with the lever and bendix
Remove the retaining ring from the lever
Remove the lever with drive ring and washer
Remove the internal gear retaining ring then the washer and shaft support
Remove the internal gear
Remove the center gear from the armature shaft of the Niva Chevrolet starter
Examine the gear. Replace the pinion if the gear teeth are badly worn or broken.
Take out the two tie rods
Pry with a screwdriver and remove the armature shaft support
Please note that a washer is installed on the armature shaft
Remove the starter armature assembly Chevy Niva with brush holder from the stator housing
Bend back the spring clips of the brushes and remove the springs
Remove the rear cover assembly with the Chevy Niva brush holder from the armature shaft
Examine the Chevrolet Niva Anchor. If the collector 1 is dirty or has risks, traces of burning, etc., sand the collector with fine glass cloth. If there is a significant roughness of the collector or mica protrusion between its plates (lamellas), grind the collector on a lathe and then grind it with fine glass sandpaper. The runout of the core relative to the shaft journals should not exceed 0.08 mm. If not, replace the anchor. If you find a yellow coating from the bearing on the shaft 2 of the armature, remove it with a fine sandpaper. If there are scuff marks, nicks on the surfaces of the journals and splines of the shaft, replace the armature. Check the reliability of soldering the leads of the winding 3 of the armature to the collector plates. Inspect the winding at the ends of the armature; the diameter of the winding should be less than the diameter of the iron package of the armature. Otherwise, replace the anchor.
Examine the Chevrolet Niva brush holder. Check the ease of movement of the brushes in the brush holder guides. They must move without jamming and the brush holder itself must not be damaged.
Check with a megohmmeter or with a lamp supplied with a voltage of 220 V, whether there is no short circuit of the armature winding to ground
Check if there are any short circuits between the sections of the armature winding or the collector plates of the starter, whether there are breaks at the soldering point of the winding sections to the collector plates
Remove the two screws and remove the brush holder from the collector side cover
Remove the brush terminals and remove the Chevy Niva starter brushes
Remove the connecting bar
Inspect the starter connecting bar. Replace it if necessary.
| Video (click to play). |
The assembly of the Niva Chevrolet starter is carried out in the reverse order. Before assembly, lubricate the drive gear teeth with engine oil, the drive shaft helical splines, the internal gear teeth, the planetary gears and the rotor shaft splines with grease (CIATIM-201, -202, -203 or Litol-24).


