In detail: do-it-yourself repair of the Chaika 3 washing machine from a real master for the site my.housecope.com.
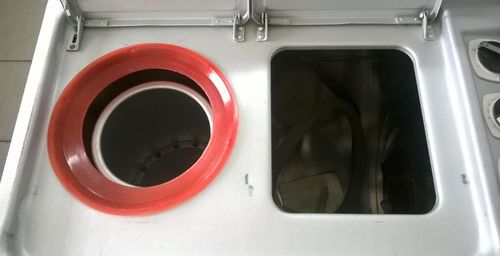
The CHAIKA washing machine is designed for washing and rinsing linen at home. The machine has a double-tank structure and consists of a welded body, inside which there are a washing tank and a centrifuge tank.
The activator drive consists of an asynchronous motor, pulleys and a V-belt. The centrifuge has an elastic rubber suspension to reduce vibration and noise. A centrifugal pump is attached to one end of the motor shaft. It is connected by hoses to the valve device and the outlet connection
Rice. one Appearance and structure of CM Chaika
On the cover of the case there are two knobs of the time relay for turning on the activator and the centrifuge. For ease of movement, four rollers are attached to the machine body. To protect the motor windings, the RTK-S relay is included in the activator circuit, and the RT-10 relay is included in the centrifuge motor circuit.
The electrical equipment of the "Chaika" washing machine consists of an M1 engine of the AVB-071-4S U4 type, 180 W, M191, TU 16-513-028-78; working capacitor SG, type KBG-MN-2-600 V-6 μF ± 10%, GOST 6118-78; thermal protective relay RT, type RT-10-1.4-UHL4, TU 16-523-297-75; time relay RV, type RV-6A, TU 25-07-1232-78; mode switch В2 ′, type С-1-00-4 / 250, TU 27-09-1222-78; electronic reversing device ERU-1-UHL4, TU 27-36-781-79 and radio interference filter elements - capacitors SZ '; С4 ′ type MBM-500 V-0.1 μF ± 20%, GOST 23232-78 and resistor R type MLT-2-15 Ohm + 10%, GOST 7113-77.
The centrifuge drive consists of an M2 engine of the DCSM-ZB UHL4 type, 220 V, TU 16-513-368-78; working capacitor С2 ′ of the MBGP-1-630 V-10 μF ± 10% type, GOST 7112-74; microswitch VG type MP 2101 U4, isp. 311, TU 16-526-322-78 and time relay RV type RV-8A, TU 25-07-1232-78.
| Video (click to play). |
Rice. 2 The electrical schematic diagram of the Chaika washing machine.
The ERU installed on CHAYKA machines usually allows you to adjust the washing time from 0 to 6 minutes. For the best quality wash, the cycle of the machine should be as follows: 50 s - rotation in one direction, 10 s - break, 50 s - rotation in the other direction, 10 s - break, etc. In this case, the washing machine can be improved, see the modernization of the washing machine, where a device for reversing the CM electric motor is proposed. This device is also suitable in case of failure of the electronic control system.
Used “Information materials TSNIITEI. 1980-1990 "
All the best, write
Washing machines manufactured by Chaika are representatives of semi-automatic equipment of the budget series. This electrical appliance is intended for washing, rinsing and drying laundry at home. It has different characteristics depending on the model.
Washing machine manufactured by Chaika
The most popular models are:
All models have a two-tank design, with the main elements:
- welded tank;
- a tub for washing linen with different capacities (depending on the model);
- centrifuge tank for wringing and drying things.
The device of the technique involves 2 stages of washing:
- The dirty laundry is loaded into the first tub, the washing mode is selected and started.
- Clean laundry must be transferred to the centrifuge tank to dry it.
Compartments for washing and spinning
Comparative characteristics of the models are shown in the table below.
To extend the life of household appliances, you should adhere to simple rules.
In particular, the instructions for the Chaika washing machine state that before washing it is necessary:
- Pour hot water into the tank up to the required mark.
- Add washing powder.
- Turn on the engine of the Chaika washing machine for a few minutes.
Considering that the modes involve a quick wash cycle, you need to use a small amount of detergent. At the end of the process, you should:
- Clean the inner mesh of the tank and rinse it.
- Rinse the hoses and pump with hot water.
- Wipe dry the centrifuge and wash tank.
- Remove all components in a special niche.
It should be avoided for storing equipment in rooms with high humidity or temperatures below + 5C.
Chaika 85 is an older model, therefore it is more susceptible to possible breakdowns, but this does not mean the poor quality of the equipment. All models are complex mechanisms, and, as you know, any mechanism is susceptible to breakage.
The most common causes of a washing machine breakdown due to reasons beyond the control of the user can be:
- hard water provokes the appearance of scale on the internal parts of the unit, which leads to their rapid wear;
- voltage surges can cause burnout.
You should also carefully follow the washing instructions to avoid damage and the need for repairs. Excessive load of laundry can also cause malfunction of the device.
If problems arise in the operation of the Chaika 2m washing machine, or other models, you should call the master to fix the breakdown.
Concerns may include:
- the presence of a burning smell;
- during operation, the device makes a grinding noise, excessive rumble or vibrates;
- the washing process significantly exceeds the set time;
- the elements for selecting the washing modes do not work;
- water does not heat up or flows out;
- the machine does not drain.
Having certain skills in working with electrical circuits and a set of necessary tools, you can independently repair the washing machine. However, in the absence of basic techniques for working with mechanical and electrical circuits, a qualified specialist should be involved in the repair.
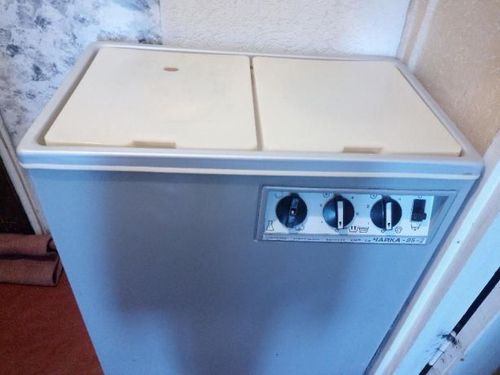
 Possible breakdowns and their causes for Chaika washing machines
The Chaika 3 washing machine, like its other models, has similar characteristics. Therefore, the possible causes of breakdown in them can be caused by identical reasons.
The most common problems in the operation of household appliances are:
The engine does not run in the "spin and dry" mode:
- wear of the carbon shields of the collector motor;
- a wire break has occurred in the electrical circuit;
- the thermal, starting or temporary relay is out of order;
- malfunction of the starting capacitor.
The rotor does not rotate when the engine is running:
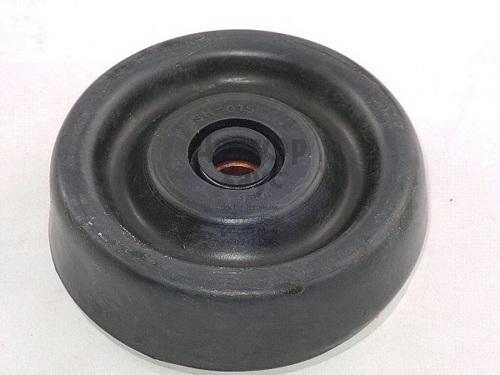
- rubber diaphragm bushings are out of order or worn out;
- the laundry is crumpled in the rotor.
During spinning, the engine emits characteristic sounds, but there is no rotation:
- laundry has fallen into the centrifuge tank;
- the possible load of laundry has been exceeded;
- There is an excessive amount of water in the centrifuge.
Water flows out from under the washing machine:
- breakdown of the pump;
- membrane deformation;
- damage to the tube.
- The water level indicator may malfunction if the drain hose is kinked.
- The drum does not rotate when the engine is running, it can be caused by the drive belt slackening.
- If the fluid does not drain, but the engine is working properly, the cause may be a clogged filter.
This list of breakdowns includes the most common problems in the operation of household appliances, in particular the Chaika 3 and 2m washing machine. The exact cause of the breakdown and its high-quality repair can only be done by a qualified technician. The Chaika washing machine is a budget technique that does its job perfectly. It is optimal for a summer cottage or a rented apartment, when it is not cost-effective to install expensive household appliances.
You turned the switch and saw that the centrifuge in your washing machine is not working. There are several reasons for the problem:
- malfunction of the protective sensor;
- timer problem;
- brake pads;
- motor winding.
In some models, for example, Saturn or DAEWOO (Daewoo), a sensor is installed on the door covering the centrifuge tank. It is designed to disable the start of the device when the door is open. To get to this sensor, you will have to remove the top panel of the washer.
Under it you will see a sensor with two contacts that you need to wipe cotton wool with alcohol... Do not scratch or sand the contacts with a knife. Check sensor operation. With the cover closed, the contacts should close.
The timer in most semiautomatic washing machines (SMP) is located under the top panel of the unit. You can repair it, cleaning the contacts.
There can be a lot of tips on how to remove the panel, due to the design features of machines from different companies.
After removing the top panel, you will see a device that resembles a clock with gears. Inside it you can see contacts that can burn out during long-term operation of the unit. Soot appears on them, which does not transmit current.
Disassemble the timer carefully. The mechanism cover also serves for attaching gears to it. After unscrewing the three screws, it must be removed so that the gear wheels do not fall out. If you are afraid that you may not remove the cover carefully, then it is better to photograph the mechanism. After opening the cover, you will see contacts. As with the sensor, they must be wiped clean with alcohol.
How does the braking system work in semi-automatic cars? The brake pads are installed under the centrifuge and provide braking when the door is opened. It is connected to the lid by means of a cable. When the cover is opened, the cable is stretched and the brake pads wrap around the rotating part of the engine - the centrifuge is braked.
Open the back wall of the SMP and check the tension of the cable, the lack of contact of the pads with the engine when the door is closed. It is the touch of the brake pads that sometimes prevents the electric motor from starting.
A common cause of centrifuge breakdown is burnout of one of the electric motor windings. You can check this with a tester (measuring device):
- We find the ends of the wires coming out of the electric motor. Usually there are three of them: the first is common, the second is leading to the starting winding, and the third is leading to the working winding. The common wire is marked with the letter “N” (often blue).
- We set the resistance test on the device, and measure it between the blue wire and one of the two, for example, the red one. If resistance readings are present on the device screen, then everything is in order with this winding.
- We continue the same steps with the other pair, blue and white wires. We measure the resistance and look at the readings of the device. If there is no resistance, then the winding is burned out. And the reason that the centrifuge does not work in your washing machine lies in malfunction of the electric motor.
In such cases, the motor is rented either for rewinding, or a new one is bought and installed.
It is difficult to list all the reasons for the breakdown of the spin system. Each model of machines may have its own nuances. Do-it-yourself repair of a semiautomatic washing machine will save you a lot of money. Here are the most common errors in the spin system:
- The engine makes a humming noise, but the spin does not work. This means that it jumped off or belt brokeconnecting the pulleys of the motor and centrifuge.
- When the rubber bushing of the diaphragm is worn out, a large backlash prevents the spinning from starting. Required bushing replacement.
- If, after checking the motor with the device, you are convinced that it is in good working order, then the reason may be faulty thermal relay, or a step-down transformer. These parts are replaced with new ones without repair.
- Check for winding on the motor shaft small thingsthat could fly out during spinning and get inside the machine.
- Unevenly laid laundry in the rotor causes the centrifuge to beat and prevent it from starting.
- If the activator and spin motors do not work, check fuseinside the machine behind the rear wall. It will not be superfluous to disassemble the electrical plug and check the contacts.
The modern NSR cannot be called a simple device. Some malfunctions can only be repaired by a qualified technician - a master.But, carefully following the above tips, slowly and carefully performing the required actions, you can repair the washing machine with your own hands! Despite the fact that a semiautomatic machine is often bought for a summer residence or other places where there is no running water, for example, in the countryside, it also requires careful handling. Follow the rules of prevention, and the machine will serve you without breakdowns much longer!
"Seagull" is made in a monolithic welded body and consists of two separate tanks. Each of them has its own activators (centrifuges).
Most often, the repair of the "Chaika" washing machine consists in replacing the activator drive, or rather, troubleshooting the asynchronous motor. Also, the motor drive belt and pulleys often fail.
Unfortunately, the repair of the "Chaika" washing machine is a frequent reason for the master to visit the house, since the equipment is already outdated.
If you notice that your washing machine has stopped working correctly, immediately call a specialist and describe the situation. Free check-out and inspection of the washing machine are guaranteed.
Why is it profitable to work with a private trader:
- guarantees for any kind of work.
- only a professional tool is available.
- prices are much lower than in services.
Now let's look at the main breakdowns that are found in the "Seagulls".
The most frequent breakdowns of the "Chaika" washing machine:
- the machine rumbles, there are extraneous noises, some kind of grinding, tapping, etc. is heard.
- water is not drawn into the tank, or vice versa, is not drained.
- after turning on the washing machine, nothing happens.
- there is a smell of burnt wiring or rubber.
- water begins to flow out from under the machine.
- the liquid has ceased to heat up to the required temperature.
- the washer vibrates too much during operation.
These are the most frequent breakdowns of the "Chaika" washing machine have to be eliminated.
Unfortunately, there is no such thing as error codes for the "Chaika" washing machine, since this is an old technique that has neither electronic control nor a display.
But, if we imagine that the error codes of the Chaika washing machine would be seen by people, then most often:
Of course, an experienced craftsman will be able to determine the problem without any codes, but the main thing to remember is that if you suspect a malfunction, give up the initiative. This, like ignoring the problem, can lead to even more serious consequences.
If we take the main reasons for the breakdown of the "Chaika" washing machine, then they include sudden changes in voltage in the electrical network, which lead to burnout of the electronic elements of the device.
Also, the reasons for the breakdown of the "Chaika" washing machine can be correlated with:
- overloading the car with things.
- improper use of the device.
- motor breakdown due to overload.
- kinking the drain hose or power cord.
- Etc.
Of course, there can be a lot of reasons for breakdowns of old washing machines. Only an experienced craftsman can make the correct "diagnosis".
The cost of repairing the "Chaika" washing machine from a private master is affordable for everyone. No markups and payments to intermediaries, only a transparent deal - a specialist works with you. The price depends on the complexity of the repair and the type of spare parts to be replaced.
Although they thought they could never. Do-it-yourself washing machine repair is not such a difficult process as you think!
From the practice of the masters, in most cases it comes down to replacing a damaged part.
- Simple FACTS:
1. Over the past 10 years, the quality of washing machines has deteriorated sharply. Moreover, the high cost is not always a guarantee that a reliable and trouble-free device has been purchased.
2. Components began to be made by all and sundry, and the manufacturer does not always take a responsible attitude to the choice of the supplier. The eye-catching range of typewriters is the result of marketing gimmicks. In fact, the filling of a number of brands is the same, and they differ in appearance and in the advertised brand.
3. Manufacturers complicate the design, making it less and less maintainable and durable. For example, a non-separable drum. If the bearings fail, the owner needs to cut the drum. Or carbon-graphite brushes installed en masse instead of graphite ones. The latter run an order of magnitude longer, and are not much more expensive. What is the reason for this decision? Consumer care?
- The most difficult repair in a typewriter?
1. RESTORATION OF ELECTRONICS.
To do this, you need to have a certain education and experience. It is difficult and long - this is how such work can be characterized, and almost no one does it at home.
Simply because it is long and troublesome. In fact, the whole machine is disassembled.
- What is the difference between non-original spare parts and original ones, except for the price?
Quality. What does “original” mean?
The fact that the part was manufactured in strict accordance with the technology and passed quality checks at a company that has a license to manufacture this very part.
- Banal malfunction - the washing machine does not heat:
Let's look through the hatch porthole and check if there is water in the drum.
If it is not there, but from what fright there will be heating.
Moving on, there is water, but it is cold, with a setting of over 60 degrees on cotton.
Often the culprit of the occasion is improperly organized water drainage. It would seem why the hell is this here. It turns out that when the level of the drain hose is low, water flows out of the tank by gravity into the sewer.
What does CM do? That's right - it collects infinitely fluid. Heating is switched on only when the required level is reached, which is controlled by a sensor - a pressure switch.
The next step is to open the wall to measure the voltage at the heating element terminals.
Be careful - the power is about 2 kW!
The presence of 220 volts tells us about problems in the boiler or temperature sensor, the latter can be soldered inside the heater or supplied separately.
If there is no tension, something has happened to the “brains”. See. Having disconnected the wires from the connector going to the heating element, we call them with a tester for an open circuit. If you are not familiar with radio electronics, we ask ourselves a question - can you ask for help?
We wool forums and ask questions specifically about our SM model.
What to pay attention to here is the triac (relay) control of the heating element. Blackening and fading will tell us about its breakage.
Let's not go deep into the jungle and go beyond the topic - let's summarize.
It took a certain amount of time. A diagnosis was made and the entire chain of devices involved in water heating was checked. In case of failures in the t sensor, the heating element will have to run to the store. And now you have a serviceable spare part in your hands and a replacement takes place.
Hooray! The SM earned. The repair process was interesting, I had to tinker, I'm a man.
You can do:
Emery - will find use on the farm, sharpen a drill, correct a chisel, etc.
For those who are engaged in construction, it is possible to make a "vibrator" based on the engine from the washing machine for shrinking concrete when pouring the foundation.
There are craftsmen who assemble a mill for grinding green grass, which is added to chicken feed.
Of course, you can collect anything, the main thing is that there is benefit from it.
Someone might want to assemble something from the engine, adapt it, but do not know how to start, connect it.
To begin with, we will find paired outputs, there should be two pairs, how to do this. Now for these purposes there are many devices, testers, ohmmeters, etc. We take any output of the winding and connect to it any of the two probes of the device, and with the second probe we look for a pair for it.
If the device showed you some value, for example, a resistance of 11 Ohm, then this is the second winding pin, we write down the readings of the device, mark the pair.
Therefore, the remaining two pins will be the second pair, but we need to determine which of them is the starting and working winding, we make a measurement, the device showed 30 ohms.
Now it is clear where the starting and working windings are, the resistance of the starting winding should be greater than that of the working winding.
After you have figured out the winding leads, you can assemble a test circuit to start the engine.
The figure shows:
OV - working, excitation winding, the main rotating magnetic field.
ON - the starting winding is necessary to create an initial torque in a certain direction.
SB - a button for short-term switching on of the starting winding to the 220V network.
In order to change the direction of rotation of the motor shaft, it is enough to change the terminals of the starting winding in places and the direction at start will change.
When experimenting with the engine, do not forget to secure it so that it does not gallop away during start-up and does not collect all the wires in a heap.
The time relay sets the time mode with a delay to turn off the electric motor. The current relay is used to start the engine, to briefly turn on the starting winding to the 220V network.
The relay is made in a plastic case, there are three contact pins X1, X2, X3. The cover shows the correct installation of the relay, a large arrow labeled “up”, the relay must be positioned so that the arrow always points up.
Why this is necessary, you will understand if you argue the device and the principle of operation of the relay.
The relay consists of [1] - a movable core; [2] - current winding; [3] - movable normally open contact; [4] - turns from nichrome; [5] - bimetallic plate; [6] - normally closed contact;
Relay connection:
We supply a voltage of 220V to the output "X3" of the current relay, phase or zero without a difference, and the second 220V mains wire is directly connected to the working winding of the motor.
Conclusion "X1" - "ОВ" is connected to the second free output, the working winding. Conclusion "X2" - "PO" is connected to the output of the starting winding.
When starting the engine, the starting current is greater than the operating current. When the starting current passes through the coil - [2] of the current relay, a magnetic field is induced in the coil, which draws in [1] - the movable steel core, it rises and raises the movable contact - [3].
The electrical circuit is closed, which connects the starting winding of the electric motor. The engine starts and develops at rated speed.
As the motor entered the operating mode, the current in the relay decreased, the magnetic field in the relay coil, which held the steel core - [1] in the upper position, weakened. The core, under its own weight, falls to the bottom and pulls along [3] - contact, starting winding - ON disconnected from the 220V network.
Nichrome coils - [4] perform thermal protection of the motor. In case of overload, jamming or interturn closure of the motor windings, the nichrome heats up and heats up with its heat [5] - the bimetallic plate, it deforms when heated, bends and opens the contact - [6], disconnects the motor from the 220V network during the cooling of the bimetallic plate.
After the plate has cooled down, the contact will close again and the relay will try to turn on the engine again.
The figure shows an example, a diagram of starting the engine from a washing machine using a capacitor.
Conclusion, for complete confidence that everything was done correctly, we carefully check the installation of the assembled circuit and test it, turn on the engine for 1 min. disconnect from the network and check the heating of the engine.
Why, in a minute, in order to determine exactly where it starts, the engine heats up in bearings or in a stator. If you wait longer, then the heat will be distributed over the body and the overheating center will not be clear.
If everything is normal, turn on the engine and check the heating of the case every 5 minutes. 15 minutes for testing will be enough, the back of the hand should endure, if not, then the temperature is about 50 ° C and higher.
If the engine is warming up, possible causes:
The bearings are worn, which has led to a decrease in the gap between the stator and the rotor, the rotor touches the stator.
The bearings are clogged with dirt or jammed in the bearing caps, which leads to seizure, heavy shaft movement.
Large capacity of the capacitor, it is necessary to reduce the capacity of the capacitor or start the engine without the capacitor by unscrewing the shaft by hand. If the engine stops and heats up, it means that the reason was the excess capacity of the capacitor.
If the above reasons were excluded, then there is an interturn short circuit in the motor windings.
If you ask this question to users of semi-automatic washing machines, they will answer that an activator is a rotating disc on the bottom or wall of the machine's tub that mixes the laundry during washing. We will only add that the blades are located on the outer side of the disc, which is made of plastic. In shape and size, such activators can be different, but their main purpose is the same - to set in motion the contents of the tank.
A modern washing machine also has an activator. A bit strange, but true. In fact, this is a drum rib, as a rule, it is a plastic element that looks like a barrier. It is attached to the inside of the drum, the task of the rib punch is to break and shake the lumps of laundry and thus improve the quality of the wash.
Note! Such an activator also has another function, it plays the role of a drum stiffening rib, protecting this part from damage and strengthening it.
Small washing machines, designed for washing 1-1.5 kg of linen, were in almost every Soviet family. Today they are used by summer residents. Repair of such a machine by a master in most cases is not reasonable, since it can cost half the cost of a new such machine. Therefore, users very often try to fix equipment with their own hands. And I must say that most people do it very well.
Small-sized machines are divided into two types. In some, the activator is located vertically. These machines include "Samara", "Desna". The second type of machines has a horizontally located activator, for example, "Malyutka-425M", "Feya-2" or "Mini-Vyatka". In semi-automatic machines with wringing, the activator is also located horizontally. When parsing such a machine, it also has its own characteristics. Let's consider in turn how to remove and replace the activator in different models of cars.
Cars of this type include "Baby", "Samara", "Otrada". The insides of such machines consist of the main elements: a tank, a cover, a body, an electric motor, a thermal relay, capacitors, and an activator. There is no drum in the activator machine, the function of the drum will be replaced by the activator, which rotates the water in the tank.
To remove the activator, you need to disassemble the machine itself and prepare the key that you need to unscrew the activator.Let's consider making such a key from a cut of a water pipe with our own hands using the example of the "Baby" typewriter. The pipe should be 150 mm longer than the diameter of the activator body. With a 6 mm drill, 2 holes are made in the pipe, the distance between them is 9.5 cm, and the holes will be located symmetrically relative to the center. Then they take two bolts and insert them into the holes, the ends of the bolts should stick out by 10-15 mm. Finally, fasten the bolts with nuts.
Now we will describe how to unscrew the activator:
- We take out the cork in the side of the machine.
- We turn the activator by hand so that the hole in the housing clearly coincides with the hole in the impeller.
- We take a screwdriver and insert it into the motor rotor, thereby jamming it.
- We insert the homemade key into the activator body and unscrew it.
Important! The activator on different machines is unscrewed both clockwise and counterclockwise.
- After removing the activator, take a similar one and assemble the machine in the reverse order.
SM-1.5 machines include "Fairy", "Ivushka", "Mini-Vyatka". Their peculiarity lies in the fact that the rotation of the activator is carried out thanks to the belt transmission. It is not difficult to remove the activator in such machines. Let's list the procedure for the example of the Mini-Vyatka machine:
- After disconnecting the washing machine from the mains, remove the pallet (marked with 1 in the figure).
- Loosen the bolts holding the engine.
- Remove the drive belt (34) from the pulley (32).
- Next, you need to unscrew the nut holding the pulley (21).
- Now, after knocking out the stopper (20), remove the activator (25).
When installing a new activator, one should not forget that the distance between the tank and the activator should not exceed 2 mm, the axial displacement should not exceed 0.5 mm. To adjust the installation of the activator, lay a washer.
Washing machines of this type differ from the previous ones in large sizes and the ability to wash up to 2.5 kg of laundry. The body of a rectangular typewriter is made of metal coated with paint. The activator is usually placed on the side. To remove and replace it, you need to perform the following sequence of actions:
- Unscrew the rear housing cover and remove it.
- Remove the belt from the pulley.
- Remove the bolt holding the pulley to the activator shaft.
- Hold the activator with one hand and remove the pulley.
- Press the shaft together with the activator disc into the washing machine tank.
- Get the activator.
- Assemble the machine in reverse order using a new activator.
- Dismantling the drum is not required in this case. To remove the activator, you will have to remove the drum rim, otherwise it will interfere. We move the plastic clips to the sides and remove the rim.
- Now you need to unscrew the nut holding the activator. It's right at the bottom of the drum, so you need a socket wrench.
- Having unscrewed the nut, we pry the activator with a screwdriver, and then we take it out together with the nut and washer.
- We acquire a new original activator, put it in place of the old one, and then fasten it with a nut.
Note! While unscrewing the nut holding the activator, ask someone to hold the drum so that it does not rotate. Of course, it is possible to jam the drum with a wooden block, but in this case there is a risk of harming the rotation mechanism.
Replacing the fin is not difficult, almost anyone can cope with this task. What do we have to do?
- We take a hard wire (or spring).
- We bend its tip with a crochet.
- We insert the wire into the hole of the rib punch, press on it and push it towards ourselves.
- The rib punch should slide off the retainer and slide off.
- The new drum finisher is put on by hand. We feed the part slightly upwards, and then we put the mating part on the hooks.
- Now the hooks need to be tucked in, for this we take the awl, thread it through the holes in the rib punch and tighten the fixing hooks.
Summing up, we note that you can replace the washing machine activator with your own hands, without the involvement of a specialist. The main thing is to buy an original spare part and take into account all the advice of specialists. Of course, if you are not friends with the technique and doubt your abilities, invite a master, and he will do everything in a few minutes.

 Possible breakdowns and their causes for Chaika washing machines