In detail: do-it-yourself repair of a vertical zanussi washing machine from a real master for the site my.housecope.com.
People buy washing machines with top loading much less often than with front loading - this is a fact.
- The tightness of the parts of the machine makes it difficult to disassemble
- Increased vibration during spinning
- On some machines it is not possible to level the rear feet
- Corrosion of the top cover from moisture
- Spontaneous opening of the drum flaps in case of imbalance
- Narrow and deep, and fits perfectly into confined spaces in the bathtub, closets or kitchen
- No need to bend over to load the laundry
- Ability to interrupt the program and add laundry
- Child safety. Control panel location.
Features and nuances for self-repair of vertical units:
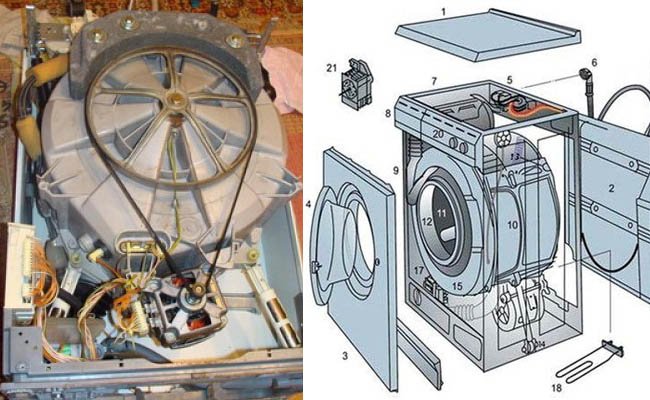
The device contains the same elements (pressure switch, water intake valve, drum, tank, control board, pump, and so on).
The axis of the drum is structurally made on two bearings; a self-positioning sensor is sometimes located on the tank (fixing the drum with the flaps up).
We will show the dismantling of units using the example of Electrolux:
1.From the sides, using a screwdriver, release the control panel
2.Pull the plastic panel up and slide towards you
3. We tilt at a small angle towards ourselves to dismantle the wires from the board connectors
4. Take out the panel
To remove the electronic control module, disconnect the remaining wires and unscrew the screws shown in the figure.
For quick and correct assembly, take pictures of the connection points of the wire loops.
To remove the water inlet valve, disconnect the rubber hoses from the clamps and dismantle them.
Detach the wires and from the outside press on the holes to push out the valve.
To remove the side panels, unscrew a few screws, do not forget to save the washers for grounding the case.
Bend the wall from below with your hand and slide it down.
After removing the two side panels, access to the screws for dismantling the front panel appeared.
To remove the NTC sensors and self-positioning the DSP drum, it is enough to remove the right wall and dismantle them.
- Frequent malfunction - there is no way to change the program .:
Example - Hotpoint Ariston ARTL 1047.
Many "craftsmen" sin that the control module is to blame for everything. But no!
It is enough to unscrew the two screws from the back and remove the control panel.
This very cracked handle is the culprit. Use the metal ring (the plug from the antenna for example).
By squeezing the plastic handle, the ring will prevent programs from skipping.
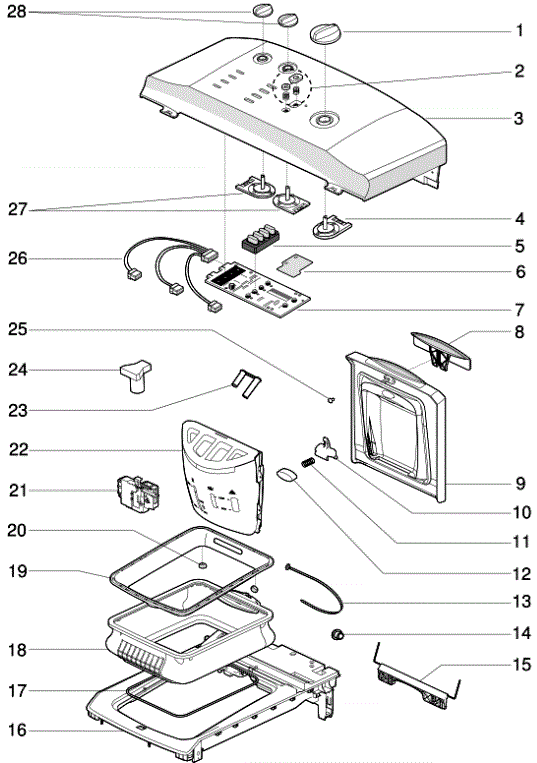
- Blown up top of the Indesite vertical, Ariston:
| Video (click to play). |
001 - control knob 002 - white on-off / reset buttons 003 - white control panel 004 - bitron switch 005 - function keys 007 - display
008 - cover handle 010 - dispenser unlocking lever 011 - dispenser hook spring 012 - disengagement button dispenser 016 - cover support
018 - partition with shock absorber 021 - door interlock device 022 - white dispenser 023 - siphon cover 026 - control panel wiring 027 - 8-pos. potentiometer
There is an opinion that two drum supports instead of one are good.
This is not the case, and in the case of "vertical" it is just a forced engineering decision. The service life of the drum bearings does not increase for a minute.
If the screws are hard to loosen, heat them up with a blowtorch.
Use a special grease for oil seals - Litol-24, TsIATIM-221, SHRUS-4M, etc.
On "Kandy", in order to change bearings, you need to disassemble the whole machine to the screw! And what is the wild tightness in the depths of the "vertical". Sometimes you have to do everything literally by touch.
2. Remove the cover from the top of the machine
We remove the metal protective strip, which is fixed with self-tapping screws.
This will allow us to remove the back iron cover and gain access to the drum and motor.
We disconnect the chips from the motor and be sure to sign each one so that we do not confuse the contacts later.
We remove the drum from the hanging springs. Further, in order to get to the bearing, you will need to remove the shaft (motor drive), which is unscrewed with a head with an asterisk. The shaft sits very tightly, so you have to make some effort to remove it.
Next, we remove the tank and knock it out of the bearing using a chisel.
So we got to the most important thing - the inner bearing and the oil seal, which most often deteriorate in washing machines. They are changed as a set. The cost of one oil seal is about $ 1. Bearings are slightly more expensive at $ 2 apiece.
When knocking out a bearing, be sure to use a metal washer. The outer bearing is knocked out from the inside.
Thank you for preparing the material for the following video:

However, vertical machines, like everyone else, can break down over time. And some malfunctions are peculiar only to washing machines of this type. How to repair a vertical washing machine with your own hands will be described later in the article.
Many malfunctions of vertical machines are also relevant for frontal ones. However, top-loading machines also have faults that are unique to them.

These breakdowns are associated with the design features of the machine and the location of the units. And the main feature of the repair is access to the internal elements of the vertical washing machine by dismantling the side panels.
All of the following types of leaks can be eliminated without disassembling the machine body:

— Drain filter leaking... In this case, it is necessary to check the condition of the seal, and also to check the tightness of the filter. If the drain filter is dry, then go to the top cover.
— Deformation / wear of the upper door seal... If a puddle appears under the machine, then first of all we check and repair this particular rubber seal. When removing the control panel of the machine, you can notice a coating of rust on the body.
Such a leak can cause serious problems such as repairing or replacing expensive parts. Therefore, we eliminate the leak as soon as possible.
In this case, you do not need to change the entire seal, but only put rubber in the place of the leak. As a result, the seal will rise slightly and, therefore, the tightness will be restored.
It should be noted that dismantling the control panel is a fairly simple task. To do this, unscrew the screws on the sides.
The next step is to dismantle the side panels. To do this, unscrew the screws located on the back wall. Next, you need to pull off the bottom edge a little, and then move it down and back. When the side panels have been removed, the front can be removed. After all, there will be access to the screws with which the front wall is fixed. As a result, access to the internal units of the machine will be obtained. Next, we are looking for leaks inside the washer.
— Checking the water pipe connection at the filler valve... If the connection is not reliable, then we carry out repairs with our own hands - we dismantle the tube, lubricate it with silicone, and then put it in its original place and tighten the clamp.Next, we check the integrity of the entire rubber tube.
— We inspect the rubber pipe connected to the washing machine tank. If there are traces of smudges, then we carry out repairs - we dismantle the branch pipe, seal it with silicone, and then install it in its old place.
— Check the reliability of the drain hose and drain connection... If there are traces of smudges, then we carry out similar repair actions.
— You should also check the condition of the rubber cuff located at the top.... We check the fastening of the clamp holding it back.
— Check tank for leaks... The screws with which the tank is connected could loosen over time. In this case, we tighten them, but not too much, so as not to collapse them. A small hole may also appear in the tank body of the machine. It should be carefully soldered.
—Water can also leak from under the drum bearing oil seal... In this case, most likely, we also replace the bearing.
This may be due to an imbalance in the drum of the machine. Such a malfunction of the machine can lead to serious consequences.

The opened doors will come into contact with the heating element, and this will lead to a breakdown of the latter. The drum will block and may be damaged. Damage to the tank and drum may require a complete replacement.
But this is, of course, an extreme case. If only the heating element is out of order, then it can be easily replaced with a new one. The process of replacing this element is carried out in the same way as for front-end machines.
Bearings can also become unusable. Replacing bearings in top-loading machines is slightly different from the same process for front-loading washing machines.
The drum of machines with vertical loading is supported on two semi-axles with bearings. These bearings are located on the outside of the washer tank. When replacing them, first of all, we disconnect all wires. Then we dismantle the pads located on the sides of the drum of the machine. Calipers with bearings are located under these pads.

First of all, we replace the bearing located on the side where the pulley is missing. Next, remove the caliper. The thread on this side must be right-handed, so we unscrew it counterclockwise. After dismantling this element, we replace the oil seal and bearing.
On the reverse side, you must first remove the drive belt. When the belt is removed, dismantle the pulley, as well as the grounding block.
On the reverse side of the caliper there is a left-hand thread. This means that you need to unscrew it clockwise. We clean the places of installation of new bearings, and then we lubricate. Next, the calipers are installed and assembly is performed.
In some cases, it may be necessary to disassemble the machine's tank. Then we unscrew the screws with which the cover is attached, and then carefully separate it at the soldering points. Reassembling the tank is done in the same way as for front loading machines.
The rest of the maintenance and repair work on top-loading machines is carried out in almost the same way as for front-loading washing machines.
Disassembly and assembly of the Zanussi ZWQ 5130, 5100 top-loading washing machine, width 40 cm, tank C4
Always turn off the power before disassembling the device.
If possible, measure the resistance of components before directly measuring voltage and current. Some parts of the device can cause injury to you. Great care must be taken to avoid them.
This manual has been written for professionals who already have the basic knowledge required to repair washing machines.
For more details see:
The new series of washing machines consists of:
- The base of the machine made of CARBORANa, which includes a filter housing on which the various components are fixed (drain pump, circulation pump, module and suspension);
- Tank from CARBORANa and stainless steel drum with a capacity of 42 liters;
- Counterweights located on the tank, one at a time on the left and right. Also from the electrical components located on the tank, such as the heating element, thermostat, motor and wires;
- Enclosure with 4 vertical surfaces:
- right, left and frontal surfaces are electrogalvanized and covered with thermal paint
- the back panel is electro-galvanized
In this version, the pallet is suspended on 4 springs; - The upper part, made of polypropylene of the cover, on which the filling valve is located, a functional support, with a control panel and electrical components, as well as a water distributor.
Repair of washing machines Zanussi (Zanussi) is a frequent occurrence. Despite the fact that these cars come off the assembly line under the sign of a foreign brand, they can also break. And often the manufacturer is not at all involved in the fact that the machine broke down too early.
External factors and improper operation are the most likely reasons for the failure of the SM.
Using the statistics of service centers, you can quickly understand which nodes and parts in the device of the Zanussi washing machine are the most vulnerable
- The dependence of parts on water quality. By the way, this is typical not only for the Zanussi brand, but also for other machines. Water oversaturated with salts with strong heating is deposited with scale on the heater and other elements.
The purity of the water in our water supply systems also does not differ, so the filter systems of the machine can become clogged with dirt and rust over time. As a result, the typesetting and drainage system suffers. - Hatch lock. This is already the fault of the manufacturers: both the blocker and the sensor are slightly underdeveloped, therefore they break more often than other brands of SMA.
- The heater (heating element) quickly builds up with scale. Experts believe that this is also due to the fact that manufacturers miscalculated in the selection of components from which the tubular part of the heater is made.
- Drive belt. It does not differ in reliability, so every 3 months it does not hurt to check its tension and integrity. If you see signs of stretching or damage to the belt, a tightening or replacement of the knot is required.
The only good thing is that it is possible to determine the malfunction on time, since the "smart" automatic washing machine Zanussi notifies the user of problems using fault codes.
Usually a Zanussi washing machine gives out the following error codes: E11, E12, E21, E22. Let's consider the most common combinations.
Water does not leave the system - cleaning of the drain filter and checking the nozzles for blockages is required.
It is also necessary to check the performance of the pump impeller - it should rotate freely in both directions. If the stroke is difficult, the pump needs to be replaced.
Complex breakdowns should be entrusted to a professional, but easy repairs to Zanussi washing machines can be easily done by yourself.
Next, we will look at how to repair a Zanussi washing machine with your own hands.
All filtration systems need to be cleaned periodically. If you neglect this rule, then later problems cannot be avoided. If there is a blockage in any of the filters, then there are problems with the intake or drainage of water.
In SM Zanussi, it is the filler filter that is most often clogged. What to do to normalize the work of the typewriter?
- Just unscrew the inlet filter - it is located on the water pipe.
- If you have not installed such a filter, then you need to clean the filter mesh.
Attention! Experts advise placing the inlet filter on a pipe with a special filter cassette that softens the water.
To clean the filter mesh, proceed as follows:
- Find the junction of the water intake hose with the washer body.
- Remove the top cover of the CM to unscrew the valve and filter.
- Disassemble the filter and rinse it under the tap.
- Replace the filter.
- Reassemble everything in reverse order.
Important! The device of the Zanussi horizontal loading washing machine is different from the front design, but the filter is cleaned in the same way.
By the way, pollution can accumulate not only because of the "errors" of the water supply system, but also because of the clothes that you send to the drum. From too dirty things, sand, dirt, debris, threads penetrate into the machine systems.
Craftsmen often find small coins, seeds, hairpins, crumpled checks in the drain filter. All this "nonsense" can provoke a stop in the work of the AGR.
Important! Remember to clean the filter at least every 3 months.
The problem with the UBL is a frequent malfunction of the Zanussi Aquacycle CM, but it also occurs in other models: for example, the Zanussi Easyiron.
It is difficult to tell right away why the blocker breaks down - through the fault of the manufacturer or user negligence. But there may be problems with the control board - then the blocker has nothing to do with it.
The plastic components of the sunroof locking device are unreliable and can break even if you simply slam the hatch shut with force. In this case, the metal hook will survive, but due to the breakdown of the UBL, washing will still be impossible.
The blocker is usually not repaired - it is easier to replace it with a new one. For Zanussi UBL typewriters costs about 1,500 rubles. It's a little expensive, of course, so first you should remove the old blocker to make sure it is 100% broken.
Remove the device according to the following scheme:
- Open the door.
- On the right you will see a small hole for the locking hook, and next to it there are two screws that hold the UBL. Unscrew the fasteners.
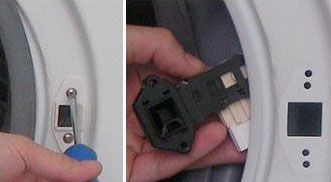
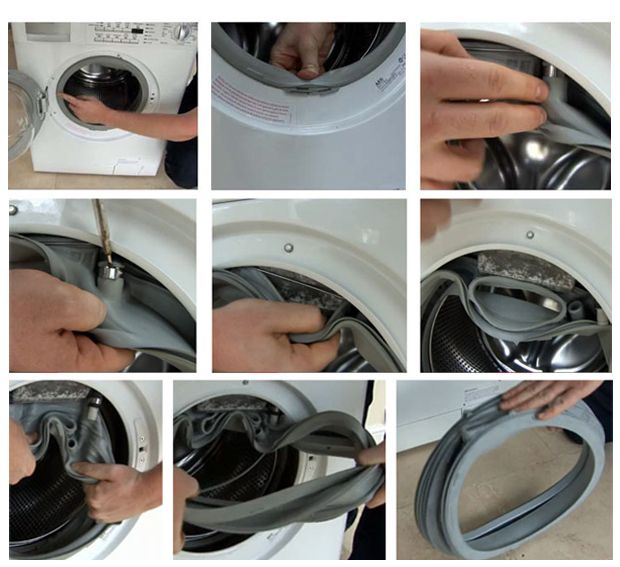
- Remove the gasket (lip). It is held in place by a wire tie that runs in a circle along the entire elastic. Pick it up with a thin screwdriver and remove. Then remove the cuff - do it by hand, without tools, so as not to damage the delicate elastic band.
- Remove the blocker by disconnecting the wires.
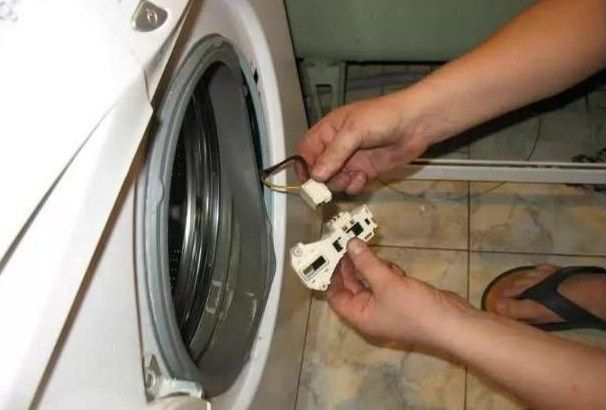
- Carry out a visual inspection of the device and make sure that the plastic part is intact. If the plastic is broken, and the records popped out, take the device with you and go for a new one.
- Show UBL in the store to sell you exactly the same.
- Install the bollard in reverse order.
Important! Close the door gently until it clicks, pressing down on the edge to extend the life of the device.
As we said above, the heating element is one of the most vulnerable places of any washing machine, especially Zanussi. The washing machine with such a breakdown may give an error E05, while the water in the tank stops heating.
To make repairs yourself, you will have to disassemble the SM case a little:
- Turn the machine with the front wall towards you.
- Unscrew the screws from the panel to remove it.
- From the bottom of the tank you will see the heater shank - it has 2 contacts and wires coming from them.
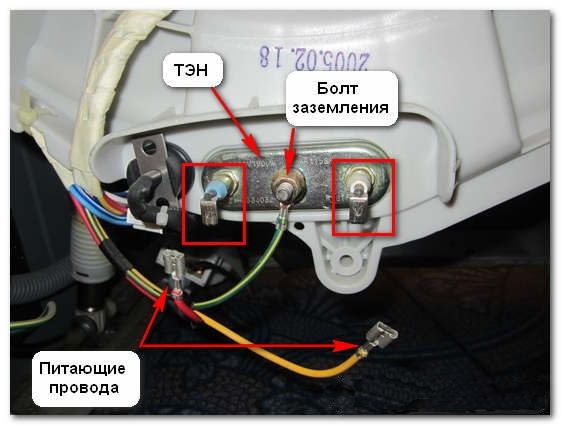
- Measure the resistance with a tester. If the device shows a value close to zero, the heating element will have to be changed. The readings of a working heater will be 20-40 ohms.

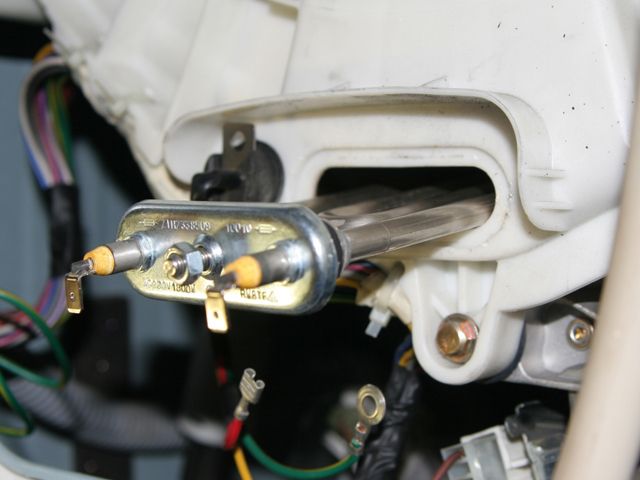
- To remove the heating element, unscrew the nut located in the center of the shank.
- Disconnect the wiring to the heater.
- Make an effort to get the heating element out of the groove. If there is a lot of plaque on it, then it could get stuck. Take WD-40 grease and lightly spray on the crevices. Loosen the old heating element and pull it towards you.
- Clean the hole well.
- Install a new heater, connect the wiring.
- Reattach the back panel and run a test wash. If the water heats up, and the E05 code is gone, then you did everything right.
Important! When choosing heating elements for the Zanussi washing machine, buy only original parts. Don't go for cheap Chinese counterparts - they won't last you long. An unsuitable heating element can also provoke a breakdown of the control unit, and then the repair will definitely "fly into a penny."
Damage caused by the drive belt is accompanied by the fact that the motor in the washing machine does not stop working, but the drum does not rotate.To check the integrity and location of the belt, proceed as follows:
- Remove the back cover by unscrewing the fasteners.
- In the niche you will see the drum pulley on which the belt should be put on. The motor pulley is much smaller and must also have a belt on it.
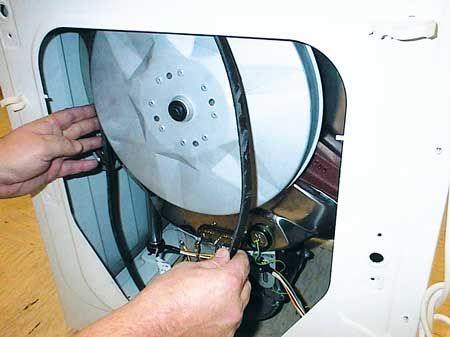
- Correct the belt if it has shifted.
- If the drum does not rotate and the belt is in place, then a replacement is needed.
- After adjusting or installing a new belt, refit the panel and run a test wash.
As you can see, the repair of Zanussi washing machines consists in eliminating typical failures and breakdowns. Fortunately, these malfunctions are such that you can easily eliminate them without the help of a wizard.
We only advise you not to touch the electronics. Even if you have a Zanussi washing machine circuit, in order to repair or replace an electronic module, you need special tools and relevant knowledge and experience. Do not want to provoke additional breakdowns - trust the master for complex problems.
This video may help you:
The bearing made a noise so much that when spinning it seems that the plane takes off in the bathroom. Why I chose vertical:
1. It immediately seemed that such a machine is more reliable and technologically advanced, because the drum is supported by two semi-axles and two bearings. I think it's clear why - there are no forces applied at an angle to the bearing, as in front-end machines.
2. The tank has one hole at the top. Overflow is possible only through the drum half-shafts or when the tank is full. Both are highly unlikely. The first is verified on this fact, since there was a small leak through the oil seal and bearing, which caused it to rustle and rustle.
3. The general maintainability is much higher than that of the frontal ones; there is almost complete access to all units only by removing one side cover. We shoot two - the car is practically disassembled. (CAUTION: The machine loses vertical rigidity when both covers are removed.)
4. For 4 years, the car served as a changing table for the baby in the bathroom. has an almost horizontal surface of a decent area.
From the pictures below it will be clear how to replace a leaking bearing. As I understand it, the repair of all Zanussi and Electrolux verticals is exactly the same, because the left and right calipers are the same for all vertical machines.
I opened the side cover and. here it is.
The limescale formed in 7 years, to which the liquid with the “means” does not reach the semi-axles in any mode, rubbed the oil seal like emery, and off we go. The grounding contact had to be cut off, but there is a hole for a self-tapping screw, which can be fixed after cutting the plastic rivet. It will be seen below.
Something incomprehensible was written on the support - 632305222316434, but this is garbage, tk. the catalog is here - on page 13. There are probably other manufacturers, but these were in the store. Left and right are different. The threads on the body are different. Which one I don't know which one, but one has the catalog code 061, the other has 062.062 comes with a cover that was not in the car, but it is needed there. The Italians are great - they thought of the manufacturer.
I went to the nearest store and bought two pieces of iron, drilled two holes d = 6mm and one d = 8mm in the middle (the side ones don't count, just to lengthen the handle, bolts M6 45mm, M8 25mm) and got a puller:
I think everything is clear with the puller. It must be twisted STRICTLY in the direction shown on the caliper body by the arrow “open”. In my case, clockwise.
Rotate 60 degrees, unscrew the central bolt 120 degrees. Otherwise, the structure will bend. And so several times, then we unscrew the central bolt completely and remove the caliper without effort. We take out a new one from the package, smear the gland sponges liberally with the applied grease. There are grooves - right to their bottom. And we screw everything back. ALL! replacement has been made. Below is the same self-tapping screw on the drum grounding contact ..
2.Remove the cover from the top of the machine
We remove the metal protective strip, which is fixed with self-tapping screws.
This will allow us to remove the back iron cover and gain access to the drum and motor.
We disconnect the chips from the motor and be sure to sign each one so that we do not confuse the contacts later.
We remove the drum from the hanging springs. Further, in order to get to the bearing, you will need to remove the shaft (motor drive), which is unscrewed with a head with an asterisk. The shaft sits very tightly, so you have to make some effort to remove it.
Next, we remove the tank and knock it out of the bearing using a chisel.
So we got to the most important thing - the inner bearing and the oil seal, which most often deteriorate in washing machines. They are changed as a set. The cost of one oil seal is approximately $ 1. Bearings are slightly more expensive at $ 2 apiece.
When knocking out a bearing, be sure to use a metal washer. The outer bearing is knocked out from the inside.
Thank you for preparing the material for the following video:
Many people buy Zanussi home appliances. Zanussi is a refrigerator, an air conditioner, a vacuum cleaner, a stove, an oven and much more. The Italian company was founded in 1916 by the son of the blacksmith Antonio Zanussi. He created a wood-burning stove and from that moment decided to engage in inventions. He did it well. The company grew and developed. Today the equipment of this brand is sold in many countries of the world.
Washing machine Zanussi
But Zanussi also has disadvantages. Having served for many years, one day the equipment breaks down. Factory defects are easy to fix at a service center absolutely free. What to do when this is a common breakdown? When the washing machine leaked, is it realistic to do the repair yourself? Washing machines have weak points, parts that are subject to heavy stress may not withstand, fail during operation. The Zanussi washing machine is no exception.

Do-it-yourself repair of malfunctions of the Zanussi washing machine is easy. Moreover, modern technology is often just calculated on the fact that the master will not be needed in many cases. Only if something really serious has happened, you need to contact a specialist. Basically, small parts break. Malfunctions are easy to eliminate, and large repair costs are not required. Wear does not affect the service life. When you have time, it's easier than ever to fix everything. True, the house must have the appropriate tools, without which independent replacement of parts is impossible.
In order to carry out repairs with your own hands, if the washing machine breaks down, you need the following set of tools:
- cross-section and flat screwdriver;
- two wrenches - 8 by 10 and 19;
- pliers are regular and long bent;
- nippers;
- you will also have to use a service hook.

It often happens that a person tries to turn on the washing machine, but when the button is pressed, only the power lamp lights up, and the display does not light up, and it is impossible to select the mode. Accordingly, the machine will not wash. What to do in this situation? It is clear that repair is needed, but what is faulty?
Most likely, the drum locking system, one of the components of the electronic system, has failed. It is better to entrust the repair of the microcircuit to the master. These are serious malfunctions - software glitches. You shouldn't joke with them. Without professional knowledge, repairs are problematic. Electrical impulses are harmoniously combined with conventional friction in modern technology. The washing machine will do all the work for a person, though only if the conductors are in good condition, the contacts are soldered, the parts are protected. The main thing is to establish the source of the problems accurately.Otherwise, elementary malfunctions for the master will cause the equipment to be scrapped.

But when the power lamp does not light up, it is likely that the plug is out of order, or the wire for connecting to the mains is damaged. The washing machine will of course not turn on. After a thorough inspection, the problem area will be identified. Do-it-yourself Zanussi washing machine repair in this case is easy. All you need is a little knowledge of electrical engineering. But you can, of course, turn to the master for help. When faced with a problem such as a lack of power or an unlit display, you should also check the door for a tight fit. Perhaps renovation is needed here.

When there is power, but the mode cannot be selected, the display does not light up, the washing machine does not turn on, a damaged drum seal may be the source of the program malfunction. It is necessary to check its condition, replace the seal if necessary. Do-it-yourself Zanussi washing machine repair in the video is a visual demonstration of how easy it is to do it. Repeat what you saw or entrust the repair to a specialist? Everyone decides for himself. The wear of the seal is one of the reasons for the strong vibration of the automatic washing machine, including the Zanussi with horizontal loading. This breakdown is very common.
Strong vibration when loading vertically is practically impossible. The washing machine is incredibly stable. Vibration is a sign that the bearing has worn out and needs repair. The part is behind the drum, it's not so easy to do everything with your own hands. We'll have to tinker to get to the bearing. Replacement requires care, the case must be disassembled. It is important to remember the order of installation of parts.
By the way, there is also a bearing in Zanussi with horizontal loading. Here, too, it can fail, and the drum will vibrate strongly. By and large, vertical loading is no different from horizontal loading. Vertical loading is believed to result in less wear on the rubber seal.
But when the washing machine spins at a speed of 800-900 rpm, the load is still incredible. Vertical loading won't help. At a speed of 800-900 revolutions, it only seems that the laundry is evenly distributed. When the drum stops, bumps cannot be avoided. Vertical loading is the same vibration as horizontal loading.
Compliance with the rules of use reduces the likelihood of damage to important parts, and you should only fold the laundry in the drum in accordance with the manufacturer's recommendations. There is no reason to abandon the 900 rpm mode for the safety of the equipment.
The drum is fixed with two axles and two bearings. The photo shows that the deformation can be strong. At the same time, do-it-yourself repair of a Zanussi vertical washing machine, replacement of a bearing is within the power of every person. You will not need much physical strength for this. It is enough to want to tinker with your favorite technique, have time, buy a bearing. How this is done can be seen in the video.
The lock on the door, which has broken, may be the very sought-after reason, the source of problems with the choice of the mode. Blocking the door is a prerequisite for starting work. By the way, if water flowed out of the machine during washing, perhaps the whole point is in the lock and unreliable fixation of the door. The blocking ensures tightness. Water will also leak when the seal is worn in a horizontal loading machine. With horizontal loading, a faulty door lock will immediately manifest itself, and with vertical loading - after a while. However, the case is reliably protected from moisture ingress. There is nothing to worry about.

The washing machine itself signals that there is a problem with the door blocking.The corresponding symbol appears on the display. But this program may crash. The door lock is checked in this case directly by pressing. The lock is attached with screws and can be changed. If, after the repair of the lock, when the door lock is 100% functional, the display does not light up, it is better to seek help from a specialist. Faults in electronic components interfere with technology.
When connecting the washing machine to the water supply, a filter is installed, which guarantees: the equipment will work well. However, at one point, water stops flowing in the right amount. Such problems can arise due to the fact that the water filter is clogged, and you simply need to clean it. It may need to be replaced. The machine will wash slower as long as there is little water in the drum. This slows down the process.
It is not worth postponing the repair of the water supply system, even if the tap is out of order. The malfunctions will get more complicated in some cases. The washing program algorithm may not be correct.
Zanussi washing machines have long held a strong position in the domestic market of household appliances. During this time, they have become very popular due to their reliability, functionality and other positive qualities. Nevertheless, like any other equipment, these units are subject to various breakdowns and malfunctions, which sooner or later occur during operation. Therefore, many owners turn to the service center, although in many cases it is quite possible to repair the Zanussi washing machine with their own hands.
Sometimes it happens that the drum of the Zanussi washing machine stops rotating. In this case, it is recommended to turn off the machine, drain the water and try to scroll it manually.
If the drum does not turn, then it is quite possible that it is jammed. This can happen for the following reasons:
- The bearing is defective. The main reason is the wear of the sealing gland, which allows water to pass through due to the loss of elasticity.
- It is not uncommon for foreign objects to fall between the tub and drum from the pockets of clothing.
- Driving belt slipping off. Usually the problem is solved by replacing it, in some cases - along with the bearing.
- In units with vertical loading, doors may open and catch on heating elements or other parts.
If the drum is turned by hand, but does not rotate in operating mode from the electric motor. There are also certain reasons here:
- Defective motor due to moisture or power surges.
- The drive belt is gradually frayed, weakened, or completely torn.
- The motor brushes are out of order.
- In electronically controlled Zanussi washing machines, the control unit is faulty, requiring repair or complete replacement.
In any case, a thorough diagnosis is required, and qualified specialists should be engaged in the repair of this unit.
In this situation, water is not poured into the tank. Sometimes the machine draws up water, but it happens very slowly. Subsequently, the wash program fails and the process stops completely. This could be due to a faulty heating element or a clogged or faulty intake valve.
It is quite possible to fix this breakdown on your own. First, the power plug is removed from the socket, after which the functionality of the heating element is checked. The fact is that if the heating element is damaged, many functions of the washing machine can be blocked. If the item is found to be defective, it must be replaced.
In case of a possible clogging or malfunction of the inlet valve, you must immediately close the water supply valve to the washing machine. Next, you need to find the junction of the inlet hose with the tank, disconnect it and check for clogging of the intake valve mesh. In case of blockage, the mesh must be washed.If the mesh is clean, check the inlet hose. To do this, it is lowered into any container, after which the tap opens. A weak head or a complete lack of water indicates problems in the water supply system. If the water pressure is normal, then it's all about the inlet valve, which should be replaced.
Sometimes a faulty pump or drain pump can be the cause. When pumping is not in progress, the water supply is blocked at the same time. There can be a lot of malfunctions in the pump and they all need to be checked. After that, a decision is made to repair or replace it.
The procedure for draining the water is an important final step in the washing program. If the water does not want to drain from the system of the Zanussi washing machine, this indicates serious problems that require quick resolution.
The main causes are a faulty drain pump or a blockage in the exhaust system. Sometimes, as a result of improper installation in the sewer, reverse draft occurs. The water level sensor and electronic control module may be damaged. The drain pump is the main link in the drainage system of washing machines. It is he who ensures the pumping of the waste liquid from the tank. Together with the water, various small debris gets into the pump. During operation, it will wrap around the blades and damage the pump. If cleaning does not work, the pump must be replaced.
Foreign objects can not only damage the pump, but also clog the outlet pipes of the drain system. The solution to the problem is to remove the blockage and clean the exhaust pipes.
Backdraft in the sewer is formed as a result of improper installation of the washing machine. For example, if the drain hose is placed too high, the pump starts to run at increased power. Sometimes even this power is not enough and water is not pumped out of the tank.
The level sensor detects the amount of water in the tank. This function is actively used during the draining process. When the water level reaches zero, the pump stops. If the sensor is damaged, it sends incorrect information to the electronic control module. For example, it shows zero liquid level, although the tank is still filled with water, and pumping is operating normally. Sometimes the control module itself turns out to be faulty, which coordinates and controls all processes in the washing machine, including the waste water drain.
The most common breakdowns of the Zanussi washing machine include an unclosed hatch door. Many owners of Zanussi periodically face this problem.
Failures of the mechanical part are primarily considered as the reasons. In these cases, the lid does not close at all, and when the lock is operating, a characteristic click is not heard. A similar situation occurs as a result of wear of parts and careless handling of the cover. As a result of strong slamming, the hinges are skewed and the lock does not snap into place. Sometimes the plastic door rail is deformed.
Another type of breakdown is associated with electronics. That is, the lid closes with a click, but the hatch does not electronically lock. In the event of this malfunction, the washing machine displays the corresponding error code. This breakdown most often occurs due to the failure of the blocking device, including the ingress of small foreign objects inside it. Also, the control module may be faulty.
In the absence of experience and skills in working with household appliances, it is not recommended to carry out independent repairs. Qualified specialists of the service center will be able to quickly find the cause of the malfunction and eliminate it in a short time.
It is recommended to eliminate the leak as soon as possible, since not only your own apartment, but also neighbors from the lower floor can be flooded. This can be done both independently and with the assistance of specialists.
It is recommended to do the following:
- The washing machine is disconnected from the power supply. Care must be taken to avoid getting into a puddle if possible.
- The water supply must be turned off using a special valve.
- The water from the machine must be drained through the filter located in the lower right corner of the front panel. It is quite possible that the matter will be limited to cleaning it.
If cleaning the filter did not give a positive result and after restarting the water continues to flow from the machine, in this case, the following work must be performed:
- Replace the worn sunroof seal.
- Install new clamps on the pipes connected to the water supply system. If there are mechanical damages on the branch pipes, they should also be replaced.
- Clean the hopper from which the detergent is supplied.
- Replace worn bearings and a washing machine oil seal.
To perform complex work, it is recommended to invite service center specialists who are able to quickly and efficiently perform all the necessary activities.
Another common malfunction is the lack of water heating. This problem occurs not only with Zanussi, but also with other washing machines. In this case, the quality of washing is noticeably reduced, since the powder does not completely dissolve during washing.
The main part of the heating system is the heating element. With constant use of low-quality, hard water, it quickly becomes covered with scale and burns out. In this case, the installation of a new heating element is required. At the same time, it is recommended to check the condition of the wires responsible for powering the heating element.
Another reason that the water does not heat up during washing is a malfunction of the control module. Here, self-repair is excluded, it is necessary to involve the specialists of the service center.
The lack of rinsing is usually found somewhere in the middle of the wash. The car just stops full of water. Quite often this happens for purely technical reasons. Therefore, before contacting the service center, you need to check the condition of the drain hose, which may be kinked or pinched.
Further, it is recommended to check for a blockage in the sewer. To do this, disconnect the drain hose, put it in the bathtub and turn on the drain again. If the water is pouring out freely, then the problem lies in the plumbing.
If the initial measures did not work, then the problem lies with the washing machine itself. Before checking, the machine must be de-energized and the water drained through the drain filter.
The most common reasons for the lack of rinsing in Zanussi are the following:
- Clogged filter, pipe or drain pump. It is required to check and clean all elements of the drainage system.
- Drain pump defective and must be replaced.
- The water level sensor is out of order. As a result, the control module does not receive the required information and does not issue the appropriate commands. This item is subject to replacement.
- The control unit itself is defective. Replacement of the control board is required.
Sometimes the Zanussi washing machine refuses to spin the laundry. In this case, the following problems become noticeable:
- Water leaves the tank, but the spin mode does not turn on.
- The water drains off normally, but the spin mode is activated only during the washing phase, and not during rinsing.
- The wash has ended, but the laundry was not wrung out well.
- The washing program stops before the waste water starts to drain.
A qualified technician will determine the exact cause. This defect is associated with malfunctions of certain parts and elements:
- The electronic module is completely or partially damaged.
- Clogged pipe that connects the drain pump to the washing machine tank. The blockage can be found in the drain hose, siphon, or sewer.
- If there is a function that determines the weight of the laundry, the reason may be its uneven position in the tub before spinning.
- Blockage or malfunction of the drain pump and its filter.
- Failure of brushes or motor windings.
- Faulty pressure switch - water level sensor.
| Video (click to play). |

