In detail: do-it-yourself Nexia clutch repair from a real master for the site my.housecope.com.
Repair and replacement of the Daewoo Nexia clutch a rather laborious operation that will require the removal of the gearbox. Replacing the Daewoo Nexia clutch is best done on a pit or overpass. It will be necessary to provide for the installation of a stop under the engine. To work, you will need not only a standard set of tools, but also a special mandrel for centering the clutch disc. Without this mandrel, it will not be possible to replace the clutch, because without proper alignment, it simply will not work to insert the input shaft of the gearbox into the basket.
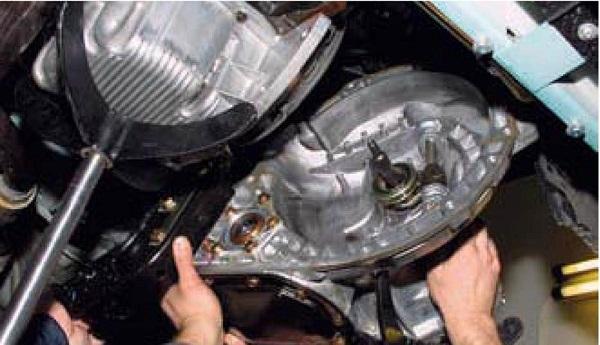
To remove the Daewoo Nexia gearbox there is a lot of work to be done.
When removing or installing the gearbox, do not support the input shaft of the gearbox on the petals of the pressure spring of the clutch cover, so as not to damage them.
To replace the Daewoo Nexia clutch we carry out the following procedure.
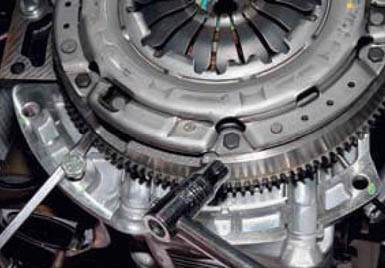
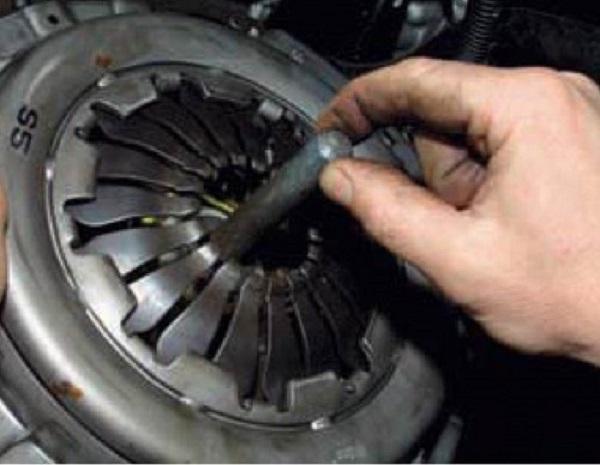
Using the "11" head, unscrew the six bolts securing the clutch cover to the flywheel. We hold the crankshaft from turning with a screwdriver inserted between the teeth of the flywheel and resting on a bolt inserted into the hole in the oil pan. Unscrew the bolts evenly, no more than one turn each, so as not to deform the diaphragm spring of the clutch cover. Next, see a photo of the process.
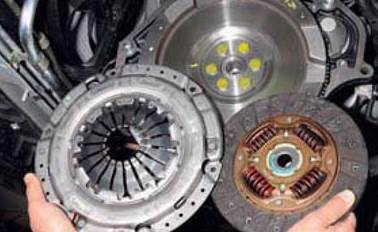
Remove the cover (clutch basket) together with the driven disc.
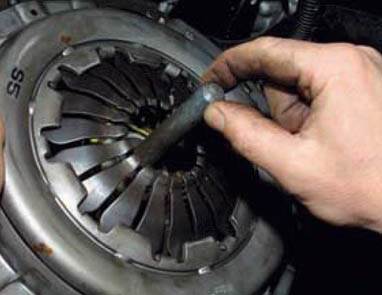
When installing the clutch, we orient the driven disc with the protruding part of the hub towards the casing and insert the centering mandrel into the hole of the driven disc.
We insert the mandrel into the hole of the crankshaft and in this position we fix the clutch cover, evenly (one revolution per pass) tightening the bolts.
| Video (click to play). |
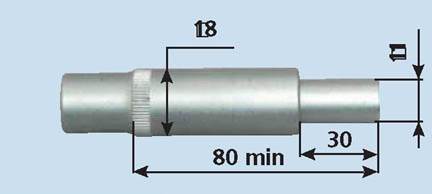
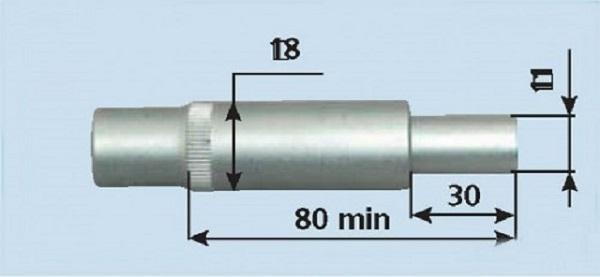
The centering mandrel for Nexia has the following dimensions, see the photo below. The mandrel can be turned on a lathe from metal, wood, plastic, or assembled from two tool heads with suitable diameters and lengths.
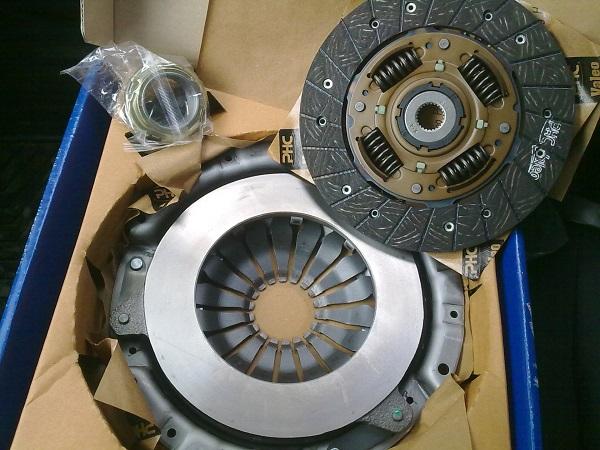
Some clutch kit manufacturers offer a plastic mandrel as a bonus and pack it in a box with a new clutch.
With a certain desire, replacing the clutch with your own hands on a Daewoo Nexia is quite possible. Moreover, this operation, with a moderate driving style, should be carried out quite rarely.
If the clutch fails, it is necessary to replace the entire set consisting of release bearings, driven and driving discs. If you change only faulty parts, then the installed old undamaged components have a small resource and they will need to be replaced soon. The article discusses in what cases it is necessary to change the clutch, what kind of malfunctions there are, and how to do it yourself with a Daewoo Nexia.
On Daewoo Nexia cars, a single-plate dry clutch (SC) is installed, in the center of which there is a diaphragm spring. The pressure plate is housed in a special casing, attached to the flywheel with mounting bolts. The driven disk is put on the splines of the input shaft of the gearbox and is located between the pressure plate and the flywheel.
The design of the hydraulic drive for shutting down the SC includes two cylinders: the main and the working one, the pipeline and the clutch pedal (PS). The SC stem is connected to the PS using a pin and a stem plug. In addition, the master cylinder is connected by a tube to the reservoir located on the front end. The hydraulic drive is filled with brake fluid.
Replacing the clutch may be necessary when the following faults are found:
- jerks during gearbox operation;
- when shifting gears, extraneous noises are heard;
- the clutch "slips", does not fully engage.
Replacement will eliminate the disadvantages.
For the convenience of work, the vehicle should be installed on a lifting device or the vehicle should be lifted with a jack and installed on supports.
From the instruments for the procedure you need to prepare:
- the key is at "11", it will be more convenient to use the socket head;
- mounting blade;
- screwdriver;
- torque wrench;
- a set of tools for dismantling the checkpoint;
- a frame for performing centering.
The mandrel can be made by yourself according to the following drawing.
Having prepared all the necessary tools and consumables, you can start replacing.
The replacement process consists of the following steps:
- First you need to remove the gearbox (gearbox).
- Before removing the gearbox, you must remove both front wheel drive shafts.
- Remove the battery.
- Then it is necessary to drain the oil from the gearbox.
- Next, you should release the slave cylinder and take it together with the bracket to the side.
- Then you need to release the gearbox from the attachment to the engine. Next, you need to release the flywheel cover.
- Then you should remove the support of the power unit.
- Now the checkpoint is being dismantled.
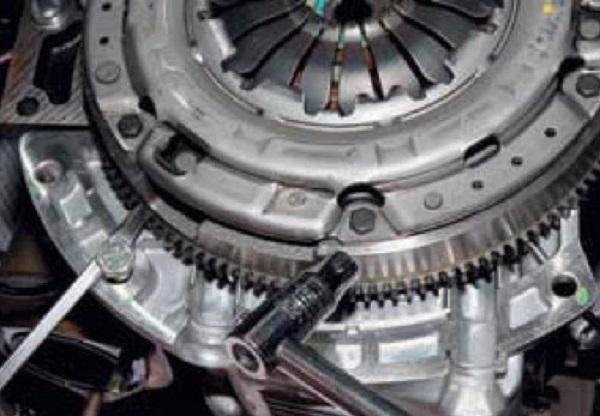 Unscrew the mounting bolts
The bolts should be unscrewed evenly, making two turns with a wrench on each bolt, moving in a circle. When all the bolts are unscrewed, you need to carefully dismantle the clutch basket and the driven disc from the flywheel.
At the end of the work, you should check how the gearbox works and adjust the PS stroke if necessary.
This completes the replacement of the clutch on the Daewoo Nexia. For long-term and trouble-free operation of the clutch, you should not keep your foot on the PS all the time. This habit usually comes about when learning to drive, as many are afraid of not having time to disengage the clutch when the car stops. Not only does the leg get tired quickly, when the PS is slightly squeezed out, the driven disc gives a slipping, which leads to premature wear.
The release bearing is also subject to this increased load and therefore increases its wear. If you need to stay in traffic jams for a long time, it is better to put the car in neutral.
This video discusses replacing the clutch using the example of a Daewoo Sense car.
For Daewoo Nexia, a dry clutch installation is provided, with one disc and a diaphragm spring.
The pressure plate or, there is another name for it, the clutch basket for Daewoo Nexia is mounted in a steel stamped housing, which is attached to the engine flywheel with six bolts. The driven disc is placed on the splines of the input box shaft. It is clamped between the basket and the flywheel by a diaphragm spring.
If one of the parts of the clutch unit fails, then it is recommended to replace all elements at the same time. This is important because the work associated with replacing the clutch is very time consuming, undamaged parts have some wear and a situation may arise that requires repeated disassembly and replacement of elements that fail ahead of time.
To prolong the life of the clutch, try to avoid constantly holding the clutch pedal with your foot. This habit is typical for novice drivers who have just graduated from driving school, they worry that they will not have time to disengage the clutch when they stop. In this position, the foot will tire quickly, and the clutch will be slightly squeezed out, which will lead to slippage and wear. Do not hold the clutch pedal for a long time, it is optimal to engage in neutral and release the pedal.
If there is a slipping of the clutch, then it is easily determined by the readings of the tachometer. While driving, if you press the gas pedal hard, the rpm will increase, then decreasing slightly, the car will start accelerating, then the clutch needs repair or replacement.
- An increase in the noise level when it is turned on.
- There are jerks during operation.
- The clutch is not fully engaged, slipping begins.
- The clutch is not completely disengaged, so it is being driven.
To perform the operation to replace the clutch, you need to prepare: a mounting blade, a key for 11, a mandrel with which the driven disc is centered.
To assess the technical condition and efficiency of the clutch, it is necessary to check the travel of the clutch pedal. To do this, you need: a ruler, a screwdriver and two keys for 13 and 12.
Here is a photo of the clutch release on the gearbox shaft.
The checkpoint is true Lanos, but one crap.
So you can't take it off the shaft, so as not to remove the gearbox!
Do not believe any nonsense!
But the photo is probably tovo a miracle hatch, through which the good is supposedly possible to clutch.
You can drain the oil through the nevo, well, look at the gears.
Replacing the release bearing Daewoo Nexia with your own hands is a rather difficult operation and without skills in auto repair it will be very difficult to do, since such a procedure requires removing the gearbox of the Nexia car, and this is very difficult, but with a video guide, the process will go much more confidently and faster ... Look and remove the box, change the clutch or release bearing of the gearbox with us.
To carry out the procedure, you will need a solid set of tools: keys, sets of heads, a hammer, a mounting, a jack, and with all this, you need a viewing hole or overpass. You will also need the skills of changing the oil in the Daewoo Nexia box, you will have to remove the drive (CV joint). Remove the box and change the clutch release with an assistant.
Subscribe to our channel in I am ndex.Dzene
Even more useful tips in an easy-to-use format
Clutch adjustment Daewoo Nexia
The clutch, with the engine running, does not engage
Gears are not included with the engine running
Twitches after releasing the clutch Daewoo Nexia
Initially, the clutch on my Nexia was poorly adjusted: the clutch was not released, it worked at the very bottom, sometimes the gears were engaged with a grinding and crunching sound. It was decided to independently adjust the clutch.
Clutch pedal free play adjustable by a rod on the pedal.We loosen the nut by “12” to adjust the stroke of the rod: unscrewing the rod leads to a decrease in the free stroke, screwing in - to an increase in the free stroke of the clutch pedal.
The stem is normally hand-adjustable, but a “6” key can be used. In my case, the clutch free play was about 15 mm, i.e. the upper limit, so I twisted the stem several times, each time checking the clutch and free play.
The result of the adjustment: the reverse gear now always engages easily and without crunching, because the clutch began to grip a little higher and the clutch is squeezed out completely. The rest of the gears also began to be easily included, literally with one finger.
The vehicle is equipped with a dry single-plate clutch with a central diaphragm pressure spring. The clutch release drive is hydraulic.
On some of the cars of the first years of production, a clutch release cable was installed.
The clutch consists of a basket (pressure plate assembly) and a driven plate. The basket is a steel casing in which a pressure diaphragm spring and a pressure plate are installed. From the side of the casing, the disc is pressed by a diaphragm-type pressure spring. The clutch basket is attached by six bolts to the flywheel. A driven disc is installed between the pressure plate and the flywheel.
Friction linings are riveted to both sides of the driven disc. To damp torsional vibrations at the moment of engaging the clutch, a damper with four coil springs is integrated into the driven disc. The hub of the driven disk splines with the input shaft of the gearbox.
The clutch release hydraulic drive consists of the master and the clutch release slave cylinders, connected by a pipeline. The clutch hydraulic system uses brake fluid.
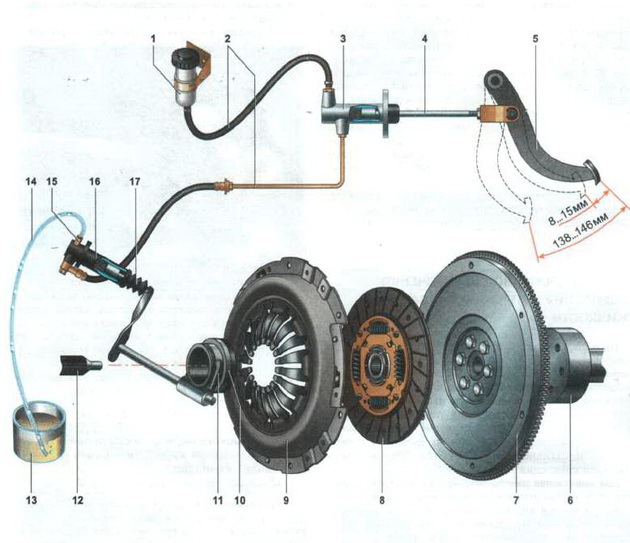
1 - reservoir of the clutch master cylinder; 2 - tubes and hoses; 3 - the master cylinder for disengaging the clutch; 4 - rod of the main cylinder; 5 - clutch pedal; 6 - rear flange of the crankshaft; 7 - engine flywheel; 8 - a driven clutch disc; 9 - clutch basket; 10 - clutch release bearing; 11 - clutch fork; 12 - primary shaft of the gearbox; 13 - capacity for draining the brake fluid; 14 - flexible transparent hose for bleeding the clutch hydraulic drive; 15 - pumping union; 16 - clutch slave cylinder; 17 - anther of the working cylinder
Clutch - technical condition check
The service life of the clutch depends on the operating conditions and driving style. Operating the vehicle at maximum load or off-road, towing a trailer, incomplete disengagement of the clutch when starting, accelerating and driving, as well as holding down the clutch pedal for a long time with the engine running, significantly reduce the service life of clutch parts.
The clutch in the engaged state (when the pedal is released) should not slip and transfer torque from the engine to the transmission without loss, and with the clutch pedal depressed, completely disconnect the transmission from the engine. The engagement of the clutch should be smooth, without jerking.
Hydraulic clutch release - bleeding and fluid replacement
Bleeding should be carried out after any repair of the clutch hydraulic drive, which has resulted in a violation of its tightness. It is impossible to get air into the system without breaking the tightness of the system or draining the reservoir of the clutch master cylinder to an unacceptable level. Therefore, if air enters the clutch release hydraulic drive during normal operation, it is necessary to check the hydraulic drive for leaks.
To carry out the work, you will need: a transparent vinyl tube of a suitable diameter, a container for draining the brake fluid, clean brake fluid, a special wrench for the fittings or a 10 mm spanner wrench.
We carry out the work with an assistant.
Sequence of execution
1. Preparing the car for the job.
To prevent air from entering the clutch release hydraulic actuator during bleeding, make sure that the level of the brake fluid in the reservoir of the clutch master cylinder does not fall below the MIN mark.
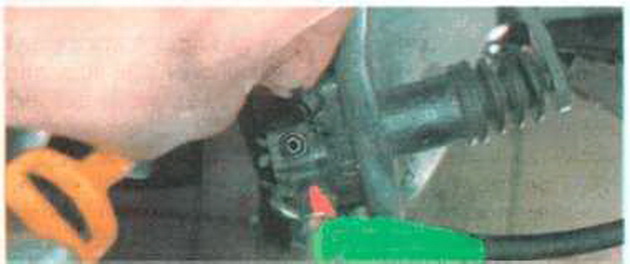
2. Remove the protective cap from the bleed nipple of the clutch slave cylinder.
3. We put on the bleed nipple a ring or a special 10 mm wrench.
It doesn't matter what model the car is, but the clutch is always the most important part. Without its normal work, it is unlikely that it will be possible to drive a car. Its breakdown on a Daewoo Nexia car (however, as well as on other cars) is dangerous not only for the car owner, but for other road users. Always check your vehicle before getting behind the wheel. If there are unusual sounds, "whistles", "squeals" or something similar when trying to start the car, you should immediately inspect.
Replacing the clutch on a Daewoo Nexia car is carried out in almost the same way as on other cars.
It's easy to do it yourself. You just need to figure out what it is and find out the reasons for the breakdown.
It is impossible to properly repair any element on the machine if you do not know its structure. On a Daewoo Nexia car, the clutch is single-disc, dry. It consists of:
- Carter;
- Flywheel;
- Bolts for fastening the casing to the flywheel;
- Driven disc;
- Pressure disc;
- Clutch cover;
- Shut-off clutches;
- Input shaft of the gearbox;
- Shutdown plugs;
- Central pressure spring.
In addition, it is permanently closed with a central diaphragm spring. If the clutch is to be replaced, then first you need to find out the cause of the breakdown.
Malfunction is possible for various reasons. There is no general rule for elimination, you need to carefully examine and listen to the operation of the car. In almost all cases, the entire device needs to be replaced.
Signs by which you can notice a malfunction:
- Noise appears when the clutch is engaged;
- The work begins with jerks, jerks;
- The inclusion does not occur completely, slipping occurs;
- Turning off until the end does not work, this indicates that it is driving.
If you are not sure that it will be possible to fix everything, then only its replacement remains. Before work, you should consult with specialists.
To replace the clutch successfully, you need to get a mounting blade, a key for 11, a mandrel and you can start working.
- The gearbox is removed;
- If, upon inspection, it is decided that the pressure plate does not need to be changed, then the position of the disc cover in relation to the flywheel should be noted;
- Secure the flywheel against turning with a spudger. Unscrew all the bolts and remove the clutch basket from the flywheel directly with the driven disc, but at the same time the disc itself must be carefully held;
- Before installing a new kit, you need to pay attention to the fact that the driven disk easily moves along the splines, if jamming is observed, then the parts must be replaced;
- Apply refractory grease to the hub splines of the disc;
- Install a new clutch. Using a mandrel, put on the driven disc, it is important that the marks (which were made earlier) are aligned, tighten the bolts;
- Remove the mandrel and install the gearbox.
After the work done, it remains to check how the replacement on the Daewoo Nexia car took place.
Experts advise changing all the details at once. Because usually, if at least one element is out of order, then after a while others will also be faulty. This will help keep the vehicle in good working order and extend its life.
[symple_box]
Content:
- Possible malfunctions
- Replacing the clutch
- Checking a replaced clutch
- Useful Tips
For Daewoo Nexia, a dry clutch installation is provided, with one disc and a diaphragm spring.
The pressure plate or, there is another name for it, the clutch basket for Daewoo Nexia is mounted in a steel stamped housing, which is attached to the engine flywheel with six bolts. The driven disc is placed on the splines of the input box shaft.It is clamped between the basket and the flywheel by a diaphragm spring.
The hydraulic drive for disengaging the clutch includes: the clutch master cylinder, the slave cylinder located on the clutch housing, a pipe, a hose, a clutch pedal and a bracket. A spring is used to return the clutch pedal to its original position.
- An increase in the noise level when it is turned on.
- There are jerks during operation.
- The clutch is not fully engaged, slipping begins.
- The clutch is not completely disengaged, so it is being driven.
In order to independently perform the operation to replace the clutch, you need to prepare: a mounting blade, a key for 11, a mandrel with which the driven disc is centered.
To assess the technical condition and efficiency of the clutch, it is necessary to check the travel of the clutch pedal. To do this, you need: a ruler, a screwdriver and two keys for 13 and 12.
If one of the parts of the clutch unit fails, then it is recommended to replace all elements at the same time. This is important because the work associated with replacing the clutch is very time consuming, undamaged parts have some wear and a situation may arise that requires repeated disassembly and replacement of elements that fail ahead of time.
To prolong the life of the clutch, try to avoid constantly holding the clutch pedal with your foot. This habit is typical for novice drivers who have just graduated from driving school, they worry that they will not have time to disengage the clutch when they stop. In this position, the foot will tire quickly, and the clutch will be slightly squeezed out, which will lead to slippage and wear. Do not hold the clutch pedal for a long time, it is optimal to engage in neutral and release the pedal.
If there is a slipping of the clutch, then it is easily determined by the readings of the tachometer. While driving, if you press the gas pedal hard, the rpm will increase, then decreasing slightly, the car will start accelerating, then the clutch needs repair or replacement.
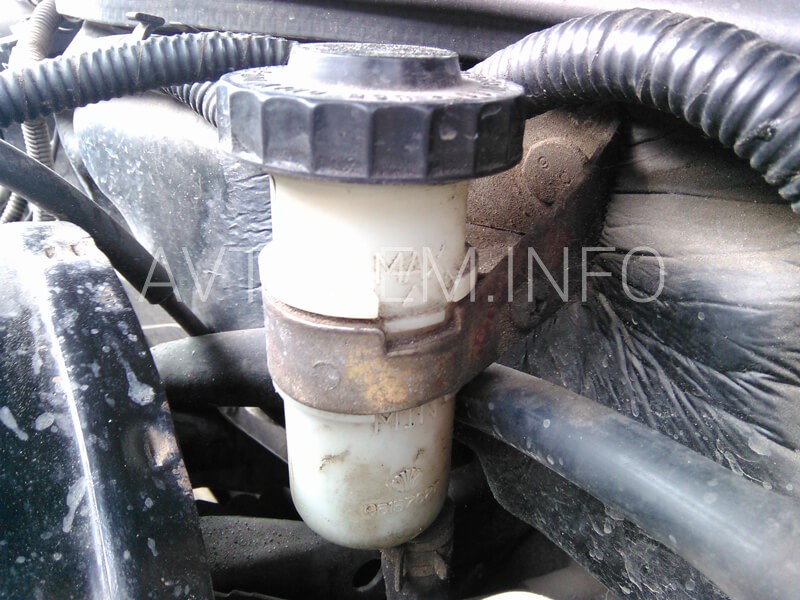
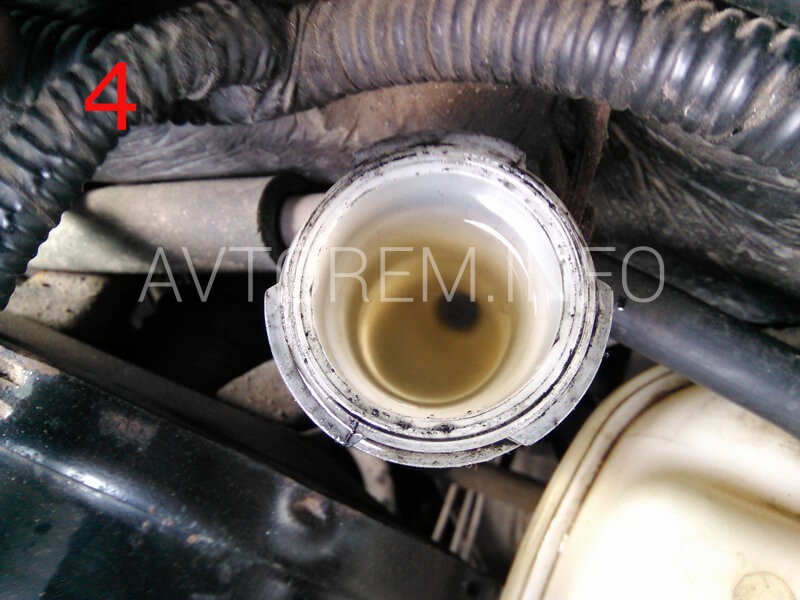
Therefore, I remind you and myself, too, that according to the requirements of the manufacturer, the working fluid in the clutch hydraulic system of the Daewoo Nexia car (Daewoo Nexia) should be changed every 30,000 mileage or after 2 years of operation (whichever comes first). And then, the slave and master cylinders of the clutch will "say" thank you, and as a token of gratitude they will serve as long as possible. And what is important - no unpleasant surprises, as in my case. I will say in advance that after I completely replaced the fluid in the system, blew the clutch, the pedal “disappeared” more.And what is the condition of the working fluid in the tank of your vehicle's GCS? How long have you changed it? If the liquid in the tank is clean, and you know exactly when the last change was, then you can skip reading the material further. You will not learn anything new. But, if the state of the liquid in the GVC tank is the same or almost the same as in the first photo and you have no idea when it was last changed, then I advise you to read the article to the end. It will be useful to you.
Spare parts. The manufacturer recommends using DOT-3 or DOT-4 brake fluid for the Daewoo Nexia clutch hydraulic system. In quantity - 200 grams. That is, in order to completely replace the working fluid in the Nexia clutch, you should buy a 300-400 gram bottle of brake fluid of at least DOT-3 class. And that's all, you can start preparing the necessary tool.
Tool. At replacing the working fluid in the hydraulic clutch system of the Daewoo Nexia car (Daewoo Nexia), You will need: a box wrench for “10”, a medical syringe or a pear, a transparent plastic bottle, a rubber hose (the vacuum hose of the ignition distributor for VAZ 2101-2107 cars is perfect for this purpose) and an assistant.
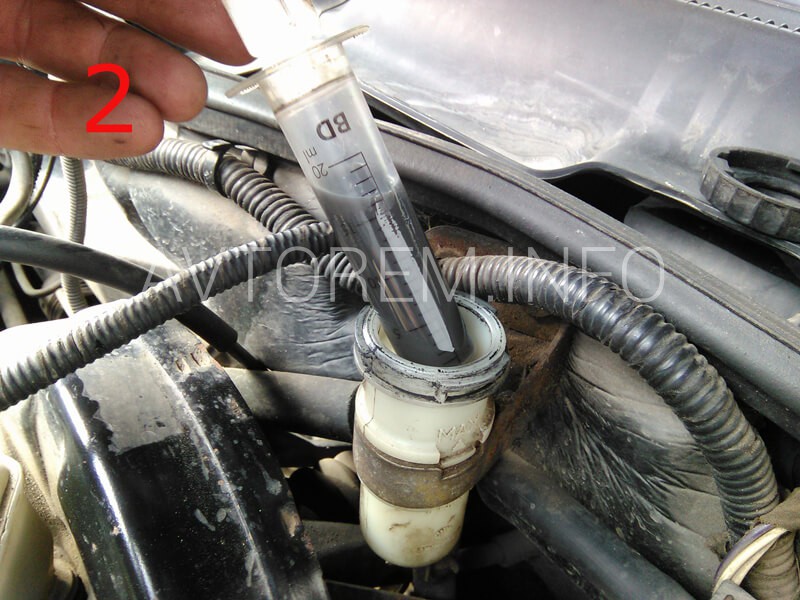
Have you prepared the tool and brake fluid? If yes, then we proceed to the independent replacement of the brake fluid in the hydraulic clutch system of the Daewoo Nexia car (Daewoo Nexia):one. The first thing to do is to take out the old liquid from the tank with a syringe or a pear (photo 2). If necessary, the bottom and walls of the tank should be cleaned of dirty deposits. After that, pour in new liquid.
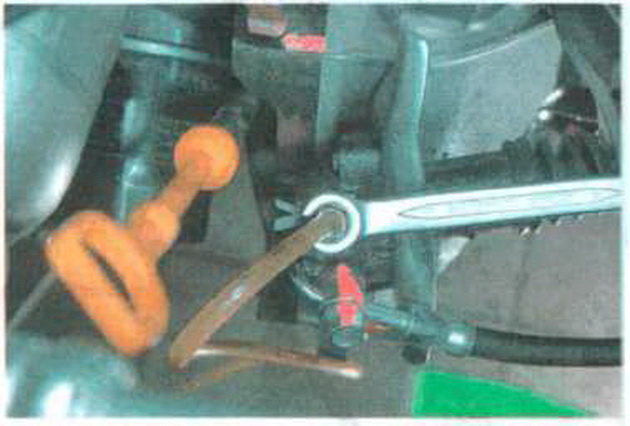
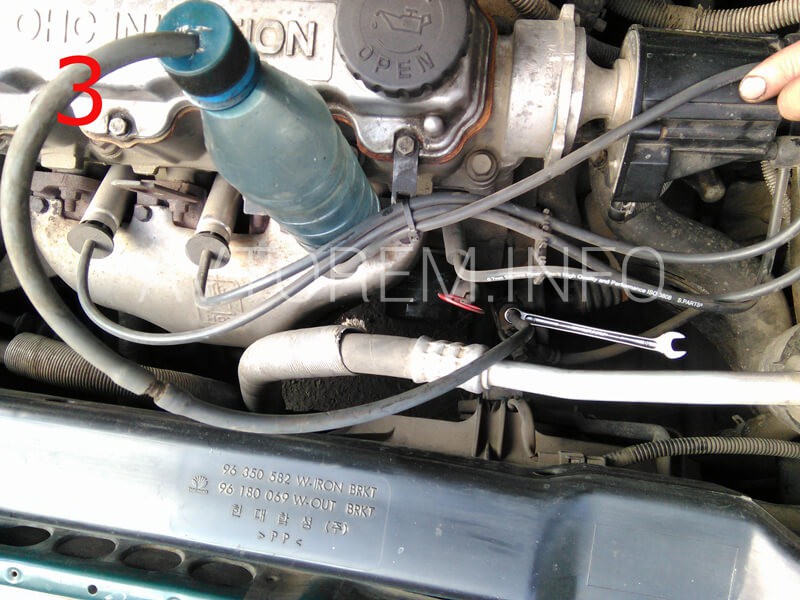
2. We put on a spanner wrench “10” on the bleed union of the working brake cylinder. After that, we connect a hose to the fitting, the other end of which is lowered into a transparent bottle (photo 3). We ask the assistant to press the clutch pedal two or three times. For the fourth time, we ask him to press the pedal and do not release it. And you at this time, unscrew the union half a turn. We observe how the liquid begins to flow into the bottle. We tighten the fitting. We repeat the process three to four times. In parallel, we control the presence of liquid in the tank.
Ready. Replacing the working (brake) fluid in the hydraulic clutch system of the Daewoo Nexia car (Daewoo Nexia) completed successfully.
Difficulty: 5.
Lead time: 9 hours.
Special tool:
- centering mandrel for installing the clutch disc.
To complete the work, 2 assistants are required.
1. We carry out preparatory and basic operations to remove the gearbox (see "Manual gearbox - removal and installation").
2. If the clutch basket is to be re-installed, then with a marker we make alignment marks on the clutch basket and flywheel.
3. With a spanner wrench 11 in several passes, no more than 1/2 turn at a time, in a criss-cross sequence, loosen the tightening of the 6 bolts of the clutch basket. To keep the flywheel from turning, use a large slotted screwdriver.
4. Completely unscrew the 4 bolts securing the clutch basket and, pushing the clutch basket away from the flywheel, remove the clutch disc.
5. Using a spanner key 11, unscrew the remaining 2 bolts securing the clutch basket and remove it.
6. Check the condition of the flywheel working surface. If there are marks on the working surface of the flywheel with a depth of more than 0.5 mm, then the flywheel must be replaced.
Before installing the clutch, make sure that there is no oil leakage through the rear crankshaft oil seal and through the transmission input shaft oil seal.
1. We put the driven disc on a special centering mandrel and install the mandrel together with the disc into the hole in the rear end of the crankshaft. The driven disc is installed with the protruding part of the hub towards the gearbox.
2. Install the clutch basket on the flywheel and screw on the 6 basket mounting bolts.
3. If we reinstall the removed clutch basket, then match the marks on the flywheel and basket, applied during disassembly.
4. With a spanner wrench 11 in several passes, no more than 1/2 turn at a time, in a criss-cross sequence, tighten the clutch basket mounting bolts until the specified tightening torque is reached.
5. Take out a special centering mandrel.
6. Change the clutch release bearing (see "Clutch release bearing drive mechanism - removal and installation").
The rest of the parts removed during disassembly are installed in the reverse order.
Dismountable clutch:
1 – pressure plate
2 – clutch cover
3 – diaphragm spring
4 – driven disc
Remove the gearbox (see subsection 12.2.).
When loosening the clutch cover bolts, block the flywheel with a screwdriver. Install the bolt to stop the screwdriver.
You can remove the clutch without a mandrel, but you must hold the driven disc - it can fall out of the clutch cover.The mandrel can be made to fit the input shaft, or an old input shaft can be used instead.
Flywheel friction surface.
1. Insert a mandrel into the hole in the pressure plate and remove the six bolts securing the clutch cover to the flywheel (see notes 1 and 2).
2. Carefully remove the clutch cover with the driven plate.
3. Examine the driven disc. There should be no cracks on the parts of the driven disc. Check the wear of the friction linings. Replace the friction linings or the driven disc in the following cases: a) the rivet heads are deepened by a distance of less than 0.2 mm; b) the surface of the friction linings is oiled; c) riveted joints are loose.
4. Check the tightness of the damper springs in the seats of the driven disc hub. If the springs are broken, the disc must be replaced. If a visual inspection reveals a warped disc, check its runout. If the runout is greater than 0.5 mm, replace the disc.
5. Inspect the working surfaces of the friction of the flywheel and pressure plate: they should be free of deep scratches, scoring, nicks, obvious signs of wear and overheating. Loosening of the riveted joints of the parts of the pressure plate is inadmissible. If defects are found on the flywheel or pressure plate, we recommend replacing them.
6. Carefully inspect and assess the condition of the support rings and the pressure plate diaphragm spring. Support rings must be free of cracks and signs of wear. The presence of cracks in the diaphragm spring is unacceptable. The contact points of the spring petals with the clutch release bearing should be in the same plane and not have obvious signs of wear.
7. Install the driven disc into the pressure plate housing with the less protruding part of the hub facing the flywheel.
8. Insert a centering mandrel into the splines of the driven disc from the diaphragm spring side.
9. Install the clutch on the flywheel and tighten the six bolts securing the clutch to the flywheel evenly diagonally to a torque of 19-31 Nm (1.9-3.1 kgfm). Then remove the centering mandrel.
We will show you how to remove and repair the clutch master cylinder in a Daewoo Nexia car. In other words, we can say that the repair kit will be replaced, here is its number in the spare parts catalog:
The essence of the problem, or why this repair is being carried out, periodically appears to be under-pressing the clutch, as a result, the transmissions simply did not turn on, and if they did, then with a crunch. In the design of the clutch master cylinder there is a rod that has two rubber cuffs, which eventually lose their properties and begin to wear out, while allowing fluid to pass through. Moreover, if you press the clutch pedal sharply, there is no problem, but if it is smooth, then it appears. Everything indicates a malfunction of the clutch master cylinder; a special repair kit is sold for its repair, which is able to solve this problem without replacing the cylinder.
Video repair and removal of the clutch master cylinder in Daewoo Nexia:
Backup video of the clutch master cylinder repair in Daewoo Nexia:

