In detail: do-it-yourself repair of disk phones from a real master for the site my.housecope.com.
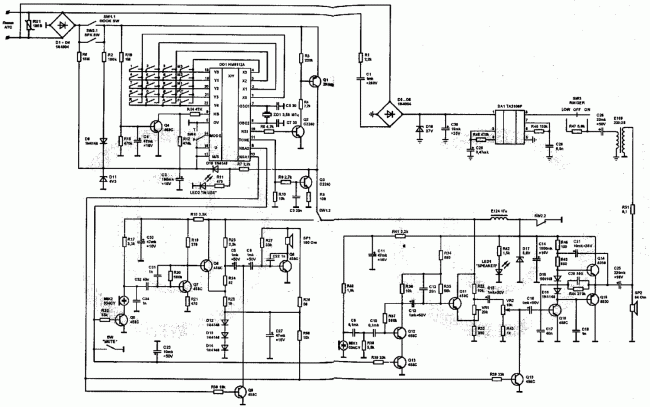
The simplest telephone set consists of a tube with a microphone and telephone capsules, a dialer, one toggle switch contact, a bell and a capacitor (Fig. 1). If we exclude the bell and the capacitor from this set, and fix the dialer on the tube, then we get an indispensable tool for the telephone installer.
The circuits of household appliances manufactured by the industry differ from the circuit in Fig. 1 by the presence of a differential transformer and an RC-circuit, designed to eliminate the local effect ("self-monitoring") and to match the line.
From the end of the 60s to the beginning of the 80s, the VEF Riga plant produced the most massive model of a household telephone in the USSR - the TA-68. The device has relatively good characteristics, and its schematic diagram (Fig. 2, Fig. 3) actually became the base for the subsequent, more modern devices of the company. The TA-72M telephone set (Fig. 6, Fig. 7) has only a modified body shape; handset, bell and other accessories are the same as for the TA-68M.
For clarity, all diagrams show a typical inclusion of a two-wire outlet cord. At the same time, connection diagrams of different dialers are shown.
The most vulnerable point of the TA-68 and TA-68M devices is the upper case cover. As a rule, on impact from a fall, it breaks off the mounting bushings, as well as the clamps of the lever switch pressure plates. For gluing the body, PS glue, dichloroethane or epoxy is suitable.
It is impossible to use only elastic adhesives such as "Moment" or "Phoenix". It should also be noted that if the case is dirty with it, it cannot be cleaned with acetone or other solvents, but only with warm soapy water or diluted shampoo.
| Video (click to play). |
If, after connecting the telephone set to the PBX network, a strong rustling and crackling sound is heard in the receiver, try pressing the coiled microtelephone cord to the receiver, making a small loop similar to how pop singers do. Then, gently feel every inch from the body of the device to the tube. Usually damage occurs either at the tube itself or directly at the body. Of course, it is best to replace the twisted cord with a new one, but not everyone has one. In this case, you need to cut off the damaged piece of the cord, carefully strip the wires and install on them the terminals previously removed from the cut cord. Since the microtelephone cord consists of tinsel wires, which are made by spiral winding of a narrow and very thin copper tape onto a silk or nylon thread, they cannot be soldered to the terminals. The terminals are bent, trapping the insulation. This way, your microtelephone cord will be slightly shorter, but will work without replacement.
Likewise, you can restore the functionality of the outlet cord. If it was not possible to detect a malfunction of the microtelephone cord, or after replacing it with a new one when shaking the handset, the same symptoms are observed, it is necessary to replace the microphone capsule (MK). Sometimes, in order to restore the performance of the microphone, it is enough to dry it on a heating battery for a day.
Pay attention to the markings on the capsule body. Currently, carbon microphones of the MK-16 type are produced with a resistance of 20. 40 Ohm for short MB lines and a resistance of 180 ± 80 Ohm for all other devices. Microphones MK-16-U are resistant to climatic conditions, designed for temperatures from -50 ° to + 50 °. MK-16-N is manufactured for normal climatic conditions (-10 ° to + 45 °).
It is necessary to pay attention to the correct connection of the dialer, socket and microtelephone cords. On the diagrams, the colors of the cores of the cords are specially indicated to make it easier to look for errors. If everything is connected correctly, then when "blowing" the microphone, you should not hear loud noise and your own voice in the receiver. Otherwise, it is necessary to check the connection of the colored wires of the microtelephone cord under the microphone (MK) in the handset. The green wire in all telephones made in the USSR should be connected only to the MK contact. White wire connects to both capsules.
The bell and the telephone capsule rarely fail completely, therefore, to check them, it is enough to measure the winding resistance with a tester. The bell should have 2400 Ohm, and the TC winding - 60.70 Ohm. The telephone capsule can be of the TA-4 or TK-67-NT type. At the bell, it is imperative to check the striker stroke and, if necessary, adjust it by turning the eccentrically fixed bell cups in one direction or the other so that the striker almost touches the cups in the position for maximum volume (the gap should be from 0.1 to 0.2 mm). The striker is fixed to the anchor, the stroke of which is selected within the range of 0.4 ± 0.1 mm. As the armature travel decreases, the ringing sensitivity increases.
If a good call does not work, it is necessary to check whether a jumper is installed between contacts K2 and K5 (Fig. 2). Next, you should check the contacts of the lever switch. In all diagrams, they are shown in a state when the tube lies on the levers of the apparatus. The distance between open contacts must be at least 0.4 mm. You can fold them down if you remove the clear dust cover of the toggle switch. Clean contacts with alcohol.
The most complex device of a telephone set is a rotary dial. It is impossible to properly adjust it at home, so it is better to immediately replace the dialer with a new one. To get acquainted with this important unit, let us briefly dwell on its main characteristics. The sending of impulses to the ATC is carried out during the reverse (free) movement of the disk. The duration of the cycle of opening-closing of the impulse contacts (IC) of the dialer is 90.110 ms (or 10 ± 1 imp / s). The ratio of the duration of the opening to the duration of the closing of the MC is within 1.4. 1.7 and is called the impulse factor. The distance between open contacts must be at least 0.3 mm. To avoid listening to clicks in the phone during dialing, the old dialers had an additional S2-3 contact group (see Fig. 2), which bypassed the phone capsule at the time of dialing. If you want to install a five-wire dialer instead of a three-wire dialer, the green and black wires must be insulated and not connected anywhere.
The above schemes are very useful in practice when repairing telephones.
In this thread, we will look at the cause of the malfunction of the fixed wired telephone TACHOS Fe TAp 01LX, country of origin: Germany. The phone was given to me for repair by my friends. According to the owner, the telephone was handled with care, the telephone worked properly for several years, but suddenly it stopped functioning. To find the cause of the malfunction, the landline telephone, of course, had to be disassembled.
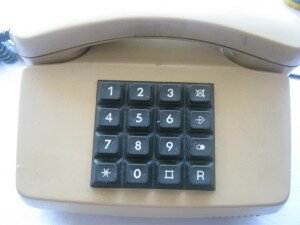
Two photographs show the construction of the landline telephone and its model (photo 1). So, we are following the phone repair.
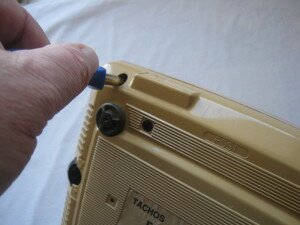
After disconnecting the case, you need to inspect the contact connections of the wires with the circuit, the telephone plug and the telephone receiver (photo 2).
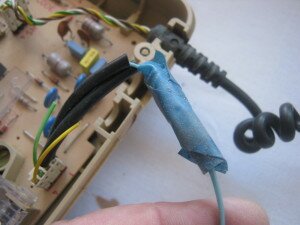
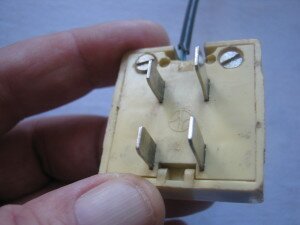
The following photos show the contact connections of the wires with the pins of the telephone plug (photo 3).
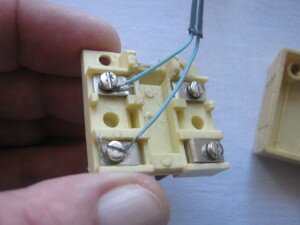
From these photographs, you can make sure that the contact connections of the wires are not broken. We carry out further inspection.
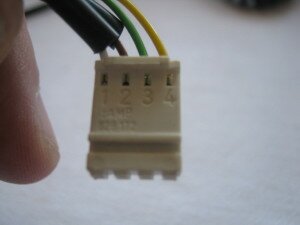
To dial the telephone plug cable, you need to disconnect this cable from the telephone circuit. Here you can notice that the contact connections are numbered - what you should pay attention to when connecting the cable further (photo 4).
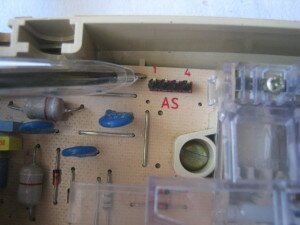
This photograph shows an image of the cable connector, the connector of which is connected to the circuit of the telephone set (photo 5).
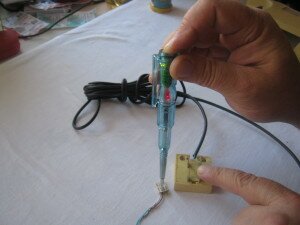
To check the telephone cable, to check the wires, you can use an indicator screwdriver (photo 6). The telephone cable consists of two wires and the photographs show how to use the indicator screwdriver for this test.
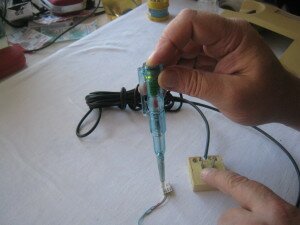
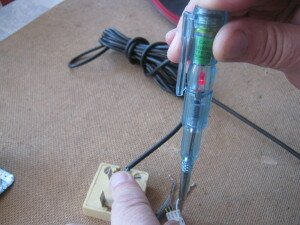
That is, the indicator screwdriver must be connected to the contact of the cable connector (photo 5), and the index finger of the other hand must be connected to the pin of the telephone plug. When checking, a break was found in one of the cable wires (photo 6, right).
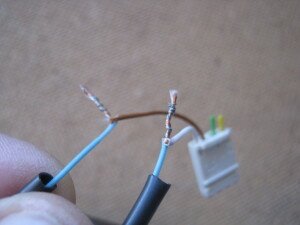
The wires of the cable were twisted - without tin reflow (photo 7, left), the wire connection underwent oxidation, which caused the rupture.
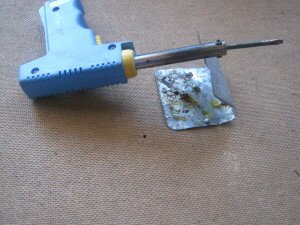
To eliminate the malfunction, a soldering iron, soldering tin and rosin were needed.
The wire connections have been melted (photo 8). Kebriks are put on the bare sections of the wires and now, you should check the cable again.
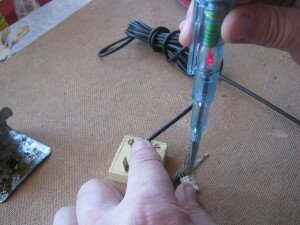
Both photographs show the test of two wires of the cable (Photo 9). The malfunction of the telephone set has been identified and repaired. As you have seen, the malfunction was in the unreliable connection of two wires, which over time underwent oxidation. You already know how electronic elements are checked from the content of this site.
He reached for the handle with a tube in his hand, the device is light, slid off the table and straight onto the floor…. bang, or maybe they tried to hang up the phone in a deranged state or wanted to hang on it themselves ... history is silent. As usually happens in such cases, the owner rips his shirt off and claims that the phone worked, and then suddenly he stopped calling. The details of the owner's life are of little interest to us, and if he does not want to talk about the cause of the breakdown, then this is his own business.
The malfunction is not complicated, it is not necessary to carry it for repair - everyone can fix it!
After a visual inspection of the TX-210M telephone set, the conclusion suggested itself. The device hung on the wall and crashed well.
Everything is clear. The phone holder on the back has been torn out by the roots.
We open the device. And everything is clear here.
The piezoelectric element of the bell was torn from its place and a wire came off from it.
You don't need a lot of mind to understand where the break occurred. We heat the soldering iron and stick the wire where it should be.
We connect our telephone set to the telephone socket. We dial the number of our beloved (or friend) and ask her to call you urgently. Checking the call. Everything works great!
We put the piezoelement in place, we will not glue it to the Moment glue, we will make it more reliable, put it on hot melt glue.
It remains to close the hole in our device. We tear off a plastic panel from another faulty phone or something else, I tore it from an old TV
We drill two holes - one larger, the other smaller. We connect these holes and we get just such beauty. You can, of course, if you have to cut out a ready-made ear from something.
With an ordinary knife we cut off the lacerated wound of the hole.
Now we will fill this huge hole with our beauty.
Something like this, you can bolt or bolt, as you like and want.
And the final touch, we hot glue along the perimeter of the plate from the outside, and inside the glue, sparing no regrets to keep it dead.
Using this telephone as an example, we saw that you can easily cope with a malfunction yourself. When opening the phone, there may be other similar malfunctions. For example, the leg of a transformer, capacitor or other heavy part may break off. Take a close look at the inside of the telephone: the conductors and the back of the printed circuit board.
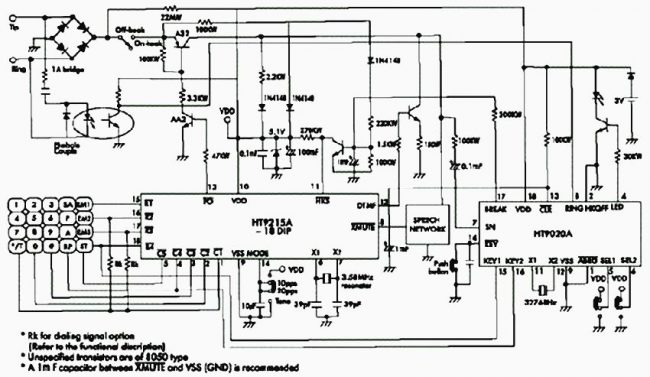
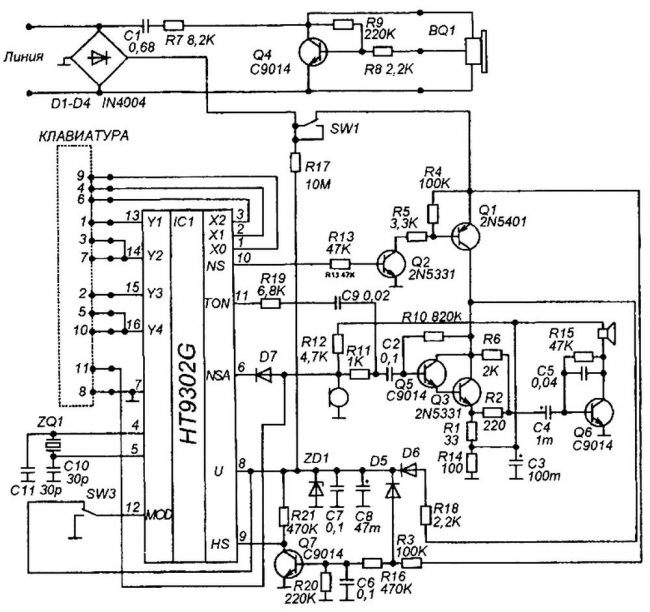
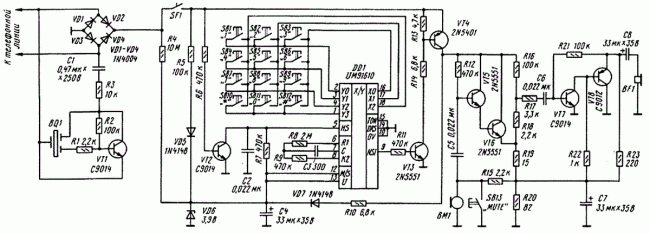
(Used materials from the site "on the knee")
 How to solder the micro usb connector on a tablet, phone, netbook, laptop with your own hands?
Now in devices you can often find usb connectors (u-es-bi, English Universal Serial Bus - "universal serial bus"). Due to accidental mechanical damage, for example, while the device is in charging mode, such a malfunction is often encountered - such as a break in the micro usb connector. You will learn how to solder the micro usb connector yourself in the article below.
Repair of a disk telephone (telephone set) is mainly reduced to the elimination of mechanical damage. Such damage is not always visible immediately, so I recommend checking the telephone set in approximately the following sequence.
First, without disassembling the device, we move the connecting cords. If you hear any changes in the earphone, then we try to clarify the location of the defect. Most often, the wire is bent near the body (in the photo, these places are indicated by blue spots).
Disk telephone repair
When repairing the cord, it is better not to solder it, but to make a good twist, a clamp is even better. First of all, this concerns the wires that go into the tubes, because the conductors there are very thin and soft. And at the place of the adhesion, they can simply come off.
If you have a tester at hand, you can measure the resistance of the conductors. It can be several (tens) ohms. If the resistance of one wire is noticeably different from the other, then the necessary measures should be taken.
Very often, the defect can be hidden in the clamps at the ends of the conductors. In this case, it is enough to press the tips with pliers.
The next step is to clean the dialer contacts and toggle switch:
they can first be wiped with alcohol, and then dry with a cloth (so that no streaks remain)
the second way is to take a regular pencil eraser and cut off a piece 1-2 mm thick. Then move them along the contacts until the black oxide disappears.
dialer
When cleaning the contacts, it is better not to bend the plates too much, because it will be difficult to restore them to their previous state.
If you hear a characteristic squeak in the telephone receiver, then the reason may be a carbon microphone or "floating" resistance of the conductors (when you move the cord, the resistance of the conductors is constantly changing). The carbon microphone needs to be replaced or the cords repaired.
There may be other malfunctions, but these appear more often. When I do a disk phone repair, I almost always follow the above steps and in most cases they help me.
A punched tape drive is a device that.
Despite the abundance of various fancy phones, many still have phones with a rotary dialer. Since the age of these friends is very respectable, breakdowns are not so rare.
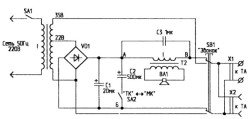
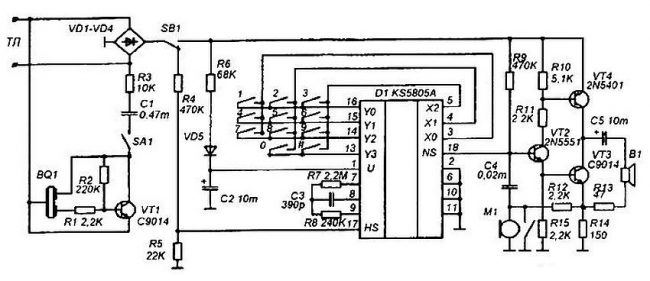
To test the telephone set (SLT), you can use the proposed sound control. It allows you to check one by one all the elements of the TA, as they say, in one pick-up. The phone check is performed in the following sequence. Toggle switches SA1 and SA2 are set to disabled. TA is connected to the X1 (or X2) connector of the control, and then it is connected to the network, and the SA1 toggle switch is turned on. Pressing the SB1 button generates a ringing signal with a frequency of 50 Hz (35 V) to check the operation of the call.
Now the SB1 button is released, and the TA handset is lifted. If the telephone capsule (TC) is in good working order, an audio tone with a frequency of 100 Hz (network pulsations) is heard in the handset. Then, using the SA2 toggle switch, connect the capacitor C2 to smooth out the power pulsations, and with a sharp exhalation “blow through” the microphone capsule (MK). With a working MK, the hissing sound of "blowing" is clearly audible in the TC.
To check the dialer, enter the number "0" several times in a row to correctly assess the uniformity of the received pulses by ear. The clicks arising from them are well heard in the BA1 dynamics. All circuit elements are located in the subscriber loudspeaker housing. Standard T2 and BA1 remain in their places inside the case, and the rest of the elements are located on the rear wall made of plastic.
On the outer side of the wall there are output connectors: X1 - screw terminal block and X2 - universal telephone socket. The rest of the elements are mounted on the inside of the rear wall. Installation is made with insulated wire. Details. As T1, a frame scan transformer TVK3 from TVs is used. VD1 - rectifier bridge on diodes D226B. C1, C2 - 100 V electrolytic capacitors; SZ - 1600 V MBM capacitor. SA1, SA2 - toggle switches TV21, SB1 - KM21 button.
As an option for sound control, you can use a loud enough electromagnetic relay with a 24V DC coil. The relay switches on between points A and B instead of T2 and BA1. The author checked the work with the PE21 (MKU48) relay, which did not have a contact system. The results are quite satisfactory. Despite its simplicity, the control works well with electronic TA. In particular, it allows you to write telephone numbers into the TA memory and retrieve them from there for verification, since when the tube is lifted, the voltage of 12 ... 15V at the linear output (X1 or X2) is sufficient to perform such operations.
To begin with, it is strongly recommended that you familiarize yourself with at least the basics of radio electronics. The fact is that the repair of mobile phones is closely related to theoretical knowledge in this area. For example, if you need to replace a resistor (this is a passive current-limiting radio electronic component), then you definitely need to know its labeling, resistance, power dissipation, temperature coefficient, etc. With other owls, it is not very advisable to repair mobile phones without knowing Ohm's law. There are a huge number of books and manuals on the topic of radio electronics, as well as thematic sites on the Internet. But this is not enough. Mobile phones are digital devices, not analog ones. Consequently, all parts and components used for the production of the latter have differences among themselves. For example, for analog devices, surface mounting technology is mainly used, and for digital devices, surface mounting. The latest technology is called SMT (surface mount technology). It also translates as "surface mount technology". And the components used in this technology are called SMD (surface mount device).
Also, there is no analog signal in digital electronics, because it is actually digital. Consequently, all digital devices have their own types and levels of programming. These are just a few of the differences between analog and digital technology. But even this is enough to scare a newbie away. But there is no need to despair here. Everything is much easier than it seems. A lot of that frightening information is not needed when repairing mobile devices. But if you are planning to seriously tackle this business, then it is strongly recommended to study analog and digital radio electronics.
Now we come to the main goal of this article. So, now you will be described in detail the procedures for technical repair of mobile phones and types of repair devices.
In order to repair a cell phone, including repairing Nokia, Samsung, Sony-Ericsson, LG, Motorola, the first thing is to determine the cause of the failure of the mobile device and identify the component, assembly, module or part that has failed. For this, the knowledge that is described above is just needed. Usually, the breakdown of a mobile phone is caused by improper operation or loss of functionality of external devices. For example, in the first case, the phone fell into the water by negligence. To restore it, complete disassembly and thorough drying are required. After that, you need to use a soft-bristled brush to clean the phone's printed circuit board with a special cleaning agent or 96% alcohol solution. In the second case, the LCD, speaker, microphone, keyboard, etc. are out of order. As a rule, in most cases, such parts cannot be repaired and must be replaced. But if there was damage to the surface (soldered) parts on the printed circuit board, then a professional approach and experience are required. In addition, for this type of repair, you will need a diagram of assemblies, modules and components of the printed circuit board of a mobile phone.
In order to start the repair procedure, the phone must be disassembled.
To open a mobile phone without causing cosmetic damage to it, you need to acquire special tools for opening them. They allow you to open the phone case accurately and as efficiently as possible without causing defects. As a rule, these instruments are sold in sets, each item of which is responsible for its own specific opening. Such kits are not difficult to find in specialized stores. In addition, they come in various types. The difference is the functionality and the price.
You also need a specialized set of screwdrivers for mobile phones. You don't need to save on this. The more specific number of attachments you have, the more chances you will have to unscrew the screws without breaking the edges.
Further, in order to diagnose the phone for its malfunction, you will need a good digital multimeter. It can be used to measure AC and DC voltage and current, resistance, capacitance of capacitors, coefficient of transistors, diode state, continuity of circuits, sections of circuits or nodes, temperature. With skillful use and knowledge of some physical laws, they can find faults in the circuit. The range of multimeters is enormous. The difference is usually in functionality and price.
We also need a laboratory power supply or power supply. With it, it will be possible to set the specified voltage and current. You will need it very often when carrying out repair work, because it will be inconvenient to substitute the rechargeable battery for testing, over and over again. Modern power supplies are equipped with current stabilization and protection functions, as well as a large number of all kinds of clamps and probes for various cases.
Soldering equipment and fixtures. To carry out soldering work, you need a soldering station.Their variety is infinitely large, and the choice is determined by the price and functional range. There are combined soldering stations that combine both a heating soldering iron with temperature control and a hot air dryer, which also has the function of adjusting temperature and air flow.
A hot air dryer is usually required for mounting and dismounting SMD components, as well as integrated circuits made in a BGA package.
Also, when carrying out soldering work, you will need a device for the bottom heating of printed circuit boards. The fact is that when installing or dismantling, for example, integrated circuits (chips), there is a risk of overheating and failure. When using a heating device, on which the printed circuit board of the mobile phone is placed and fixed, the board is rationally heated. And already when the board is heated, you can start assembling or disassembling components without fear of their breakage. this procedure takes place in a few seconds.
Antistatic thermo-tweezers are also useful for soldering work. It is very convenient to use it to dismantle some of the components.
Since you will be faced with soldering work on the installation / dismantling of integrated circuits, you will need a vacuum manipulator. This device is manual and automatic. It is designed to place the chips with the contact pins on the surface of the printed circuit board of the mobile device as accurately, efficiently and conveniently as possible. It is inconvenient to do this with tweezers, especially since there is a high probability of “kill” the microcircuit with an uncalculated pressure. This will never happen with a vacuum manipulator.
Also in the work you need a desoldering pump. With the help of it, you can easily perform soldering by removing the molten solder.
Optics. Parts and components of mobile phones are measured in micrometers and nanometers. It is clear that working without special magnifying devices is very problematic and harmful to vision. In these cases, it is strongly recommended to acquire a 40 diopter technical microscope (not to be confused with a biological one). You will also need a backlit tabletop magnifier. It is not convenient to work with a microscope in all cases, and a desktop magnifier is convenient to use almost always when ultra-high magnification is not required. Mounting magnifying glasses or forehead binocular glasses also do not hurt.
To carry out washing, cleaning all kinds of components and printed circuit boards from dirt, oils, fats, solder, plaque and rosin, you need an ultrasonic bath. It performs ultrasonic cleaning very efficiently and safely.
Other tool. Among other installation tools and accessories, you will need a mounting fixing table, with which you can easily and securely fix the printed circuit board for repair work. Be sure to have a variety of tweezers, mounting awls, round-nose pliers, pliers, long-nose pliers, wire cutters with you. You can add solder paste, flux, solder, rosin, cleaners, ultrasonic cleaner and other consumables to this list.
Where to get parts and components for repair? Of course, you can buy them in specialized stores, but it is best to buy broken phones. Since in some cases, it will be very problematic to find some parts, and it will not be difficult to buy, for example, a broken phone, which contains the necessary part, moreover, at a very low price.
Well, here we are with you and got acquainted with the minimum that a mobile device repair engineer should have. Of course, knowledge and experience will come with time, as theoretical and practical skills are developed.Read books on electronics, if possible, sign up for special training courses in the repair of mobile phones, communicate with people who have experience in this area, visit specialized forums on specific topics, where people are always ready to help.
In general, great success to you in your mobile phone repair business!
More information for learning self-repair of mobile phones HERE.
A telephone is a device designed to work for a long time. Defects can appear in almost any telephone set during its service life. In most cases, you can eliminate them yourself, which will be discussed below.
In devices with a dialer and a toggle switch with mechanical contacts, contamination or deformation of such contacts leads to unsatisfactory operation of the device or even to its complete inoperability. If, when you pick up the handset of the telephone, you cannot hear the answer signal from the PBX, you should first of all pay attention to the contacts of the hook switch. In this case, it is advisable to check the resistance of the electrical contact with an ohmmeter, which should be a fraction of an ohm. Poor contact can be caused by deformation of the rocker switch contacts or contamination (oxidation). In the first case, using tweezers, the contacts are neatly bent; in the second case, it is necessary to rinse the contacts with alcohol and degrease them. You should not use a sanding cloth, even a fine abrasive cloth, to clean the contacts, as you can break the silver coating of the contact pads. The same measures should be taken if there is a suspicion of poor performance of the dialer contacts.
Sometimes the dialer dial rotates slowly and unevenly, resulting in the wrong digits of the number. This occurs as a result of contamination of the rubbing surfaces of the dialer mechanism, drying out of the lubricant, weakening of the return spring, violation of the adjustment of the centrifugal regulator. All rubbing parts should be washed with gasoline or alcohol. Then the rubbing parts, with the exception of the parts of the centrifugal regulator, must be lubricated with an oil-gasoline mixture. Remove the finger disc and inspect the return spring; if necessary, wash it with gasoline and tighten it by 1.2 turns. Check the speed of the dialer mechanism: the centrifugal regulator must return the disk after dialing the number “0” to its original position in 1 s, otherwise the dialer mechanism should be carefully adjusted. The parts of the centrifugal regulator are not subject to lubrication. Recently, the rubbing parts of dialers are made of Teflon and self-lubricating metallographite, and the parts of such dialers do not need additional lubrication. The dialer is the most difficult part of a telephone, and you can only disassemble it if you are sure that it can be assembled at home.
Keypad dialers also have misalignment and contamination of contacts, which leads to increased contact bounce and incorrect dialing of numbers. It is necessary to remove dust from the contacts with a stream of air and rinse them with alcohol, and, if necessary, bend (if the contacts are mechanical). There are no such problems with reed contacts.
Very often the cords connecting the handset to the device and the telephone itself to the PBX socket are damaged. In this case, a strong rustle and crackle is heard in the receiver, or nothing is heard. To look for damage, you should carefully feel every inch of the cord. Damage usually occurs at the points where the cords are connected to the machine, handset, or plug. The damaged section of the cord is cut out, the wires are stripped and connected to the clips removed from the cut cord.Telephone cords are made up of tinsel strands made by winding a narrow and thin copper strip onto a silk thread, so copper strands cannot be soldered to the clamps. Contact is achieved by crimping the copper conductors with clamps.
A faulty carbon microphone is often the cause of noise in the handset telephone. If the handset is shaken sharply, the interference disappears. This can be the result of partial burnout or insufficient carbon powder. To eliminate the defect, you can try to slightly press the top cover of the microphone into the capsule body by 2.3 mm. Sometimes, to restore the performance of the microphone capsule, it is enough to dry it on a heating battery for a day. Better yet, replace your faulty carbon microphone with a new one.
The telephone ring and the telephone capsule rarely fail. To check their serviceability, it is necessary to measure the resistance of their windings to direct current with an ohmmeter. For a call, it should be 1.5. 2.5 kOhm, for a telephone capsule - 60.70 Ohm. If the bell does not ring, you should check if ringing voltage is applied to its windings. If it does not work, it is necessary to check the reliability of the connections, as well as the serviceability of the capacitor. If voltage is applied to the bell winding, and the striker remains stationary, check for a gap between the bell cups and the striker. To set the optimum clearance 0.1. 0.2 mm it is necessary to loosen the screws securing the cups, and by turning the cups around the axis, set a gap that provides a melodic sound. If necessary, you should also adjust the armature stroke, which should be 0.3. 0.5 mm. As for the telephone capsule, in some cases its sensitivity can be increased by turning the membrane upside down.
Sometimes a telephone malfunction is associated with a broken contact in the printed circuit: either poor soldering, or the formation of microcracks in the printed conductors. The latter defect usually occurs when the telephone falls, near the most massive parts installed on the printed circuit board (transformer, toggle switch, etc.). Microcracks are usually invisible to the naked eye and can be detected with an ohmmeter. After detection, strip the printed conductor on both sides of the crack by 5.7 mm, Tinned it, put a tinned stranded wire with a cross section of 0.07 on the conductor. 0.15 mm and carefully solder this area.
Fixed telephone communication has significantly lost ground over the past 20 years. Once upon a time people stood in line for years "to the telephone". And now in the offices of telecommunication companies you can see a huge queue of people who want to abandon this service that has become unnecessary in the era of mobile communications.
Nevertheless, the most far-sighted citizens prefer to keep landline telephony as more reliable and helpful in case of mobile interruptions.
Of course, landline telephones - wired and cordless - need to be repaired on a regular basis. Moreover, many of these phones serve for 10 years or even longer. What repairs may be required for cordless landline phones and what can break in a regular corded phone?
By itself, the term "wired telephone" suggests that for the normal operation of the device, the wire must be in good working order. Most of the breakdowns of wired telephones are caused by the breakdown of contacts in the places where the wire is connected to the body of the device and the telephone socket. It is in these places that the cable experiences the greatest stress, most often it is frayed and therefore normal communication is disrupted.
A little less often, a twisted cord connecting the tube and the case is exposed to such breakdowns. The fastening there is much stronger, the twisted construction of the cord allows it to "spring" and resist overloads, and there are usually fewer fracture loads.Other breakdowns are usually caused by prolonged wear and tear and are repaired by replacing parts with new ones.
The most common breakdowns and repairs of landline phones:
The construction of cordless phones is more difficult, and accordingly, repairs are also more difficult. In addition to the previously listed breakdowns - microphone, speaker, dial buttons - problems with the interaction of the handset with the base and problems with charging are added. This requires a complete diagnosis of the device.
You can safely trust Remfon in diagnostics and repair of stationary telephones in Moscow. We restore even very old models!
Our site will help you quickly find an experienced craftsman to order any home appliance repair services. Submit your request and trusted specialists will offer you their services and prices.
As strange as it sounds, the passion for rarities and for communication devices of the last century does not disappear anywhere. Some people collect stamps or bugs, some people collect watches or cars, and some people collect rotary telephones. It is not always possible to find a model that is favorite or interesting from the point of view of history or functionality, which can still support normal operation. And then you have to take the device to the repair of disk telephones. After all, independently fix such problems or problems as:
- discharge of the wire,
- failure in contacts,
- the absence of some tiny but necessary detail is very difficult.
And so I want to hear the call again, say "hello" and in response to hear a familiar voice.
The true masters who revere "relics" and know how to handle them have not yet been extinct in our country. You can “meet” them on the YouDo crowdsourcing exchange. Its difference from a regular service:
- you can get acquainted with each of the employees in absentia,
- you can leave a request with a request to solve your problem and accept any proposal that suits you on your own,
- there is no persuasion, which helps to make the right decision and entrust rotary phone repair to the most suitable candidates in your opinion.
Before a master can equally participate in accepting an order or display his portfolio on the exchange website, his qualifications are carefully checked. The performer submits to the relevant services that regulate the appearance of new workers and weed out the unfit ("crooked"):
- scanned diploma and work book
- undergoes a questionnaire survey and interview
| Video (click to play). |
Only then can he accept or offer his services and repair disk telephones.



 How to solder the micro usb connector on a tablet, phone, netbook, laptop with your own hands?
