VIDEO A hair dryer for drying hair is an electric device, which is a piece of pipe through which a stream of air heated to 60 ° C is supplied at a high speed in a given direction. Often, for ease of use, the pipe is equipped with a pistol grip.
The photo shows a 1600 Watt Melissa Magic hairdryer. On the handle there is an operating mode switch, with which you can turn on the hair dryer and stepwise change the temperature of the air outgoing from its nozzle.
A construction hair dryer in appearance, principle of operation, device and electrical circuit practically does not differ from a hair dryer. Only in it the air flow is heated up to 600 ° C.
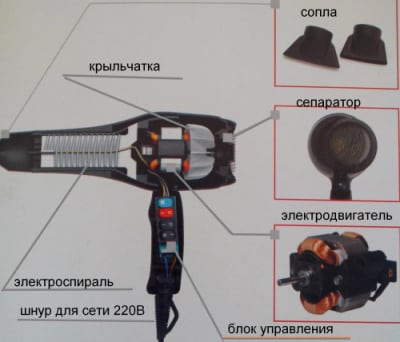
When the hairdryer is turned on, cold air from the room is sucked into its pipe using a rotating impeller mounted on the shaft of a DC motor. Further, the air flow passes through a tetrahedral heat-resistant frame made of mica or ceramic, on which a heated nichrome spiral is wound. By cooling the coil, the air flow heats up to a temperature of 60 ° C, and in the building one up to 600 ° C, after which it exits the pipe.
There is usually a switch on the body of the hair dryer, combined with a step setting of the operating mode, which allows you to turn on the hair dryer in full or half power mode.
The photo shows the appearance of a typical slide switch for operating modes.
To exclude skin burns when drying hair and destruction of the hair dryer body when the engine malfunctions, a thermal protection in the form of a bimetallic plate is installed on the frame.
When the air is heated above a predetermined temperature, the bimetallic plate bends upward in the direction of the arrow in the drawing and opens the contacts. The heating coil is de-energized and the air heating is stopped. After cooling down, the bimetallic plate returns to its original position, and the contacts are closed again.
As you can see, the principle of operation and the device of the hair dryer is not much different from other heating household electrical appliances and any home master can repair the hair dryer.
Most hair dryers and hair dryers have the following electrical diagram. The supply voltage is supplied through a C6 plug with a flexible cord. Capacitor C1 serves to suppress noise emitted by the motor brush assembly. Resistor R1 serves to discharge the capacitor C1 after disconnecting the plug from the outlet to prevent a person's electric shock when touching the pins of the plug. In some models, C1 and R1 elements are not installed.
The operation of the hair dryer is controlled using the switch S1. In its position, shown in the diagram, the hairdryer is off.
When you move the switch slider one step to the right, its movable contact closes terminals 1-2 and the supply voltage through the rectifier diode VD1 flows through the current-limiting coil H1 to the motor and the heating coil H2. The diode cuts half of the sinusoid and thus reduces the impeller speed and the heating power of the H2 coil by half.
When you move the engine one more step, contacts 1-2-3 close, all the mains voltage is supplied to the heating element and the motor and the hair dryer works at full power.
Usually, DC motors are installed in hair dryers, designed for a supply voltage of 9-12 V. To reduce the voltage, the H1 spiral is used. The diode bridge VD2-VD5 is used to convert alternating current into direct current. The electrolytic capacitor C4 smooths out the ripple. Spark-suppressing capacitors C2-C3 perform the task of extinguishing sparks in the brush-collector unit of the engine and suppressing radio interference.
The S2 button is used to switch the operation of the hair dryer to the cold air blowing mode. When pressed, the H2 coil stops heating up.
To protect the hair dryer from overheating, which can occur due to a decrease in the impeller speed in the event of a motor failure, the thermal protection element St is used, which opens the supply voltage circuit to the H2 heater when the maximum permissible air flow temperature is exceeded.
Attention! Care should be taken when repairing an electric hair dryer. Touching bare wires and live parts can seriously damage your health. Do not forget to unplug the hair dryer when making repairs from the socket!
If you get a broken hair dryer for repair, then first of all you need to find out by what external signs the hair dryer was found to be faulty. According to them, using the table below, you can immediately assume where to look for a malfunction.
In everyday life, a large number of electrical appliances are used to make life easier for the layman. But any technique tends to fail over time. Repairing a hair dryer can be easily done with your own hands at home, without asking for help from a service center.
A hair dryer is a device that is used to dry and style hair. It consists of the following structural elements:
Engine;
TEN - heating element;
Fan;
Thermal protection;
Power cable;
Regulators (fan speed, temperature, etc.).
The principle of operation of the household hair dryer is based on a low-voltage DC collector motor.In order for the device to turn on, a special lowering coil is used in its design, which helps to drop the voltage to the required level. It is installed inside the heating element. With the help of a diode bridge, the voltage is rectified. The engine has a steel shaft on which a fan is mounted (in most cases, it is made of plastic, although there are now professional models with metal blades). The fan can have two, three or even four blades.
The heating element of an electric hair dryer is presented in the form of a spiral with a nichrome wire. It is wound on a non-combustible base, which increases the safety when using the device. When plugged in, the coil begins to heat up, and the fan installed behind it blows warm air out of the hair dryer case. To protect against overheating, a temperature controller (adjustable during operation) and a thermostat are used. In addition, any hair dryer has a "cold wind" or "cool" button - when you press it, the spiral stops heating up, only the engine and the fan remain to work, respectively, cold air blows from the nozzle.
It should be noted that not all equipment has a thermostat. It is designed to control the heating of a block with nichrome during long-term operation of the device. For example, it can be a stationary professional hairdryer (used in hairdressing salons). When the coil reaches its maximum allowable temperature, the thermostat cuts off the power. After cooling, the contacts are turned back on.
Typical malfunctions of the Bosch LCD hair dryer (Bosch), Valera, Skil, Vitek, Scarlett (Scarlet) and others:
Smells burnt. The smell can come from the coil, which has gotten the hair as a result of careless handling, or from burning of the internal parts of the circuit;
Hair dryer does not turn on. The reason may be a breakdown of the engine, a broken power cord, a lack of voltage in the network;
Decreased work efficiency. The power of the device depends on the cleanliness of the filter installed on the back of the case. If it is clogged, then the device will start to work with less efficiency;
The fan rotates very slowly. Most likely, something just bothers him;
Hair dryer Braun (Brown), Philips (Philips) or Rowenta (Roventa) does not heat up. There are several reasons why this happens: the cold air button is blocked, the spiral is broken, the circuit is damaged, the thermostat does not work.
Before starting repairs, you need to know how to disassemble a Parlux, Saturn, Moser or Jaguar hairdryer yourself. There is nothing complicated in this, you just need an instruction and a screwdriver:
There are two bolts on the back of the body. They need to be unscrewed and carefully removed. In some cases, there are more of them, make sure that all fasteners are removed;
In parallel, you can also remove the cover from the top panel - there is a fan under it. Most often it is simply pressed against the body, so it comes out without problems if you pry it with a screwdriver;
Under the top panel of the case there is a mode switch and a cold air button. Several wires are installed on the panel. Which are connected to the pins of the circuit. For further disassembly, they will need to be removed;
Now you can remove the coil from the hair dryer head. It is necessary to act carefully, otherwise it may break, remove only after making sure that all fasteners have been removed;
Under the spiral, respectively, there is a motor. Most often there is no need to get it, since almost all malfunctions will be noticeable immediately at the place where the motor is connected to the contacts of the heating element. An exception is the need to replace a part, then a major repair is made.
Consider how to make an independent repair of a hairdryer Babyliss, Rowenta Brush Activ, Bosh, Remington and others at home. First of all, you need to clean the fan and motor shaft from hair.A lot of them are collected there even after several months of intensive use. To do this, you need to remove the back top panel and cut the hair, then simply remove it with tweezers or fingers. In no case should you wipe the parts with a damp cloth - this will damage the contacts. This is done anyway, regardless of the problem.
If it smells burnt, then you need to repair the spiral and filter. They can be cleaned with a dry soft brush. Just wipe the heater teeth and clean the filter. Be careful not to break the contacts during the cleaning process.
If the hair dryer does not turn on, then you need to check the power cable right away. Most often, it breaks at the base, because during operation, the hair dryer rotates many times in different directions along its axis. If everything is fine with him, then look at the contacts on the spiral. There may be 2, 3 or 4. When the device falls or is bumped, they are sometimes unsoldered, which causes the motor power to be cut off.
When the breakdown is related to the fan, it is as easy as shelling pears to repair the device. The first step is to check if the blades are intact. Of course, the efficiency of their work does not change too much from their state, but if cracks or notches are noticed, then it is better to immediately change the propeller. Then inspect the shaft. Sometimes small parts or other debris fall into the nozzle of the hair dryer, blocking the shaft, and it starts to spin slowly.
Now let's discuss the reasons why a professional hair dryer Coifin, Steinel or Lukey does not heat a spiral of dry warm air. As we said, there can be several reasons. For example, the cold air button is stuck. The principle of its operation is as follows: when you press the button, the contacts inside the case open, as a result of which the heating coil stops working. If it is open all the time, then the spiral simply cannot start heating. If the problem is not in the button itself, but in the contact, then you need to solder it yourself.
The cause of the breakdown may lie in the broken coil, its repair is a little more difficult to carry out than cleaning. In some models, it is made of low-quality material that breaks easily from impact. If some notches are missing on the base or mother-in-law is visible, it is replaced.
Video: how to repair a spiral in a hair dryer
VIDEO
Today, rarely a woman can do without a hair dryer. But unfortunately, finding a good hair dryer now is a very difficult task, they often fail. Fortunately, thanks to its primitive design, repairing a hair dryer with your own hands is not particularly difficult, even at home.
Almost all hair dryers have a similar design. It consists of a body in which the rest of the parts are located - a switch, a motor combined with an impeller and a heater. Power enters the device through the power cord, then it goes to the switch, which has several operating positions. From it, the voltage goes to the electric motor and to the heating element.
Since the motors used in hair dryers are low-voltage (designed for voltages from 12 to 36 V), direct current, and in our network we have 220-250 V AC, the current supplied to the motor passes through a special spiral located in the heating element ... After passing the spiral, the voltage drops to the required one, but the current remains variable, so it goes to the diode bridge, where it is straightened and only after that it gets to the electric motor, forcing it to rotate the impeller.
The heating element is a nichrome wire, twisted into a spiral and fixed on a frame made of heat-resistant material. There can be several such spirals in a heating element. This is necessary in order to be able to change the temperature of the air flow by switching modes.
The hair dryer also has two degrees of thermal protection. The first is implemented in the form of a thermostat located in the break in the supply wire and located at the outlet of the heater.When a certain temperature is reached, it opens the circuit, turning off the device. After cooling down, it closes the circuit, restoring the device to work. If the thermostat for some reason did not work, and the temperature continues to rise, the second stage is activated in the form of a thermal fuse in the open circuit, which burns out, and the device turns off. Unlike a thermostat, a thermal fuse is a disposable part and needs to be replaced after it is triggered.
In this drawing, you can see where certain parts are located:
3. - switch of operating modes;
6. - the frame of the heating element;
8. - heating element (spiral);
The principle of operation of a hair dryer is disgracefully simple: the air is sucked in through the intake holes by the impeller and driven through the heating element, where its temperature rises to the level set by the selected operating mode. Then a stream of hot air passes through the nozzle and hits your hair.
But for a complete understanding of the principle of work, one drawing is not enough. In addition to him, we need a schematic diagram of a hair dryer.
In the future, when considering faults, we will refer specifically to her.
Frequent breakdowns
Due to the simple design and the fact that it appeared a long time ago (in the 1950s), a huge amount of statistics on breakdowns has accumulated over the entire period of operation, and all possible malfunctions of the hair dryer are now well known. You do not have to deal with diagnostics and repairs for a long time, everything together will take you a maximum of 1 hour.
Malfunctions and remedies
For simplicity and convenience, we will compile a list of faults / ways to eliminate them, which we will refer to when diagnosing. The designations of the elements indicated in the schematic diagram are given in brackets. If nothing is written after the "/", then you need to replace the faulty element with a working one.
1. Open or short in the power cord / replace the cord, or after cutting out the problem area, connect the wire and insulate it well.
2. Breakdown of a capacitor (C1) or resistor (R1) /.
3. Faulty thermostat (F2) or thermal fuse (F1) /.
4. Broken switch (SW1) /.
5. Failure of the cold air button (SB1) / replace it with a good one. When replacing, note that this button is normally closed and is openable. If you don't need it, you can disconnect the wires from it and connect them together.
6. Breakdown of rectifier diodes (VD1 - VD4) /.
7. Faulty smoothing capacitors (C2, C3) /.
8. Hair is wrapped around the motor shaft and is jammed / cut off the hair with a utility knife or scalpel. Be careful not to damage the impeller.
9. The grease on the motor bearings has dried / wash them off the old grease with a solvent filled into a syringe with a needle, and lubricate the bearings with liquid silicone grease.
11. Breakage in nichrome spirals (H1 - H3) / if the break is not visually noticeable, disassemble and carefully scrape the terminals with a knife through which it connects to the wires and assemble them back. If this does not help, or the break is visible to the naked eye, replace the spiral with a similar resistance.
12. Closing the spirals (H1 - H3) with each other / if the heater frame is intact, change the spirals for new ones, if you find damage to the frame and you don’t have the same one for replacement, postpone the repair until better times or throw away the hair dryer.
13. The heating element is heavily soiled / disconnect it from the wires and soak it in a solution of detergent. After 2 hours, brush it with a toothbrush, rinse it under running water and attach it back. Remember to dry it thoroughly before installing it in your hair dryer.
14. The fan impeller has collapsed / replace it with a suitable one. Glue or soldering will not help here, as you will not be able to center the impeller well and it will quickly break due to the resulting vibrations.
Note that all items in the list are arranged in diagnostic order.
In order not to rack your brains over how to disassemble a hairdryer, you need to prepare for this in advance. Manufacturers are trying to complicate the disassembly of their products by using screws with a non-standard (pitchfork, asterisk, triangle) notch and hiding them under stickers and plugs. Before starting disassembly, make sure you have a screwdriver with replaceable bits, and that the set contains the bits you need.
Remove all caps and stickers from the housing before loosening the screws. After you have unscrewed all the screws, you can try to carefully separate the halves of the case using a plastic card (you can use any object convenient for you. It is important that it is plastic. Metal can damage the detachable parts). If the halves won't budge, make sure you haven't missed any well-hidden screw. After making sure that there are no countersunk screws, apply more force and release the latches holding the housing.
Diagnostics and repair actions
Now let's take a look at the repair steps you will need to take. To do this, we will again make a list, but this time, the symptoms of the malfunction will be indicated first, and after the "/" - the numbers of the items from the list of malfunctions that must be checked. Items must be checked in the order in which they are listed.
1. Poorly switching modes / 4.
2. The hair dryer works in a stationary state, but as soon as you pick it up, it starts to junk / 1, 4, 11, 12.
3. When connected to the network, the circuit breakers are triggered at the entrance to the apartment / 1, 2.
4. Heating is in progress, but the impeller does not work, there is no air flow / 6, 7, 8, 9, 10.
5. There is only cold air, other modes do not work / 4, 5, 11, 12.
6. The impeller spins slowly, the air flow is weak, and the hair dryer makes a lot of noise during operation / 8, 9.
7. Smells burnt during operation, although otherwise everything is fine / 13.
8. Strong vibration is observed and extraneous sounds are heard, there is no air flow, or it is very weak / 14.
It also happens that a hairdryer does not show any signs of life when plugged into an outlet. In this case, you need to carry out a complete diagnosis.
For this we need a multimeter, we cannot do without it. Before work, de-energize the hair dryer and switch the multimeter to the diode continuity mode (in this mode, when a short circuit is detected, the buzzer is triggered).
First check the power cord by ringing each core from the plug to the capacitor C1, then proceed to check the elements C1 and R1. None of them should be closed. Then check thermal fuse F1 and thermostat F2. In a normal state, they are closed, an open circuit indicates their malfunction. The next thing to check is switch SW1. Switch it to the hottest air supply mode and ring the conclusions among themselves. If there are no breaks and the contact does not disappear, then everything is in order with the switch. Also note that elements L1 and L2 should not be open-ended.
We turn to the rectifier diodes VD1 - VD4 and the diode VD5. They should ring only in one direction, if the diode passes current in both directions, or is in an open circuit - it is faulty. After checking the smoothing capacitors C2 and C3 (the presence of a short circuit in them indicates their failure), you can work on the M1 motor, for this switch the multimeter to the resistance measurement mode. If there is an open or short circuit between the motor terminals (for such motors, the minimum resistance is 5 ohms), it is faulty.
Now you can tackle the spirals H1 - H3. When checking them, you need to touch the probes not with the spirals themselves, but with the wires entering the connecting terminals, otherwise you may not notice poor contact in the terminals themselves. If the resistances of the spirals do not differ much from those indicated in the schematic diagram, then everything is in order. Less resistance indicates a short circuit between the spirals, and more indicates poor contact at the terminals. Endless resistance speaks of a break.
It remains only to check the SB1 button (a working button must be closed), and the diagnosis can be considered complete. Now you need to eliminate the detected breakdowns using the methods from the list of faults. After that, you just have to assemble the hair dryer, performing the disassembly steps in the reverse order and that's it, the repair is complete.
Test the hairdryer by plugging it in. Next, we look at the situation: - all functions work fine, so you did everything right; - the hair dryer does not work as it should, or does not turn on at all - look for where you made a mistake, and after finding it, fix it.
P. S .: The article was written to order, but we did not get along a bit with the customer. He insisted that the article meet all the requirements of search engines and give a good position in the search results. I insisted that the article should also benefit the readers. The customer gave a lot of moronic keys with which the article turned into a dick understand what.
As a result, the customer was sent to fuck, and now you see the article in front of you)
Video (click to play).
I really hope that it will be useful to you and my work will not be in vain.

