VIDEO
Do-it-yourself laptop cooler repairs can be done, but we recommend doing this at a service center, where they will select a suitable cooler, replace the thermal paste and, possibly, find other malfunctions.
The laptop cooling system (hereinafter CO) is an extremely important component of a PC. The performance of a laptop depends on the quality of its work, which is undoubtedly very important for any user. The name of this system speaks for itself about its main purpose: cooling the motherboard and its components.
If the system in question starts to perform poorly, the user is faced with a lot of problems. Strong noises, overheating of the surface, incorrect operation of the laptop system (braking, freezing, arbitrary reboot, the appearance of a "screen of death") - all this indicates that the cooling system is not working properly. This article will acquaint you with the main "symptoms" of incorrect operation of the cooling system, ways to eliminate this problem and options for upgrading your iron assistant.
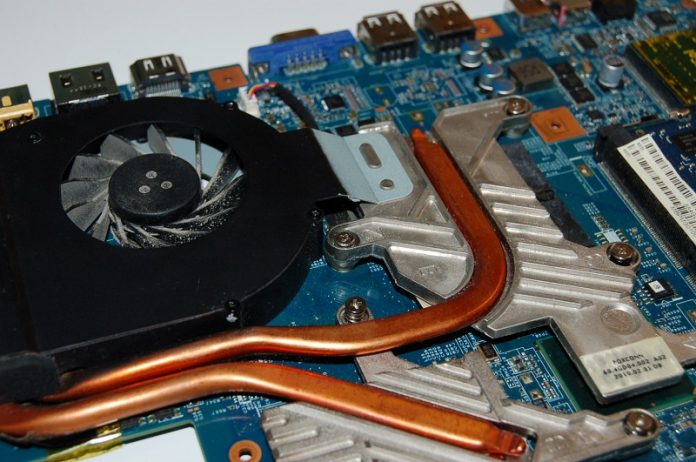
Like any other system, this one has its own constituent elements. Each of them has its own functional purpose. If at least one component has lost its functionality, the laptop cooling system may need to be repaired. Let's take a closer look at the design of the cooling system:
Contact surfaces. This element of the cooling system device is designed to transport heat to the heat exchange zone.
Heat pipes containing a special fluid designed to absorb heat. They are made of copper. It is heat pipes that are most responsible for the quality of heat removal from especially hot parts of the laptop.
Heat exchanger or radiator of the cooling system. It is a heat-conducting plate (copper or aluminum). They are installed in a laptop in sets of several dozen pieces each. The power of the radiator is determined by their number.
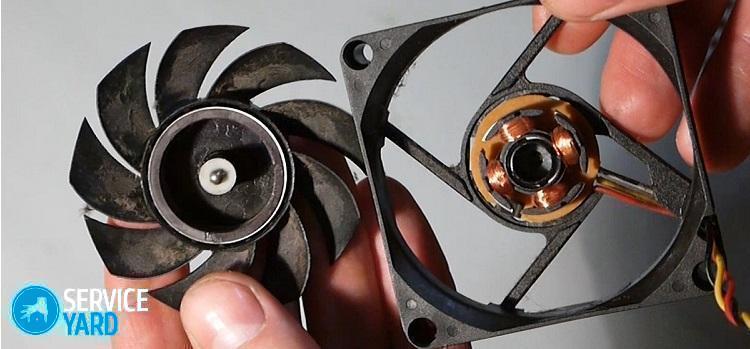
A fan, the rotation speed of the cavities of which is regulated by thermo-sensors. This is perhaps the most important part of JI. It is the fan that is the source of the powerful air flow, the main purpose of which is to blow heat out of the laptop. For this, there are small holes in the body of each device.
Any breakdown or problems arising in the operation of any mechanism does not go "asymptomatic". Even the most inexperienced user will easily notice problems in the operation of the cooling system. So, among the most striking indicators of incorrect work of CO are:
Severe overheating. Have you ever noticed that your laptop gets too hot? Especially its bottom. Sometimes the temperature reaches such an extent that it becomes simply unbearable to work with such a device. This is direct evidence of the poor, low-quality work of the CO. Heat is not blown out, which in turn causes it to build up and move to the outer parts of the laptop (case, keyboard, monitor).
Strong noises that were not typical of a laptop before. The explanation of this "symptom" is similar to the previous one - problems in the work of the CO.
Slowdown, braking, freezing, frequent reboots of an arbitrary nature. Have you guessed the reasons? Severe overheating of the laptop components significantly complicates its operation. In fact, parts (motherboard, video card, etc.) become unusable for some time.The normal functioning of the system becomes simply impossible.
If you have noticed the symptoms of poor-quality operation of the cooling system described above, you can try to fix the problems yourself. Below will be given and considered the most effective methods.
Do-it-yourself laptop cooling can be superficial and deep. At this point, we will consider superficial cleaning, because the reluctance to carry out deep cleaning is due to such reasons as the user's fear of damaging something inside the laptop and breaking the seal if the warranty period has not expired.
For surface cleaning, the user will need a can filled with compressed air. This type of cleaning is carried out as follows:
When the laptop is turned off, the power adapter is disconnected and the battery is removed.
A jet of compressed air from the cartridge is directed into the hole intended for the outlet of hot air.
How do I clean my laptop's cooling system if surface cleaning doesn't work? To carry out this operation, you will need a screwdriver, a can of compressed air (hairdryer, vacuum cleaner), cotton swabs. Of course, deep cleaning involves disassembling the case, which must be carried out in the following sequence:
Turn off the device by removing the battery.
Remove the back cover by unscrewing the bolts with a screwdriver prepared for this purpose. When carrying out this point, remember that you need to be extremely careful. There is no need to make sudden movements. Make sure the cover comes off easily and nothing gets in the way.
Further cleaning will not cause difficulties. You should carefully inspect the cooler, radiator. It is in these areas that dust and dirt accumulate most often. All actions should be carried out with the utmost care. Using a balloon and cotton swabs, you need to clean the insides of accumulated dust.
After finishing the "cleaning" and making sure that the inside of the computer is free of dust, the user can safely start fixing the back wall of the laptop in its original place.
If the above steps did not help to fix the laptop overheating, replacing the cooling system is not at all a necessary measure. Perhaps the reason is thermal paste, and replacing the old one with a new one will help solve all the problems. You should check the presence and condition of thermal paste on the processor and video card. If its quality leaves much to be desired, the user must remove the radiators from the indicated elements, after which, after removing the old layer of thermal paste, apply a new one.
Modernization of the laptop cooling system will be required if all the previous solutions to the problem in question were inactive. In some cases, the problem is not at all in the external configuration and errors in its operation. The problem can be internal, systemic. On the user's laptop, extremely "heavy" programs can be installed that force the video card and processor to work at their full capacity.
To normalize the work of CO in such cases, the computer must be upgraded. You will need to install a more powerful cooler, comparable to a specific model. At the same time, the pinout of the new fan can be completely different. Then the upgrade should be continued by re-soldering the contacts.
During the upgrade, the user may face the problem of inability to install a fan with a higher power. Often this is due to the fact that those simply do not fit a particular model. Inconsistencies in dimensions and mounting holes reduce the possibility of upgrading to almost nothing.
How can you remedy the situation in this case? The answer lies in the additional copper plates on the heatsink. Additional heat sinks increase the heat dissipation area.This, in turn, simplifies the work of an already installed, "factory" cooler, and all cooling problems disappear. For example, owners of Asus equipment in most cases eliminate overheating problems in this way.
Every computing device contains components to help cool the processor, graphics, memory drives, and other components. The cooling system of a laptop does the same, so the quality of the system should be at its best. By cooling the motherboard and all other parts of the computer or laptop, we prevent the device from overheating, degrading performance and failure of some important parts of the PC.
In what cases will the laptop cooling system and not only work poorly? Of course, the case is very hot, and if you touch the components, for example, the processor, you can even burn your hand. This is unacceptable. Severe noises and brakes in the system will lead to bad consequences if the problem is not corrected in time. You can notice the appearance of errors in the system, blue BSoD death taps, long opening programs. If this is the case with you, then first of all take care of the cooling system, and if this does not help, then the reason is in other components.
Now we will consider the structure of the Cooling System (CO). The design consists of many elements. It turns out that the failure of any of the elements means repair or replacement of the entire cooling system. So, CO consists of:
Heat pipes - With a special fluid, the tubes help to remove heat from the processor. They are usually made of copper. The CO component is very important, so it is worth paying attention to. Can pass through the processor and video card chip, and then to the fan blowing out hot airCopper radiator - is a small copper plate that removes heat. The structure can also be made of aluminum.Fan - an important component of CRM. Helps to blow hot air through a special hole in the laptop. The rotational speed of the cooler is determined by sensors on the processor.
Modern laptops are capable of detecting high temperatures using sensors. If the threshold is exceeded, the processor starts to work at lower frequencies, as a result, you can see the slowdown of the computer, other components can also reduce performance, this is called throttling - when the processor misses a part of the clock cycles to protect itself and other components from thermal damage. Overcoming the critical point, the computer immediately turns off, although this function does not exist in all processors.
In addition, you can determine the temperature in two ways: touch the laptop panel, if it is very hot, then you need to take action. The second method is to use special utilities to monitor temperatures. For instance, AIDA64 , HWMonitor and many others.
It is worth noting that the processor temperature should not rise above 70 degrees, and the mark of 85 and above is critical. Modern processors can withstand temperatures of 100 degrees or more, but then the computer will most likely shut down.
The temperature of the video card is about the same as that of the processor.
The chipset temperature is a maximum of 90 degrees. We look at the characteristics of our chipset on the Internet.
Memory drives should not heat up above 50 or 60 degrees. The optimum temperature for them is 30-35 degrees.
The reasons for computer overheating can be completely different. Let's take a look at the main ones.
If overheating began after purchasing a laptop, then the design of the cooling system has defects.
After long-term operation, strong noises were noticed, which were not there before. Cooling system problem.
Errors in the operating system, blue screens of death, slow applications and crashes, reboots. All this is due to overheating of the main components of the laptop - the processor, video card and RAM. What's to blame? The cooling system, of course.
It will be difficult for an inexperienced user to disassemble a laptop completely to clean the CO. Of course, you can look at the instructions on the Internet, or contact an experienced friend, or give it to a service. Sometimes the CO can be located behind the motherboard, which complicates its cleaning, which means you have to disassemble everything.
It is advisable that you have a compressed air cylinder on your hands, and if there is none, you will have to use at least a vacuum cleaner, but very carefully. Now specific actions:
Turn off the laptop completely, remove the battery and hold the power button for about a minute;
We disassemble the laptop (the analysis depends on the design, here you will have to try to do it yourself);
We use a vacuum cleaner or hair dryer (if it is not possible to get a compressed air cylinder). We carefully go through the entire body, cleaning it from dust. As you can see, you need to clean not only the laptop cooling system, but also the entire computer case.
You should clean your laptop at least once a year.
It is possible that a light cleaning of your computer did not help you much. This is likely with a complex design of the cooling system, when a vacuum cleaner or hairdryer will not help much. We follow the following points, which are a bit similar to the previous ones:
Turn off the laptop and take out the battery;
We completely disassemble the laptop into parts, the main thing is not to forget in what sequence to screw them on later;
Using a can of compressed air, a cotton swab, or a lint-free cloth, we begin to gently clean every corner and every component of the laptop.
If everything is done correctly and the case with the cooling system looks clean, you can assemble the laptop.
Like a desktop PC, a laptop has a layer of thermal paste on the processor and graphics card. If you haven't changed it for several years, then it's time to do it. Before applying, you must remove the old layer of thermal paste. This must be done carefully, otherwise you can only make it worse. Read the article on applying thermal paste below:
As we said above, a laptop cooling system consists, roughly speaking, of two parts:
Fan (cooler).
Copper pipes, heat sink and other heat sink components.
Leaving one of these parts leads to the uselessness of the cooling system. The fan has a bearing that can jam - a characteristic crackling sound or rattling sound. Modern laptops in the BIOS have the ability to display an error on the screen in the event of a malfunction of the cooling system, in this case, the cooler. You can check in another way - bring your hand to the hole on the laptop. If the air does not come out, then the fan is out of order.
Poor dissipation can also be caused by copper or aluminum pipes, which must conduct heat to the radiator grille. It is possible that the fan is running, but what is the point if hot air is not expelled. Such a problem is even more dangerous than a fan breakdown, because due to severe overheating, the processor and other components can burn out.
How do you fix the copper tube problem? There is only one way out - replacement ... It happens that you have to replace the entire cooling system. It will be easier if it is removable, and there are worse cases.
So, we have covered the main points related to the cooling system. Firstly, the design, we learned that the CO consists of a cooler, copper pipes, a radiator and a special hole in the laptop case itself for removing hot air.
The main problems of the cooling system:
There is a lot of dust in the radiator grill;
Malfunctioning tubes. They do not remove heat as they are depressurized;
Defective cooler bearing.The fan starts spinning slower, or stops altogether;
The thermal grease of the processor and video card has dried up.
What to do in case of malfunctions:
Carefully clean the entire laptop from dust using a compressed air cylinder;
Replace the tubes or fix the fan, if this fails, replace the entire cooling system;
Replace processor and video card thermal grease.
If you do not have the skills that would help to do all this, take the device to a service center or an experienced friend.
What does the CO modernization mean? This is an improvement that contributes to better cooling of the computer components. It will come in handy even if the problem cannot be corrected using the above methods. Sometimes the cooling system in a laptop can be simply weak, so the launch of powerful programs contributes to strong heating of the processor, because it operates at maximum frequency.
The upgrade is not only about installing a more powerful fan, but also adding copper fins to the heatsink. Heat dissipation in this case will be stronger. When installing a new cooler, you may need to re-solder the contacts.
Additional ways to cool your laptop:
Purchase a cooling pad. Decrease in temperature to about 15 degrees.
Raising the laptop chassis above the surface to allow space underneath.
We have covered the main points regarding CO. I hope you now understand what the laptop cooling system consists of and what malfunctions may arise during operation. You can always ask questions in the comments.
Do not forget to subscribe to the RSS feed, and also join our Vkontakte group. You can become a reader of our twitter and page on Google+.
Any laptop heats up to some extent during operation. Especially often, overheating of this technique occurs in the summer, when the ambient temperature rises. Such overheating is also observed when modern computer games are turned on. In order to protect the equipment from the critical temperature, temperature sensors are initially installed in it. When the temperature readings of the central or graphic processor reach a critical value, the device simply turns off. But this is not always convenient, especially if at the time of shutdown you were performing important actions on your device.
In order to cope with overheating problems, you need to find their cause and try to fix it.
The main reason for laptop overheating lies in its dimensions, namely in the compactness of the case. In it, manufacturers place all the same components that are available in an ordinary desktop computer. The challenge, however, is to maintain the performance of the device. To accomplish this, the hardware items are packed fairly tightly in the case. There is very little free space between them. This interferes with the full movement of air, the meaning of which is to remove hot streams to the outside and the flow of cold ones to the inside. The compactness of laptops does not allow equipping them with large and powerful coolers.
An additional inconvenience when using a laptop is dust, lint, hair, wool and other small light particles that periodically accumulate in places where air is blown out and on the radiator. Because of this, the performance of the device is reduced, in particular, the thermal conductivity. In this case, the cooler becomes clogged, and its efficiency decreases.
Sometimes the cause of overheating of your device is a malfunction of the fan caused by its breakdown or factory defect.For example, it may turn out to be insufficiently lubricated or a bearing is faulty.
During prolonged operation of the device, thermal paste may dry out, with the help of which the best heat transfer to the cooler and radiator is carried out, enabling the fan to function more efficiently.
Some laptop owners misuse them. For example, you can often observe how at home the device is not installed on a hard surface, but on a blanket or placed directly on your lap. In these cases, overheating of the device cannot be avoided, because the openings for heated air blowing are closed, and the processor is not able to fully cool down.
To determine the temperature of the laptop, special programs are used. If you suspect that your device is overheating, refer to the data that displays the temperature sensor measurements. For example, you can use BIOS / UEFI or the HWInfo utility to find out the required information. You can find any other program that will show you the heating of your computer by displaying sensor data. In a special window, you can also monitor the rotational speed of the cooler.
In the operating manual, you can find information on the permissible operating temperature range of the device. These data are also available on the official website of the company selling laptops.
But it is not necessary to resort to utilities when determining the permissible operating temperature of a small-sized computer.
If it overheats, then it will be immediately clear by the following signs:
too loud noise from the fan;
the air being blown out is very hot;
abrupt shutdowns of the laptop;
hot case.
If you ignore the constant overheating of your laptop, this can lead to unpleasant consequences. For example, high temperatures have a negative effect on the processor. The crystalline structure of its components is gradually deteriorating, negatively affecting its performance.
You've probably noticed that an overheated microprocessor starts to "slow down", slowly performing tasks. In this case, the owner of the device can see error messages on the screen. Some processes can be invisible to the user. Sometimes, when overheating, the processor needs to perform calculations several times until it gets the correct result.
But this situation can be especially inconvenient for gamers who are fond of online games with detailed graphics. The high temperature inside the laptop provokes the shutdown of the device right during some important "battle". Often, such nuances make the gaming community ask the question: "how to cool the laptop?", And resort to sophistication for the sake of good cooling.
But the negative thermal factor adversely affects not only the crystal structure of the microprocessor. After all, silicon participating in the operation of transistors is also susceptible to carbonization, like contacts. This provokes even greater overheating and easily disables the device in just a few months.
There are many different laptop stands available today. They differ in the presence or absence of an additional cooling cooler. Both of them allow you to reduce the temperature of the processor. Such devices are sometimes quite inexpensive and available to everyone.
You can reduce the temperature by reducing the list of software that works together with the system. It is also advisable to close unused applications through the task manager.
You can control it according to the following scheme: start the "power supply", → go to the settings of the current power plan, → select additional power supply parameters, → open the processor power management tab → lower its maximum voltage.
Sometimes, simply turning off the laptop allows it to cool down enough to continue safe operation. This reduces fan noise and allows the underside of the case to cool down.
Professionals advise cleaning the cooler (fan and radiator) from dust every six months. In doing so, it is advisable to update the thermal paste, which increases heat transfer from the CPU to the heatsink.
A Phillips screwdriver is used to open the housing cover. Dust that has accumulated inside the laptop, between the radiator fins and under the fan, can be removed with tissues, cotton swabs, a can of compressed air or a vacuum cleaner.
To reduce the chances of overheating the device, it is necessary to properly distribute the thermal grease when replacing the cooling element. You can buy it at any computer store or radio market.
Sequencing:
detach the heatsink from the processor surface;
remove the remnants of the old thermal paste from the processor and heatsink;
apply new paste to the surface of the microprocessor.
The paste is applied in a thin layer, it is necessary to provide a minimum of space between the radiator and the contact area. If you apply an unnecessarily thick layer of paste, the CPU may overheat and even fail.
If you have experience in assembling / disassembling a laptop, you can probably independently replace the fan with exactly the same or more powerful one. This should be done when it is known for sure that the cause of overheating lies precisely in this element of the laptop. Sometimes it is enough just to change the bearing grease. It's easy to do it yourself. After such maintenance, it rotates freely from a light touch.
The BIOS contains items that allow you to change the rotation modes of the fans that cool the motherboard (if any) and the central processor. In the presented section, you can set the aggressive mode for them. But at the same time, the noise from the fans will be noticeably higher, even when the laptop is not performing any tasks (idle).
Some discrete graphics cards come with special utilities, but they are usually used to reduce the speed and noise from the fan, which increases the temperature.
Some manufacturers make life easier for users by supplying with the motherboard (or laptop) specialized programs that allow you to monitor the readings of the sensors and change the parameters that affect forced cooling.
VIDEO
When using a laptop, proper operation is essential. When it stands on a hard surface, such as a table or a special stand, there is enough room for hot air to blow out. When the laptop is placed on a sofa, blanket or bed, the air outlet and air inlet slots are blocked, therefore, the cooling deteriorates. It is best to place the body of the device on specialized tables, which have additional holes on their surface for hot air to pass through.
I would like to bring up this problem for discussion, because very often laptops come for repair with a depressurized (cracked) cooling system, namely copper pipes.
Who, how solves this problem, sometimes there is no opportunity to buy, and the price sometimes bites very hard.
On the Internet, on some forum, I read that they pour oil, water and salt into the tubes, maybe someone else has come up with what to pour into the tube.
_________________
Aluminum radiator with heat pipes Heat pipes are an element of the cooling system, the principle of operation of which is based on the fact that a volatile liquid is located in closed pipes made of a heat-conducting metal (for example, copper). Heat transfer occurs due to the fact that the liquid evaporates at the hot end of the tube and condenses on the cold end, and then flows back to the hot end.
If the tube is hollow, then the condensed liquid is returned to the evaporation zone by gravity. In other words, the tube will only work in a vertical or near-vertical position when the condensation zone is higher than the evaporation zone. There is a filler inside modern heat pipes. They work in virtually any position because capillary forces are used to return the liquid to the evaporation zone, rather than gravity.
The capillary effect used in modern heat pipes is due to the ability of condensed liquid to move through thin capillaries (pores) in any direction. This effect is observed if you put a sponge in a puddle of water. The cavity of the copper tube is filled with various materials, wicks, porous ceramics, etc.
Materials and refrigerants for heat pipes are selected based on the application, from liquid helium for ultra-low temperatures to mercury for high-temperature applications. However, most modern tubing uses ammonia or water as the working fluid.
“How heat pipes work
Heat pipes have a wide range of operating temperatures, the rate of heat transfer exceeds the speed of sound, and have a service life of more than 20,000 hours, which makes them a highly efficient and reliable technical system. Inside there is a working fluid - water, and a wick - several layers of thin wire, or specially sintered ceramic chips. In order for the water to boil at lower temperatures, air is evacuated from the heat pipes.
Just in case, let me remind you that air has been evacuated from the pipes, and after depressurization they irrevocably stop working, it will not be easy to evacuate the air ourselves.
Do not overheat them, and do not cool them after soldering with water! When heated over 100 degrees, the heat pipes die. "
Based on site materials>
_________________
Aluminum radiator with heat pipes Heat pipes are an element of the cooling system, the principle of operation of which is based on the fact that a volatile liquid is located in closed pipes made of a heat-conducting metal (for example, copper). Heat transfer occurs due to the fact that the liquid evaporates at the hot end of the tube and condenses on the cold end, and then flows back to the hot end.
If the tube is hollow, then the condensed liquid is returned to the evaporation zone by gravity. In other words, the tube will only work in a vertical or near-vertical position when the condensation zone is higher than the evaporation zone. There is a filler inside modern heat pipes. They work in virtually any position because capillary forces are used to return the liquid to the evaporation zone, rather than gravity.
The capillary effect used in modern heat pipes is due to the ability of the condensed liquid to move through thin capillaries (pores) in any direction. This effect is observed if you put a sponge in a puddle of water.The cavity of the copper tube is filled with various materials, wicks, porous ceramics, etc.
Materials and refrigerants for heat pipes are selected based on the application, from liquid helium for ultra-low temperatures to mercury for high-temperature applications. However, most modern tubing uses ammonia or water as the working fluid.
My personal conviction, summarizing all of the above, is that the restoration of heat pipes is a useless and unrealistic activity in domestic conditions. Ideally, the tube should be filled with frion (gas that works in refrigeration systems, air conditioners) In a small temperature range, it transforms from a liquid to a gaseous state, and the work spent on this process makes it possible to cool, because it is always colder at one end (where the cooler cools) than at the other.
Video (click to play).
_________________

