Details: do-it-yourself sony ericsson repair from a real master for the site my.housecope.com.
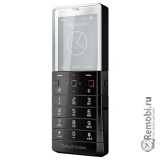
A cell phone Sony Ericsson K550i came in for repair with a declared malfunction - the joystick does not work down, the center of the joystick is broken, there is a dot on the display.
We turn on, check. The dot on the image is really present (broken display), the center of the joystick is broken, you can't press down. Well, let's change the display, keyboard backing and keyboard.
We snap off the two latches of the battery compartment:
We take out the battery and the SONY M2 flash drive:
We pry the top of the phone with a screwdriver:
Snap it off and set it aside:
Pry off the upper part with a pick:
and snap it off the case:
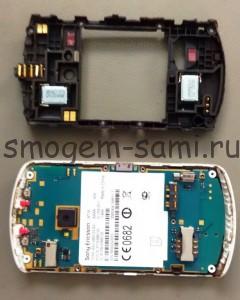
And we take out the board from the case:
We snap off the three latches at the top of the phone:
and snap off the antenna at the bottom of the phone:
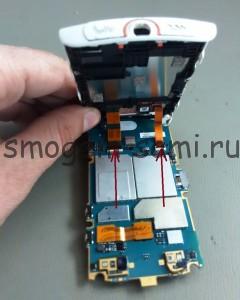
We swing the display board aside by carefully disconnecting the display cable:
Disconnect the keyboard backing cable and move the main board to the side:
Carefully use a screwdriver to peel off the keyboard backing from the display board (it is held on double-sided tape):
And we take out the display module (it is fastened with four latches on the sides):
Install a new display and keyboard backing (old ones on top, new ones on the bottom):
Glue the keyboard backing onto double-sided tape like this:
Putting everything together in reverse order. We pay special attention to the display cable. We remove the protective film from the display, change the keyboard to a new one (on the left - new, on the right - old):
We collect to the end. We include. Testing the joystick:
We check incoming and outgoing calls, camera, all buttons. We put on a run with periodic switching on - off, incoming and outgoing calls. Everything is working.
| Video (click to play). |
All photos were taken with a Kodak EasyShare C1530 camera.
By the way, spare parts for sony phones can always be bought on the website following the link. There is a wide selection of spare parts for repairing Sony phones. All spare parts are guaranteed by the manufacturer.
ReMobi service centers in Moscow and St. Petersburg, Yekaterinbug and Novosibirsk, Nizhny Novgorod and Kazan, for repairing mobile equipment, offer you repair of Sony Ericsson cell phones. Our full range of services includes everything from free diagnostics to flashing Sony Ericsson phones.
Our operator will quickly call you back and answer your questions ›
Typical malfunctions
The most common reasons for repairing Sony Ericsson phones are hardware problems. These include the following problems:
- problems with the telephone network (you cannot call);
- the display is broken (image distortion, darkening, blurring appears);
- the keyboard does not work (partially or completely);
- sound (distorted or absent);
- not charging.
Also, non-observance of the temperature regime leads to the repair of Sony Ericsson mobile phones:
- overheating (excessive heating of the device);
- hypothermia.
The service center specialists can easily repair your Sony Ericsson smartphone by replacing the battery and re-soldering the contacts.
Summing up, you can make a list of what the breakdowns and repairs of Sony Ericsson Xperia are usually associated with:
- improper use of the phone;
- use of fake chargers;
- software failure;
- mechanical stress;
- the influence of moisture;
- self-repair;
- a factory defect, which is quite rare.
"Remobi" - to be held in high esteem, you have to love your work!
Interesting to know what. ... ...
No company wants to lose fame, success may be short-lived, but fame may be eternal, and Sony Ericsson phones, which were once popular, have again become desirable and in demand among a huge number of buyers. The manufacturer has won the gratitude of the owners for taking care of the quality and capabilities of the device.The company gained fame due to its first models, which were imprinted in the memory of many as the Walkman line, the peppercorn was in high-quality sound, which is still appreciated by lovers of listening to music. The introduction of new Xperia models has helped to bring back its former prominence. The Xperia line is selling fast and swiftly thanks to the work and patience of the company to create a shape, a quality assembly and a new design.

Parsing old Sony Ericsson models
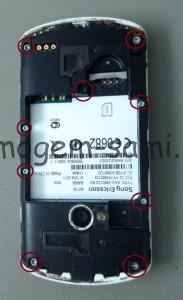
- The back cover of the device is removed, the battery, SIM card and memory card are removed;
- Using a screwdriver, the screws that fix the panels of the device are unscrewed;
- The shutter of the camera opens, with a knife or a pick, pry off and remove the back panel. When using a knife, you need to be very careful not to scratch the phone case;
- The back panel is removed from the latches and detached from the bottom, then the front panel is removed;
- Before disassembling the Sony Ericsson phone inside, carefully remove the protection (stretches towards the hole for connecting the charger), then you need to disconnect the keyboard board cable by prying it under the end with a knife.
- Two screws above the display are unscrewed and the display cable (like the keyboard) is removed, then the camera cable;
- The main board, which rests on the same latches as the phone panel, can also be removed, and with extreme caution;
- Disconnect the Fast Port, remove the camera cable, vibration motor;
- The flashlight diodes and the camera shutter sensor are very neatly peeled off. The unit is removed from under the speakers.
Analysis of newer Sony Ericsson models
Models such as w200, k510i, k310, k320, which allow sending SMS messages, are disassembled as follows:
- The back cover is opened and the battery is removed. With the help of knives or a pick, the back panel is released from the latches;
- The bolts holding the board are unscrewed. Next, the board is removed;
- The vibration motor, microphone, bell, speaker is removed or replaced;
- The metal base is separated and the keyboard and charging connector are removed. Next, you can take out the display.
When disassembling the phone, you should remember, write down or photograph the order of removing parts and some complex nuances. Because, as you know, it is always much easier to disassemble a device than to assemble it.
Video instructions for disassembly and repair Sony Ericsson WT19i
If you need to repair a Sony Ericsson WT19i mobile phone by yourself, carefully study this video instruction on how to disassemble a phone with your own hands. This video contains detailed information that will help you fix the phone sensor, replace the display, speaker and microphone, and repair the keyboard and phone cable yourself. Also, in this phone parsing video there is information on how to repair drowned cell phones. All you need to repair your cell phone yourself is to follow the instructions carefully and use the right spare parts.
Fast delivery of inexpensive original spare parts for the Sony Ericsson WT19i cell phone in Moscow and other regions of Russia by phone - 8 (495) 125 29 79.
We disassemble the Sony Ericsson W595 phone to change the matrix.
This article is not a guide to action! You are solely responsible for collecting and disassembling your device.
Many manufacturers do not assume warranty obligations if the device has been disassembled by the user. If you do not want to void the warranty for your device, check the warranty terms in the documentation or with the device manufacturer.
Remove the back cover, take out the battery, sim card and memory card.
Pry up the metal cover on the top of the phone with a parsing tool or credit card. The cover is glued onto double-sided tape and should come off easily.
Remove the two screws under the cover.
You can now remove the front cover from the top of the phone. To do this, insert a case disassembly tool (or credit card) into the gap between the case pieces on the left and right, and slide it down and down to disengage the latches that hold the case pieces together. It should look like this. The panel is still holding on from the bottom. Then slide the panel down to disengage the bottom latches.
The front panel has been removed. Remove the small screw underneath.
Lift the board with the matrix a little. The board has three connectors and three connectors with black labels. Pull the tab to remove the connector from the connector.
Remove the keyboard board and speaker. Remove the two screws at the top of the phone.
Slide the top of the phone, peel back the keyboard, and remove the two screws under the keyboard. The keyboard is glued on double-sided tape.
You can now remove the back cover of the phone case. To do this, insert a disassembly tool (or credit card) into the gap between the gray panel and the battery compartment, and slide it around the perimeter of the case to disengage the latches.
It should look like this. The two small pieces will fall out by themselves when you remove the back cover. Then remove the two circled screws.
Now you can remove the battery compartment by peeling off the ribbon that is glued to the side. After removing the battery compartment, remove the two circled screws.
Lift the motherboard up. It is still connected by a loop. Pull on the black tab on the connector to release it from the connector.
Reassemble in reverse order.
If you liked it, please do not be lazy to click "I like" or "share" or "+1" just below, or post a link to the article in your blog or forum. Thank you 🙂
You can rate this article: 

Thank you so much for the disassembly instructions. Mom's phone was accidentally washed in the wash. typewriter more than a year ago. We pulled it out, blew it with a hairdryer - it did not turn on. They gave it to be repaired and we were told that everything was useless. I just found it by accident, I completely forgot about it until this evening. I decided to try to disassemble and thoroughly dry all the circuits)) With the help of your website, I disassembled, dried with a hot hairdryer all the circuits where there were traces of oxidation and smeared all the circuits with salicylic acid (alcohol 1%), dried them again, put them back together. I really wanted to make it work) And now the solemn moment, I press the button, ... turned on. URAAA. I almost yelled with joy at all, it is impossible - 23:05 already))) Super)) Thank you!
Maxim, cool! Thanks for the comment 🙂
The article is wonderful, thank you so much, Roman! 😉
I have a problem with the "0" button, I thought - the contacts under the button were oxidized / clogged, I looked - everything was clean. 🙁 Rubbed with alcohol - does not work. But I found something else, if you press on the area slightly to the left and above "0" and at the same time press on "0" - then everything works. Now I don’t know, I must somehow crawl under the keyboard - maybe I’ll see something there. 🙁
Yes, apparently - a small resistor, if this is it - has been sealed off. Just from that row of small elements just above and to the left of "zero". Such are the things.
Cyril, if you really soldered it off, you can solder it. But is he really unsoldered? Maybe it's just a problem with the keyboard backing?
Exactly, exactly! 🙂 It even falls off on one side in the truest sense of the word. Therefore, for now, just on top of the adhesive tape, it stays on, but in order for the button to work, you still need to press. There is no way to solder so far, I will endure.
Um, I wonder, but if you delete it altogether and connect the contacts directly? What is it for there at all?
My comment here is the very first one. So, please tell me why I dried all the microcircuits, the phone turned on, but the keyboard (1,2,3,4,5,6,7,8,9,0, *, #, and the side buttons did not work), I changed it, took it from the same phone (with damaged caviar), now everything works except for the camera! I also tried to change the camera, it worked, I opened it - I found oxidized contacts again, washed it with alcohol, dried it, everything was as it should be. It still doesn't work.
Tell me, is it possible to fix it at all? Help!
Maksim Osmachko, in general, it would be nice to clean all the handkerchiefs from oxides, moreover, to clean it, and not just wipe it.
Hello! Please help me, my phone screen does not have a signal and contacts are not pressed, and then the theme turns out to be a dull gray, I lost the sound many times. for a robot I really like the phone if you can tell me how you can do it, I really hope for you
I have a problem .... how the flat wire broke (I don’t know what else to call it) it comes from the motherboard .... the largest and widest one. It broke a little and the "power" button (red tube) did not work for me and the button did not work to the left. I could not turn on, turn off the phone. When disassembled following your instructions, due to carelessness, I tore off one end of the wiring completely. Tell me if you can somehow save the phone. 🙁
Buy a new ribbon cable - this is a "wide flat wire".
thank you Kirill! You gave me hope)
The main thing is, do not confuse which ones, carefully study the types - which ones, where, and for what. Look for details on the Internet so as not to confuse something, but wasted money. 🙂
I subscribed to the comments in this article, so I am always in the know. 😉
Thank you, now I understand how to disassemble! I have a problem, in the process of charging the phone a child spilled tea and got into the area of the charging plug, now the charge does not go, I tried to measure the voltage at the terminals of the phone without a battery, there is not even 3 volts, the battery was zero for a day
The phone won't turn on. The power supply has what to do?
The phone does not turn on, what is the reason?
Alexey, Alexander, Meruert better take the phones to a good service.
I downloaded new songs, and when I played them, my phone got out. I turned on, showed the logo, then a black screen and periodically vibrates, what should I do?
Alena, reflash your phone.
I have such a problem, I started giving out contacts without names in squares, zeros, I rebooted it, it comes to the Sony Ericsson logo and that's it, it doesn't go further, it doesn't react to anything! I went to the workshop, they say that everything cannot be done. What do you advise? Thank you!.
I like thank you very much
Is it realistic to change the charging connector yourself? The old one is completely broken, the headset or charging is constantly coming off. Is it soldered or is it just removed like w810?
Thank you !! The article helped with the repair, although some fasteners are not so located.
Tell me, I replaced the display, it became bad to hold the charge, and does not reproduce the photo.
Hello, I changed the loop with the earpiece, but I still don't hear anyone when making calls, what could be the problem?
Hello, such a problem: the phone was in the water a couple of times, after each time it was taken for repair and it seemed to work fine. Then the jokes began, if you set a large clock size, then somehow then the clock went down, and only half of the numbers were visible, then in the player all possible icons, cursors, album cover, visualization - everything was grouped at one point (forming a mess), contacts every time I had to copy from the SIM card, but sometimes the phone said that the SIM card was empty. All of the above was solved by the firmware, but the effect was enough for a day, and all of the above was returned. Now, after flashing, the phone works for less than an hour, even if it just lies / is idle, then it reboots and before the moment the sony ericsson logo is loaded it vibrates and reboots, and so on so far I haven’t asked. What could it be…
please tell me when you open the phone (Sony Ericsson W595) the buttons down and turn off / on I close it works sometimes when I fidget the down key stops working
answer sooner someone
The phone is super thank you everyone.
Seryoga minyay train.
Vladimir, IMHO some kind of software problem for sonierics, I'm not very good at them 🙂
Hello! I wanted to know where you can buy spare parts for Sony Ericsson W-595 in Shymkent?
Hello Roman! I found your site, everything is described in detail and clearly. I have already ordered a board-to-board train, I will send it to collect it. Thanks and good luck!
Thank you Roman. Very helpful article.The speaker of the phone stopped working. The service advised to throw it away. Disassembled thanks to your recommendations, without them I could not figure out how to understand. I checked the speaker - it's working. Somewhere there is a break, or the amplifier burned out. But it works with the headset. Everything is so small that you can't connect, look. Moved the connectors, it does not help. And there are no replacement components, for verification. That's the whole repair.
Good afternoon. The battery is discharged, the phone does not turn on from charging, I tried to power it with wires to the battery inserted - the upper right software part lights up. That is, not all of the illumination, but a part. I squeeze the inclusion - it turns on. The charging process is not displayed. what to do?
Hi all!:-)
I'm tired of struggling with the buttons, they jammed, etc.
It was decided to change the substrate, which is what I did :-)
Changed the backing of the buttons work with a bang!
Hello. Such a moment. I dug up my old K790, decided to restore it ... I started to disassemble it today, and when I removed the back cover with the shutter, 2 parts fell out (one the size of a crumb, white, looks like a “whirligig”, and the second is a spring). Without them, the shutter "flies" back and forth, not fixed.
Is this already a PPC cover? Or can that spring be inserted back somewhere, and everything will be ok?
Hey! If I'm not mistaken, in the second photo you can see where the spring is placed near the lid, you need to try, I can't say there.
I tore out my eye, but did not consider it) well, in the evening I will try to trick))) ATP
The upper left corner (if you look at the circle of the camera) seems to be where the spring is sparkling 🙂
I see, And such another question, perhaps you remember from old memory ... When to remove that part of the case, should the lens cover be “closed” or “open”? When I was filming, it was closed.
closed, then sign off what happened.
closed, then sign off what happened.
It turned out to be assembled yesterday.))
The spring is really where it is in the photo., And a detail similar to a “whirligig” is a bolt cover latch, which is inserted between the spring and the body. All this fell apart for me because when removing the cover, the seal between the body and the camera stuck together. When I removed the case, everything "with snot" stretched, a gap formed from which everything fell out. I solved everything with 3 drops of super-glue along the edges of the plate, where the shutter is.
You are engaged in bourgeoisie) k790 has already become a spare, and my main one is still Nokia 3310, though it is stitched.
4 years have passed, the phone is still working 🙂
Do you still have the same Nokia?)
I changed 2 more firmware, and began to use it a little less often, because it's a pity) But it's still the same)
Damn I have the same stolen ... Damn I want the same now!
They just don't let it out ...
There should be a ride to Gorbushka)
I also have an excellent k800 device
🙂
It's great for conversation, but not for a photo)
Previously, it seemed like the quality of the photo was a bomb :-)
he took pictures on the main page by the way he was brought from germany and the sticker above the joystick is not a cybor shot but it is written VODAFONE
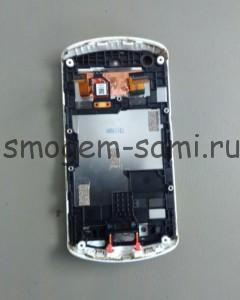
It is usually more difficult to repair a slider than a regular communicator, since its design involves great difficulties during disassembly and assembly. Also, such communicators have the likelihood that the cable connecting the main board and the display will break. It is about this case that we will tell today.
To the studio "Let's fix everything!" brought on repair phone Sony Ericsson j20ifor which the display did not work. Our master had to completely sort out the device in order to get to the desired loop and replace it. Work is not easy.
Two halves of one whole. In this form, the poor fellow communicator and got to the service center. The naked eye can understand what is defective in it.
You can start disassembling the device from any part. We decided to start from the main board side.
First, remove the back cover and take out the battery. This is very easy to do.
Moving on to the inner protective panel. To remove it, you need to unscrew all the bolts. And then gently pry along the edges with a thin object. Not necessarily metal, you can also plastic.
We remove the motherboard, which contains a part of the torn off bus. To do this, you also need to unscrew a few bolts.
Now we need to free the port from the "garbage" - the damaged part.
Until the moment of assembly, the final stage Sony Ericsson phone repair we won't need this part anymore, you can put it aside.
Remove the keyboard from the top. It is glued, so we detach it with a thin plastic tool so as not to accidentally damage any of the keyboard elements.
This is how the communicator keyboard looks like without keys. As you can see, there are two bolts that need to be removed to get to the wires.
You need to peel off the red hard sticker from the back panel - there are also several screws under it.
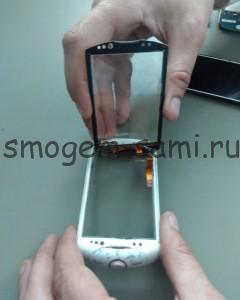
Now you can safely remove the plastic frame.
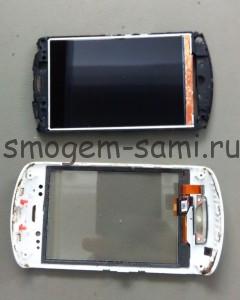
Then, without much difficulty, you can lift the display and detach it.
Here is our ill-fated train, which is to be removed. It comes off quite easily, especially considering that we no longer need it.
Here we see the peephole of the camera. It is not on the new part, so it must be removed.
It is very easy to peel it off and will not cause problems.
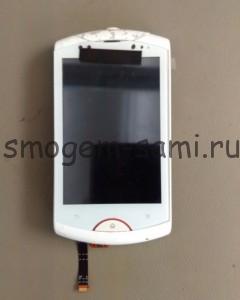
This is what the torn and the whole elements look like. There is very little left - to assemble the device and test it. Assembly is carried out upside-down.
Now that we have covered the progress of the work, it is worth adding a few caveats. As you can understand from this article, this work is not easy. It is necessary to closely monitor all movements and all actions that are performed, so as not to inadvertently ruin something.
It is worth noting that it is better to seek help from a service center that repairs phones in Novosibirsk. Professionals will restore the device quickly and efficiently, providing a guarantee for their work.
By the way, you can consult us on any topic of interest related to the repair in the "Ask a question" section.
Sony Ericsson Cellular Phone Service Centers and Workshops
Barnaul, st. Pavlovsky Trakt, d. 251, TC Europe view on the map
- Repair of mobile devices and gadgets: cell phones, smartphones, e-books, GPS navigators, tablets, radio stations
Sony Ericsson Authorized Service Center
Sony Ericsson Authorized Service Center
Yekaterinburg, Prospect Kosmonavtov, 25 a see on the map
Sony Ericsson Authorized Service Center
Ulyanovsk, st. Goncharova, 38 see on the map
Sony Ericsson Authorized Service Center
Yekaterinburg, st. 8th March, 99 show on the map
Sony Ericsson Authorized Service Center
- Repair of mobile devices and gadgets: cell phones, smartphones, e-books, GPS navigators, tablets, radio stations
Sony Ericsson Authorized Service Center
Saint Petersburg, Moskovsky prospect, 186 view on the map
Phone: +7 (812) 703-03-03, 387-11-10
Sony Ericsson Authorized Service Center
Barnaul, st. Leo Tolstoy, 22 to look on the map
Sony Ericsson Authorized Service Center
The employees of the service center are professionals with many years of experience in this field, which allows us to guarantee the consumers of services high-quality service of equipment, optimal conditions for its repair ...
Ryazan, st. Kudryavtseva, 66 view on the map
Sony Ericsson Authorized Service Center
- Repair of mobile devices and gadgets: cell phones, smartphones, e-books, GPS navigators, tablets
Sony Ericsson Authorized Service Center
Yekaterinburg, st. Stepana Razin, 41 view on the map
Sony Ericsson Authorized Service Center
- - delivery of the Sony Ericsson phone for repair by the service center
- - on-site repair of a Sony Ericsson phone at home or in the office
- - service of replacement of consumables
- - services for the installation and configuration of equipment
- - sale of spare parts for repairing Sony Ericsson phones.
 - delivery of the Sony Ericsson phone for repair by the service center
 - on-site repair of a Sony Ericsson phone at home or in the office
 - service of replacement of consumables
 - services for the installation and configuration of equipment
 - sale of spare parts for repairing Sony Ericsson phones.
To install or configure the purchased equipment, you can use the services of specialists from authorized organizations (authorized service center), who will carry out all the necessary work for the further operation of the phone. If there is no service center at the indicated address or is located at a different address, please let us know.
Important: Disassembling your device voids your device warranty. The site is not responsible for your device.If you are not confident in your abilities, contact a certified service center.
Tools
1) Screwdriver
2) Unnecessary credit card or something like that.
3) Tweezers
1) Remove the back cover and take out the battery
2) Remove the back plate with a plastic tool (a plastic card can be used)
3) Unscrew the two screws shown in the picture below
4) To remove the front panel of the phone, pick it up with a plastic tool on the left as shown in the figure below
5) Now on the right side of the phone
6) The front panel can be removed
7) To remove the keyboard, use a plastic tool to hook the keyboard at the top as shown in the picture
8) Now from below. Then the keyboard can be removed
9) Next, unscrew the two screws shown in the figure
10) Now there are two screws on the top of the phone
11) Disconnect the latches on the right as shown in the figure below
12) Now on the left, disconnect the latches
13) Now remove the back cover, to do this, disconnect the latch as shown in the figure below
14) Remove the back cover. Just be careful not to break the second latch.
15) Remove the lower case
16) To remove the top of the phone, pry on the latch
17) Now you can remove the top of the phone
18) Unscrew the screw shown in the picture below
19) We remove the speaker together with the navigation panel. To do this, first hook up the train, but do not remove it at all.
20) Next, using a plastic tool, raise the navigation bar
21) Disconnect the cable shown in the figure below
22) Now we remove the display along with the navigation panel and speaker
23) Disconnect the speaker if you need to replace
25) Now, to disassemble the back panel of the case, insert the plastic tool as shown in the figure to remove the plastic frame
26) Next, unscrew the two screws
27) Remove the plastic frame
28) To remove the motherboard, unscrew the two screws
29) Lift the motherboard, but remove it completely.
30) Disconnect the keyboard cable
31) Phone disassembly completed
This is a translation of the official SonyEricsson W595 disassembly guide.
Phone disassembly video