If almost no steam comes out of the iron, and there is water in the container, most likely the holes are clogged with salts. You can restore your performance with a simple trick. Pour water and vinegar (ordinary, table) into a bowl with low boron (a frying pan is suitable). One glass of vinegar per liter of water. The second recipe is for 250 ml of boiling water, 2 teaspoons of citric acid. In the dishes with the prepared liquid, lower the disconnected iron. The liquid should cover the sole.
Put the container with the iron on fire, bring to a boil, turn it off. Wait until it cools down. Warm up again. This can be repeated 3-4 times. Until the salts dissolve.
Sometimes water stops coming out of the spray arm. Most likely, this is due to the fact that the tube is disconnected. In this case, the repair of the iron consists in the fact that it is necessary to disassemble the panel on which the injection buttons are fixed and reinstall all the tubes and wires.
The second way to descale the iron is to disassemble it completely so that only one soleplate remains. Cover the sole with tape so that water does not seep out, but you can also put it in a dish. Pour hot water with vinegar or citric acid inside the sole, let it cool, drain, pour over again. Continue this way until you are satisfied with the result. Then rinse with water and collect.
VIDEO
Disassembly of modern irons requires care and caution from us so as not to damage the lining of the iron - when disassembling them.
The screws for fastening individual parts of the iron are hidden and such parts also have latches for fastening them. In the example, it will be considered iron scarlet with a detailed description of its disassembly and subsequent repair.
When the iron was turned on, this appliance was heated to an insignificant temperature and then turned off until it cools completely. The reason for such a malfunction in the given example may be the only one - it is a malfunction of the thermostat. During the operation of the iron, the parts of the thermostat undergo frequent heating over time, as a result of which there is a slight deformation of the movable and fixed contacts in the thermostat.
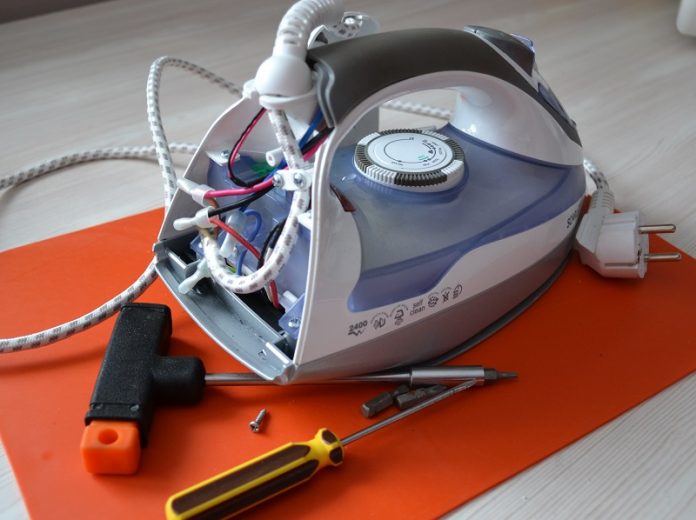
Let's start disassembling the iron. To do this, we need a small knife and not necessarily with a sharpened blade. Initially, we open the decorative cap in the back of the iron, photo # 1, as you can see in the photo, photo # 2, the screw head has an unusual shape for us. This screw head will not fit a Phillips or flathead screwdriver and, as usual, this type of screwdriver may not be available in our toolbox.
From the photograph it is clear that in this case, you can use small scissors to unscrew the screw, the screw in the future, it is advisable to replace it with a Phillips or flathead screwdriver for possible further repairs.
Here, on three photographs, a further sequence of disassembly in the bow of the iron is shown, photo No. 3, that is, a small cover is opened that hides the hole for water filling and the screw for a Phillips screwdriver is unscrewed.
To inspect the thermostat contacts, you must completely disassemble the iron. The back part of the iron is removed, which hides the contacts for connecting the power cord, and the rest of the screws are unscrewed, as shown in photo # 4.
To remove the iron body, you must also remove the thermostat knob. The handle is pry off with a knife blade with little effort and then photo # 5 is removed.
After removing the facing part of the iron, the part attached to the sole of the iron is opened, photo # 6; photo №7, which is designed for heat removal from the sole of the iron.
Since it was previously indicated that when the iron was connected to an external voltage source to an electrical outlet, the iron was heated slightly and turned off until it cools completely, in case of such a malfunction, it is necessary to reduce the distance between the movable and fixed contacts of the thermostat.
That is, slightly bend the fixed contact, while reducing the distance between the two contacts of photo №8.
Now you need to check the functionality of the iron, for this, the assembly of the iron is temporarily postponed - to check the operation of the thermostat contacts.
You can put an emery stone under the soleplate so as not to damage the table surface from heat. After connecting the iron, you must not touch the live parts of the iron contacts with your hands and tools. With such a check, only a visual observation is carried out - for the actuation of the contacts.
After adjusting the actuation of the thermostat contacts and its satisfactory operation, you can reassemble the iron parts.
The assembly of the iron is carried out in the reverse order, that is, when disassembling the iron, attention is drawn to the belonging of a particular part and the method of their connection.
The next reason for the malfunction of the irons can be attributed to the blown fuse.
Finding this fuse can take its own time. Is it worth looking for such a fuse at all, or can you find another way out of this situation?
A fuse is necessary in the circuit to prevent the coil from burning out in the sole of the iron, that is, it protects the electrical circuit from exceeding the nominal value - in terms of current strength.
If this malfunction is a blown fuse, the malfunction can be eliminated as follows:
At the place of removing the fuse, a small section with cross-section of copper wire 0.5 mm ., beforehand, a small piece of cambric is put on one end of the wire, which is necessary to isolate the bare section of the wire of the soldered piece of wire.
A section with a thin section of the wire, consisting in the iron circuit, if the current strength is exceeded with a sharp voltage surge, it will simply burn out like a fuse.
If you just connect the two ends of the wire by soldering instead of a fuse, in this example, it is advisable to connect the iron through a power filter in order to avoid burning out the spiral of the iron soleplate.
Irons are found in almost every home. Over the years of use, many get so used to their faithful friend and so do not want to get used to a new one, that when it fails, they do not go to buy a new one. And they try to restore it on their own or carry it to service centers. In this article we will look at how to repair an iron yourself, using the scarlett sc 339s iron as an example. We need the following tool for repairing: a Phillips screwdriver, a flat screwdriver, pliers and tweezers.
carefully snap off and remove the upper part of the handle. In photo 4, the points of attachment of the water supply pipes with plastic clamps are marked under the number 1-3, and the screws for fastening the handle itself are marked under the number 4.5. Next, with tweezers, carefully so that there is nothing to break, disconnect the tubes 1-3 and unscrew the screws numbered 4.5.
Unscrew the marked screws in Figure 7.
unscrew the bolt shown in Figure 9.
Be careful and attentive during repairs.
An iron that fails at the wrong time can ruin all plans, especially if you are far from hypermarkets and hardware stores. You can try to fix the unit yourself. Not all modern models can be repaired, but there are devices that can be brought back to life. First you need to get to the insides. How to disassemble the Scarlet iron? This, as well as the repair of some other models, will be discussed in our article.
Before disassembling the Vitek, Scarlet or any other iron, try to figure out what exactly happened. Problems are different:
the iron does not heat up;
the iron turns off quickly;
the iron is overheating;
steam comes out;
no steam is sprayed out.
In the first case, you must first of all inspect:
the wire;
outlet;
a plug;
the place of attachment of the wire and plug.
To check the outlet, all you need to do is turn on some other electrical appliance or plug the iron into another outlet. If you can see with the naked eye that the reason lies in the plug, then read step-by-step instructions on how to fix the plug.
If everything is in order, inspect the outside of the wire:
There should be no knots, breaks or damage to the insulation on the cord.
At the junction of the wire and the plug, the wire must not stick out, and the wire sheath must be free of cracks and breaks.
Do not allow the fork to have slots, loose screws.
If there is visible damage, it is best to replace the wire; fortunately, in any company salon of the company that produced the iron, you will also find accessories. To do this, of course, you will need to remove it.
But sometimes there is no way to disassemble the iron. Therefore, in the damaged place, it is necessary to connect the broken pieces of wire and wrap it all with electrical tape. Or just wrap if the outer part is torn. It is possible that you do not have to get to the terminal block.
If everything is in order with the wire and the electrical network in the house is working normally, most likely the heating element has burned out. When the iron quickly turns off or overheats, problems can be with both the heating element and the thermostat. These parts cannot be repaired; it is best to replace them.
Important! It is better to buy replacement elements from the same company that produced the unit itself - then there is no risk that the parts will not fit.
Any electrical appliance consists of many different parts. In modern irons, of course, there are fewer small elements than in old ones. Individual elements are combined into non-separable units, and it is the group of parts that changes.
Regardless of whether you need to disassemble a Scarlet, Vitek or any other iron, you need to understand what is inside it. Each iron has:
sole with built-in heating element;
water tank;
thermostat with handle;
nozzle;
steam regulator;
cord;
fork;
contact block.
Important! Almost all modern models have holes in the sole. They are intended for steam outlet. With the help of a thermostat, the ironing mode is set - it is he who "is responsible" for the temperature to which the sole heats up. The steam unit includes not only a water tank, but also a sprinkler for forced outlet of heated steam, a flow regulator.
Before disassembling a Vitek iron or any other, prepare the necessary tools and materials. You need:
Screwdriver Set;
wide knife;
multimeter;
soldering iron;
solder;
insulating tape;
heat shrink tubes;
sandpaper;
pliers.
You will need two types of screwdrivers:
flat;
cross;
with asterisks (rare, but you can find it).
Important! The knife can be successfully replaced with any hard flat object - for example, a ruler or a bank card, which you forgot to throw away. With their help, you will pry on those parts that are fastened with latches.
A multimeter is needed to ring the wire and all the elements of the electrical circuit that arouse your suspicions. Sandpaper is useful if you need to clean the contacts.
How to start repairing the Scarlet iron? There are not so many options - after examining the unit, you will make sure that there are only a few screws, and besides them, there are removable parts. Therefore, it is better to act in this order:
Remove the thermostat disc (just pinch with your fingers and pull up).
Remove the steam buttons (in the same way as the disc, and if necessary, release the latches).
Unscrew the screws on the rear cover.
Most of the screws are on the back:
They also need to be unscrewed, this usually does not pose a problem.
It may well be that there are additional latches. Pry off the cover with a flat object and remove it from the body.
You will see a terminal block under the cover. It is it that needs to be checked right away - it is quite possible that the cord has burned out or moved away.
Important! It is enough to simply eliminate this nuisance, and you will not need to further disassemble the "Scarlet" or any other iron. The burned-out wire must be soldered, insulated and ringed with a tester, and then simply screw the lid back on.
If the terminal block is working properly, the iron will have to be disassembled further. It should be borne in mind that some models (including Scarlett) under the lid and on the handle may also have fasteners, most often bolts. They also need to be removed. In general, you need to remove all fasteners that are removed.
Important! So they don't get confused, put a white sheet of paper on the table, and put the screws and bolts on it in the order in which you unscrewed them.
Unscrew the screws until the sole is detached from the body. This is possible with almost all models.
To do this, you need a multimeter:
Put it in dial mode.
Press one probe to one of the contacts of the plug.
With the second probe, touch one wire on the block, and then to the other - once the device should beep.
Repeat the same experiment with another pair of plug-wire. If there is a signal this time, the wire is fine.
back to content ↑
This is the main part of any heating appliance.
Important! If an element breaks down, it is best to buy a new iron - some companies have very strange marketing policies, when replacing an element is more expensive than a new device.
But first, the heating element must be checked. To do this, you need to get close to the sole itself:
Look at the back of the sole - there should be two heating elements.
Measure the resistance with a multimeter, for this it must be switched to the measurement mode up to 1000 ohms.
Look not at the display - after seeing a value of about 250 OHM, leave the heating element alone, it is serviceable.
If you see a value greater than 250 Ohm, run to the service center for a new heating element or to the store for a new iron.
Important! To avoid problems with the heating element, it is enough just to regularly take care of the device. And this is not difficult. See for yourself by looking at several effective and very simple ways to descale your iron inside.
If the cause of the breakdown is too serious and the purchase of a new part is very expensive, it is wise to purchase a new device. Our rating of irons will help you in this matter.
It can be extremely unpleasant if you put the disc on “silk” or “synthetics”, and the unit heats up in a second as if you are going to iron cotton. There is nothing you can do, you have to deal with the thermostat.
It is a plate with a pin and many contacts. The pin is needed so that the disc is put on it - the one that you removed at the beginning of the process. Then we act like this:
We are looking for two contacts that fit the plate.
We put multimeter probes on them and ring in two positions,
If the thermostat is set to off, there should be no squeak.
In any other position, the device should beep.
There may be several problems:
If the device makes no sounds in the “on” position, the iron does not heat up. This case can be quite simple - it is possible that carbon deposits have formed. Contacts must be cleaned with fine sandpaper.
The regulator behaves the same in all positions. In this case, you can try to separate the burnt contacts, but not everyone succeeds and not always. It is best to replace the thermostat.
Important! Sometimes the contacts mesh with each other. This happens if the iron is dropped. The iron heats up - the plate presses on the contacts, but they do not open. In this case, the plates must be made to move, but curvature must not be allowed.
This detail can also cause a lot of trouble. It is located approximately in the same place as the thermostat, and is needed to prevent overheating. Usually the fuse is protected by a white tube (but may be of a different color):
Locate the fuse contacts.
Set the multimeter to dial mode.
Check your contacts.
A squeak is heard if the item is in order.
Important! In theory, the fuse can be removed from the circuit, but this should not be done. Better to replace it. You can get out of the situation by soldering a piece of copper wire with a cross section of 0.5 mm in place of the burnt element, putting a piece of cambric on it.
Doesn't steam come out even though the tank is full? First, check the holes. Cope with the trouble by performing a simple iron repair, you can pretty quickly.
Take a clean skillet.
Fill it with water.
Add vinegar at the rate of 1 tbsp. table vinegar per liter of water.
Unplug the iron.
Place it in the skillet so that the solution covers the entire sole.
Another solution can be made:
Pour a glass of boiling water into a frying pan (or other dish with low sides).
Dissolve 2 teaspoons of citric acid.
Place the iron in the skillet.
Put the entire structure on the stove, bring the solution to a boil.
Switch off the hotplate.
Wait for it all to cool down.
Preheat the stove again
Repeat the procedure until the salts clogging the holes dissolve.
Important! In the same way, you can clean not only the iron, but also the sole separately - for this, the top must be sealed with polyethylene and tape, and only then dipped into a container with water.
This is a fairly simple breakdown, most often caused by the disconnection of the tube:
Disassemble the panel containing the injection buttons.
Replace all tubes and wires.
Irons of this brand are not much different from other popular modern models, but they still have some features. As in all other cases, to work you need:
screwdrivers;
flat object;
nail scissors;
tester.
Important! The hardest step will be the first step.Irons of this brand have a decorative cap at the back with an unusual screw shape. The easiest way to unscrew it is with small scissors, but there may not be a screwdriver with a corresponding sting in the set.
Further, the sequence will be as follows:
Open the cover of the water filling hole.
Remove the screw (a Phillips screwdriver will work).
Remove the back wall (same as for other irons).
Unscrew the rest of the screws.
Remove the thermostat knob.
Open the knot attached to the outsole - this is where the heatsink is located.
Check all contacts as described in the previous case.
Important! Remember that when using this technique, it is very important to observe the temperature regime and other settings. We strongly recommend that you, even if you are confident in your knowledge, once again remember:
The principle of inspection of the unit of this brand will be the same as for the "Scarlet", but again, there are subtleties, and the first of them is the screws that fasten the back cover. You will see three-pointed stars on the splines, so a Phillips screwdriver will not save you, as well as a star screwdriver.
If suddenly you have a special one in your set - consider that your iron is very lucky. It usually costs more than service at a service center. You can, in principle, try scissors, but you need to act very carefully. Having removed the back cover, you get access to the insides of your unit, which means you can disassemble the iron, ring and replace the burned out parts.
VIDEO
VIDEO
VIDEO
VIDEO
VIDEO
VIDEO
VIDEO
As you can see, most of the likely problems with household appliances can be fixed by hand. But still, if you have no idea about the operation of irons and electrical appliances in general, it is better to contact a service and repair center so as not to aggravate the problem.
To fix an iron with your own hands, you need to know how this device is made. Considering the device of the iron, we can say that it is structurally similar to devices such as a kettle or a heater. The differences lie only in the purpose of the devices and the presence of additional units.
In the iron, regardless of the country and manufacturer, there are four main components:
heater;
plug with cord;
thermal fuse;
Temperature regulator.
In order for the iron to start working, you should apply voltage to the tubular heating element located in the sole of the device. In modern models, such as "Roventa", powerful heating elements from 1000 to 2300 W are used. If you do not interrupt the heating process, then the sole of the appliance will become so hot that it will only be suitable for frying eggs, and not for ironing.
In order to prevent excessive heating, a regulating device is built into the apparatus circuit. The thermal mode depends on the iron's thermostat, which is selected taking into account the type of fabric: some materials can be ironed at a temperature of 100 C, others need values of 200 C. In most models, which include Brown irons, the adjusting wheel is located in the upper part of the body under the handle.
An important unit for ensuring safety is a fuse. When the appliance reaches extreme temperatures resulting from a malfunction, the thermal fuse will open the contacts and the iron will turn off.
Before you repair the iron, you need to check the serviceability of the power cable. Most often, it cracks in places of frequent deformations - at the entrance to the body or near the plug. The malfunction may appear gradually when the indicator lamp flashes during ironing. Such a wink means that there is no normal contact and oxidation of the terminals is possible.
Another malfunction manifests itself more violently. If the wires rub against each other for a long time, the insulating layer may break and a short circuit may occur. Outwardly, this is manifested by a strong clap, shutdown of other devices and a specific smell characteristic of burnt wiring.
For women who are particularly sensitive, situations like this hurt to the core. They perceive the breakdown as a natural disaster and respond with calls to their husbands, to the Emergencies Ministry and house management.The most correct option is the first, because any man whose hands grow from where they should be can make the iron turn on again. Otherwise, you should still contact the strong half so that he handed over the thing for repair.
The internet is filled with videos on the topic of ironing repairs. Many plots are devoted to the flaws in the supply wire. If the cord is faulty near the plug, there is no need to disassemble the appliance. In the case when suspicion falls on the part that is hidden by the body, you cannot do without disassembly. To make, for example, repair the Philips iron with your own hands, you should remove the back cover. Behind it, the power cord diverges into three wires. If the insulation is damaged, it must be restored. When oxidizing the terminals, you need to disconnect the wires and clean up problem areas.
VIDEO
The heating element in modern designs is a reliable unit and rarely breaks. When this trouble occurs, it is better not to buy a new heater. It's easier to get a new iron. But first, you should make sure that the problem is in the heating element.
In all models, the heater contacts are soldered to the device contacts and connected to the indicator lamp. If the lamp is on, and the iron does not heat up, then the malfunction is associated with the heating element.
The most common cause of heating element failure is coil rupture. Another reason may be insufficient contact of the heating element rods with the device terminals at the connection points.
On some models, the thermal fuse is included in one heater circuit and the regulator in the other. If the fuse is faulty, then a false "diagnosis" can be made, suspecting that the heating element is malfunctioning. To find out exactly the reason for the failure of the device, it should be completely disassembled.
VIDEO
Temperature control is carried out with a round wheel. It is located in the Azur iron and in other models on the body under the handle. When you turn the wheel to the right, the heating temperature increases, to the left, it decreases until the heating element is completely turned off.
The wheel acts on the thermostat by means of a special sleeve or steel angle and is attached to the body with latches. In the Scarlet iron and in other models, it is enough to pick up the adjusting disc with a screwdriver to make it come off.
The operating principle of the thermostat is based on various properties of metals. In the manufacture of this unit, two plates are soldered, made of metals with unequal coefficients of linear expansion. Thanks to these indicators, each plate behaves differently. Outwardly, it looks like this: under the influence of temperature, the common plate bends, causing the circuit to open, and the iron turns on.
To make sure that the temperature regulator is faulty, you will have to disassemble the iron completely.
The handle of the device and the plastic parts of the case are attached to the metal parts with latches or self-tapping screws. Even one manufacturer has many models, and they all have design features. But all species have common points.
To disassemble the iron, it is necessary to examine its sharp part, where there is one attachment point. For example, a Philips iron hides a self-tapping screw under the steam knob. To unscrew the screw, turn the handle all the way to the left and pull up. After removing the adjusting unit, you can unscrew the self-tapping screw. In the Brown model, the screw is hidden under the nozzle cover. You can remove the nozzle by slightly pulling it towards you. After removing it, free access to the screw opens. Other screws or latches are located under the back cover of the device.
After the plastic part of the case has been removed, the iron thermostat should be considered. In cold mode, the contacts must be closed. If there is a special device, it is better to ring the knot.If there is no device, you can clean the contacts with fine sandpaper, and then turn on the iron to the network.
To set up an iron, you can refer to statistics, which say that 50-60% of malfunctions occur due to the fact that a thermal fuse fails. This unit is disposable and reusable. Fuses of the first group, like kamikaze, are triggered only once. The unit is designed so that when the heating element reaches a temperature of 240 ° C, the circuit is broken. Further operation of the device without additional intervention becomes impossible.
More modern technologies involve the use of bimetallic parts. Such a thermal fuse is able to turn off the iron in extreme situations, and then turn it on again. If the iron does not work for this reason, the easiest way is to discard the knot and short the circuit. This can be done in different ways:
by soldering;
by crimping a metal rod;
switching power wires.
In each case, it is necessary to achieve reliable contact.
Another common ailment is a problem with the steaming system. Sometimes in the Bosch iron, the button that starts the process is strongly pressed, and steam is not supplied. Repairing a Bosch iron should begin by unscrewing the screw at the back and removing the back cover. Then you should carefully pull out the two buttons regulating the steam supply up. They are not screwed in and are held onto the bushings by friction. Next, you need to unscrew the screw, after which the plastic handle should be easily removed. There are two pumps under the cover: one supplies water to the sprinkler, the other supplies water to the soleplate to create steam. The steam pump needs to be removed. At the bottom there is a ball that sticks to the bottom of the chamber due to scale. To eliminate the malfunction, you need to push the ball into the chamber and assemble the iron in the reverse order.
Whatever iron you have to repair, you must remember about safety and follow certain rules: turn on the device to the network only when it is necessary; do not try to fix the malfunction with wet hands; during repairs, the iron must be installed on a stable, non-conductive and heat-resistant coating.
Video (click to play).
VIDEO

