In detail: DIY repair of a water pump, a kid from a real master for the site my.housecope.com.
Submersible vibration is very popular among gardeners and summer residents. pumps like "Kid", and other modifications that work on the same principle. They are inexpensive, productive, create a sufficiently high pressure and have a high pumpability (i.e., they can supply water over a sufficiently long distance). Unfortunately, these pumps are not very reliable. Moreover, their breakdowns are very diverse. Where the valves leak, where the thrust breaks, problems with the pump winding, power magnet, short circuit or open circuit. There are quite a few simple malfunctions that are easily eliminated, but after repairs, for example, replacing rubber valves, the pump does not pump or pumps very weakly. Here you still need to correctly adjust and assemble the pump. To understand how to properly adjust the pump, we will consider the principle of operation and the important points of proper adjustment.
Working principle and design
Vibrating Submersible Pumps are inertial pumps. The operation of inertial pumps is based on the excitation of oscillatory processes in a liquid that contribute to its movement.
Design of all vibration pumps is of the same type. The pump consists of an electromagnet, a vibrator and a pump body.
The electromagnet consists of a U-shaped core assembled from sheet electrical steel and two coils wound with enameled copper wire.
The core with the coils is installed in the housing and sealed with epoxy. The compound serves to fix the core with coils in the housing, serves as an insulating material and provides heat removal from the coils to the housing, through which they are cooled.
| Video (click to play). |
The compound is prepared from epoxy resin, plasticizer, hardener and quartz sand, which improves thermal conductivity.
The vibrator consists of an anchor with a rod pressed into it. The rod has a rubber spring called a shock absorber. The parameters of the pump and its efficiency depend on the manufacturing quality of the shock absorber.
In the design of "Rucheyka" and "Baby", only natural rubber shock absorbers are used, which undergoes vulcanization for a long time. This ensures stable pump parameters.
A rubber diaphragm, installed at an appropriate distance from the shock absorber through a distance coupling, serves as an additional support for the rod and provides its direction. The diaphragm also separates the pressurized electric and hydraulic chambers. The stop provides compression and fixation of the diaphragm in the pump housing.
A rubber piston is attached to the end of the rod.
Finally, the final assembly is the pump casing with a valve that closes the inlets. There is also a 0.6-0.8 mm gap between the valve and the body, which ensures free flow of liquid in the absence of pressure.
The valve is also made of high quality rubber. It is the most vulnerable element in the pump and is the first to fail.
Vibrating pump great for irrigation systems, the construction of which was considered earlier.
How does a vibration pump work?
When the pump is connected to an electrical network with a current frequency of 50 Hz, the armature is attracted to the magnet. When the poles are magnetized, every half period, the shock absorber throws the armature back.That is, in one period of the current wave, for those who know electrical engineering, the armature is attracted 2 times. Accordingly, per second at a frequency of 50 Hz, the armature is attracted 100 times. The piston located on the same rod with the armature vibrates with the same frequency.
The volume in the pump casing, limited by the piston and the valve, forms the hydraulic chamber. Since the water pumped by the pumps is a two-component mixture containing dissolved and undissolved air, it has some elasticity - it is springy under mechanical action, which is what happens in the hydraulic chamber when the piston vibrates.
Water, like a spring, compresses and expands, and its surplus is pushed into the discharge pipe - in this way the pump pumps water. In this case, the valve allows water to enter and restricts the exit of water through the suction openings.
Pump modifications
Pump "Trickle" produced by JSC "Livgidromash" has a classic layout, i.e. the suction ports are at the top and the motor is at the bottom. This design has better cooling, eliminates the capture of impurities from the bottom. The pump can operate for a long time in a submerged state with the suction openings open to the air.
In this condition, according to international standards, the pump must work for 7 hours. Top suction pumps pass this test.
In critical cases, it is still worth purchasing pumps with a thermal relay, which will turn off the pump when it overheats. Overheating can occur in a limited amount or when the voltage rises above the permissible level. A pump with a thermostat will cost more.
Bavlenskiy plant "Electrodvigatel" satisfying the demand of discerning consumers, mastered the production of pumps "Kid" in several versions:
- "Kid" and "Kid K" - with the bottom arrangement of the suction holes (K - with thermal relay);
- "Kid M" - with the upper arrangement of the suction holes;
- "Malysh-3" - can be used in 3-inch wells, ie. wells equipped with a casing pipe with an inner diameter of 80 mm.
It is advisable to purchase pumps with a bottom arrangement of suction openings with a thermostat. Otherwise, they must not be left unattended. The popular opinion about the advantage of pumps with a lower water intake is that they can pump water from a shallower reservoir is controversial. The pump with top water intake can be positioned horizontally and will work perfectly.
The pumps must be equipped with a nylon cable for mounting and securing the pump. The nylon cable is not conductive and excludes electric shock in case of insulation breakdown. The use of a steel cable for securing leads to chafing of the lugs in the pump housing.
Although domestic pumps are produced according to the II class of protection against electric shock (- class II sign) and the insulation strength is tested with a voltage of 3750 V, it is better not to touch the electric pump connected to the network and not tempt fate.
If the wiring is equipped with grounding, then it is better to purchase pumps according to the 1st protection class, i.e. with euro plug. But these pumps are also more expensive.
PAY ATTENTION to fakes, when the pump is equipped with a Euro plug, and the wire is two-core, and even with a cross-section of 2x0.5mm, instead of the minimum allowable according to the international standard 2x0.75 mm.
Do not equip pumps with hoses with an internal bore less than 19 mm (3/4 ”). This leads to overloading of the pump and loss of performance.
Information on the parameters of vibration pumps from different manufacturers, indicated on the plates and in advertisements, is very contradictory.
Most domestic pumps are marked with a nominal head of 40 m at a nominal flow of -0.12 l / s (or 0.43 m3 / h).
On imported (Chinese) pumps, the maximum head is marked from 60 to 80 m.This is the head when the flow is completely shut off. In fact, all these pumps with a head of 40 m pump much less than the "Trickle" or "Malysh" pumps.
The maximum flow determined when vibration pumps are operating without pressure, depending on the adjustment, ranges from 1 to 1.5 m3 / h.
The power consumed by the pumps is indicated in the range from 180 to 300 W. In fact, the pumps adjusted to the rated parameters consume power from 190 to 220 W in the pressure range from 1 to 40 m. With increasing voltage, productivity, current and power increase. When the voltage drops to 200 V, the performance decreases by 25%. Thus, vibrating pumps can operate with voltage fluctuations inherent in rural areas and suburban areas.
The immersion depth indicated in the marking means to what level under the water layer the pump can submerge, in this case - 3 m.
Although the pump casing can withstand significantly higher pressure, they stopped at 3 meters. This is enough for the Bavlensk "Babies" and the Livensk "Brooks". If the pump is drowned deeper (up to 5-7 meters), there will be no problems.
During a short operation without immersion in water, the pump heats up and the aluminum housing expands out of proportion to the compound (epoxy filling of the magnet) and due to the lack of plasticity in the latter, the filling is detached from the pump housing. the situation is greatly aggravated by an increase in vibration during operation without water at all (during pumping out dry .. as a result, complete detachment of the magnet and the absence of a gap between the vibration piston and the magnet - no movement of the piston.
Treatment is simply impossible. it was performed in a car service on the occasion of being there
- first of all, we separate the electrical part (disassemble the vibration pump) by tapping with a hammer on the body, we are convinced that there is no fastening (the sound does not immediately feel the solidity of the contents) of the magnet .. we take it out of the body, make longitudinal and transverse grooves on it with a small grinder (depth less than 2- x millimeters), we make such grooves inside the case in a chaotic manner, then coat it with a thin layer of "glass" sealant (the one with which glasses are glued into foreign cars) - it is very durable and strong - ordinary sealants are up to it like the moon !! and press the magnet into the case using a press with a force of about 250-300 kilograms - (with less do not push in because of the viscosity of the sealant) I admit that instead of the sealant you can use some kind of adhesive, but I was at the auto service
hold until solidified and assemble in the reverse order ..
- First and foremost, if the valve and the piston are in good condition, this is the gap between the electromagnets of the coils and the piston, the gap should be 4-5 mm. If the gap is less, the coils will break if more the motor overheats. It is calculated as the difference between the depth of drowning of the iron of the coils in the body and the size of the protrusion of the iron of the piston above the rubberized flange-spring.
- The second valve should play freely on the stand, if you try to blow from the side of the water intake, the air should flow freely in both directions. The valve must not be damaged! It is advisable to unlock the rack from the outside with two nuts. This completes the valve.
- The third is the piston. It should also be free of mechanical damage and shape distortion, and be quite elastic. Rivet the nut with which it is fixed on the sleeve.
All this turned out to be very good, and the question lurked, why is it buzzing and not pumping? It turned out that inside the piston block, its sleeve (on which both the piston and part of the iron of the electromagnet sit) is screwed with a nut to a rubberized flange (such as a membrane-spring), and is disengaged with another nut. So, these two nuts completely unscrewed (((. In order to see this, it was only necessary to disassemble this unit, removing the piston, removing the gap adjustment washers, remove the thrust ring and pull off the rubber membrane (from the piston side!). Having removed the aluminum cylinder, we firmly clamp the piston sleeve to the rubberized flange-spring, de-counter, and collect everything back.We measure the gap, if it goes beyond 4-5 mm, then this sleeve has washers with a thickness of 0.5 mm, adding or removing them from one side, we can change the gap in any direction.
We collect our happiness, special attention should be paid to the correct installation of the cover - the pipe through which the water comes out of the motor should be on the same side as the hole on the rubberized flange-spring))). We tighten, more precisely, we twist (collect) our miracle, and check. If the jet hits at least a meter (by immersing the motor in a full bucket of water, and plugging it into the mains), then everything is ok! If not, we disassemble, check everything over again.
A little from a lot of personal experience: the comrade from above said correctly about setting up the magnetic system, the gap is 4-5 mm. checked by a rod, the depth gauge rod to the end of the coils, and to the mating surface. then do the same on the moving system, the depth gauge rod on the rubber, but do not press, and on the end of the armature yoke. on the piston: it must be set as follows, the depth gauge rod to the edge of the piston contact, the end face to one of the four arms. we collect a movable system, a glass, rubber, a ring with four ears, we hold this ring as evenly as possible without distortions and presses, the depth gauge rod into it, the end to the edge of the piston, the data should converge with the body.
And in the end, the final assembly is the pump casing with a valve installed in it to close off the inlets. There is also a gap of 0.6-0.8 mm between the valve and the body, which ensures free flow of water in the absence of pressure.
Among all the variety of vibration pumps on the market, it is "Malysh" that enjoys the greatest popularity. This pump, which has an optimal price-performance ratio, is quite reliable, but nevertheless, various problems with it occur quite often.
Popular pump models Kid
In this article, we will consider typical breakdowns that may arise during the operation of the "Kid" submersible vibration pump, and the repairs that are necessary to eliminate them with our own hands.
The products of this sample have their own design and device features, which naturally affects their weaknesses. They need to be highlighted first.
"Kid", and any other type of vibration pump, very problematic transfers work "dry". This is due to its design features, namely the presence of a stator, which is extremely susceptible to overheating. Even short-term idle operation, lasting several minutes, can cause damage to the mechanism.
In addition, there is a cumulative effect - the operation of a water pump in air causes a gradual accumulation of damage in the stator, which greatly reduces its service life.
Over time, the wear of the stator will reach a critical rate, and a short circuit of the turns occurs, as a result of which the pump will be unsuitable for further operation. In order to repair such a breakdown, it is necessary to rewind the coils of the vibration pump with your own hands.
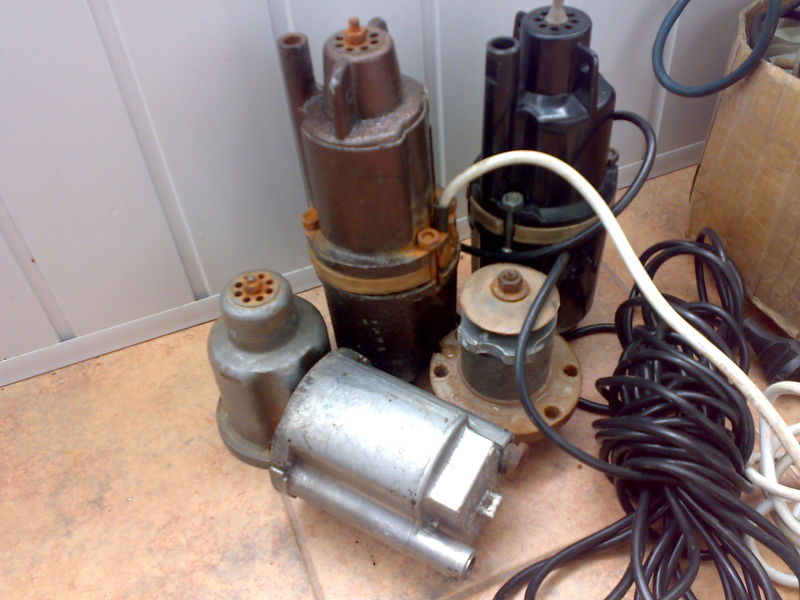
The simplest pump Kid with a cast iron body, close
Another problem of vibration pumps "Malysh" is the loss of strength of the body joints during operation. This is the weakness of the technology, which is the basis of their work: constant internal vibration provokes the weakening of threaded connections, which can completely unwind if repairs are not carried out in a timely manner.
The biggest problem is the weakening of the threads on the check valve and submersible pump piston retainers, which cannot be tracked by inspecting the product body. So be prepared to proactively tighten the submersible pump connections from time to time.
You can also go over the pump with your own hands right after the purchase, and replace all standard nuts on threaded connections with self-locking nuts, or tighten the locknuts over the standard ones.
Since the Malysh submersible pump belongs to the class of budget devices, manufacturers, in order to reduce the total cost, use rubber gaskets to seal the case, which do not have sufficient efficiency.
As a result, accelerated wear of the check valve and piston is observed, which allow water with a large amount of mechanical impurities to pass through. To reduce the negative impact on the submersible pump, it is recommended to use a mechanical filter.
Here you can do in two ways: handicraft - put on a nylon stocking on the water intake hole, or purchase a store filter. Most often, filters for vibration pumps are offered either in the form of a cylinder made of porous material or in the form of a nozzle made of a metal mesh with very fine meshes.
In principle, both devices provide effective cleaning from large insoluble particles (silt and sand).
Modification of the pump check valve Kid
Another scourge of budget vibration pumps is a capricious check valve, on which the level of water supply pressure depends. Very often, even in a new device coming from the factory, the device has an inaccurately tuned "reverse". So it makes sense to adjust it yourself right after the purchase.
To do this, you need to lower the pump into a large container of water (a barrel will do) and experiment with tightening the nut on the valve. Once you reach the maximum head, fix it with a lock nut.
To begin with, we will consider the features of disassembling and assembling the submersible pump "Kid" with our own hands, as they are the beginning and end of any repair.
To disassemble the device, in sequence, remove all the screws that connect the parts of the case. It is recommended not to unscrew one screw at once, but to gradually loosen all connections by several turns. A vise can be used to secure the pump.
If the pump has already been in operation for a long time, then it is possible that, under the influence of water, the bolts are tightly acidified, and no special lubricants help.
There are two ways out: either use a power screwdriver with a large lever, or carefully saw off the screw caps with a grinder. For the future, it will not hurt to replace the standard screws with screws with Phillips slots, which will facilitate further work with threaded connections.
Pump Kid with steel body and power cable
When the repair is complete and you need to reassemble the unit, be careful to match the holes on the top of the case and the center rubber gasket. Since they are located symmetrically to the edges of the housing, it is easy to get tangled in the correct position of the gasket.
After assembly, be sure to check whether the device is operational in a bucket of water so that you do not have to lower and remove it from the well once again.
There are three possible reasons for this problem: Loose stem threaded connections; the valve is worn out or torn; the stock broke (in this case, DIY repair is possible only if you have a spare "Kid" that can be used for details).
- After connecting the pump from the network, it knocks out the plugs, or the cable is charred.
Reasons: the armature winding burned out - rewinding of the coils is necessary; the cable is damaged - the cable needs to be replaced.
Reason: unregulated non-return valve.
- Excessive vibration and overheating of the device.
Cause: damage to the compound (a layer of epoxy lining for vibration damping) - it needs to be replaced.
Disassembly of the pump that has been in operation Malysh
Now let's turn to a specific work technology that will help us cope with troubles.
to the menu ↑
- We disassemble the device.
- Determine the place where the compound peeled off from the submersible pump housing. This can be done by lightly tapping the body with a small hammer. In normal areas, the sound will be dull, in damaged areas - voiced.
- We remove the assembly with the compound from the body of the vibration pump.
- Using a grinder, carefully apply a grid of notches to the inside of the case, up to 2 millimeters deep. We make the same mesh on a node with an epoxy compound.
- Cover both areas with notches with glass glue (any sealant can be used)
- We return the assembly with the compound to its original position - fix it and wait until the sealant hardens.
- Putting the body back.
To rewind the vibration pump coils, you will need the following materials:
- Copper wire with a diameter of 0.65 m (PETV grade);
- Epoxy resin, plasticizer, hardener.
- Winding machine;
- Soldering iron
- Electric stove;
- Hammer;
- Screwdriver;
- Protective gloves.
It is recommended to repair the vibration pump outdoors, or in a well-ventilated area, since epoxy resin will have to be melted to rewind the coils, and it releases toxic substances, the inhalation of which is harmful to the body.
Pump Kid, ready to install and connect
First, we disassemble the submersible pump. We remove the filled electromagnet from the device. To do this, you will need to melt the epoxy compound.
For this, an electric stove is best suited, on which you need to put the unit body. Wait until the epoxy warms up to a temperature of 160-170 degrees (this is indicated by the characteristic smoke coming from it - this smoke is toxic, try not to inhale it).
Next, we need a wooden log, about which it will be possible to knock out the electromagnet from the body. After the compound has warmed up, put on protective gloves and beat the body against the deck (the electromagnet should look down) until the electromagnet changes its position so that you can pry it off with something and remove it.
While the case is hot, clean it of epoxy residues with a metal brush or flat-head screwdriver.
Now you need to knock the electromagnet out of the coil with a hammer. To do this, you need to use a small piece of wood as a wedge. It is recommended to do this with an assistant who will hold the coils while you will knock out. If you fix the coil in a vice, then, most likely, the repair will end on the deformation of its frame.
As soon as the core of the electromagnet is knocked out, unwind the coil and clean its frame from the remaining epoxy resin. Place the bobbin on the winder and wrap the bobbin fully (about 8 layers). This can be done without a special machine, but it will take much more time.
Connect the beginning and end of the wire to the main part using a soldering iron. We put the electromagnetic core back into the coil frame. We pass the cable for connecting to the mains through the seal inside the case. We separate the cable and strip its ends by 2-3 cm.
We solder the cable to the beginning of the winding of the coils. Gently lower the coils into the housing. To make the coils sit tightly in their place, attach a small wooden block to the electromagnetic core, and gently tap them into the desired position.
Now you need to make an epoxy compound. Fix the unit body in a vise. Stir the epoxy, plasticizer and hardener in a metal container.
Fill the coils with the resulting mixture up to the upper edge of the electromagnet. Wait 10-15 minutes for the compound to fill all gaps. If after the epoxy has dropped into the voids, its level has decreased, then add an additional amount of the mixture.
In order for the compound to completely cure, you need to wait at least 24 hours. Then assemble the device body.After the repair has been completed, test the operation of the pump in a bucket of water; it may be necessary to adjust the gap between the armature and the electromagnet.
to the menu ↑
As you know, any even the most reliable mechanism has a certain resource, after which diagnostics, repair or disposal of an individual mechanism or the entire device will be required.
We have already found out that the compact and unpretentious device of the submersible vibration pump Trickle can provide you with the necessary minimum of water resources for the needs of the site / house.
In this article, we will try to consider in detail some of the nuances of operation, shortcomings and repair of a vibration pump, a baby with our own hands and its nuances.
First of all, it is necessary to say about the characteristic predisposition of the device body as a whole and the pump body to corrosion. Of course, this drawback is not critical, and it can become a problem for you only after tens of years. But, do not forget that the pump has direct contact with water resources, which are subsequently consumed by you with particles of corrosion.
After several years of operation, when disassembling the baby pump, you will be able to observe a thin layer of corrosion on almost all metal assemblies. This means that the metal has a poor anti-corrosion treatment. Therefore, not always saving when buying can save you money in the future, therefore, repairing a water pump, a kid can make you shell out a tidy sum of money.
Also, repair of a submersible vibration pump Kid, can be complicated, due to the potential for rusting of the screws.
Due to the specific principle of operation (due to vibration waves), very often in baby-class pumps, destruction of the internal fasteners, valve and stem is observed. Seals, if broken, are also likely to be unusable.
Also, with improper operation and constant overload work, the baby will need to repair the water pump ahead of time. The consequence of such errors can be the destruction of metal, which in the future will not allow repairing the submersible pump Kid with his own hands and its key elements.
If you use the pump in too contaminated water (silt, waste water, etc.), be aware that baby water pump repair is not far off. Since this device is not intended for pumping water with a large amount of sand, stones and other solid particles. Regular suction of large particles clogs the valve of the device, and also destroys the working surface in the form of a cover, in which the rubber valve should work.
The negative impact of vibration of the pump, a trickle, can also be attributed to the poor "vitality" of the thrust ring, which eventually cracks, which forces the replacement of this part of the device. Also, quite often there is a problem of violation of the integrity of the winding, which is the reason for the failure of all pump systems to work.
DIY pump repair Kid
But this breakdown should not be confused with a temporary shutdown of the pump due to overheating under the action of an automatic control system. If more than a few hours have passed since such a shutdown, it means that the kid's own pump repairs should be aimed at replacing the "burnt" parts and mechanisms.
to the menu ↑
In the event that your device has stopped pumping water, most likely the repair of the vibration pump Kid is inevitable, but it may also be that the problem is not in the pump.
Also, in some situations, in the event of situations potentially dangerous for the operation of the pump (intake of air, solid particles, overheating), it is necessary to make diagnostics, and, if necessary, start repairing the baby pump.
In any case, the main convenience of servicing the device in question is that its movement will not be difficult due to its compact size and the absence of the need for additional installation work.
Both diagnostics and repair of the pump, a baby trickle should consist of the following stages:
If you want to prevent malfunctioning of the trickle pump in the future, remember a few basic rules:
Vibration pump kid out of order
- Try not to operate the device for more than two hours in a row (take a break for 30-40 minutes)
- After active work, do not remove the device from the water at the same moment, give the engine time to cool naturally.
- When lowering / lifting the pump into the water source, do not allow the body of the device to hit the walls of the well.
Observe these rules, and, working only with clean water, the Trickle pump will be a faithful assistant in the household for many years.
to the menu ↑

