In detail: DIY repair of a fuel injector from a real master for the site my.housecope.com.
- Self-repair of gasoline engine injectors
- The concept of injector nozzles and the principle of their operation
- Why and when to check injectors
- We are looking for faults, we make repairs
- Diagnostic tool
- Checking the power supply to the injectors
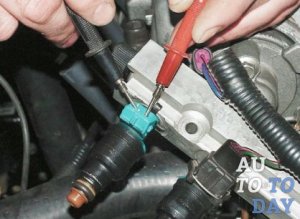
- Checking the windings
- Ramp diagnostics
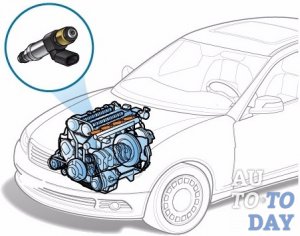
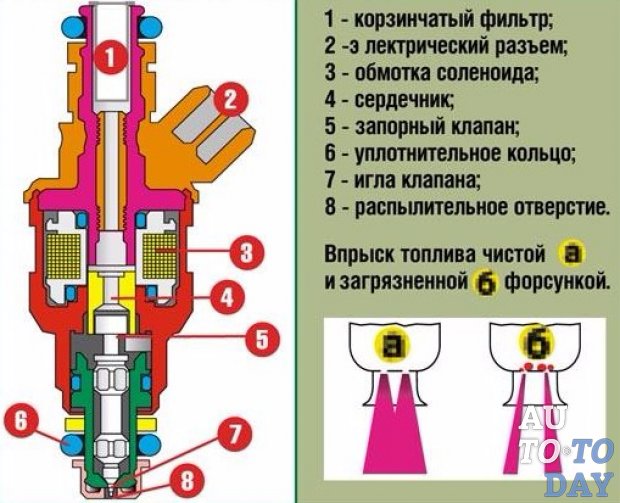
For the metered supply of fuel to the combustion chambers of the engine, injectors are required. In the fuel system, they allow gasoline to be mixed with air. Thus, a combustible mixture is formed, which then ignites.
Injectors are:
• Electromagnetic - the valve monitors the access of fuel and regulates the atomization of the fuel mixture using the electronic engine control unit. There is a valve on the central distribution system in front of the throttle valve.
If you decide to buy a used car, or you have already driven about 100 thousand km on your car, then you should check the performance of the injectors or replace them.
The injectors (their condition) are affected by the quality of the fuel consumed. If low quality fuel is regularly poured into the tank, then the nozzles will not last long. They will have to be changed earlier than after 100 thousand kilometers.
• Unstable engine idling.
• Increased fuel consumption.
• The engine does not start well.
• The exhaust gases have become more toxic.
• At idle, the ignition skips.
• The car picks up worse acceleration (although the gas is squeezed out "to the floor").
• If you notice at least one of the above symptoms, it is worth checking the injector nozzles.
To extend the life of the injectors, it is desirable:
| Video (click to play). |
• Fill the tank with only high quality fuel.
• Regularly add various additives to the tank (sold in auto chemistry departments).
• Every 40 thousand km clean the nozzles (because they get clogged).
Before checking the injector nozzles, pay attention to the fuel filter (it must be clean), the gas tank and the fuel pump sieve (they can be clogged and deposits). Such examinations are required after 30 thousand kilometers for preventive purposes. If everything is in order with this part of the fuel system, proceed to check the injectors.
You can go to the service station, where there is a special stand. Liquid is supplied to the nozzles under pressure, and you will be able to see the operation of each sprayer on the stand (what dose of atomization it produces).
At home, you can also check the injector nozzle. This can be done in several ways:
Start the engine. Touch the working nozzle with your hand - it should pulsate. If no jitter is felt, then the injector is out of order. Add revs at idle speed and let the engine run a little. If the cap nuts that hold the injectors are loosened one by one, the engine speed will decrease. If the speed does not change, then the nozzle needs cleaning or replacement.
Do-it-yourself check of petrol injectors is possible if you have a diagnostic tool:
• Machine on-board computer (will help to identify malfunctions in the engine management system).
• Pressure gauge (determines the fuel pressure). Helps to identify problems with the fuel pump pressure regulator, clogged fuel filters.
• Polarity LED on injectors (you can also determine the polarity on the ignition modules and the coil).
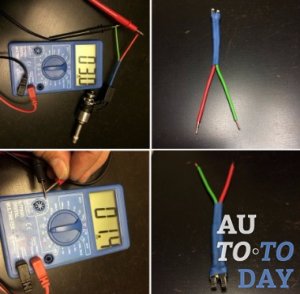
• Ohmmeter or multimeter (determines the resistance of the injectors).
The injector on the injector requires immediate replacement if the resistance on it is higher or lower than 11-15 ohms. This is determined using an ohmmeter.
How to check the resistance on the injector windings?
1. Remove the negative terminal from the battery.
2. Disconnect the connector with wires from the injector.
3. Connect the ohmmeter wires to the injector electrical connector.
4. Compare the ohmmeter readings with the standard ones (this is indicated in the manufacturer's instructions).
You can also check the injector nozzles on the ramp. For this:
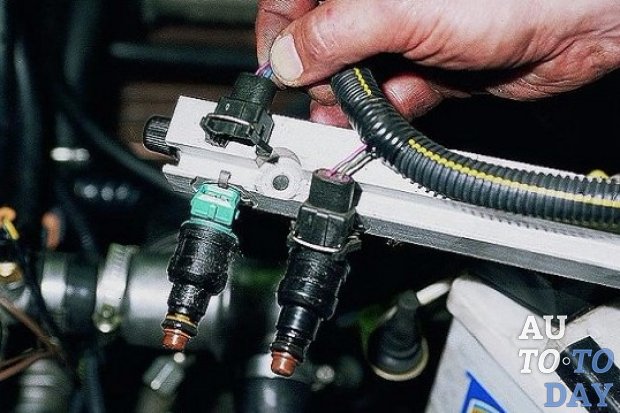
1. Remove the ramp together with the injectors.
2. Get her out of the awkward position.
3. Remove the negative terminal.
4. Connect the harness to the rail harness.
5. Replace the minus terminal.
Connect both fuel pipes and use a wrench to tighten the fittings that hold them. Place a container with a measuring scale under each nozzle (there should be 4 containers). Crank the engine with a starter.
Switch off the ignition. When calm, no liquid should leak from the nozzles.
If leaks are noticeable, the fuel injector is leaking and must be replaced. Compare the amount of leaked liquid in the measuring containers. If the amount of leaked liquid is different, then one of the nozzles needs cleaning or replacement.
Remember to inspect the nozzles for defects. If you find something, change the nozzle. Replace the ramp.
The reliable operation of the engine depends on the correct functioning of the injectors. Their condition is largely influenced by the quality of the fuel used. High-quality fuel significantly increases the life of the injectors. During normal operation, they are replaced every 100 thousand kilometers.
The main reasons that negatively affect the performance of the injectors are their clogging, as well as wear or breakage of some parts that make up their design. For prophylaxis, various additives should be added to the fuel tank, and every 30-40 thousand km of run, check the filter elements and clean clogged nozzles from dirt and debris. You can do this work yourself or contact the professionals of specialized firms, one of the proven ones is
Malfunctioning injectors signal such symptoms:
✔ the engine is unstable at idle;
✔ increased fuel consumption;
✔ Difficulty starting the engine;
✔ poor response when pressing the gas pedal;
✔ exhaust with smoke and increased toxicity.
Lower ambient temperatures will exacerbate these symptoms as the volatility of the mixture decreases. Timely flushing will prevent coking of the nozzle spray. For this, special cleaning fluids are used, and the procedure itself can be carried out even at home. This should be done regularly as smaller fuel outlets will reduce engine power and performance.
A spanner wrench is used to remove and further disassemble the injectors. This is, firstly, convenient, and secondly, an open-end wrench can damage the union nuts of the injector bodies, and they can crack during disassembly and assembly. On examination, worn parts are identified and replaced.
Repairs to the sprayer must be carried out with absolute cleanliness. Before removing injectors from diesel engines and during their disassembly, it is necessary to thoroughly rinse everything. The smallest particles of sand or dust trapped in the channel can damage the threads and impair a reliable seal. After disconnecting the high-pressure tube from the nozzle, it is necessary to close the fitting with a tight and clean cap, this will protect its cavity from dirt.
After removing the injector from the gasoline engine, it is imperative to close the holes where they are inserted with clean plugs. There is also a non-disassembly cleaning method using a temporary power system. It consists of an additional fuel pump, a plastic bottle with cleaner and a hose. The fluid is pumped in two stages with a break to dissolve the deposits. The first time the device turns on for 5 minutes, and then for another half hour. The advantage of this method is flushing the entire fuel system, and its simplicity allows you to perform actions in a garage. Of course, not every driver can do it on their own, in this case, you should contact a car repair company.
The injection mechanics is the main difference between a diesel engine and a gasoline engine. In a diesel internal combustion engine, fuel is supplied to the combustion chamber using a nozzle. The device injects fuel in a metered manner into a chamber with a high temperature and pressure, after which the diesel fuel ignites. The nozzle is subjected to the greatest load: the part is constantly in an aggressive environment and works at high intensity. Any negative factor can disable the part or significantly reduce its resource, after which the diesel engine nozzles will need to be repaired.
To understand the mechanics of the injector, we will describe the injection cycle schematically:
- The injection pump takes fuel from the tank;
- then the pump saturates the fuel rail with diesel fuel;
- fuel enters the channels that lead to the nozzle;
- inside the nozzle, fuel flows to the sprayer;
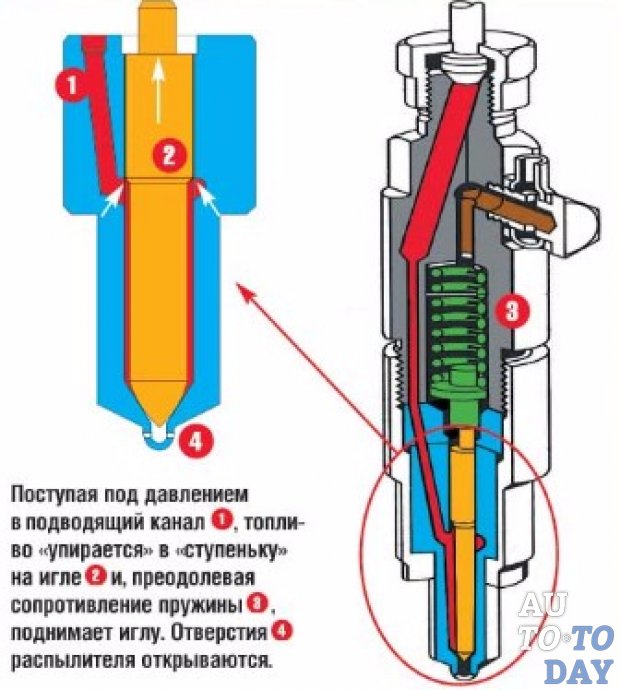
- when the pressure on the atomizer reaches the set threshold, the nozzle opens and diesel fuel enters the combustion chamber.
Let us describe the design of the part using the example of a primitive mechanical nozzle with 1 spring. In the lateral part there is a channel that provides a continuous supply of diesel fuel. Inside the nozzle chamber there is a movable barrier with a spring and a needle, which drops when the pressure rises. The needle rises, clearing the path of fuel to the sprayer.
Additionally, more advanced types of nozzles can be noted:
- Piezoelectric: The spring pusher is lowered by a piezoelectric element. This technology provides a high intensity of opening of the atomizer: fuel economy is achieved, while the internal combustion engine operates more smoothly.
- Electro-hydraulic: The design includes an inlet and outlet choke and an electromechanical valve. The operating mode of the components is controlled by the engine control unit.
- Unit injectors: used in engines that do not have a high-pressure fuel pump. The fuel is supplied directly to the nozzle.These spraying devices have their own plunger pair inside, which generates the pressure required for injection.
Due to excessive loads, the injector may fail due to a violation of the operating mode of the motor. Manufacturers declare the resource of parts to be up to 200,000 km, but due to negative operating factors, wear of parts appears much earlier.
Repair of diesel injectors may be required for the following reasons:
- Low quality diesel fuel: the scourge of all "diesel operators". Due to impurities in the fuel, the sprayer becomes clogged; the dosage and the fuel supply mode are violated.
- Poor assembly quality of the injection component or factory defect: the injector does not withstand the operating conditions, the part as a whole or individual components fail.
- Mechanical damage caused by incorrect operation of adjacent ICE systems.
Usually, breakdowns are of the following nature: the spray angle and the amount of supplied fuel change, the integrity of the body is violated, and the needle travel deteriorates.
Let's briefly describe the "symptomatic series":
- jerks and jerks are felt when moving;
- The internal combustion engine is unstable at idle, stalls;
- when the engine is running, an excessive amount of exhaust is emitted;
- tangible loss of traction;
- failure of individual cylinders;
- gray or black smoke from the exhaust pipe.
It is preferable to entrust the routine maintenance or overhaul of diesel engine injectors to qualified specialists - they will be able to restore and adjust the part on high-precision automated stands. However, a certain set of repair procedures can be carried out in artisanal conditions without the use of complex equipment.
To carry out self-service of diesel engine sprayers, the car owner will need:
- a set of open-end or spanner wrenches;
- screwdrivers for straight and Phillips head;
- clean dry rags;
- maximeter;
- flushing fluid for internal combustion engines.
It is recommended to carry out work in a dry and lighted, dust-free garage.
Diagnostics of diesel injectors and their maintenance involves removing the nozzles from the internal combustion engine. Before starting work, it is recommended to thoroughly wash the engine and engine compartment to avoid the ingress of debris and foreign particles. With particular fondness, you need to rinse the cylinder head. High pressure tubing should be marked with markings to avoid confusion during reassembly.
Before removing it is necessary to close the nozzle fittings (use plastic caps) to avoid contamination. It is not recommended to use ordinary open-end wrenches to dismantle the nozzles - an inexperienced repairman can strip the threads from the nozzles. If the required qualifications are not available, use spanners and a long-handled head tool.
After removing the nozzles from the holes, dry them and remove external dirt with a rag. O-rings are placed in the holes of the nozzles. When repairing injection parts, they are replaced with new ones without fail. Do not allow dirt from the rings to get into the injection system during removal.
There are several methods to check if the sprayer is working properly. The easiest way is to check the injector while the engine is running:
- Start the "engine" at idle speed.
- Begin to unscrew the nozzles one by one in turn.
- If, after removal, the operation of the motor has deteriorated, then the remote nozzle is operational and must be returned to its place.
- By the method of elimination, you will find an injector, the dismantling of which will not change the operating mode of the internal combustion engine. This will be the broken device.
You can use a multimeter for diagnostics. In advance, it is necessary to throw off the battery terminals and disconnect the wiring of the injectors, and then "check" every detail with the device. On high resistance injectors, the device values will be in the range of 11 - 17 ohms; at low impedance, the multimeter will show up to 5 ohms.
The defective injector must be inspected.First, we look for leaks in the body of the part. If there are none, proceed to disassembling the part. We fasten the part in a vise and knock out the sprayer with a gentle tap. Next, you need a thorough cleaning: we soak the parts of the nozzle in diesel fuel or solvent to remove carbon deposits. Remove fumes and deposits with a fine steel grater. After completing the cleaning, you need to check the nozzle at the maximum meter. If the optimal injection parameters have been achieved, the device is ready to be installed in the engine.
In other cases, it is necessary to completely replace the atomizer on the defective nozzle. When installing a new part, carefully remove all factory grease, otherwise the device will not work.
Before disassembling the device, mark all parts with a marker to avoid confusion. Be especially careful when marking high pressure hoses. The nozzle is screwed in by hand as far as possible. Further tightening is done with a dynamometer wrench. For tightening values, refer to the motor manual. After installing the injector, evacuate air from the fuel system. On modern cars, for this it is enough to turn the starter several times; or use a manual priming pump (if equipped).
Let's list the main features:
- the resource declared by the manufacturer has been developed;
- there are breakdowns on the case, other leaks;
- burnt out spray nut: if the problem is not corrected early, the spray itself will become unusable.
Please note that on some engines, after installing a new injector, it is necessary to "tie" it to the engine: make changes to the settings of the control unit.
Self-repair of injectors is a rather forced measure. Such a service in artisanal conditions can bring success only in the case of the highest qualifications of the master. The main problem of garage repairs is the lack of high-precision bench equipment for diagnostics. The repairman cannot objectively assess the effectiveness of the service measures.
If there is an opportunity to contact a service station, do not neglect it: computer equipment and cleaning stands will extend the life of the injectors and save them from potential expensive repairs. The same ultrasonic cleaning can save a motorist from engine problems for several seasons. Repair of modern common Rail injection systems in a garage is not possible: you need a mandatory fine-tuning of the part by computer.
Use a cleaning fuel additive to avoid costly repairs and replacement parts. They prevent the formation of carbon deposits and the settling of deposits. The use of additives should be systematic, not one-off. Remember, additives are about preventing breakdowns, not fixing them.
The injector is the main segment of the diesel engine fuel system.
For motorists, such unfavorable cases are probably known, such as: increased fuel consumption, low engine power, which are inevitable during vehicle operation.
Saving Is what most diesel motorists look for. However, the high cost of modern elements of diesel power systems is not affordable for everyone.
Delivery of injectors to a diesel service is one of the popular methods for solving the problem. Many motorists do not know how and do not want torepair diesel injectors with your own hands.
In this situation, you will have to pay not a small amount of money. Of course, this method will be the most effective, but sometimes it is impossible to transport a broken car to a maintenance service (for example, when a failure befell on the road).
Therefore, we will tell you how to do DIY diesel injector repair without the help of auto mechanics and a big waste of money.
For repairing diesel injectors it must be remembered that with a simple replacement of the nozzle in the nozzle, when you unscrew the desired nut, replace the nozzle and attach the nut back, you directly run the risk of spoiling the nozzles even more and its quality can deteriorate significantly.
Therefore, it is better not to use this method. Manufacturers note that changing nozzles is optimal on average every 100,000 - 15,000 km. It should be noted that the most common causes of injector malfunction are: wear, corrosion or contamination.
It is important to know that the Delphi injector is equipped with designs that are much more reliable and durable compared to the Bosch injector. Read more.
Join the group and you will be able to view images in full size
Once you notice that the "gluttony" of the car has increased greatly recently or the engine power has decreased. These symptoms may indicate problems with one of the main elements of injection engines - injectors. In such a situation, you can try to repair the nozzle by handing it over to the masters (or by doing it yourself), or simply replace it. But how to do it right? We will deal with this in our article.
So, many motorists confuse the two definitions "injector" and "injector", but these are different names for the same device. Its task is the formation, supply and atomization of the fuel mixture for further ignition in the combustion chamber. The injector can be installed on both diesel and gasoline engines. At the same time, modern devices are under close control of the ECU.
As for the types of injectors, according to the injection method, they are of three types:
- piezoelectric. Installed on diesel engines. Their advantage is their high response speed and repeatability of the cycle while maintaining an ideally accurate dosage. These advantages are due precisely to the use of a piezoelectric element. Operating principle - hydraulic (fuel supply is carried out by pressure);
- electromagnetic. Installed on gasoline engines. The most constructively simple version of the nozzle. Works on an electromagnetic principle. As soon as a command is received from the ECU, an EM field is created and injection is carried out. After removing the tension, the mechanism returns to its original state;
- electrohydraulic. Mounted on diesel engines. Works using fuel pressure. In this case, the command to open the drain throttle and actuation of the valve is given by the ECU.
Many motorists do not attach importance to the process of dismantling the injector, but in vain. There are several important points to consider here:
- Before removing the nozzle, it is necessary to ideally clean not only the device to be removed, but also the area around it. Remember that any ingress of dirt or sand particles is fraught with the further performance of the unit. Excess debris can enter the channel and destroy the integrity of the thread or seal. Further operation of the nozzle will no longer be possible.
- Close the union as soon as the high pressure pipe is removed from the injector. To do this, you must use a clean cap with as much density as possible. If dirt or sand gets into the fitting, then when testing the nozzle on the bench, debris may end up in the needle, which will lead to its blockage. Consequently, the nozzles will have to be changed.
- It will not work to remove the nozzle with an open-end wrench, let alone install the device in place and tighten it to the required torque. The best option is to use longer sockets with a 24 or 27 hexagon.
- It is not recommended to unscrew the nozzle immediately - it is advisable to twitch it a little in the thread. This will greatly simplify the work, and prevent accidental damage to the head or threads on it.
Immediately after removal, it is necessary to remove the sealing washers from the nozzle channels and everything that could remain there after dismantling (debris, parts of washer elements, and so on). After cleaning is complete, the debris must be removed permanently. To do this, turn the engine with the starter for at least 15-20 seconds. This will be sufficient for self-cleaning of the motor. At the same time, it is necessary to check the control system and the state of the candles (the performance of the latter can be perfectly observed through the opened channels). It remains to cover the places where the injectors stood with clean rags and cover the engine with polyethylene to prevent water from entering.
The next step is to check the performance of the injectors. The criteria are quite simple:
- as soon as fuel is supplied, the nozzle opens when a certain pressure is reached;
- the presence of small streams or leaks of fuel before the full opening of the nozzle indicates a malfunction;
- jets or drops during the fuel spraying period should not be present;
- the torch should be as even as possible and exit along the axis of the hole;
- after stopping the fuel supply, the pressure will remain for some period of time.
If the nozzle does not meet at least one of the above criteria, then replacement of the nozzle is inevitable. To do this, proceed in the following sequence:
- prepare your desktop. Here it is important to wash everything from dirt and dust, find two small containers and pour diesel fuel into them, find a vice, a set of keys and a sharp knife. It is important to take into account that nozzles from Japanese manufacturers cannot be clamped in a vice. Otherwise, the lips of the sealing part will be wrinkled. Such nozzles must be disassembled, inserted into a spanner wrench, and only then placed in a vice. Products from German brands are less whimsical in this regard;
- for disassembly, use a special extended head, which is already useful for removing the injectors. First, loosen the nut, and then unscrew it by hand;
- then pull out the sprayer and clean the cavity of the nut (you can do this with a regular brush for cleaning the battery terminals);
- rinse the nut in the first container with diesel fuel ("dirty" version) and leave it to drain on clean paper;
- remove the intermediate casing and rinse it in the second tray;
- open the package with a new sprayer and completely wet it in a container with clean fuel;
- put the sprayer in place and check the results of work on the stand.
If everything is fine, you can complete the disassembly and assembly process. The next step is to install the injectors on the engine. But we must not forget about the presence of special seals (disposable washers). Their task is not only to seal the nozzle channel, but also to protect the device from overheating. In addition, before screwing the injectors into place, it is necessary to check the absence of water in the engine on the dipstick. Everything is fine? - Then you can screw the nozzles into their original place, having previously lubricated the threads on the nozzle with a special grease (graphite or copper). The optimal pulling force is 6-7 kg * m. The reverse build process usually does not cause problems.
Thus, with knowledge of some of the nuances, the presence of natural patience, it is not difficult to repair the nozzle. The only thing is that without a special stand for testing the injectors, this will not work. If such a device is available, the road is open. If not, then it is better to turn to professionals. Good luck.
Modern cars are entirely injector. The owners of such machines sooner or later face the question of repairing injectors, since the functioning of the entire system directly depends on their uninterrupted operation. In some cases, it is easier to replace the nozzle than to repair it, but it is nevertheless necessary to restore the serviceability of a serviceable part more often.
ATTENTION! Found a completely simple way to reduce fuel consumption! Don't believe me? An auto mechanic with 15 years of experience also did not believe until he tried it. And now he saves 35,000 rubles a year on gasoline! Read more"
You can check the functionality of the injection system, diagnose the health of the injectors with your own hands. It is not necessary to go to the service station every time.
Injectors are mandatory components of the ITS (injector). They are intended for the metered supply of fuel. It is the nozzles that make it possible to create fuel assemblies (fuel-air mixture) by mixing gasoline or diesel fuel with air. The combustible mixture formed in this way is easier to ignite.
It is customary to distinguish between several types of nozzles:
- models controlled directly by electronics (the valve of such nozzles regulates the spray level, controls the access of fuel);
- options for injectors that do not meter fuel, but only supply it under pressure;
- injectors of a new model using the piezoelectric effect (in comparison with analogs they work four times faster).
As a rule, if a used car was bought, or the service life of the native car has exceeded the 150,000 mark, the performance of the injection system elements should be checked.
Of course, the quality of the fuel that the owner fills the car with directly affects the resource of the injectors. A depressing situation reigns in the countries of the former CIS and in Russia, where it is not clear what is being sold at gas stations. Having poured such a composition into the fuel tank of a car, and having driven several thousand kilometers, one has to start repairing certain parts, including injectors.
The injectors should be checked as soon as the following signs are present:
- it became very difficult to start the engine;
- increased fuel consumption;
- the engine is troit, unstable in the XX mode;
- the exhaust has become much more toxic;
- the agility of the car has worsened;
- ignition slips to XX.
If one of the above signs is present on an injection car, then it will not be superfluous to check the operation of the injectors. We can say that the time and money are well spent. However, it will be possible to completely eliminate the topic of money if you learn how to independently check the injectors.
The injector is checked with a multimeter or an ohm meter. The injector is disconnected from the high voltage and then checked. It is necessary to test the compliance of the impedance values of the injectors with the standard values. If the injectors are low-impedance, then their resistance should be within 2-5 Ohm, if high-impedance - within 12-18 Ohm.
First you need to remove the nozzle from the rail.
- The area around the nozzle is thoroughly rinsed, blown out and dried. Particular attention should be paid to the place where the fuel line is connected.
- Unscrew the wire nuts, but very carefully and gradually, if you intend to continue using the fuel line. It is recommended to wear protective gloves before unscrewing.
- Close the union with a plug or a piece of clean polyethylene, and then wrap with electrical tape.
Next, the nozzle is checked visually.
- The catalog number must be stamped on the nozzle body, and an individual 16-character code is written on top of it. This will indicate the originality of the part that is worth repairing (the original part is worth spending time on, the Chinese analog is better to replace immediately).
- If dirt is visible at the end of the nozzle, this is unacceptable. It is necessary to soak the sprayer and the nozzle body in a special Vin Es liquid.
Now is the time to start disassembling.
-
First you need to unscrew the tightening fasteners of the nozzle, and then place it in the bath.
Due to a clogged throttle inside the nozzle or due to a weak connection, the diesel fuel flows back into the tank, and this, accordingly, leads to abnormal injection and loss of pressure in the rail.
The spray nozzle with the needle also deteriorates, although to a lesser extent.The gap between these parts of the nozzle is also small, which can lead to rapid wear. As for the wear of the needle, it will eventually get scratched and damaged.
When sorting a nozzle in a domestic environment, a good, high-quality magnifier will be of great benefit. Most of the internal parts of the nozzle are small, a magnifying glass will allow you to see all of them, without losing anything. Small elements also include round metal balls that perform very important functions inside the nozzle.

