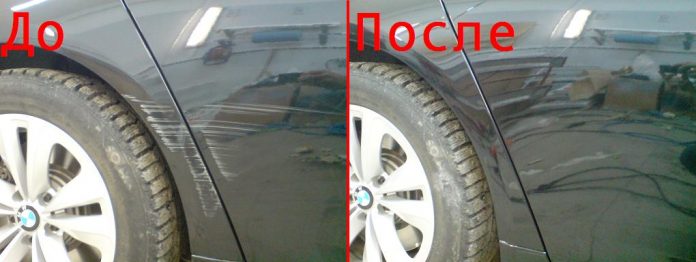
Scratches on the base paint cannot be removed by polishing. They can be made almost invisible. There are polishes with the addition of color pigments. It can only be used for simple acrylic enamel. Complex shades or metallic paint should not be treated with such compositions.
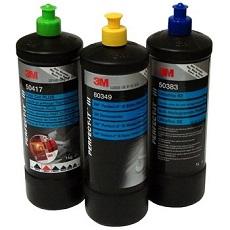
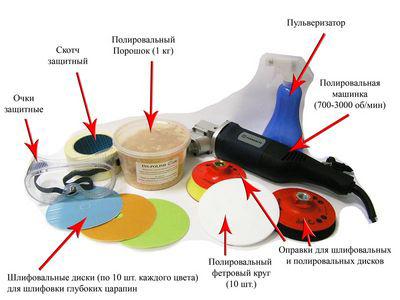
On the market, you can find several types of aids with which you can make repairs yourself:
If the scratches have only slightly damaged the base coat of the paint on the car, we strongly discourage making repairs in this way. It will not be possible to completely remove scratches, since 100% getting into the shade is almost impossible. It is better to mask the damage with polishing as much as possible.
The compositions described above are best used if the scratch width is more than 1 mm. In this case, the pigment will cover the peeled paint, and the varnish will protect the surface and give it a shine.
Containers with brushes are only suitable for acrylic enamels. If the scratch is even and deep, cover the edges with masking tape. Degrease the surface and apply the compound. It is important to fill the hole that has formed in the paintwork layers. Then remove the tape, sand the surface with P2000 sandpaper and water and polish the repair area. This will maximize the effect. Repairing chips and scratches with paint brushes and markers is a good budget pre-sale option.
Unfortunately, if the paintwork on the car is a base for varnish, then you need to buy more expensive compositions. Be sure to follow the manufacturer's instructions. It is best to give preference to firms with the largest range of offered shades.
Any of the compositions requires mandatory degreasing. Never apply paint if the car is damaged by rust. Sand the lesions as much as possible with sandpaper before removing any scratches.
If there are a lot of scratches, and now the area with a circumference of 10 cm on your car is densely covered with deep "cuts", it is more rational to resort to high-quality painting.
The good news is that you don't have to paint the entire element. Often, the elimination of paintwork defects on a car can be carried out by the method of local painting. Unfortunately, it is extremely difficult to do such repairs well with your own hands. To do this, you need:
The main thing missing on the list is the experience you won't have. No “artisanal” repair method can remove deep scratches like a skilled colorist and experienced painter can.
Now you know how to remove scratches or hide them as much as possible.
VIDEO
Repair of chips and scratches on the car body: which method to give preference
DIY repair of scratches, chips on the car body
Work on paint chips
Stages of repairing a scratch or chip on the body
Materials for the repair of scratches and chips on the car body
Budget calculation
This moment is quite unpleasant for the car owner, not only because the car loses its aesthetic appearance, but also because it is in the places of scratches and chips that corrosion and rust begins to develop.
Therefore, it is very important to get rid of such small damage as soon as possible, since delaying the repair will lead to even greater monetary costs. You will learn how to independently remove scratches and small chips on the car body from this article.
One of them is polishing the body surface. This work can only be done when the scratch has not reached the ground level. For polishing, you need special pastes that will help remove a thin layer of paint in the place of the scratch and level it down to one level.
In this case, it must be remembered that the car is not painted, but on the contrary, a layer of paint is removed. This will require accuracy and care, because you can overdo it and polish to a layer of soil. Then you will have to paint not only the scratch, but the entire polishing place. And this will lead to additional costs of money and time.
It should be remembered that before using a wax pencil, the car must be thoroughly washed, and the place of the scratch must be cleaned with gasoline or white spirit. Removing a scratch with a wax crayon is fairly straightforward. If the scratch has not touched the layer of soil, but itself is very wide, here you will not get off with polishing and a wax pencil.
In any case, you have to paint. Only a scratch will be enough to paint. To do this work, you can glue the scratch on both sides with adhesive tape or masking tape. To apply paint, you can use a brush with which girls paint their nails. The main thing is to thoroughly rinse it in acetone and thin it out a little.
If the scratch has touched a layer of soil, there are also two possible solutions to this problem. The first is only suitable for very thin and small scratches. It consists, as in the previous case, in covering up scratches with a wax pencil. Again, do not forget about the preliminary treatment of scratches and washing the car. But don't flatter yourself. This method has one big drawback.
Over time, the wax layer will begin to fade, and the scratch will become more visible. Therefore, this treatment will have to be performed over and over again at some intervals and, in order to avoid this, it is best to touch up the scratch site.In this case, two layers of paint are applied after preliminary preparation.
If you notice a wide scratch that has reached the ground - forget about the wax pencil, it will not help in this matter. Here, only painting the damage site will help out.
For this, the place of the scratch must be washed and treated, as mentioned above, with gasoline or white spirit. Then it does not hurt to glue the problem area with adhesive tape around the perimeter and apply two layers of paint. This method is much more reliable and effective than a wax pencil, and it is done only once, unlike the first.
What if the scratch went through the top coat of paint, the primer coat and got to the metal? Although this damage is one of the most unpleasant, there are also ways to repair it. Here you will not get off with ordinary painting, and even more so with a wax pencil. First of all, as in all cases, the car should be thoroughly washed with foam and dried.
Then the standard process is processing with white spirit or gasoline. ... After that, wipe the car again in the place of damage, first with a damp and then with a dry cloth. If elements of corrosion are already visible in the place of the scratch, the next step will be the application of an anti-corrosion primer.
This element must never be omitted, as painting a deep scratch without anti-corrosion primer may lead to unexpected results.
Corrosion and rust will continue to develop under the paint layer, and will soon nullify all your efforts.
Sometimes car owners have parking problems, in which bumpers very often suffer. Therefore, scratches on bumpers are a fairly common problem that cannot be ignored.
The plastic bumper is not susceptible to corrosion and rust, so everything is simple here - cleaning from dirt, processing with gasoline and touching up with acrylic varnish from a repair can or paint.
If your car has metallic paint - everything is the same with one small feature. It consists in the fact that such a painted layer has a slightly higher gloss, which sometimes becomes very noticeable. To eliminate this problem, the painted area is covered with a thin layer of varnish.
We sorted out the scratches, but there is another common problem with the car body - paint chips. Chips of paint, even at a shallow depth, have a fairly large area, so a wax pencil is not used here.
If the depth of the chip is small, treatment of the problem area with a color-enriching polish can help, after which a layer of protective polish is applied.
Before processing, the surface should be cleaned and degreased. In the case when the chip has reached a layer of soil or metal, the polish is useless, and tint of the chip cannot be avoided. Some car owners are faced with the problem of bloated paint.
The damage is quite unpleasant, since under these swellings, foci of rust and corrosion appear. Therefore, this problem must be dealt with immediately. To do this, carefully open the bottle and remove any remaining paint.
You should remove so much that the remaining paint adheres securely to the car body.If, after opening the bubble, you find traces of corrosion or rust under it, it is imperative to remove it and treat the place with anti-corrosion primer.
Then you can start painting. The paint is applied in several layers so that it is equal in level with the old layer.
We thoroughly clean the place of the defect from dirt, traces of rust, if any. We make stripping to the ground. Degrease.
During troubleshooting, you decided what kind of primer you need: for paint or for metal. Apply a primer with a rubber spatula and let it dry. Then we clean up the area again.
That is, all procedures are performed in accordance with the body painting technology, only on a small area.
Before applying paint to the repair site, cover the surrounding surface of the body part with film or paper and masking tape. Apply paint from a spray can in accordance with the instructions.
If you use a "pencil" to repair a scratch or chip, then apply the paint in two or three layers. Do not immediately remove the resulting influx ... Let the paint dry.
After repairing a chip or scratch in the body and complete drying of the paint, polish the body at the place of repair. Given that the damage area is small, the body can be polished without the use of equipment, i.e. manually.
If you have too large a scratch area on the car body, the repair, most likely, will have to be done to the entire body part. Here already one "pencil" is indispensable.
In the same way, the repair of plastic parts is carried out with the only difference that the means for plastic surfaces are used.
On the shelves of the store, you can find a repair kit to restore the surface of the car. In its simplest form, these are several cans of paint, supplemented with consumables.
Kits are more expensive and include brushes, sandpaper, varnish, masking tape and other accessories. Stores often offer paint tinting to match the desired tone. Repair kits for severe chips contain primer, putty and tools to work with them.
Corrosion treatment compounds can sometimes be found in kits. Anti-corrosion mastic is ideal for car repairs with significant paintwork damage. The last finishing can be carried out not only with varnish, but also with special means that increase the reflectivity of the paint.
The main reasons for the formation of defects are small stones and road sand. They leave multiple but slight scratches. When diagnosing a car, it is necessary to assess their size and penetration depth.
A matte surface means that only the varnish has been damaged. White body - damage to paint or even soil. The budget will be affected not only by the "depth" of the work, but also by the speed of reaction.
Scratches that have reached the metal require immediate repair. The ideal driver should keep wax crayons close at hand and repair any dangerous damage as it is found. Timely cosmetic work will save money in the future. Approximate guidelines for determining costs:
- Fix it PRO and New Fix - sets of several pencils, from $ 0.15 to $ 2 excluding shipping.
- Single pencil Fix it PRO (Car Repair Pen) - $ 0.1.
- 5X and 5Pcs - Multiple scratches, price up to $ 7.
- 3M Scratch Remove - deep damage, up to $ 15.
If you decide to carry out a full cycle of priming and painting, then the main source of savings will be attentiveness. Do not skimp on materials, do not thin the varnish too much - it may leak.
Paint smudges are formed due to the high humidity in the room.For the same reason, do not use the car until it is completely dry.
On any freeway, there is a pebble that, flying out from under the wheels, hits the car body with the energy of a bullet fired from a small-bore rifle. As a result, chips are formed - point damage to the paintwork of different depths (from tenths of a micrometer to a millimeter) with bare metal. They are not as harmless as they seem.
Corrosion of the body usually begins from this place. In addition, the car has a sloppy appearance and significantly loses in value. We invite you to familiarize yourself with how to repair chips on a car body using the technology of the Nussle company (Germany), which is engaged in body repair and the production of professional tools for repairing dents without painting.
If you are not particularly interested in high-quality elimination of chips, then you can take a thin brush, nitro enamel of a suitable color and paint over the damage. For those for whom a slight spotting of the car does not seem like a good idea, you should do differently, spending up to three days to repair the chip.
Works are carried out in dry and heated garages. In extreme cases, repair work can be done in the summer. The room must be electrified. Alternatively, find a portable power generator.
Electricity will allow you to well illuminate the place of work and connect an infrared heater. Before starting work, you need to acquire some tools and supplies.
acrylic paints for outdoor use. You can use water-soluble or Gifthalic;
two-component acrylic primers;
two-component acrylic varnish;
waterproof sandpaper P1500 and P2000;
final polishing paste;
magnifying glass;
a metal tool with sharp ends - a tool knife, a hook, and the like. You can make them yourself;
portable infrared emitter. For example, Ballu BHH / M-09.
Repairing chips is a good reason to thoroughly wash your car. Work begins after complete drying. The repair area is thoroughly degreased, even if you used a cleaner like Fairy when cleaning. White spirit is best suited for this.
The light should be placed so that the place of work is not obscured by hands and tools. So use two or three sources.
First you need to determine the type of paint coat on your car. Not all bodies are lacquered. On budget models, a glossy enamel film is formed during hot drying. Evaluation is done with a clean cloth and a drop of polishing paste, which should be rubbed over the body without applying significant force. If there are colored stains on the cloth, then there is no varnish, there is only pigment.
Assess the extent of the damage with a magnifying glass. If the chip has reached the metal, then it is better to assume that the corrosion has already begun.
When working with a chip, a miniature tool and literally homeopathic portions of materials are used - primer, paint, varnish, rust modifiers.
Trace the area with a colored wax crayon to keep it in view.
Clean the metal underneath the chip using the sharp end of the wire and the tip of a tool knife. Place a drop of rust modifier. Turn on the infrared heater, wait for the moment when the body part is noticeably heated, and the place of repair is completely dry.
Clean the repair site with P1500 sanding paper, making a matte “patch” with a diameter of about 8 cm around the chip. In order not to capture a larger surface, take a piece of wooden lath the size of a matchbox and wrap it with sandpaper.
Dilute a small amount of 2K acrylic primer. It can be drained into a container from an aerosol can. Using a toothpick, sharpened match, or a fine-tipped brush, place the soil inside the chip so that it is half full.Use the infrared heater again and wait until the applied material is completely dry. It can shrink, so the priming process is repeated.
If the car is new, then it makes sense to find the paint code, which is written on the model nameplate, next to the VIN code. Each manufacturer finds a special place for it, but in most cases it is installed under the hood, on the shield between the engine compartment and the passenger compartment. As an option - the lower rear corner of the front door, the B-pillar. After two to three years of operation, the color of the paint becomes less saturated. But the lighter the car, the more likely you will be in tone using the factory markings.
It is a common misconception that automobile paints are habitually called "nitro paint". Pigment formulations based on dissolved cellulose (hence the root "nitro") are not currently used. All modern car paints are produced on an acrylic base. They can be water-soluble or Gifthalic containing an alkyd resin that acts as a binder.
The paint, which is considered "native" for the car, is probably Giftal, when it dries it forms a strong waterproof film and does not require additional varnish. An indispensable condition for its use is thermal curing. Therefore, after application - the process is similar to a primer - the place of repair is necessarily warmed up by an infrared emitter. It should be warm to the touch. Complete drying time from 5 to 10 hours. At temperatures below 20 ° C, this paint will completely polymerize after a month.
It makes sense to use water-soluble acrylic paints for outdoor use in two cases:
the paintwork changed its tone during operation;
the finishing layer is varnish.
Water-soluble paints can be mixed with each other to achieve the desired shade. Moisture will not be able to penetrate the primer layer and cause corrosion. Although they form a strong waterproof film when completely dry, it is best to apply a layer of two-component acrylic varnish on top of them.
It is not necessary to use an infrared emitter to dry a layer of water-borne acrylic paint or two-component varnish. In this case, it will take at least two days for complete curing.
As a result of the sequential filling of the chip with layers of primer, paint and varnish, a pimple with a height of no more than two or three tenths of a millimeter should appear on the surface of the part being repaired. To get rid of it, they carry out finishing.
The surface around the pimple is painted with any paint that can be easily washed off. For example, water-dispersion. This will allow you to precisely control the position of the abrasive paper and not sand down what you should not.
First, an abrasive paper P1500 is taken. It is fixed on a small wooden block the size of a matchbox and is slightly moistened. Grind the bump until streaks appear on the surface of the control paint. Check the quality of the work by sliding your finger along the tubercle. Ideally, you shouldn't feel the difference between it and the rest of the surface.
The protective paint is washed off, the sandpaper 1500 is replaced with P2000, which finally smoothes the protrusion. The surface remains matt. Polishing is done with a paste applied to a soft cloth made of natural material. For example, flannel, bikes, felt. The felt pad is too rough for this job.
The technology offered by Nussle is a long and painstaking process. But time and effort will not be wasted. The place of the former chip is no different from the rest of the body surface.
VIDEO
Good afternoon. In today's article, I want to talk about how to repair scratches on a car. Since our site is intended for the smart and handy, we will cover up the scratches ourselves.
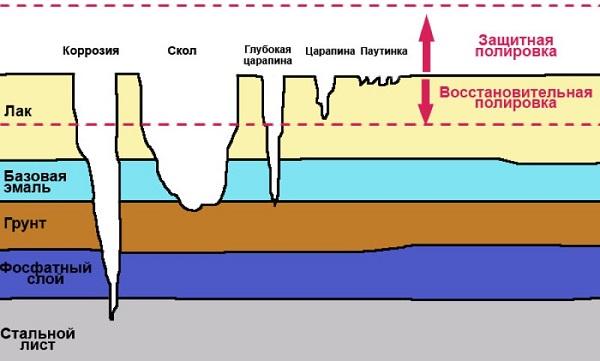
Before talking about the methods of repairing scratches, let's talk about what scratches are and how they differ from each other. This picture will help us with this:
In our picture, these are the two right defects. Both of these defects can be removed by abrasive polishing, about which we have a separate article on our website.
Also, these defects can be made less noticeable with a pencil to remove scratches.
It is sold in all car stores selling consumables and costs from 150 to 300 rubles, there is an option to purchase it from the Chinese.
If you doubt the effectiveness of these "pencils" watch a visual video:
VIDEO
As you can see, the pencil masks scratches quite well.
If this is your case, you are also relatively lucky! In this case, it is only necessary to restore the varnish layer, i.e. no need to pick up paint.
Scratches to the base enamel can be removed in two ways.
Economy option - we cover the scratch with the pencil described above. Yes, he will mask the scratch and even cover the base enamel with the thinnest layer of nitro varnish, but the scratch will still be very noticeable.
Correct option - we purchase in bulk the minimum amount of two-component varnish, silicone remover and a thin brush. We wash the scratch and degrease it. After that, using a thin brush (or even a match), apply a layer of varnish over the entire length of the scratch.
As a result, you get something like this:
Yes, you can still see the scratch ... but you have to wait 2 weeks, that is. until the lacquer rises, abrade the scratch according to this article. After that, the scratch will look something like this:
With due care the scratch can only be found when viewed point-blank and with bright light.
Formally, these scratches cannot be removed. Those. they will be visible in any case, but you can easily reduce their visibility.
The technology is no different from the above-described touch-up of a crack in the varnish. Only here you will also have to touch up a layer of base enamel.
This is done by means of a "special pencil" with paint, it looks like this and is ordered using the paint code:
By the way, they can also be ordered in China. The problem is that it is not always possible to find the right pencil. Sometimes, for the place of a pencil, you can order such a bottle with a brush:
But I am of the opinion that there is no point in overpaying, since the scratch will still be visible!
Usually I go to the shop that sells auto paint and pick up the color by fan. Then I buy either a can of paint or the minimum selling amount of paint in the bottle (just shake the can and sprinkle it into its cap).
After that, degrease the scratch and apply a layer of paint with a thin brush. You can wipe off any paint that gets on the edges of the scratch immediately after painting.
After that, dry the paint and cover with varnish or pencil according to the method described in the previous paragraph).
After these operations, you should get something like this:
It makes no sense to prime the scratch, since the primer will not create additional adhesion, but will worsen its appearance, therefore we do everything the same as in the previous paragraph, i.e. degrease and apply base enamel directly to bare metal.
Unfortunately, nothing can be done. Definitely, the part will have to be completely repainted, but it can be made for sale according to the method described above (options 3-4). It is very important to understand that this elimination of a scratch will last half a year at best, and then all the paint from the rusty area will begin to swell like this:
Readers, I hope that after reading the article, you understand how to repair scratches on a car with your own hands. If you have questions, or if you can supplement the article, write in the comments.
We all know that the time spent on the road can be reflected in different ways on the car. For example, dents or other damage may form on the bodywork. Removing scratches on a car is easy enough to do with your own hands.Today you can buy a wide range of all kinds of products for removing scratches from a car and painting damaged areas, irregularities and chips.
To effectively eliminate defects from the glass, especially the windshield, it is best to contact a specialist at a service station. But you can also use tools at hand to remove scratches from your car. Surface repairs are quite successfully carried out with their own hands at home, and large funds are not required for this.
Experience shows that of all types of scratches on a car, the most common are "cuts" on the bumper. Chips often appear on the doors of the car. If you find scratches on your favorite car, then this is not a reason to rush headlong into the workshop. Removing scratches from a car can be done efficiently and easily on your own, without spending a lot of time and energy.
The formation of chips and deep scratches is an unpleasant fact, but you shouldn't be upset. This does not mean that you cannot drive a car. The top layer of paint on the car body can be spoiled by ill-wishers or ordinary hooligans; it can suffer from hail or gravel on the road. One way or another, removing scratches from a car is a feasible mission, and it is not necessary to hand over your favorite car for repair.
If the body or bumper of your car is found to be scratched by a nail or the impact of another car, contact the police immediately. Let law enforcement investigate who committed the crime. Be sure to demand from the malefactors to pay moral and material compensation.
When starting to repair chips and scratches, try to independently assess the extent of damage. First, determine their depth. This will help you understand whether you need to send the car for repair or if you are able to do everything yourself. The surface of a car consists of several layers:
the first layer is varnish;
the second is the base enamel;
the third is the ground;
the fourth layer is phosphate;
the last one is steel sheet.
To accurately determine the depth of scratches on your car, you will need to use a magnifying glass. This should be done only in good daylight, so the light of a flashlight in the dark at night will not work. If after a preliminary inspection it became clear that the scratches are insignificant and the steel sheet is closed, then the repair of the surface of the car body damaged by "cuts" can be performed in two ways:
removing scratches without painting using a special masking pencil;
removing scratches from the body with a plastic polish.
To avoid painting the car's surface, buy a pencil for removing not very deep defects. Pre-wash the machine and dry it dry. A process such as removing scratches on the body requires a complete absence of dirt and dust. Don't forget about quality lighting. In order not to spoil the eyesight and coverage of the car while identifying defects and covering them up with a liquid pencil, it is best to perform this procedure in an open, well-lit area or in a room where powerful lighting devices are installed.
It is not necessary to cover the machine with a protective film. We take a masking pencil and carefully apply it to the damaged areas. Let it dry. Repairing the paintwork on the bumper of a car with such a small but handy fixture will take a little time. The active substance completely fills the damaged layers. After applying it, the car will look no worse than when you picked it up from the car dealership brand new.
Before purchasing a marker like this, find out as much as you can about this tool. For example, ask your friends who have already tried this method and will be able to recommend a really high-quality product.
An important point is the polishing of scratches on the body. In this case, painting of problem areas is also not required.To make your car look like new from the interior, it is necessary not only to remove coating defects, but also to thoroughly polish the body with special agents for painted surfaces and plastic. Remember to use a respirator mask and gloves to protect the respiratory tract when cleaning, painting and polishing the machine.
Apply a small amount of polish to the soft circular attachment of a polishing machine or drill and rub in by hand for a while.
As soon as the substance is evenly distributed over the surface of the body, you can turn on the machine.
The process can take about 20 minutes and the effect will surprise you. Such a simple removal of all kinds of irregularities, roughness and chips from the surface of the car body can be compared with the work of specialists of an automobile salon or service station. If you are satisfied with the result of your own labors, wash the car again and then wax it.
Video (click to play).
As you can see, with the help of a pencil and plastic polish, you can do it yourself with your own hands to remove minor surface damage, chips and scratches. Removing more complex flaws is a very risky undertaking. It should be entrusted to real professionals.
VIDEO 
