In detail: do-it-yourself gazelle vacuum brake booster repair from a real master for the site my.housecope.com.
Guys. When the vacuum tank is overhauled, it can be very difficult to reassemble it. The elastic bands are new, the body does not heat up and does not turn to close the locks. Here's a simple solution.
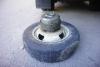
We put a vacuum cleaner on the wheel. If with a partner you can put the spring right away. I collected one so I put the spring later. The rubber band under the fitting must be pulled out, but this method is harder.
Above is a block of wood above the bolts.
Jack on top and rest against the frame.
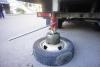
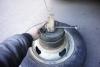
We lift by pressing the body.
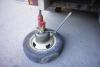
They pressed the installer through the key, the body turned. If you are assembling one and could not put the spring right away, you can then push it in, but this is worse, but you can neatly.

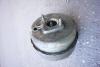
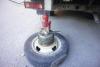
we put on the elastic band of the fitting. The body was smeared with lithol to make it easy to turn. Good luck.
Post has been edited Steam locomotive: September 21, 2014 - 23:14
Respect for your patience and hard work. And we are lazy, we buy business ones. By the way, I also changed the pipki without a camera, so that the tire fitters did not pay for disassembly and assembly.
- Like
- I do not like

countryNik 22 Sep 2014
we are not lazy))) we went through and not that (non-separable)
When disassembling, you do not need to knock anywhere. Spill it with a VDshkoy, put the vacuum cleaner on the spare wheel, and turn it by the bolts with a pry bar. I figured it out just with a bang. Before that I knocked with a hammer - the result was generally zero.
Post has been edited Steam locomotive: September 22, 2014 - 08:08
- Like
- I do not like
countryNik 22 Sep 2014
Yes, he’s okay, he’s getting ready. just to make it easier to adapt to bungle for turning
- Like
- I do not like

He began to troit the internal combustion engine, poisoned VUT. I bought a repair kit and started playing the accordion. Disassembled, assembled, new, old rubber bands, everything is useless, Troilus censorship is like a bastard. He spat, clamped the pedal rod in a vice, poured water into the joint of the halves of the bodies and pressed on the VUT body, and lo and behold, bubbles began to flow. On a practically new VUT (mileage somewhere around 5000 km), air leaks through the connection. A sledgehammer in hand with a spacer and from the heart and the suction stopped. As I am lucky for spare parts, the meal is almost 60-70% and everything is factory made. I tightened the spring with copper wire in one turn and twisted the ends. Wire 0.5 mm. After assembly, cut with scissors and pulled out with pliers.
| Video (click to play). |
- Like
- I do not like
countriesNik 26 Jan 2015
ooo .. it's easier there. where there are adaptations for disassembly
anyone interested I can dig deeper ..
only if the VUT starts to freak out from the brakes. this is his oil seal. changes .. just do not forget to smear. otherwise it will be like yesterday
- Like
- I do not like
ooo .. it's easier there. where there are adaptations for disassembly
anyone interested I can dig deeper ..
only if the VUT starts to freak out from the brakes. this is his oil seal. changes .. just do not forget to smear. otherwise it will be like yesterday
30 years in auto repair, great experience. I don't take the Cossacks for repairs, than they thought, the Volga was also stuck in the engine there, since this is no longer a tractor and not yet a car, and I am not repairing ATT. There were cases, but these were carnations, compared to a gazelle, this is a nail through a gazelle vu and bent on both sides. This is about spare parts, they are like on foreign cars, and are made from children's feces.
Many people immediately sin on the vacuum brake booster.
Many owners of VAZ cars are thinking about repairing a vacuum brake booster. What are the symptoms of a malfunction of the vacuum brake booster, I will now tell you.
No, of course, the brakes do not completely disappear and after some time after pressing the pedal, the "brake" is still grasped. But at the same time, the brake pedal is kind of soft and takes at the very end.
When you press the brake pedal, the pedal gently goes down, it turns out that the vacuum brake booster is working. If the vacuum brake booster did not work, then the sensations when pressing the brake pedal would be like in the VAZ 2101.But such symptoms occur when the brake pipes are not tight.
How to check the vacuum brake booster
Vacuum brake booster it is very simple to check. You push the brake pedal all the way and start the engine. If the pedal moves smoothly with the engine running, the vacuum booster is in good order. Everything else is not his concern.
Today, almost all cars are equipped with vacuum brake boosters, so the topic is popular. Yes, and repairing a vacuum brake booster is not so difficult, you can repair the vacuum brake booster with your own hands. The main thing is to carefully study the device of the vacuum brake booster of a particular car model, because they may differ slightly. Therefore, for a start, I recommend that you study device of a vacuum booster of car brakes.
Checking the vacuum brake booster UAZ, GAZ, VAZ
- The engine troit is one of the signs of a malfunction of the vacuum brake booster. Eliminate air leaks in the intake manifold that lead to a depletion of the combustible mixture.
- Bleed the brake pedal, then start the engine, if the brake pedal fails while starting the engine, then vacuum booster works... If it remains motionless, it means that the vacuum booster should be repaired or replace the vacuum booster.
- Inspect vacuum amplifier housing for leaks.
- Adjust the brake booster occasionally.
Prepare the necessary servo repair tools.
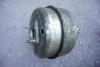
By design, the vacuum brake booster is in one block with the cylinder head. The body of the vacuum amplifier is divided into two parts: 1 - atmospheric, 2 - vacuum.
The vacuum section is connected to the intake manifold with a check valve. And the collector, in turn, acts as a source of discharge. For continuous operation of the vacuum brake booster on diesel engines, an electric vacuum pump is used.
The vacuum booster works only when the engine is running. This can be explained by the fact that when the engine is not running, the check valve separates the vacuum amplifier and the manifold.
The atmospheric chamber is connected to the vacuum chamber when the brake pedal is depressed. When you press the brake pedal, pressure is exerted on the tappet, which moves the valve. The diaphragm under the action of the piston rod leads to the injection of brake fluid to the working cylinders.
And the return spring serves to move the diaphragm to its original position. The operation of a vacuum amplifier can be described by the pressure difference in the vacuum and atmospheric chambers. The pressure difference causes the pusher, rod and piston to move.
Remember, the presence of brakes does not mean that your vacuum brake booster is working. Just when the vacuum booster malfunctions, it becomes more difficult to drive the vehicle. This makes it difficult for the driver to drive. The driver has to apply more effort to brake than usual.
The main malfunctions of the vacuum brake booster:
- Wear and aging of rubber valves, rupture or damage to the diaphragm.
- Breakage or damage to the hose, as a result of which the engine manifold is connected to the vacuum brake booster. Check the fastening of the clamps and the hose for cracks.
DIY vacuum brake booster repair
- Study your vehicle manual, view and read vacuum brake booster circuit.
- Disconnect the brake link located under the steering shaft.
- Remove the brake master cylinder.
- Inspect and determine the malfunction of the vacuum brake booster and replace the vacuum brake booster or carry out repair of the vacuum brake booster assembly.
If you are used to dealing with car breakdowns on your own, then it will not be superfluous to know how to repair a vacuum brake booster (VUT). It is nothing more than a mechanism that helps to reduce the force applied to the brake pedal. Even in old cars, it was constantly necessary to depress the pedal with all the force, since it was necessary to develop an effort of up to 80 kilograms. But since the time the amplifier appeared, this figure has dropped by half.
The VUT body is divided by a diaphragm into two parts, through which the stem passes. This rod is connected directly to the pedal itself and the other end creates pressure on the piston of the brake cylinder. The most important thing in our movement is road safety, which is why instructions on how to check the vacuum brake booster in a car before driving will be useful. And although its malfunctions will not lead to a breakdown of the entire system, the unexpected stubbornness of the brake pedal can scare you while driving, and the result of the accident will depend on your reaction.
Checking the vacuum brake booster is an integral part of the vehicle inspection process. True, it makes no sense to crawl under the bottom of the car every day, the operation of the VUT can be checked indirectly. What signs can tell you about the state of the amplifier, we will tell you a little below, and also offer repair options.


How is it worth checking the VUT for serviceability without resorting to an inspection hole? This is done like this: when the engine is not working, you need to press the brake about 6 times. Then, while holding this pedal, start the engine. The pedal should move slightly forward, and if this does not happen, the first step is to check the tightness of the hose connections and the operation of the check valve.
If your vacuum brake booster hisses, then be sure to check a few places. The most common problem of VUT failure is the hose that connects it to the engine intake manifold. It is imperative to check for cracks and breaks, it is necessary to check whether the clamps are tightened. Also, the amplifier can fail due to internal parts such as a valve. Over time, this valve becomes hard due to the wear of the rubber, so that the elastic baffle can rupture.
You can simply purchase a vacuum brake booster repair kit and change the anthers, sometimes it saves you from hissing. But this is worth doing if you are sure that the amplifier itself is working.
Symptoms of a malfunction of the vacuum brake booster include such a case when the motor starts to run. Many car enthusiasts first go to buy spark plugs, tune valves, but the engine still does not work well. In such cases, it is worth doing a little check: close the amplifier hose so that it does not let air into the engine. If the engine starts working properly, then the problem is in the brakes.