
In detail: do-it-yourself repair of outerwear from a real master for the site my.housecope.com.
To a darned place was almost imperceptible, they select threads in color, thickness and quality that would correspond to the fabrics being repaired. You can pull the threads out of the hem at the seams. Darning stitches should first run along the fabric (warp) and then crosswise (weft). Start off darning it must be in a strong place, otherwise it will quickly collapse. The stitches should be fine. With a transverse passage, the needle is passed under the thread, then over it. At the edges of the darning, the thread is not pulled too tight so that the shrinkage of the thread does not tighten the fabric during washing. The rows of threads should fit snugly against one another. You can also darn on a sewing machine, which has a special device.
If the fabric is not frayed through, but only very thinned, darn along the threads, without making cross stitches.
If a piece of fabric is accidentally snatched out and it is torn at the same time along the weft and the warp, then it is necessary to darn as two separate tears.
Patches must be of the same material from which the item is sewn, or of a similar quality and color. Before applying the patch, the material must be washed and ironed so that it does not sit down later. The patch is applied to the place to be repaired, observing the direction of the weft and warp threads. If it needs to be placed near the seam, then the seam is paired, and the patch is brought into this seam with one side. Then it is swept in and after that, bending the edges, sewn with a blind seam from the front side and from the wrong side. Pull out the outline. On a rectangular patch, an oblique incision is made at all four corners to a depth of 0.5 cm. If the patch is not visible, it can be sewn on with a typewriter.
| Video (click to play). |
On the diaper fabrics, the patch is applied on top. To do this, the damaged area is outlined, adding 0.5 cm to each side, and the corresponding patch is cut out. Bending the edges inward, sew. On variegated materials, the pattern should match the pattern of the item being repaired.
Sheets and towels can be repaired as needed. The sheets are often wiped in the middle. They are repaired like this: they are cut in the middle along the warp thread and both halves are attached with edges, and the edges are trimmed.
Towels tend to wear out faster at the ends. The towel is cut in the middle and sewn back with worn ends. The edges of the towels are trimmed.
Jackets and trousers sometimes require minor repairs: the cuffs of sleeves and trousers wear out. The sleeve cuffs are repaired as follows: the lining is stripped off and the hem of the sleeve is carefully cut off. The ends of the sleeves and the cut strip are ironed out, the strip is sewn on, then folded inward, the lining is sewn on and ironed again. On trousers, the edges are repaired in the same way. If the braid of the trousers is frayed, it is replaced with a new one. The trouser tape has a thickened edge, which should protrude from the edge of the trousers along its entire width. If, along with the braid, the edge of the trousers themselves is rubbed, then first the bent edge of the bottom of the trousers is stripped off, cleaned of dirt and ironed. Worn places are plastered and the trousers are folded 3-5 mm above the stitching line. A new braid is sewn along the edge.
If children's trousers are worn in the back to the holes, then in order to apply a patch, they are ripped apart at the seams. Then the rectangular patches are cut, leaving 0.5 cm on each side for the seams. It is recommended to hem a satin strip on the inside of the patch, this will protect the trousers from rapid wear in the future. The finished patch is strongly ironed, smoothing its seams. And so that the braid at the bottom of the trousers does not wear out and does not get shaggy, saturate it with PVA glue.
Lace curtains are usually darned. But it takes a lot of time, and the darned places spoil the look of the curtains.It is better to soak the pieces from old curtains, corresponding to the pattern, in starch and glue the curtains from the inside out to the damaged area, and then iron them with a hot iron.
Woolen items can be repaired as follows: move the edges of the gap as close as possible, take a piece of the same cloth, spread it thickly with egg white and place it under the torn place, then iron it from the inside out with a hot iron.
The damaged area of any item can be glued with BF-6 glue or other fabric glue. The prepared patch is moistened and ironed. The patch is placed under the damaged area, face up, and the outline of the flaw is outlined in chalk through the hole in the fabric. The edges of the patch should be 1–2 cm larger than the damaged area. Separately, prepare a patch for the patch, which should be 0.5–1 cm larger than the patch itself along the edge. Squeeze a little glue onto a clean glass and let it dry for 4–6 minutes. With dried glue, smear the damp cloth, the edges of the patch and the patch. The gap between the edges of the damaged item and the edges of the patch is also smeared with a thin layer of glue. The glue layer is also allowed to dry, after which it is lubricated again. The second layer is also allowed to dry, then, applying a patch smeared with glue, they fasten everything with an iron (3-4 seconds). After preliminary fastening of the patch, the thing is turned over, a damp cloth is placed on top and kept under the iron for 20 seconds. Exposure under a hot iron is repeated 2-3 times, wetting a rag.
Slit pockets wear down at the edges. To repair them, the paper clips on the pockets are stripped off, the bottom frame is unstitched, and the edging is turned onto the front side. Then it is stripped off and the worn edge is cut off. After ironing, the hem is sewn on the lower edges. The seam is ironed out. If the width of the facing is not enough and there is no spare material, then you have to use the fabric from under the bead. For the manufacture of a pocket frame during repair, a pocket flap is often used, without which the thing does not lose its appearance. The sewn edging is wrapped inside the pocket and, covering the edge of the frame, is sewn along the seam line. At the end of the repair, the paper clips are placed along the edges of the pocket, where they were previously. The burlap of the pocket, if it is worn out only in its lower part, is cut to a strong place and again sewn or extended.
The button is sewn on not pulling strongly to the material, but leaving the thread somewhat free. The "stalk" formed in this way must be wrapped several times with thread. This is done so that the loop wraps around the button loosely without pulling. Moreover, the "stalk" should be longer in denser tissue and shorter in light tissue. A button can be sewn to silk without a "stalk", not pulling the thread very tightly. When sewing buttons to outerwear, you need to put a small button or a piece of fabric on the other side - for strength.
The buttons are sewn in places where the fabric is not stretched too much. To position the sewn buttons exactly opposite each other, you must first sew the upper part of the button, make a mark on its head with chalk and press it to the opposite side. The second half of the button is sewn onto the printed place.
If the leather gloves are tight, wrap them in a damp cloth for a few hours, then put them on your hands and dry as they are.
Leather gloves sometimes fade from the inside out and get your hands dirty. Rub talcum powder on the seamy side to keep your hands clean.
To protect the white fur from yellowing, we advise you to store it in a blue bag or case in the summer.
Wear and tear on the elbows can be reduced. This is especially true for jerseys. Sew on the sleeves from the inside out with a piece of light fabric, preferably the same color. Then the lining will be wiped, not the jersey.
Do not hang woolen clothing you have just taken off in your closet. It must first be ventilated, cleaned of dust and only then hung in the closet.
Do not hang clothes on the back of a chair. From this it loses its shape. Coming from the street, immediately hang your coat or dress on a hanger. It is important that they match the shape and size of the garment.Short shoulders will stretch the sleeves, long ones will make dents on them. Dresses with a large neckline slide off any hanger, so the hanger should be covered with fabric.
Wet woolen clothing should not be dried near heating. The fabric loses its natural properties from heat.
Threads for darning in color, thickness and quality should correspond to the fabrics being repaired. They can also be pulled out of the hem at the seams. The darning stitches should be fine and go first along the share thread, and then along the weft (across). With a transverse puncture, the needle is passed under the thread, then over it. At the edges of the darning, the thread is not tightly pulled, so that when shrinking after washing, the threads do not tighten the fabric. The rows of threads should fit snugly against one another. Darning can also be done on a sewing machine with a special device. If the fabric is not frayed through, but only very thinned, the darning is laid along the share, without making cross stitches.
Patches must be of the same material from which the item is sewn, or of a similar quality and color. Before applying the patch, the material must be washed and ironed so that it does not sit down later. The patch is applied to the repaired place, combining the share and weft threads. If the patch is to be placed near the seam, the seam is paired and the patch is inserted with one side into the seam. Then it is swept in and after that, bending the edges, sewn with a blind seam from the front side and from the wrong side. Pull out the outline. On a rectangular patch in all four corners, an oblique incision is made to a depth of 0.5 cm. If the patch is not visible, you can sew it on with a typewriter.
On the diaper fabrics, the patch is applied on top. To do this, the damaged area is outlined, adding 0.5 cm to each side, and the corresponding patch is cut out. Bending the edges inward, sew. On variegated materials, the pattern should match the pattern of the item being repaired.
Damaged areas of any item can be glued with BF-6 glue or other fabric glue. The prepared patch must be moistened, ironed, placed under the damaged area with the face up and through the hole in the fabric, draw around the contour with chalk. The edges of the patch should be 1–2 cm larger than the damaged area. Separately, prepare a patch for the patch, which should be 1–0.5 cm larger than the patch itself along the edge. Apply a little glue to a clean glass and let it dry for 4–6 minutes. With dried glue, smear the damp cloth, the edges of the patch and the patch. The gap between the edges of the damaged item and the edges of the patch is also lubricated with a thin layer of glue, allowed to dry and re-lubricated. The second layer is also allowed to dry, then, applying a patch smeared with glue, they fasten everything with an iron (3-4 seconds). After preliminary fastening of the patch, the thing is turned over, a damp cloth is placed on top and kept under the iron for 20 seconds, then repeated two or three times, wetting the rag.
Fixing sheets and towels... The sheets are often wiped in the middle - they are cut along the lobar thread and both halves are sewn along the edges.
Towels tend to wear out faster at the ends. The towel is cut in the middle and sewn with worn ends. The edges are hemmed.
Blazers and trousers sometimes they require minor repairs: the cuffs of the sleeves and trousers wear out. The sleeve cuffs are repaired as follows: the lining is stripped off and the hem of the sleeve is carefully cut off. The ends of the sleeves and the cut strip are ironed out, the strip is sewn on, then folded over, the lining is sewn on and ironed again. On trousers, the edges are repaired in the same way. If the braid of the trousers is frayed, it is replaced. So that the braid on the bottom of the trousers does not wear out, it can be impregnated with PVA glue.
Lace curtains usually darned, but it takes a long time, and darned places spoil the appearance of the product. Pieces of old curtains, corresponding to the pattern, can be soaked in a starch solution and "glued" to the damaged area of the curtains from the inside out, and then ironed with a hot iron.
Woolen Woven can be repaired as follows: move the edges of the gap as close as possible, take a piece of the same cloth, spread it thickly with egg white and put it under the torn place, and then iron it from the inside out with a hot iron.
Buttons sewn, leaving the thread somewhat free. The "stalk" formed in this way is wrapped with a thread several times (it should be longer on dense fabric and shorter on lightweight). A button can be sewn to silk without a "stalk" by loosely pulling the thread. Sewing buttons to outerwear, put a small button or a piece of fabric on the other side - for strength.
Buttons sewn in places where the fabric is not too tight. To position the sewn buttons exactly opposite each other, first sew the upper part of the button, make a mark on the head with chalk and press it to the opposite side. The second half of the button is sewn into place of the print.
What if the dress has become large (small), its model is tired or outdated, the length is no longer satisfied? Any dress can be altered, giving it a new life and beautifully fitting it ...
 How to sew pants to fit perfectly
 How to sew pants to fit perfectly
If you have lost weight, decided to slightly change the style of your trousers or fit them correctly, then you cannot do without fitting and altering. You can sew any trousers ...
How to patch jeans without anyone noticing it
 How to patch jeans without anyone noticing it
Denim is very durable, but even it wears out quickly and creeps up in places of strong friction. But everything can be easily fixed with hidden or decorative patches ...
Even on satin or silk, a hold is a disaster, and even more so on knitwear. It can be removed from clothing in almost all cases ...
How to store a fur coat in the summer to make it happy and warm in winter
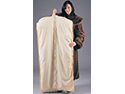 How to store a fur coat in the summer to make it happy and warm in winter
Fur coats made from different types of natural fur have different durability and differ greatly in durability. But the basic recommendations for storage are suitable for almost all fur coats - even mink, even rabbit ...
Improper storage, scuffs or bends of the pile spoil not only the appearance of the fur product, but also knock a woman out of a rut. One consolation - such defects are easy to fix. Moreover, even with your own hands ...
Want to alter your fur coat? Here are some ideas to choose from.
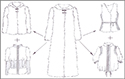 Want to alter your fur coat? Here are some ideas to choose from.
Fur is a very rewarding material, it is easily repaired and altered. Therefore, there are many options for what to alter an old or just boring fur coat. In this case, you can use both the entire product and its individual parts ...
Caring for your leather jacket to make it last long and look like new
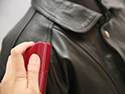 Caring for your leather jacket to make it last long and look like new
Compliance with just a few simple rules will keep your leather jacket from deformation and stains. Caring for leather clothes is one of the most labor-consuming, although it has its own nuances. The main guide is the information on the label ...
How to alter a leather jacket. Turning old into fashion
 How to alter a leather jacket. Turning old into fashion
Even not very experienced dressmakers can make small changes in the leather product, narrow its width or shorten the length. Moreover, you can turn a boring, damaged or out of fashion item into a trendy new thing ...
Skin repair with liquid skin. What you need to know
 Skin repair with liquid skin. What you need to know
Small cuts, scuffs and scratches on leather jackets, coats, skirts, jackets and bags can be easily restored with a special polymer. After repair, the product looks like new and does not lose its durability ...
Regina Kudryavtseva,
Zanevsky prospect, Ladozhskaya metro station
I didn't know what to do with my old fur coat. It's a pity to throw it away, it's already inconvenient to wear and the style is outdated. Although strong. read all reviews
Anastasia B.,
Prospekt testers, metro station "Pionerskaya"
I left for the sea, was late for the airport. Taking documents from her purse, she unsuccessfully pulled the lock. The dog is barely. read all reviews
St. Petersburg, Moskovsky Ave., 137
Shopping center "Electra" (right at the entrance)
from 10.00 to 22.00, without lunch and days off
+7 (812) 449-10-33
St. Petersburg, Zanevsky Ave., 71, building 2
TRK "Zanevsky Cascade - 3" (new complex, ground floor)
from 10.00 to 22.00, without lunch and days off
+7 (812) 384-45-81
Saint Petersburg, Kolomyazhsky Ave., 17, building 1
hypermarket "Karusel" (right entrance, 2nd floor, next to "Brownie")
from 10.00 to 22.00, without lunch and days off
+7 (812) 245-24-50
We draw your attention to the fact that this website is for informational purposes only and under no circumstances is a public offer determined by the provisions of Part 2 of Art. 437 of the Civil Code of the Russian Federation, with the exception of the contract (public offer), which is posted here
For detailed information on the timing and cost of services, please contact the phones indicated on the website.

If you need to spend Clothing repair, then in some cases repair with the help of an adhesive spider web will help you.
This method can be used when you or someone close to you, inadvertently touches, say, with the sleeve of your jacket, on a protruding nail and the fabric is, as it were, cut.
There are no holes as such on the clothes, but there is a cut that spoils the appearance of the product. What is the best way to carry out repairs so that - the product is restored and the appearance is not damaged.
The gluey spider web is what will help you in this case!
You don't need to go far for an example. The sleeve on my husband's jacket is in need of a similar repair.
| Video (click to play). |
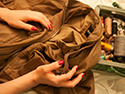
To repair such cuts with the glue method, I usually do this (see photo):
- I am preparing a rectangular piece of fabric suitable for repairing the product, slightly larger than the size of the incision. So that the patch overlaps the incision. (1,2);
- I carefully cut off all protruding threads, give the cut a "decent" look - so that nothing sticks out, the cuts are smooth, beautiful;
- I insert the prepared patch under the incision, as shown in photo 3, 4;
- The incision for further processing is ready! (5);
IMPORTANT: the difficulty is not to move the edges of the cut, but to do it very carefully. To do this, you need to carefully move the iron, not carrying it over the fabric, but raising and lowering the sole.
As you can see - simple, fast and neat! Try it.
Spring is very soon, which means it's time to get jackets and coats out of the closet. But if you are tired of your old coat over the past season, then now is the time to prepare it for spring and remake it into a new stylish thing with your own hands. We have already talked about fashion trends on coats in the spring of 2017, and now let's see how you can bring fashion ideas to life.
Clothing prints are very popular now. This season, designers have presented a variety of coats adorned with floral, abstract and animal prints.
photos from fashion shows for inspiration
If you want to decorate an old coat with a modern animal print, then nothing could be easier. And even special drawing skills are not required.
- acrylic paints for brown, black and green fabrics
You don't even need a brush, you can do it with your fingers! Use your fingers to apply acrylics to your coat or raincoat and let dry. It is better to print not on all coats, but on individual parts that you want to highlight, for example, on the sleeves or lapels.
Military is a huge trend in the fashion world and especially it touched outerwear. It will be very simple to remake an old coat into a fashionable military-style coat, the main thing is to know the main attributes of this style. And they are: large metal buttons, rivets and other metal fittings, lacing, braid and other trimmings.
To remake a military-style coat with your own hands, you will need:
- metal buttons. In the photo in the master class below, the girl suggests simply painting the buttons with gold paint, but this is not necessary, because it is easier to buy buttons made of metal or imitating it. You can choose any metal: gold, silver, copper.
Sew on the new buttons on the coat instead of the old ones. Not all buttons have to be functional, some may have a purely decorative function. Tape the hem of the sleeve. The tape can also be sewn to hem, shoulders or pockets.
Video master class on creating this coat
An old coat can be updated slightly by shortening the sleeve and finishing with a satin flyer hem. How to do this, see the photo below.
Decorating a coat with rhinestones and beads or embroidery on a coat has remained in trends for several seasons in a row. They do not lose their relevance, because they always look beautiful and will decorate any coat.
I bring to your attention two master classes on altering an old coat and decorating it with rhinestones. For this decor you will need rhinestones, which you can buy at any hand-made or fabric store. Rhinestones can be sewn on or glued on. If you do not plan to wash your coat or expose it to other mechanical stress, then adhesive rhinestones are quite suitable for you.
In the first master-lkass, the girl decorated the collar and pocket with large rhinestones.
A very simple way to quickly remake a coat into a new one is to decorate it with lace. Lace can be either contrasting or matching the fabric of the coat. For example, a small master class on decorating coat sleeves with lace. The desired lace pattern is carefully sewn onto the coat by hand.
Long vests and sleeveless coats came into fashion several seasons ago and will continue to stay with us in the coming spring. This coat slims, and is also a great alternative to boring twists and raincoats.
Making such a coat with your own hands is very simple.
- an old jacket or just a fabric matching the lining for processing the armhole of the sleeve
If you do not want to redo an old thing, but you want to get a new one, then neoprene comes to the rescue. This fabric is very easy to work with, does not fringe and at the same time keeps its shape perfectly, so even those who have never held a needle in their hands can sew a coat from it. It will take a little time for such a coat, but the result will please. Choose neoprene in the colors that are relevant this spring, the girl in the photo chose pink and was not mistaken.
Open your coat. Any item of yours will do for a pattern.
Sew the seams. Since you are working with neoprene, you do not need to trim the edges.
And the last fashionable trick for today regarding coat decor is the collar. If you don't want to sew and glue anything, but you want to renew your coat, then just buy a fur collar. These collars are not only in fashion this season, they can also give a completely new look to your coat. Miniature collars (boas) or voluminous fur collars are in fashion. Such an acquisition will not hit the budget either, because artificial fur is in fashion.
Do you like our site? Join or subscribe (notifications about new topics will be sent to the mail) to our channel in Mirtesen!
No matter how many clothes requiring repair fall into my hands, I am convinced that everything is ingenious and simple! 
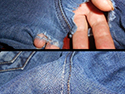
That's how it turned out this time. A neighbor-client brings an autumn jacket, asks to come up with some kind of patch.
It, of course, only seems (to her!) That there is only a patch, and there is nothing complicated about it.
Here in the photo you can see, a shred was torn out from the side, the collar, by the way, was also in a shabby condition. And the whole jacket seemed to me somehow faded or something.
Well, what kind of "patch" can we talk about ?! And I will probably never learn to say the word “NO”!
I began to think. 
The application cannot be glued, since she is an adult girl, especially somewhere in the kidney area.  The embroidery is the same.
 What remains is what I love the most - to tie everything that I don't like!

I imposed these details to emphasize the texture, let's say, to give some kind of harmony and even zest.
And that's what I got.
The trims accentuate the waist and slim the barrel!
And everything seems to be simple, but there are some nuances: I had to dissolve my daughter's sweater-noodles, and then knit with thin knitting needles.
But the saddest thing is when She came, i.e.client, and I suddenly began to stutter, mumble, and in the end I could not even pronounce the price!
By the way, I am an unemployed girl, but she is a “worker”, and she looked me in the eye like that, and I halved the price, and, moreover, for 2 months, because she has a loan!
And I have it, the loan, as if I do not!
But I'm an optimistic girl! 
I love my "golden" hands and my ideas! And even though everyone scolded me so much, scolded me so much that I will never earn money, I do not despair!
I will definitely write about a cardigan made of old sweaters!

Repair of ripped seams... If the side seam on a coat, jacket, jacket is ripped open, the side seam of the lining is ripped off. If the seam is ripped apart by 2.5 - 3.5 centimeters, it is sewn by hand with line stitches; with a length of more than 3.5 centimeters, the parts are first swept away, carefully aligning the edges, and
sewn on the machine so that the line exactly continues the old line. After removing the basting, the seam is ironed out, the floor lining is straightened and attached to the side seam of the top, the back lining is sewn to the floor lining with blind stitches by hand.
When repairing the seam of the armhole in the destroyed area, the sleeve lining is stripped from the seam of the armhole and the sleeve is sewn to the edge of the armhole so that its fit is even. The set-in section of the sleeve is sewn to the edge of the armhole by hand, with line stitches. They should exactly continue the old line. The frequency of stitches is 4 - 5 per 1 centimeter of a line. Then carefully straighten the back lining and floor along the edge of the armhole and attach it with marking stitches to the seam of the armhole. The seam is tightly ironed to smooth out the bruises. After that, the sleeve lining is straightened and sewn to the seam of the armhole with secret stitches.
Lining seams are sewn with blind hem stitches. If the seam holding the lining to the bottom of the product is being repaired, then the bottom is first cleaned from the inside out of dust, and then the lining is sewn on.
Repair of the lining at the edge of the sleeves. When starting to repair the bottom of the sleeves, the lining is attached to the upper part of the sleeve, at the elbow level, and then the lining is stripped off from the bottom of the sleeve.
The worn part of the lining is cut off by 10 - 12 centimeters. The seams on the cut parts are ripped open. Along these parts, the lining is cut out a new one, the same shape, or each seam making an allowance of 2 centimeters.
New parts of the lining are alternately stitched to the lining of the upper and lower halves of the sleeve with a seam 1 cm wide. Stitching seams iron and grind the front and elbow edges in new areas of the lining. The seams in these areas should be an exact continuation of the old stitches in both width and direction.
The seams are ironed towards the upper half, while bending the edges along the line of the line. The repaired lining is attached to the elbow seam of the sleeve. The lining is straightened inside the sleeve. Sew to the bottom of the sleeves 5 - 7 cm from the edge and sew with blind hem stitches.
The repaired sleeve is ironed and steamed.
Repair of the bottom of the trousers... If the tape sewn to the edges of the trousers has worn out, it is replaced with a new one. Pull back the old braid, carefully clean the edges of the trousers from dust and thread ends. The new braid is laid along the bottom of the trousers so that it is thicker, the edge protrudes 1 - 2 millimeters from under the bottom of the trousers. The tape is sewn with hemming stitches at both edges.
In some cases, instead of a special tape, a strip of cotton fabric 2 - 3 centimeters wide can be sewn to the bottom of the trousers.
The cuffs of the trousers are repaired as follows. First, the entire folded edge of the bottom of the trousers is stripped off. They clean it from dust, threads and iron it tightly. Worn areas with open holes are plastered. After stitching, the seams are pressed tightly again. Draw a new line for the hem of the trousers. It should go 3 to 5 millimeters above the seam of the piece. Along the new line, the hem of the bottom of the trousers is folded inside out, swept out, sewn by hand and ironed tightly. After that, a special tape or strip of cotton fabric is sewn to the edge of the bottom of the trousers. Iron the bottom tightly, and then iron and steam the whole thing.
Repair of woolen and woolen products. The rubbed fabric (drape, broadcloth, wool) is darned from the inside out, the thread in thickness and color must match the fabric. It is best to pull it out from the edge of the same product.
When darning, the stitches are positioned so that they approximately coincide with the direction of the fabric threads, that is, they continue them in the place where they are torn or worn out.
In those cases when the cloth is torn, it is stitched: somewhere on the edge of the product, the thread is pulled out and both edges of the torn product are sewn with it; the needle should not be pierced through, but by grasping half the thickness of the fabric. You can discreetly insert patches on woolen things with gizmos. For strength, a piece of silk is hemmed from the inside out, slightly larger than the patch. When sewing, care must be taken not to pierce through the material.
It is better to sew patches for woolen products in a quadrangular shape. To do this, cut the torn places, make cuts in the corners, select the appropriate patch fabric, the size of which should be half a centimeter larger than the hole, sweep the patch and grind it down on a machine or on hands. The seam is smoothed on both sides. The corners of the patch are cut to avoid creases.
If you need to spend Clothing repair, then in some cases repair with the help of an adhesive spider web will help you.
This method can be used when you or someone close to you, inadvertently touches, say, with the sleeve of your jacket, on a protruding nail and the fabric is, as it were, cut.
There are no holes as such on the clothes, but there is a cut that spoils the appearance of the product. What is the best way to carry out repairs so that - the product is restored and the appearance is not damaged.
The gluey spider web is what will help you in this case!
You don't need to go far for an example. The sleeve on my husband's jacket is in need of a similar repair.
To repair such cuts with the glue method, I usually do this (see photo):
- I am preparing a rectangular piece of fabric suitable for repairing the product, slightly larger than the size of the incision. So that the patch overlaps the incision. (1,2);
- I carefully cut off all protruding threads, give the cut a "decent" look - so that nothing sticks out, the cuts are smooth, beautiful;
- I insert the prepared patch under the incision, as shown in photo 3, 4;
- The incision for further processing is ready! (5);
IMPORTANT: the difficulty is not to move the edges of the cut, but to do it very carefully. To do this, you need to carefully move the iron, not carrying it over the fabric, but raising and lowering the sole.
As you can see - simple, fast and neat! Try it.
- My works and photos (66)
- HOME AND FAMILY (806)
- Children are our happiness (61)
- Helpful Tips (4)
- For kids, crafts with kids (182)
- home economics (271)
- travel (160)
- feng shui, psychology, spirituality (114)
- All about beauty and health (758)
- for weight loss, diet (80)
- health, traditional medicine (305)
- beauty recipes for face (175)
- hair care (75)
- hand and foot care (85)
- FOR HOME - handmade (2510)
- lampshades, bedside lamps, lamps (125)
- Vases, pots, baskets (240)
- wreaths (182)
- interior design (297)
- cardboard furniture (30)
- DIY furniture (152)
- Miniatures (20)
- mosaic (66)
- panels, frames, mirrors (252)
- crafts, interior decoration (554)
- bedspreads, curtains, rugs (379)
- renovation, decoration of premises (54)
- DIY CANDLES. Decor (56)
- DIY topiary (132)
- Floristry (104)
- Fashion & Style (305)
- FOR COTTAGE AND GARDEN handmade (371)
- Wooden furniture and buildings (79)
- indoor, garden plants (90)
- Garden figures and sculptures (62)
- construction in the country (50)
- handmade for Garden and Cottage (97)
- HANDMADE from simple materials (1166)
- CARDBOARD HANDMADE (227)
- from waste material (260)
- from branches, snags, birch bark (90)
- wine cork (16)
- pebbles and stones (28)
- from coffee beans (75)
- from corn leaves, talash (10)
- from light bulbs (16)
- zipper (27)
- from sticks, honey. spatulas (41)
- food (56)
- from plastic bottles (110)
- natural materials (102)
- button (28)
- from shells and coral (21)
- pumpkin and seeds (17)
- cones and acorns (44)
- from egg trays (32)
- nuts, seeds and pistachios (18)
- PAPER HANDMADE (1021)
- corrugated paper, napkins (86)
- boxes, baskets, panels (218)
- coffee filters (17)
- sheet music, book pages (112)
- origami, kusudama, quilling (177)
- papier mache (108)
- Paper Art (8)
- scrapbooking, pergamono (110)
- Paper FLOWERS (285)
- Corrugated and crepe paper flowers (119)
- VINTAGE (611)
- vintage pictures, prints (54)
- Vintage hand-made (318)
- burlap, jute, twine (261)
- prints on furniture, pillows (58)
- Shabby chic (49)
- EMBROIDERY (699)
- beadwork, sequins (10)
- satin stitch embroidery, cutwork (64)
- children's embroidery (65)
- carpet embroidery (50)
- cross stitch, patterns (405)
- ribbon embroidery (77)
- three-dimensional embroidery (22)
- plastic canvas (20)
- Useful for embroidery (41)
- KNITTING (2721)
- vases, baskets, sachets (75)
- knitting for children (215)
- knitting for men (45)
- knitting from bags (21)
- knitting. toys (218)
- knitted little things, crafts (208)
- knitted jewelry, accessories (121)
- jackets, cardigans, vests (261)
- magazines, knitting books (45)
- crochet rugs, ottomans (129)
- blouses, pullovers, jumpers (230)
- socks, slippers, knitted shoes (77)
- dresses, tunics, coats (140)
- Plaids, pillows, bedspreads (189)
- napkins, coasters (144)
- Crochet tablecloths (46)
- bags, wallets, cosmetic bags (175)
- tops, sundresses, swimwear (113)
- patterns, technique, utility (176)
- sirloin, combined (45)
- flowers crochet and knitting (144)
- Hats, shawls, scarves, snoods (202)
- skirts, shorts, trousers (44)
- DECOUPAGE (515)
- decoration (323)
- decoupage on fabric (34)
- volumetric decoupage (39)
- dot painting (12)
- stencils, templates, pictures (152)
- egg crackle (27)
- TOYS, DOLLs handmade (1023)
- Felting toys (38)
- toys, felt crafts (158)
- coffee toys, crafts (71)
- dolls from nylon, from socks (107)
- textile dolls, Tilda (182)
- soft, textile toys (282)
- Christmas toys (36)
- Crafts, toys for children (206)
- COOKERY recipes (1511)
- chicken dishes (48)
- fish dishes (41)
- in a multicooker and microwave (29)
- preserves, jams (36)
- sweet pastries (185)
- Georgian, Caucasian cuisine (124)
- roast (41)
- appetizer, main courses (122)
- zucchini, eggplant (62)
- carving (31)
- sweets, cookies, desserts (93)
- culinary benefits (149)
- meat dishes (36)
- drinks (51)
- pies, pasties, pancakes (54)
- pizza, pies, khachapuri (139)
- salads recipes with photos (148)
- pickles, preparations for the winter (104)
- soups, liquid dishes (39)
- cakes (104)
- fruit cakes (51)
- decoration of cakes, salads (80)
- MODEL (709)
- plaster, clay (58)
- marzipan, mastic (143)
- plastic, polymer clay (298)
- salted dough (190)
- cold porcelain (210)
- MASTER CLASS / Tutorial (5221)
- NEWSPAPER WEAVING (712)
- Weaving from newspapers. MK (643)
- weaving from newspapers.ideas (72)
- HOLIDAYS, crafts and gifts (1938)
- Bouquets and gifts of candies (70)
- paper in gifts decoration (90)
- fancy gifts (73)
- New Year Christmas (853)
- Handmade Postcards (37)
- Easter (412)
- Gifts for lovers (166)
- Gifts for Women (89)
- Gifts for Men (20)
- wedding (147)
- Halloween - Halloween (92)
- NEEDLEWORK. TECHNICIANS (1652)
- Accessories, handmade jewelry (467)
- different techniques (15)
- felting (28)
- decor items (383)
- decor, shoe decoration (19)
- decorative bottles (84)
- leather (60)
- kinusaiga, needleless patchwork (33)
- books, magazines on needlework (82)
- DIY SOAP. Decor (22)
- painting (30)
- painting on fabric (29)
- painting objects (119)
- flowers from nylon (22)
- flowers from ribbons, flowers from fabric (480)
- Technics: WEAVING (286)
- beading. jewelry (94)
- Tapestry, Isothread, Tenerife (26)
- macrame tatting (71)
- beaded flowers and trees (84)
- USEFULNESS (217)
- earnings on the Internet (48)
- pictures for diary (26)
- Lyru (80)
- useful programs, links (91)
- Website powered by WordPress (3)
- SEWING (1637)
- Denim Ideas (111)
- Needle cushions (76)
- T-shirt (55)
- baskets, plates, vases (98)
- shoes, slippers (79)
- alteration of clothes (187)
- pillows, pillowcases, ottomans (174)
- utility for sewing (76)
- patchwork, patchwork (331)
- bags, wallets, cosmetic bags (304)
- sewing for children (188)
- sewing for animals (23)
- sewing. skirts (22)
- we sew ourselves (495)
- It's interesting (965)
- cars (22)
- for soul, prayer (7)
- online shopping (277)
- beautiful photos, pictures, painting (56)
- unbelievable but true (7)
- useful services, sites (452)
- funny (68)
- I. Miscellaneous (92)
- video, clips, music, films (78)
- Songs for the soul (30)
- Wishlist and wishlist (7)
Selected rubric alteration of clothes.


Good afternoon. Below is the work that I had on my computer. I don’t know from whom I found it. I didn't have a diary then. Maybe the hostess will respond? I will be happy to indicate the authorship. It is all tied up from unnecessary T-shirts and shirts. Below is a master class on slippers
How to make leather shoe jewelry
Gathered for a rock party or student get-together? Don't have the right shoes for your look? Don't despair - our master class will tell you how to make leather jewelry for shoes in 30 minutes.
You will need: a piece of leather (leatherette or dermantine) of any color, measuring 20 * 30 cm, scissors, a ruler, a pencil, universal glue (be sure to read what materials the glue is used for, it should be written about the leather and leatherette), jewelry steel fastener colors, thread, needle.
Good day! I probably will soon have to rename my diary from “Vdohnovlyalochka” to “Plyushkino” or to “Nevybrosalochka” :)))) This is the only topic that interests me most). I suggest that you collect all the old T-shirts, if you still have them, there are many ideas for using them. I propose to sew or cut such string bags. I would not dare to walk around the city with such, but hanging with apples or garlic in the kitchen or in the pantry is a very tempting idea. See the photo master class under the cut. By the way, the string bag can be crocheted if the T-shirts are still worn)


