РџРѕ состоСРЅРёСЋ РЅР ° СЃРµРіРѕРґРЅСЏС € РЅРёР№ день РјР ° С € РёРЅР ° уже СѓСЃРїРµС € РІСРѕ Рї °РРµРР ° С € РІСРѕ Рї °РРµРР ° С € РІСРѕ Рї °РРµРР ° С € РІСРѕ Рї °РРµРР ° С € РІСРѕ Рї °РРµРР ° С € РІСРѕ Рї °РРІРР ° С € РІСРѕ Рї °РРµРР ° С € РІСРѕ Рї °РѕРµРР ° С € РІСРѕ Рї °РРµРР ° C P 'SЃRІSЏR · Ryo SЃ SЃRoR "SЊRЅS <Rј SЂR ° SЃS,SЏR¶RμRЅRoRμRј RїSЂRѕS † RμSЃSЃR RІRѕ RІSЂRμRјRμRЅRo ° C ... SЂRѕRЅRoRєR ° RѕS ‡ RμRЅSЊ RѕS,SЂS <RІRoSЃS,R ° SЏ RїRѕR" SѓS ‡ Röhr "P ° SЃSЊ ...
GAZ "Volga" cars are the oldest passenger cars, popular during the Soviet Union and the first years of perestroika. The last Volga car rolled off the assembly line in 2010, halting the development history of this line of middle class cars.
However, these "old" cars are still popular with their loyal fans. Some models, in particular the Volga GAZ-24, received the status of exclusive retro cars, and cars from the latest series are still successfully operated by their owners. Therefore, the topic of maintenance and repair of the Volga has not lost its popularity either.
The Volga car belongs to the cars, the repair of which is not always possible to carry out on your own. Therefore, it is advisable to start work only if you have experience and a suitable tool or contact professional masters for GAZ "Volga".
Considering the average age of "running" cars, the following can be distinguished among the typical malfunctions:
This list is due to both the design features of cars and the operating conditions, including the condition of the roads, the quality of gasoline and the use of anti-ice reagents.
Depending on the specific model and year of manufacture of the car, the list of basic faults, of course, may vary, but the above ones are the most typical.
originally had a paintwork that practically did not provide protection against corrosive processes, therefore, most cars require body restoration work.
It should be noted that updating the Volga's body, however, like any other car, is best done immediately after finding problem areas in order to exclude further spread of corrosion and minimize financial costs.
The most vulnerable place in the Volga's suspension is the rear axle gearbox, which is subjected to significant loads during operation.
Signs of the necessary repair of this unit are the noises appearing in the gearbox when driving. Depending on their nature, you can carry out a preliminary diagnosis of malfunctions. The most common parts requiring replacement are the following:
During operation, the fastening nuts of the connection of the parts are loosened, which also causes additional noise and premature wear.
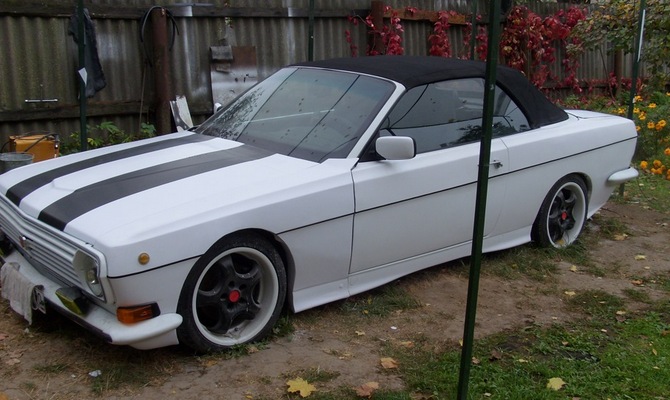
Tuning GAZ 24 is a very exciting and educational process. The time for this activity flies by unnoticed.
This car is already a real legend. The model came off the assembly line of the Gorky Automobile Plant in the last century. The model is also known under the name "Volga". As before, this car is very relevant today, especially in the field of tuning. Today on the roads of our country you can see real masterpieces of tuning art. Among them, the modified GAZ 24 are often "caught". This should not be too surprising. From time to time "old" models need to be updated, to give them a second wind.
GAZ 24, better known as "Volga", is one of the main symbols of the Soviet era. However, times change, and today even a symbol can be reworked beyond recognition. Such tuning, in many respects, is focused precisely on modernizing the car, and not on preserving the retro style. The modern world dictates its own conditions and, in accordance with such requirements, modernization is carried out for both the GAZ 24 and the tuning of the GAZ 3110. In order for the revision of the "Volga" to be successful, it is better to choose a copy of the car that could survive to this day in a more or less satisfactory condition.
The most commonly used and, at the same time, quality materials are velor, leather and alcantara. Without a doubt, the leather interior will always be a symbol of luxury and respectability. However, in addition to aesthetic functions, "skin" also has practicality.
It does not require complex care; it retains a great appearance for a long time (with proper care). As for Alcantara, it should be noted that its appearance resembles suede and is, today, the most suitable artificial material. It is resistant to abrasion, elastic and pleasant to touch.
An unlimited number of colors is another plus of Alcantara. Regarding velor, it should be noted that it is a material that is pleasant to the touch (like Alcantara) and is cheaper than leather, its main drawback is its rapid pollution.
Now let's move on directly to tuning, or rather to replacing the skin. To do this, let's turn to the seats. To begin with, they will have to be dismantled from the passenger compartment. After that, you need to remove the old skin. The foam underneath should be replaced with new material. Only you choose the material.
It all depends on the cost and your financial capabilities. Better to replace the shock-absorbing elements of the seats. To change the old upholstery, you need to open it and make the patterns for the new upholstery on it. You can sew upholstery elements with your own hands or, if you have the means, you can give them to the workshop. We have given the characteristics of each upholstery material above.
For a high-quality full-fledged tuning, these elements will have to be replaced or updated without fail. For doors, the same velor is perfect, relative to the floor and ceiling - here everything is up to you. It is recommended to cover the floor with a carpet of discreet colors (dark gray).
This material is very hard-wearing and will last you long enough on the car floor. As for the ceiling, it is better to use velor for it. This creates a truly aesthetic appearance. In a situation with door inserts, everything must be done in the same way as in a situation with seats. It is necessary to remove old elements, form patterns, cut new elements, and mount them in place.
The GAZ 24 dashboard, like any other car always, provides the driver with all the necessary information online about the operation of the vehicle. Sometimes tuning enthusiasts overload the dashboard too often with unnecessary instruments and meters. However, more often than not, the panel is completed with really necessary additional devices that are best suited both for their intended purpose and from a practical point of view.
Additional devices that are installed on the panel can be conditionally subdivided into the following two groups: meters and processors. While the purpose of the first group is clear from its name, the situation with processors is somewhat different. Among other things, they are the ones who control certain auto systems.
Additional devices are very important to the driver. Of course, the driver receives the minimum necessary set of information from the factory instruments, but in order to use the car to its maximum potential, you should have something more. In such a situation, it is important to know exactly the real performance of components and assemblies.
The simplest and most popular are dial gauges. These are understandable devices. Their design is varied - electrical (digital) and mechanical (analog). The first group is, of course, more convenient to use. Most often, they are combined into a single network, which is controlled by a single controller-dispatcher.
Such a system is highly informative in comparison with individual mechanical instrumentation. Electronic accessories dominate the automotive electronics market today. Today's electronics offer a variety of compact LCDs for consumer choice that accommodate many meter options.
This is very convenient, since all the necessary information is displayed on one display and you do not need to shake your head looking at dozens of dials. It should be noted that the price of electronics and mechanics has now almost leveled off. Such a compact display can be attached directly to the dashboard of the car, right in front of the driver, in such a place that it is most comfortable for him to read information from it.
Volga cars are equipped with four-stroke four-cylinder carburetor engines of two modifications (complete set in the photo). The differences between these engines are in the compression ratio. For the 24D engine, AI-93 gasoline is needed, and for the 2401 engine, A-76 is needed. Since the motors are not very modern, and you always want to increase the power, you have to go to some tricks.
Chip tuning GAZ 24 in this situation is impossible, since there is no computer in this model. Therefore, we turn to tuning the GAZ 24 engine. First, you will have to turn the carburetors 180 degrees. This is necessary to reduce the leverage of the system. At the same time, the throttle of the first chamber will be the intake valve.
It is important to fully synchronize the operation of the two carburettors. There are no specific tips and tricks on this matter, so everything will have to be done empirically. After completing all the procedures, the machine will be transformed. The power will increase significantly. The result may be such that in fourth gear, the engine will accelerate the car to a speed of 150 km per hour without any problems. Thus, the potential of this power plant is enormous.
VIDEO
At the first stage - preparatory - you need to choose from the cabin all the elements that are only being dismantled: seats, floor and carpet coverings, threshold pads.
Second phase. At this "step", you should carefully look at the entire internal body part, you cannot miss a rusty or rotten place. In a situation, if you find it, you should proceed to the stage of cleaning and processing this place with anti-corrosion grease.
The front fenders are being dismantled.
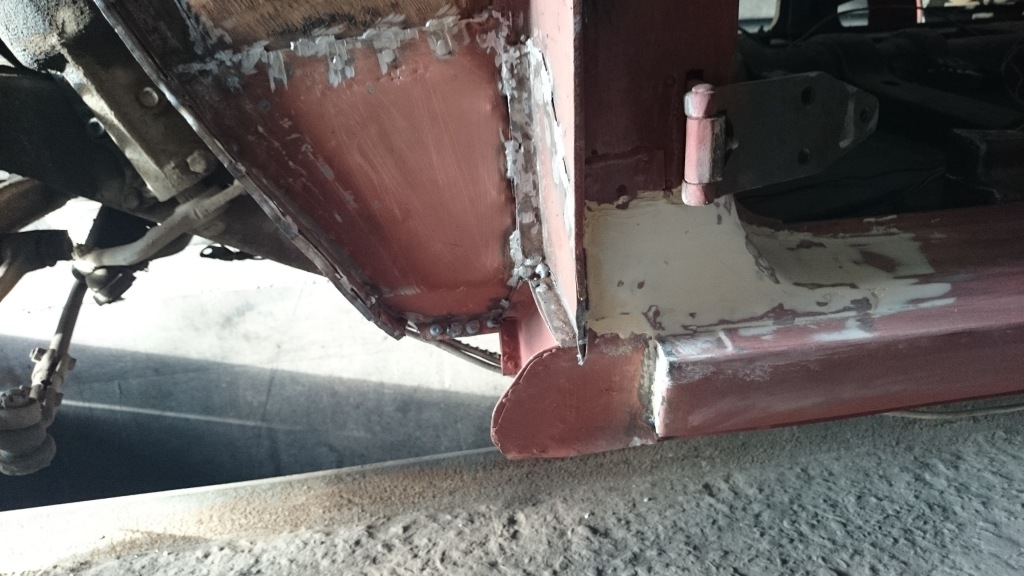
To install the thresholds, you will need to purchase two types of chisels: wide and narrow. We will use it to remove the threshold, which is located outside the body, or rather, along the rubber door seal. Then you should clean everything that is close to the inner rib. If the body kits are not installed en masse, then the chisel can be made from an old spring or a plane.
It is necessary to carefully examine the internal thresholds and, as a result, decide whether to leave them (update) or change them. If the body kits are in good condition, you can simply treat them with phosphate, and then, after half an hour, rinse with water. When the thresholds are dry, they should be degreased and treated with anti-gravel liquid.
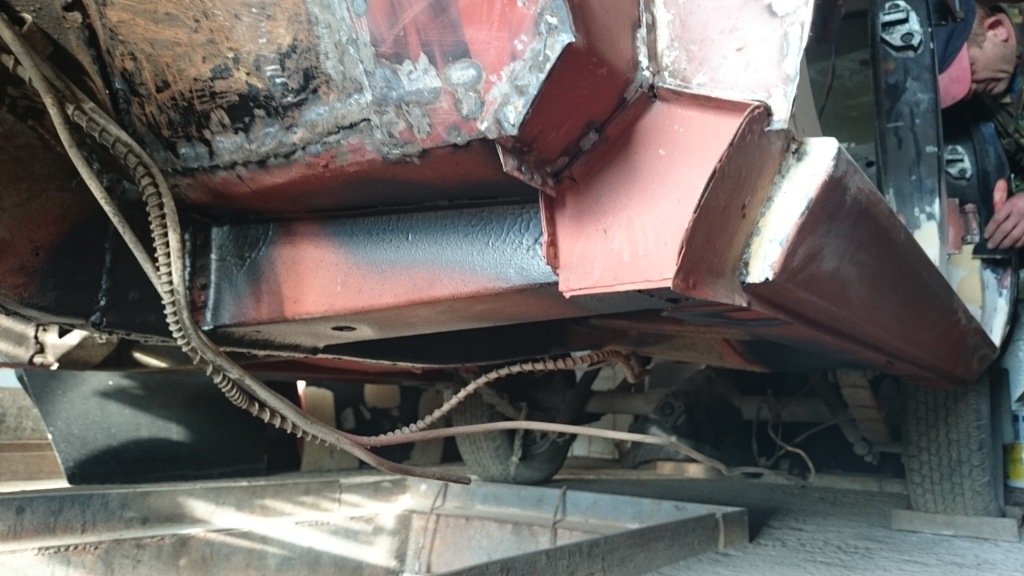
This stage is carried out if it is necessary to change the thresholds. In such a situation, you should put the car on the brake and turn it on to first speed. Then you need to fix the wheels in one position using locking shoes. When you are confident that the wheels will remain motionless in any situation, you can cut the threshold and drill holes in it for welding. Then we set the internal thresholds. After that, it's time to purchase plastic thresholds.
To continue working, you need to fold the thresholds, and then secure them with a clamp. With a drill, it is necessary to drill holes along the weld seam, each at a distance of ten centimeters. The whole process requires precision and accuracy.
We attach plastic sills to the body. We treat them with anti-gravel liquid, then carefully prime and paint.
You cannot remove the right and left body kits at the same time, because the machine will skew and it will be impossible to assemble it. It is necessary to close all the glass windows, and the parts that are near the thresholds should be pasted over with paper tape. In this case, they will not deteriorate during operation. It is imperative to use a primer and anti-gravel liquid. As a result, if you follow all the recommendations, the thresholds can be replaced without any problems with your own hands.
The quality of domestic roads is familiar to all motorists. Rims suffer from pits and other types of irregularities, in many respects. Therefore, in this article, we will try to view all the pros and cons of alloy wheels on the GAZ 24, and also try to choose the most acceptable ones for tuning. (The photo also shows the elements of 3 d tuning).
What are the advantages of alloy wheels? To begin with, there are two types of them: light alloy and forged. Light-alloy ones can add softness to the car while driving, they also add dynamics. At the same time, the ductility of the forged discs provides them with a longer service life.
type of braking system;
manufacturer (you can choose options from domestic or foreign manufacturers). However, it should be noted that domestic disks are presented in a larger assortment, and they are also easier to maintain. But, the final choice is yours. Constant care and some transformations in the exterior of the car (for example, changing disks to alloy wheels) can add personality to the car, they will also delight their owners with positive changes in dynamics.
The bumper is one of the most important tuning elements. This is a part that is often damaged. Previously, plastic bumpers for the GAZ 24 were intended for practical functions. However, today they also perform aesthetic functions. In the process of their production, different types of plastic are used, which, it should be noted, are not very easy to repair.
Welding. With its help, plastic bumpers are repaired, filling dents and cracks at an appropriate temperature - 350-600 degrees;
Bonding (if the plastic does not withstand high temperatures);
Trim-Fix technology. Special compounds and reinforcing mesh are used.
In appearance, it is impossible to determine what material was used during the tuning of the GAZ 24 bumpers. There are different alloys of plastic and plastics, by which parts are marked:
PP - polypropylene;
PAG6 - hard plastic;
PUR - polyurethane
Fiberglass bumpers - they have no markings.
Refinement of the plastic bumper, in case of a breakdown, must begin with cleaning from paint (if it is painted) and dirt, and then, depending on the material from which the bumper is made, produce:
gluing with epoxy compositions, if the bumper is made of fragile or hard plastic;
flooding - if made of a soft type of plastics.
To make the repair of the plastic bumper the most effective, and also not to damage the general tuning, special electrodes are used for welding. They are made of the same material as the bumper. Repair work starts from the inside of the bumpers.If, after repair, it is necessary to give the bumper the same color as that of the car, you need to carry out an additional procedure for choosing a paint.
ChipsAway technology will help you choose paint with an approximation of up to 100 percent. It has more than 58 thousand shades at its disposal.
Engines for the Volga were produced by the Zavolzhsky Motor Plant. If you do not take into account ZMZ 21 and its modifications, then, in fact, power units marked 402, 405 and 406 were installed on passenger GAZ cars. There were both carburetor and injection versions. Motors are quite simple in design, and therefore do-it-yourself engine repairs are carried out without problems, which is what motorists do.
As already mentioned, the Volga engine had several options and markings. The most successful and successful is the injection version of the 406 16-valve engine. Although, all options, with decent maintenance and care, will serve their owners for a long time.
Consider the main technical characteristics of all three power units:
Technical characteristics of ZMZ 402:
Technical characteristics of the ZMZ 406 engine:
Repair of the legendary carburetor engine ZMZ 402 is quite simple. So, the engine is dismantled from the car and disassembled. In this case, the cylinder head is removed, which, most likely, has worn out valves, guide bushings, seats and valve stem seals. If there is deformation or deflection of the body, it is necessary to grind the plane.
But, often, the main problem is the corrosion of the aluminum cylinder head, since the operation is carried out on tap water.
The cylinder block of the Volga engine goes through the boring-honing stage. So, often the piston group cannot be repaired, due to heavy wear, and the assembly is linened under the standard size - 92.0 mm. But, there are also repair options for pistons - 92.5 mm, 93.0 mm.
The crankshaft groove is carried out for the following liner sizes: 0.25, 0.5, 0.75, 1.0 and 1.25 mm. But as practice shows, the last size for boring the crankshaft becomes 1.0 mm. When boring to large sizes, there is a high probability that the part will break under load.
Also, often, engine repair is accompanied by the change of the following parts:
Oil pump.
Water pump.
Spark plug.
High voltage wires.
Other parts that are out of order.
It is imperative to clean and install a carburetor repair kit. After assembling the power unit and installing the injection, it is necessary to adjust the flow and ignition.
Since the 405 and 406 engines were produced with different injection options, it is necessary to consider repairs separately for the carburetor and injector. So, consider, the basic operations are necessary when repairing the Volga engine.
The carburetor versions of the 405th and 406th are repaired by analogs with the 402th. The difference is that this "classic" version of the motor has an 8-valve system, while these two have a 16-valve system. Structurally, the ignition system is very different. Of course, the parts have a slightly different location and appearance, but this does not change the principle of repair.
The 406th engine has a piston group size of 92.0 mm, as in the 402nd ICE. But already in the 405th, standard pistons have a diameter of 95.5 mm. In this case, the dimensions of the repair options are 96.0 mm and 96.5 mm.
With an injection engine, not everything is as simple as it seems at first glance. So, the first problem that will have to be faced is the presence of "complex Volgovskaya electronics", which must be disconnected and connected after the repair. Dismantling the head of the block will require some knowledge in the design of the injection power unit.
The groove of the crankshaft has the same dimensions of the liners as in the carburetor "classic" engine ZMZ 402 - 0.25, 0.5, 0.75, 1.0 and 1.25 mm. As for the cylinder block, everything is a little more complicated, and the boring should be entrusted to the professionals in the car service.
Since engine repair will require changing almost all components, do not forget about changing the repair kit for the gas distribution mechanism, as well as the water pump. As practice shows, in 90% of cases, such an important knot as the clutch also changes.
It is worth remembering that after grooving the crankshaft and installing a new clutch, the unit must be balanced to avoid wear.
After a major overhaul, without fail, after 2500-3000 km of run, it is necessary to change the oil, since at the time of running-in it loses its properties. Further maintenance is carried out after 12-15 thousand kilometers.
The Volga engine is one of the most maintainable, and can also be easily restored with your own hands. This is proved by the long-term practice of many motorists. The order of operations is standard, from disassembly to boring and honing. But, novice motorists should refrain from independent such work, since there are many subtleties and nuances.
VIDEO
The mechanics of our car service are able to restore the appearance of an old car to an ideal state. The body shop of the Auto Captain service employs professionals who know all the nuances of repair and high-quality car painting, are provided with the latest equipment and warehouse stocks of car enamels. An example is the "Volga GAZ 24" (manufactured in 1987), repaired in our car service.
Vehicle make and model: GAZ-24 VolgaProduction year: 1987Color: beigeMileage: 160 thousand kmAcceptance date: 555Repair terms: 22 daysReinforcement works - RUB 58,000 (60 h)
Putty - RUB 40,000 (45 h)
Primer - RUB 15,000 (20 h)
Painting - (5 h)
Polishing - (8 h)
And much more
Two wings - RUB 6,000
Front door - 2000 RUB
Putty - (5 kg)
Primer MIPA Acrylfiller HS 4 + 1 - (4 kg)
Paint - (4 kg)
Varnish U-Pol - (4 kg)
Polishing paste 3M
The Volga entered service in its standard form for this age - deplorable. We completely rebuilt the body and installed a remanufactured Jaguar interior.
Other photographs of the work not included in the narrative. Below you can read in detail the description of the sequence of the repair process. You will see how our craftsmen have breathed new life into the old body.
Despite the age of thirty, "Volga GAZ 24" arrived for auto repair on its own, in a working condition. The owner of the "Volga" decided to replace the bumpers, headlights and radiator grill, rear brake lights, so the mechanics immediately dismantled these elements.
A thorough examination of the body showed that there are no foci of rust, cracks, large dents on the metal of the roof, three doors, the hood, and the trunk lid, but there are a lot of small chips and paint scuffs. The photo shows chips on the hood, a curved front edge of the lid, and edge defects. No damage was found to the internal surfaces, frame, reinforcements, spars, stiffeners.
Significant foci of rust were found on the underside of all (front and rear) fenders. The driver's door of the car is also rotten along the lower edge. The repair of these parts by the master, together with the owner, was recognized as inexpedient. For replacement, we found and bought fenders and a door in fair condition during disassembly.
Such repairs required a complete repainting. Together with the owner of the car, the craftsmen decided not to restore the "native" light beige color, which had faded badly. For replacement, the owner of "Volga" chose a more expressive and fashionable color.
Dismantling the fenders and doors required a large amount of reinforcement work (cutting off the welding of the rear fenders, disassembling the internal mechanisms of the door). After dismantling, the parts from disassembly were installed on temporary fasteners.
After washing the car, cleaning chips, scuffs, bloated paint, dents and creases on the hood, trunk, doors of the Volga were repaired. For this, the method of spotter drawing and manual straightening were used.The spotter drawing technology applies (after stripping the fold to bare metal) a temporary welding of the drawing element (shaped wire), deformation correction using a reverse hammer. Hooks and supports were used to manually straighten dents on the embossed elements.
When straightening the parts, the car service technicians repaired the factory air pockets on the rear pillars. A large amount of work required sharpening the body reliefs on the doors, fenders and rear pillars. In total, 60 hours were spent on the tin work. After fitting, the rear fenders were welded into place.
Local painting of parts was not performed, since a complete repainting of the body was to be done. The rest of the body defects were cleaned up and filled with a thin layer of putty, which was sanded with a Festool sander (using emery wheels) and manually. The putty operations required the use of five kilograms of Car Sistem putty. Putty and sanding took 45 hours of working time.
With manual fine-tuning of grinding, small irregularities are not visible to a direct glance, therefore, the smoothness of the surface is checked by viewing the work from different angles (back and front).
Before painting, the entire body of the Volga was covered with a thin layer of primer, which was sanded with a fine sandpaper. The craftsmen used MIPA Acrylfiller primer (4 kilograms), which were applied with a SATA primer gun. The primer (along with drying and sanding) took 20 hours.
Before the first painting, all glasses were covered with plastic wrap fixed with special tape. In the photo you see the car, completely ready for the first painting.
The quality of the bodywork, sanding, and primer is clearly visible in the angle shot, which reveals the smooth flanks of the fenders, wheel arches and doors.
On the advice of the masters of our car service, the owner of the "Volga" decided to replace the rear and side windows of the car, which had been dismantled. For the best quality of painting, the craftsmen also dismantled all removable parts of the body: doors, hood, trunk lid, front fenders.
For painting the owner of "Volga" chose a red-brown color, which is called "Pirano" in the catalog of automobile enamels. In total, the painting took 4 kilograms of paint, specially ordered by the car service. For three layers of varnishing, 4 kilograms of U-Pol varnish were needed. First, the master painted over the removable body parts.
This photo shows that after the first painting, the enamel did not reach the required depth and shine, so it was decided to paint the body twice.
All removed body elements are painted and dried by our craftsmen in a special Yokistar painting and drying booth, equipped with special lighting, an exhaust hood, and temperature control.
After the second painting, the car enamel acquired the required depth and shine, which can be clearly seen in the picture of the painted door.
The skill of the painter is expressed in the ability to apply automotive enamel with a thin layer that does not drip. In this case, the paint layer must completely (without gaps) cover the primer and darker spots of the putty. In the picture, the foreman assesses the intermediate quality of the first layer of paint. It is easy to see that for the safety of the interior, all openings from removable parts are covered with plastic wrap.
Being demanding about his work, the master notices even small specks of dust that can stick to a freshly painted body.
Car paints are particularly hazardous work, so the painter works in a special suit, mask and respirator. In addition to the quality of painting, the harmfulness of the production process is recognized as the main obstacle to independent painting work with a car. Even a modern Ivata pistol does not get rid of harmful fumes from car enamel.
Particular care is required for painting hard-to-reach places of the body, places of laying window seals. Removable body parts are dismantled to ensure that there are no poorly stained areas.
After the second painting, the main part of the body looks fresh, in the side shot you will not find traces (irregularities) of body repair, gaps, paint overflows, unpainted places. All painting work took 5 hours, after which the car was dried in a chamber for 35 minutes at a temperature of 60 degrees.
After the second painting, all removed body elements are reinstalled. After keeping the car after painting and drying for two days, the craftsmen polished the body. It took eight hours to polish the body with 3m brand paste and a RUPES polishing machine.
The picture shows that no difference can be found in the color quality of the main body and the removable parts. The body pleases the owner with a mirror shine.
In total, 22 working days (170 hours) were spent on reinforcing, straightening, painting and polishing. As a result, the Volga received a new color, a reference appearance with a two-year warranty on the paintwork.
The finished car looks much more elegant than when it left the factory assembly line many years ago. The trendy color is noticeable on the road, has shine and depth.
After installing all the glass, rubber, new decorative caps, bumpers, false radiator grille, the owner of the Volga will receive an ideal retro car, which can be proud of on the roads near Moscow and Moscow.
And in this video you will see a small excerpt from the body painting process.
So simply and uncomplicated, we have completely restored the body to perfect condition.
The GAZ 24 engine is a new engine of that time - ZMZ-24, produced by the Zavolzhsky Motor Plant, there are 2 modifications: ZMZ-24D and ZMZ-2401. The engine is based on the old Volga (GAZ-21), which has been produced since 1957, and the 24th Volga has been produced since 1970. The old motor has been significantly improved and modified.
Both modifications are conventional internal combustion engines, the difference is that the ZMZ-2401 ran on 76th gasoline, and the ZMZ-24D ran on 93rd gasoline. The design of these motors is very similar, they have 4 cylinders, 8 valves each, a block head made of aluminum, a camshaft located at the bottom, a gear timing.
Features of the GAZ-24 engine:
Unlike the old ZMZ-21 engine, in the new ZMZ-24D the cylinder liners are seated on copper seal rings in the cylinder block, in the 21st engine they were seated on rubber seal rings are seated in the block on copper seal rings, and not on rubber, as in the ZMZ-21 engine. This means that it has become easier to press in and press out these rings in case of repair and the cylinder liners in the new engine are cooled;
the drive of the oil pump is hexagonal, so it is easier to install;
there is a straight plane of the pallet in the motor, it fits perfectly to the block, so less oil leaks from the crankcase.
And most importantly, the GAZ-24 engine is more powerful than the GAZ-21 engine due to the larger valve discs. The difference in motors 24D and 2401:
the hoses for the 2401 motor are 4 mm longer;
The cylinder head in 2401 is 4 mm higher, and the engine itself is less powerful, since there is a larger combustion chamber in the cylinders.
The GAZ 24 engine has excellent endurance, withstands many bullying from the driver:
pour in different oils, even from Kamaz, mix different oils;
do not check the oil level in the crankcase every time;
overheat the motor;
drive at maximum speed.
Examples demonstrating how durable the ZMZ-24 motor is:
Volga GAZ-24 worked in a taxi, after which they disassembled the engine, and saw that clots of liquid resembling solid oil had accumulated around the oil pump, the oil became very thick, under the valve cover everything was also in thick oil. Moreover, the car was given for repairs not because the engine knocked, but because it is time to repair the engine in time, a kind of scheduled maintenance.
The second case, when the engine was repaired in the garage, the problem was that the gasket of the block head broke through, a large amount of antifreeze began to get into the engine, so the oil became already white, but still had to go on this oil. At first, the engine growled strongly, but after 200 km.the antifreeze from the oil pan evaporated and the oil became normal and the engine began to work as it should.
Despite its endurance, the motor of the 24th Volga still requires repair from time to time, because this motor has characteristic problems, namely:
it happens from the rear oil seal that oil flows, and even on a new engine this happened. In the rear part, on the crankshaft, it is necessary to install a stuffing box packing, which consists of 2 halves, and oil flows at the joints of this packing, if these joints are smeared with an oil-resistant sealant, then there will be no more leaks;
oil consumption of the engine, despite the fact that the oil does not flow anywhere and the engine does not smoke. If the motor is new, it means that you just have to go through the rolling, then after about 10,000 km. oil consumption will decrease.
There were even cases when the engine continued to consume oil up to 50,000 km. and then he stopped and continued to serve up to 200,000 km. no oil consumption.
There were also cases when a seat fell out from under the valve on the GAZ-24 engine, the reason is that the seats were not always well pressed in at the plant. If such a situation happened and the saddle fell out, then the saddle was crushed by the valve into small parts, which scattered around the engine, which led to the fact that it was necessary to do a major overhaul, to clean the manifold and carburetor.
Often at the Zavolzhsky Motor Plant, defective parts were produced, on which the durability of the engine depends. But if it was possible to buy a car with a well-assembled motor, and the owner of such a car correctly operated the car, then such a motor could easily last up to 280,000 km. without repair. There were even cases when the mileage reached 380,000 km.
It is necessary to overhaul the ZMZ-24 engine if:
oil consumption has become very high through the piston rings;
in the oil system, the oil pressure has become low;
a knock appeared in the crank mechanism;
often the engine began to overheat.
If you do a major overhaul, then you need to change these details:
valve stem seals;
all gaskets and seals;
all earbuds;
piston group: pistons, rings, cylinder liners;
camshaft and crankshaft gears;
oil pump;
When overhauling, you also need to grind the crankshaft, if this cannot be done, then you just need to change it. If necessary, it is necessary to change the valves in the cylinder head, the main thing is that they must be rubbed onto the seats of the cylinder head. If the Volga-24 engine cannot be repaired, then a new motor must be installed immediately, if the cost of the repair will cost more than replacing the motor. During the tuning of the Volga 3110 or 24th, it is also worth deciding whether to buy another engine or modify the standard one. There are interesting options when a Japanese engine (uz or jz) is installed together with a box and such a Volga tuning feels very confident.
The GAZ 24 (ZMZ-402) engine is an improved engine, which was also installed in the 24 Volga, it has a modified block and block head. This engine began to be installed in the Volga in 1985 on GAZ-24M cars, and after 1986 it was installed on the GAZ-2410. The ZMZ-402 engine uses not the same parts as on the ZMZ-24, namely:
another oil pump, it has a higher performance;
more massive crankshaft pulley;
the water pump was mounted on the cylinder block, and not on the head, as before;
another thermostat housing.
The following details have not changed:
motor pallet;
camshaft gears;
piston group;
barbells;
crankshaft;
pushers.
In addition, they began to install a cast iron camshaft in the 402th engine, if earlier it was made of steel. The shafts of the 402 engine have become more durable. As for the repair, the 402th motor is repaired in about the same way as the 24th, it is sometimes necessary to adjust the valve clearances in it.
And then a video on how the ZMZ-24D engine works:
Video (click to play).
VIDEO
