In detail: do-it-yourself knitting machine repair from a real master for the site my.housecope.com.
Repairing a knitting machine is a complicated matter and only an experienced craftsman can do it. It's good if you live in Moscow or another large city where there are knitting machine repairmen. But what if you cannot find such a master in your city? All hope is for the Internet or a book that has a section dedicated to the repair of knitting machines. But such a book is not so easy to buy, and most importantly to understand.
The terminology used in the technical description of the device and operation of knitting machines literally hurts the ear. And only a specialist can grasp the meaning of the content of this book. We offer you simple and simple general recommendations for the repair of a knitting machine such as Neva, Neva-2, Neva-5, Severyanka, Veritas. They can be used if the knitting machine needs to be repaired by yourself.
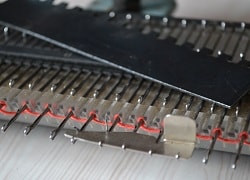
The needle bar should be installed so that the breaker teeth (metal plates on the edge of the machine) are parallel along the entire length of the machine with the same gap between them.
Depending on the design of the car, it can be different, but for cars of the 5th class (Neva, Veritas, Severyanka and the like) it is 3.8 mm. This does not mean that you need to measure all the teeth with a ruler. Simply, when looking for the cause of your knitting machine's malfunction, pay attention to this.
Check that all the teeth are straight (not bent) and that they are all perfectly horizontal. Perhaps one of them was the cause of the knitting machine malfunctioning.
The presence of nicks on the ribs of the needle bar is not allowed, this leads to jamming of the carriage and breakage of the needle. If there is such a defect in one of the sections, for example, the central part of the needle bar, then it can be rearranged to the edge, since the needle bar is drawn from segments for 20 needles. The worn-out section, moved to the edge of the needle bar, will only be used when knitting the fabric over the entire width of the needle bar.
| Video (click to play). |
The guides (long metal strips) along which the carriage moves, must be parallel to each other and simultaneously parallel to the upper edge of the striker teeth of the needle bar. It is worth paying special attention to this point, because sometimes these guides are the cause of the carriage jamming or tight movement.
It so happens that the machine falls off the table, or you had to loosen their fasteners when replacing the needles (they are fastened with long screws and nuts). After tightening these fasteners, the carriage begins to wedge in this place or does not pass this section at all. This means that the position of the guides is knocked down or you have overtightened the mount. That is, they pressed this plate too hard against the needle bar. Also, remember to periodically lubricate these rails with a little oil.
Adjustment of the thread guide (the eye in the carriage where the thread is laid) is made in three directions: in the center of the gap between the needle beds; by height; lateral position along the gap.
When knitting the fabric on double-loop machines, the hole of the yarn guide should be under the center of the gap, at an equal distance from the needles or breaker teeth of the needle bar.
When knitting on single-loop machines, the yarn guide is installed as close as possible to the hooks of the needles.
During operation, the thread generates a groove at the lower end of the yarn guide, which leads to the release of loops, breakage of the thread and the formation of "shaggy" edges of the fabric.
You can grind the end of the yarn guide and adjust its position.
Sanding should be done carefully with very fine abrasive paper that does not leave scratches.
If the groove cannot be removed by grinding, try making and installing a slotted bar on the top of the carriage to guide the thread into the yarn guide.
In the process of operation, the wedges of the carriage wear out and depressions form on the working edges, which cause breakage of the needles, wear of the needle bar and heavy movement of the carriage. Minor wear can be corrected by grinding. In this case, the symmetry of their location on the base of the carriage must not be violated, otherwise frequent loops will be dropped.
Grinding should be carried out with a small file only along the edge of the wedge, and not across. Transverse grinding will only increase the friction force of the heels of the needles in this area and the noise during the operation of the machine will become even greater.
After grinding the wedges, it is necessary to smooth out their working edges with a fine sandpaper.
In general, all parts of the knitting machine should be smooth, even and free from any roughness.
To badly worn wedges, unfortunately, no knitting machine repair will not help and only need to be changed.
The brushes on the carriage are designed to open the tongues of the needles. However, many modern household knitting machines use a different mechanism, such as magnets. But, in knitting machines such as Neva-2, it is the brushes that raise the tongues of the needles, which is extremely inconvenient and leads to frequent omissions. So, these brushes are installed so that the bristles do not touch the yarn guide, but lightly touch the needles and are located at a slight angle in relation to their rods.
The bristles of the brushes should be thick and cut in such a way that the short pile is facing the yarn guide and does not fall into the hole in the yarn guide. The housing holding the bristles of the brushes should not touch the heads of the needles.
Knitting machine needles must be in perfect condition and well polished. Even after the knitting machine has been idle for a long time, knit several dozen rows of yarn, sand them lightly with thread and then start knitting your product.
The tongues of the needles should rise freely and easily, and when descending, fit snugly against the hook of the needle.
The heels of the needles should not be bent or shifted, but exactly in the same plane with the needle shaft.
The needles should move easily in their grooves, not get stuck and even less jam.
Keep the grooves clean, sometimes cleaning them from fleece and dust.
The size of the needles must be the same as the one indicated in the instructions for use and repair of your knitting machine.
If you have to do your own knitting machine repairs, remember that the knitting machine is pretty simple. Most importantly, try to first understand how it works. Understand how the carriage works, which lever and what it is intended for, etc. When you study how a knitting machine works, you will see that all its “breakdowns” are associated only with “fine” adjustments, as well as the tightening of various fasteners.
Never completely disassemble the knitting machine. Please note that even two higher engineering degrees cannot replace the many years of experience of a knitting machine repairman.
How the knitting machine works and works
In order to understand how to perform knitting machine repair you need at least to figure out how it works. To understand why this or that part is needed, how a knitted fabric is formed. Almost all knitting machines have the same principle of forming a hosiery, on the basis of which a number of other weaves are made.
Knitting by machine without problems
The knitting machine has three main elements: threads, knitting needles and carriage. Just like in hand knitting: threads, knitting needles and knitter's hands. The way you use the thread depends on how the needles, using the carriage, will knit the fabric. The first reason for the appearance of knitting defects is the wrong selection of yarn for knitting.
Which used knitting machine to buy?
A modern computer-controlled electric knitting machine is expensive.She has fantastic creative possibilities and is intended more for experienced knitters. If you are just starting to learn to knit, choose a simpler, more inexpensive knitting machine. You can even buy a used knitting machine, for example Toyota KS-858.
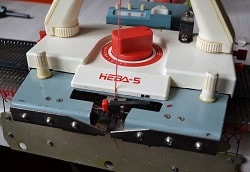
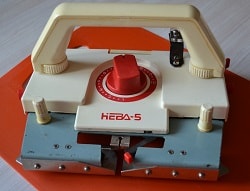
Knitting machine Neva-5
This model of a knitting machine can perform various types of weaves, patterns. Its device is simple and it is easier to repair a knitting machine. In addition, you can buy spare parts for it. The ideal machine for beginners to learn to knit.
Knitting machine Severyanka
Knitting machine Severyanka is very easy to operate. This knitting machine has a very simple structure and therefore its capabilities are limited. However, for beginners, such a knitting machine is fine. Moreover, you can buy it very inexpensively and if you need to repair a knitting machine, you can try to make it yourself.
Do you have a sewing machine and love to sew? Then this site is for you. Professional craftsmen will tell you how to make minor repairs to a sewing, knitting machine. Experienced technologists will share the secrets of tailoring. Review articles will tell you which sewing or knitting machine to buy, a mannequin iron and many other useful tips you will find on our website.
Thank you for viewing the entire page.
DIY knitting machine repair
Repairing a knitting machine is a complicated matter and only an experienced craftsman can do it. But it's good if you live in Moscow or another large city where there are knitting machine repairmen, but what if you can't find such a master in your city? All hope is for the Internet or a book where there is a section - repair of knitting machines, which is not so easy to buy, and most importantly to understand. The terminology used in the technical description of the device and the operation of machines literally hurts the ear, and only a specialist can grasp the meaning of what is written. But we still offer small general recommendations for the repair of a knitting machine such as Neva, Neva-2, Neva-5, Severyanka, Veritas, just for the case when you need to repair a knitting machine yourself.
1. The breaker teeth must be parallel to each other.
The needle bar should be installed so that the breaker teeth (metal plates on the edge of the machine) are parallel along the length of the machine and there must be the same gap between them. Depending on the design of the car, it can be different, but for cars of the 5th class (Neva, Veritas, Severyanka and the like) it is 3.8 mm. This does not mean that you need to measure everything with a ruler, just when looking for the cause of a malfunction of your knitting machine, pay attention to whether all the teeth are even and are located strictly horizontally, perhaps it was one of them that was the cause of the failure.
2. The nicks on the ribs of the needle bar lead to jamming of the carriage.
The presence of nicks on the ribs of the needle bar is not allowed, this leads to jamming of the carriage and breakage of the needle. If there is such a defect in one of the sections, for example, the central part of the needle bar, then it can be rearranged to the edge, since the needle bar is drawn from segments for 20 needles and the worn section, being on the edge, will be used only when knitting the fabric over the entire length of the needle bar.
3. The guides for the carriage must be strictly parallel
The guides (long metal strips), along which the carriage moves, must be parallel to each other and parallel to the upper edge of the breaker teeth of the needle bar. It is worth paying special attention to this point, since sometimes these guides are the cause of the carriage jamming or tight movement. It so happens that the car falls, or you had to loosen their fastening when replacing the needles (they are fastened with long screws) and after tightening, the carriage wedges in this place, or does not pass this section at all. This means that the position of the guides is knocked down or you overtightened the mount, pressed this plate too hard against the needle bar.In addition, do not forget to periodically lubricate these rails with a small amount of oil.
4. Adjusting the yarn guide of the knitting machine
Adjustment of the thread guide (the eye in the carriage, where the thread passes to the needles) is made in three directions: in the center of the gap between the needle beds; by height; lateral position along the gap.
When knitting the fabric on double-loop machines, the hole of the yarn guide should be under the center of the gap, at an equal distance from the needles or the breaker teeth of the needle bar. When knitting on single-loop machines, the yarn guide is set as mono closer to the hooks of the needles.
5. The yarn can produce a groove in the yarn guide
During operation, the thread generates a groove at the lower end of the yarn guide, which leads to the release of the loops, breaking the threads and the formation of shaggy edges of the fabric. You can grind the end of the yarn guide and adjust its position. Sanding should be done carefully with very fine abrasive paper that does not leave scratches. If the groove cannot be removed by grinding, try making and installing a slotted bar on the top of the carriage to guide the thread into the yarn guide.
6. Depressions are formed on the working edges of the wedges
In the process of operation, the wedges of the carriage wear out and depressions form on the working edges, which cause breakage of the needles, wear of the needle bar and heavy movement of the carriage. Minor wear can be corrected by grinding, while the symmetry of their location on the base of the carriage must not be disturbed, otherwise there will be frequent drops of the hinges. Grinding should be carried out with a small file only along the edge of the wedge, and not across. Transverse grinding will only increase the force of friction of the heels of the needles in this area and the noise will become even greater during operation of the machine. After grinding the wedges, it is necessary to smooth out their working edges with a fine sandpaper. In general, all parts of the knitting machine must be smooth, even and free from any roughness. Badly worn wedges, unfortunately, no repairs will help and they only need to be changed.
7. The brushes on the carriage expose the needle tabs.
Carriage-mounted brushes are designed to open the tongues of the needles, although many modern household knitting machines use a different mechanism, such as magnets. But on knitting machines like Neva, it is the brushes that raise the tongues of the needles, which is extremely inconvenient and leads to frequent skips. So these brushes are installed so that the bristles do not touch the thread guide, but lightly touch the needles and are located at a slight angle with respect to their rods. The bristles of the brushes should be thick and cut in such a way that the short pile is facing the yarn guide and does not fall into the hole in the yarn guide. The housing holding the bristles of the brushes should not touch the heads of the needles.
8. The needles must be in perfect condition
Knitting machine needles must be in perfect condition and well polished. Even after the machine has been idle for a long time, knit several dozen rows of yarn, sand them lightly with a thread and then start knitting your product.
The tongues of the needles should be free to rotate and fit snugly against the end of the hook.
The heels of the needles should not be bent or shifted, but exactly in the same plane with the needle shaft.
The needles should move easily in their grooves without getting stuck or jammed. Keep the grooves clean, sometimes cleaning them from fleece and dust. The size of the needles must be the same as the one indicated in the instructions for use and repair of your knitting machine.
When buying a knitting machine, not everyone thinks about repairing it in the future. Let's figure out with you why the knitting machine can break down and how to eliminate the cause of the breakdown. Consider one- and two-circuit machines.
The first thing to look out for is is your knitting machine skipping stitches when knitting? If so, look carefully to see if the tongues of the needles open and if they are broken.If the needles are broken or the tongues on the needles are missing, remove the carriage and pull out the seal that holds all the needles from under the rail. Next, replace the needles or rearrange the bad needle at the very beginning or very end of the knitting machine's fabric, then insert everything back.
The second reason is the carriage itself. If the brushes in the carriage are worn out, they may be the cause. They should be replaced or, as some do, cut the length of the brushes so that they become thick again.
2. Carriage jams when knitting.
If the carriage is stuck in the middle of the fabric during knitting, then here you will have to remove the carriage and put it back at the beginning, and lower the knitted loops. Moreover, if this is a two-circuit machine, then first unscrew the connector of the upper and lower carriage, remove the lower carriage, and draw the upper one to the end of the rails. Check if the thread thickness is correct (too thick), or maybe you have chosen too high a knitting density. Reduce it using the density adjuster located on the carriage.
- Knitting by machine (MK knitting of individual elements) (166)
- Knitting machine sweaters for women (141)
- Punch Cards (81)
- Knitting machine for kids (80)
- Culinary and pastry masterpieces (75)
- Hats, scarves, stoles and shawls on a knitting machine (70)
- Knitting Magazines (61)
- Tops, T-shirts, shorts on a knitting machine (53)
- Knitting machine dresses (49)
- Size Charts (35)
- Knitting Machine Patterns (34)
- Socks, knee-highs, leggings, leggings, tights, mittens, etc. (34)
- Intarsia on a knitting machine (30)
- Knitting tunics (27)
- DIY (27)
- Traditional recipes for health (27)
- Knitted garment patterns (26)
- Knitting machine sweaters for men (24)
- Knitting Skirts (21)
- Bolero, poncho on a knitting machine (17)
- Knitting Machine Berets (15)
- Beauty recipes (15)
- Knitting machine suits (13)
- Knitting machine repair (9)
- Canning (9)
- Coats, jackets on a knitting machine (5)
- Knitting technology (4)
- Elastic band and everything connected with it (4)
- Knitting for animals (4)
- DFJ jacquard (4)
- Women's vests on a knitting machine (4)
- Ruches, frills, folds. (3)
- Garter Bar (3)
- Finishing finished knits (2)
- Bottom Decoration (2)
- Forums (2)
- Knitting machine blankets (2)
- Garden, vegetable garden (2)
- Dissolutions (1)
- hoods (1)
- Knitting machine pockets (1)
- Knitting machine braids (1)
- Collar (1)
- Jam (1)
- Knitting Machine Pleats (0)
- Garden, vegetable garden (0)
- My music (0)
- Pocket (0)
- Knitting Machine Plank (0)
- Partial Knit (0)
- Men's vests on a knitting machine (0)
Selected rubric Knitting machine repair.


Adjustment of the PADDLE CARTRIDGE Silver
Thanks to Tigra Lvovna for the selection of material.
Here is the general concept of a prince perekid!
When the carriage moves from left to right - adjust the RIGHT part on the bridge
When the carriage moves from right to left - adjust the LEFT part on the bridge
ADJUSTMENT is very sensitive, you need to move it by millimeter and see what happens.
I found valuable information on openwork on Osinka, the Craftswoman answered Silver.
Yes, the lace does not like a strong brace, but there is still such a moment, for example, when knitting complex laces, when there is a “big zigzag”, then the fabric, regardless of which guy, has very weak spots, especially when drawing With transfer to one needle from both sides. in such cases, I pull the canvas on these needles by hand, or you can hang small weights on each zigzag, I really liked Tanina Astra's idea of "with clips and nuts"
Let's see how the female half of humanity lives. Today, the fashion to wield knitting needles is disappearing, it is appropriate to put a knitting machine, it will do the work itself, if you put a drawing on a punch card, drive it into the memory of a personal computer through special software. The advantage is great, the unit is much faster than human hands, the product is ready earlier. We recommend that those who are worried about scallops and other decorative elements stop.A galaxy of educational videos has been posted on YouTube, it will help you learn in the shortest possible time. The product breaks down, the male half of humanity - we are sure - is ready to repair knitting machines with their own hands. If, of course, the female sex asks for help ...
Grandma's sweater has become the talk of the town. Mittens, scarves - without this it is difficult to survive the cold Siberian winters.
Instead of considering repairing Brother knitting machines, they decided to plunge into Russian, Soviet industry. Patriotic ladies can easily master their own models. Knitting machines were produced in the USSR. You can easily find an old Neva-2 produced in 1983. The period that normal people remember joyfully, some scold: you cannot openly get a lot of money, they could ask where they got it from. Now it's better, they will come, demand to share ... The instructions contain a dozen tips on how to knit correctly, first we will describe the device of the knitting machine:
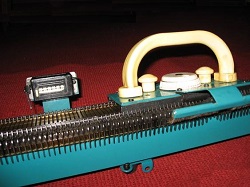
- The basis of the unit is made up of a table, which resembles a musical synthesizer like two drops of water.
- The bed is formed by transverse working grooves, needles slide back and forth.
- In the front part, the needles are crushed by a rail screwed with a number of bolts to the bed. There are nuts on the underside.
- Along the table under the needle grooves there is a groove of the seal. To prevent the needles from sliding back and forth without permission, it would be a punishment for the knitter.
- The needle is crocheted, not a knitting needle. There is a snap-on spout.
- The main part of the knitting machine is the carriage. Like a shuttle, it whips back and forth, forming even rows of ligature. The drive is manual, the craftswoman gets full control.
- To prevent the carriage from falling, there are stoppers on the sides of the table. According to the craftswomen, it interferes so much that sometimes it is better to remove the restraints, avoiding hitting with the shuttle every time you reach the edge of the canvas.
- The carriage in some knitting machines can count rows by switching a mechanical counter. For fixing, proper operation of the mechanism, teeth are cut on the table from the front side, there are one or two gears on the shuttle.
The needle rests on the heel, as YouTube puts it, the heel. Grabbing, it is convenient to push out the favorites, making the loop skipping (if there is a mode). It is important that the needles do not run away, they stand still. Not to mention those cases when you need to put on a loop, making a hole in the right place in the knit. It is possible to get complex drawings, openwork patterns, if you know arithmetic, be able to count the loops.
Understood, the carriage runs back and forth, the knitting machine is devoid of electrical components. Conveniently, it is quite easy to repair the knitting machine yourself. Rule number one Neva 2 says: you cannot turn the carriage back in the middle of the canvas. Reach the end, come back. Failure to comply with the condition causes deformation of the needles, destruction of the needle bar. Let's talk about how to change bent points for new ones. Please note the carriage should move smoothly without jerking. The new knitting machine is taut. Normally, it will take a while for the carriage to develop.
The density is set on the knitting machine; it must correspond to the thread number. Otherwise, the heels of the needles will be clogged and may lead to lifting off the table. Forces skipping of adjacent stitches in skip mode (when the needles are pulled towards themselves, a special lever on the carriage is pressed). The situation is complicated by the fact that nowadays they forget to write the number on the reels. However, the thickness of the threads is different. How to determine the required mode? Check with the seller.
The counter reset button should not be pressed while driving. Leads to breakage. Neva 2 cannot be kept in the sun for a long time, the needle cushion will collapse. A simple list of rules for operating the device.
The hook needle is called the reed needle. The knitting process is based on the movement of the blade back and forth along the grooves of the needle bar. Platinum needles on the sides. Hooks with a point directed towards the floor, pulling a new loop downward. Now let's try to explain the receipt of a series on our fingers:
- There is an old loop pulled down by platinum.
- The thread was laid by a craftswoman over the needles.
- The needle slips forward, the old loop slips backward, released by the tongue.
- The needle passes under the thread, when moving back, it hooks.
- The thread is pulled into the old loop.
- From above, the thread is covered with platinum, which is pulled down on the sides.
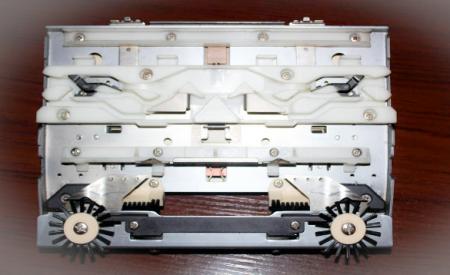
The cycle repeats again. In Niva 2, you patiently need to manually lay the thread, in the fifth model it is done automatically. There are five wedges in the carriage. Two control the downward movement of the needle, and two control the upward movement of the needle. One wedge - the middle one - is responsible for the knitting density. The plates are raised by pressing on the heel.
When the carriage is jammed, the first thing to pay attention to is whether there is grease. It is necessary to apply a layer on the rails, under each plate, making it easier to slide. It is pertinent to remind you that periodically it is necessary to clean the knitting machine. The rails are unscrewed, the needles are removed, then the platinum is lifted by the heels. You can gently clean the space underneath.
The elimination of defective needles, which rise when extended, is carried out in the same way. The heels are slightly shorter than normal. The rails are removed, loosened in order to remove the defective parts. At the same time, you can do the needles that slide back. To eliminate the effect, there is a spring under the rail, it happens that the steel tension is weakened by the mechanical fatigue of the alloy.
It is allowed to lay the oiled thread in several layers in the longitudinal groove of the needle bar across the needles. It is necessary to check the effectiveness of the measures taken. Some of the needles are installed back, the rail is pressed by hand, a trial release is underway. If there is no backward slip, the knitting machine is assembled completely.
If the carriage is jammed, pay attention to the plastic tabs. The surface is worn out, we will replace the parts. The reason is the cutter (a part that brings the needles to the desired position along the carriage), the ends of which are unbent. Should be folded properly. When knitting with thick yarn, sometimes a section of the fabric is carried out from under the platinum. Unscrew the screw holding the carriage, take the shuttle out of the working area. The web is manually adjusted back.
Here are some of the faults described in detail by the manual:
- If the carriage moves too tight, or the yarn is too thick, or the density is too low for the selected thread thickness.
- Frequent dropping of buttonholes means: the tab of the front part of the knitting machine hook is not set correctly.
- Individual needles do not form loops if the tongue is broken or the needle is deformed. Replace with a new one.
- The vertical strip of the canvas is obtained when the platinum does not work properly, it sticks. Try to lubricate as mentioned above. Doesn't help - replace the part. The rail is removed, pressed from under the guy line. Platinum stretches towards itself and to the side. Should come off, then you can put a new one.
- The platinum falls out, the quickdraw is faulty.
- The counter has stopped counting, the fastening of the lever has weakened. Pull up. The lever must touch the carriage, otherwise there will be no counting. Pay attention to the slide. Sometimes it gives slack, ceasing to touch the counter lever.
- Sometimes the needle bar may be scratched by the wedges of the knitting machine carriage. It is worth tightening the fastening screws in this case.
So, repairing knitting machines with your own hands is a reality. Nothing complicated or supernatural, but it becomes possible to quickly finish an artistic work. What can break? Write in the comments that! Let's think, try to answer the question. A knitting machine repairman is not always needed if your savvy is in your bosom.
We want to say goodbye: avoid breaking the instructions, get up and running. Use sewing machine oil for lubrication. Knit yourself, teach your family, make real masterpieces. Download instructions online!
Posted by admin in Household appliances 04/29/2018 0 152 Views
Repairing a knitting machine is a complicated matter and only an experienced craftsman can do it. It's good if you live in Moscow or another large city where there are knitting machine repairmen.But what if you cannot find such a master in your city? All hope is for the Internet or a book that has a section dedicated to the repair of knitting machines. But such a book is not so easy to buy, and most importantly to understand.
The terminology used in the technical description of the device and operation of knitting machines literally hurts the ear. And only a specialist can grasp the meaning of the content of this book. We offer you simple and simple general recommendations for the repair of a knitting machine such as Neva, Neva-2, Neva-5, Severyanka, Veritas. They can be used if the knitting machine needs to be repaired by yourself.
The needle bar should be installed so that the breaker teeth (metal plates on the edge of the machine) are parallel along the entire length of the machine with the same gap between them.
Depending on the design of the car, it can be different, but for cars of the 5th class (Neva, Veritas, Severyanka and the like) it is 3.8 mm. This does not mean that you need to measure all the teeth with a ruler. Simply, when looking for the cause of your knitting machine's malfunction, pay attention to this.
Check that all the teeth are straight (not bent) and that they are all perfectly horizontal. Perhaps one of them was the cause of the knitting machine malfunctioning.
The presence of nicks on the ribs of the needle bar is not allowed, this leads to jamming of the carriage and breakage of the needle. If there is such a defect in one of the sections, for example, the central part of the needle bar, then it can be rearranged to the edge, since the needle bar is drawn from segments for 20 needles. The worn-out section, moved to the edge of the needle bar, will only be used when knitting the fabric over the entire width of the needle bar.
The guides (long metal strips) along which the carriage moves, must be parallel to each other and simultaneously parallel to the upper edge of the striker teeth of the needle bar. It is worth paying special attention to this point, since sometimes these guides are the cause of the carriage jamming or tight movement.
It so happens that the machine falls off the table, or you had to loosen their fasteners when replacing the needles (they are fastened with long screws and nuts). After tightening these fasteners, the carriage begins to wedge in this place or does not pass this section at all. This means that the position of the guides is knocked down or you have overtightened the mount. That is, they pressed this plate too hard against the needle bar. Also, remember to periodically lubricate these rails with a little oil.
Adjustment of the thread guide (the eye in the carriage where the thread is laid) is made in three directions: in the center of the gap between the needle beds; by height; lateral position along the gap.
When knitting the fabric on double-loop machines, the hole of the yarn guide should be under the center of the gap, at an equal distance from the needles or breaker teeth of the needle bar.
When knitting on single-loop machines, the yarn guide is installed as close as possible to the hooks of the needles.
During operation, the thread generates a groove at the lower end of the yarn guide, which leads to the release of loops, breakage of the thread and the formation of "shaggy" edges of the fabric.
You can grind the end of the yarn guide and adjust its position.
Sanding should be done carefully with very fine abrasive paper that does not leave scratches.
If the groove cannot be removed by grinding, try making and installing a slotted bar on the top of the carriage to guide the thread into the yarn guide.
In the process of operation, the wedges of the carriage wear out and depressions form on the working edges, which cause breakage of the needles, wear of the needle bar and heavy travel of the carriage. Minor wear can be corrected by grinding. In this case, the symmetry of their location on the base of the carriage must not be violated, otherwise frequent loops will be dropped.
Grinding should be carried out with a small file only along the edge of the wedge, and not across. Transverse grinding will only increase the force of friction of the heels of the needles in this area and the noise during operation of the machine will become even greater.
After grinding the wedges, it is necessary to smooth out their working edges with a fine sandpaper.
In general, all parts of the knitting machine should be smooth, even and free from any roughness.
Unfortunately, for badly worn wedges, there is no knitting machine repair will not help and only need to be changed.
The brushes on the carriage are designed to open the tongues of the needles. However, many modern household knitting machines use a different mechanism, such as magnets. But, in knitting machines such as Neva-2, it is the brushes that raise the tongues of the needles, which is extremely inconvenient and leads to frequent omissions. So, these brushes are installed so that the bristles do not touch the yarn guide, but lightly touch the needles and are located at a slight angle in relation to their rods.
The bristles of the brushes should be thick and cut in such a way that the short pile is facing the yarn guide and does not fall into the hole in the yarn guide. The housing holding the bristles of the brushes should not touch the heads of the needles.
Knitting machine needles must be in perfect condition and well polished. Even after the knitting machine has been idle for a long time, knit several dozen rows of yarn, sand them lightly with thread and then start knitting your product.
The tongues of the needles should rise freely and easily, and when descending, fit snugly against the hook of the needle.
The heels of the needles should not be bent or shifted, but exactly in the same plane with the needle shaft.
The needles should move easily in their grooves, not get stuck and even less jam.
Keep the grooves clean, sometimes cleaning them from fleece and dust.
The size of the needles must be the same as the one indicated in the instructions for use and repair of your knitting machine.
If you have to do your own knitting machine repairs, remember that the knitting machine is pretty simple. Most importantly, try to first understand how it works. Understand how the carriage works, which lever and what it is intended for, etc. When you study how a knitting machine works, you will see that all its "breakdowns" are associated only with "fine" adjustment, as well as the tightening of various fasteners.
Never completely disassemble the knitting machine. Please note that even two higher engineering degrees cannot replace the many years of experience of a knitting machine repairman.
In order to understand how to perform knitting machine repair you need at least to figure out how it works. To understand why this or that part is needed, how a knitted fabric is formed. Almost all knitting machines have the same principle of forming a hosiery, on the basis of which a number of other weaves are made.
The knitting machine has three main elements: threads, knitting needles and carriage. Just like in hand knitting: threads, knitting needles and knitter's hands. The way you use the thread depends on how the needles, using the carriage, will knit the fabric. The first reason for the appearance of knitting defects is the wrong selection of yarn for knitting.
A modern computer-controlled electric knitting machine is expensive. She has fantastic creative possibilities and is intended more for experienced knitters. If you are just starting to learn to knit, choose a simpler, more inexpensive knitting machine. You can even buy a used knitting machine, for example Toyota KS-858.
This model of a knitting machine can perform various types of weaves, patterns. Its device is simple and it is easier to repair a knitting machine. In addition, you can buy spare parts for it. The ideal machine for beginners to learn to knit.
Knitting machine Severyanka is very easy to operate. This knitting machine has a very simple structure and therefore its capabilities are limited. However, for beginners, such a knitting machine is fine. Moreover, you can buy it very inexpensively and if you need to repair a knitting machine, then you can try to make it yourself.
Do you have a sewing machine and love to sew? Then this site is for you. Professional craftsmen will tell you how to make minor repairs to a sewing, knitting machine. Experienced technologists will share the secrets of tailoring. Review articles will tell you which sewing or knitting machine to buy, a mannequin iron and many other useful tips you will find on our website.
Thank you for viewing the entire page.
- (2)
- (0)
- Knitting (1931)
- Coats, jackets, cardigans (151)
- Accessories (25)
- Toys (15)
- Bruges Lace (12)
- Brioche (2)
- Blouses, jumpers, tunics (286)
- Mittens, gloves, mitts (22)
- Hats (60)
- Decor (29)
- Kids (93)
- Mens (117)
- Socks, booties, slippers (98)
- Knitwear Processing (31)
- Dresses, skirts, sundresses (138)
- Blankets, bedspreads, rugs, pillows (135)
- Techniques and Techniques (77)
- Patchwork (20)
- Swing (10)
- Tablecloths, napkins (458)
- Bags (47)
- Jacquard and intarsia schemes (10)
- Tunisian Knitting (33)
- Patterns (79)
- Loin Knitting (285)
- Shawls, stoles, scarves (45)
- For soul (8)
- Home improvement (16)
- interior (5)
- Computer literacy (11)
- Calculations, schemes, patterns (4)
- Photos (4)
- Cooking (154)
- No baked (10)
- Bread maker (2)
- Bakery (60)
- Desserts (29)
- Blanks (24)
- Meat (15)
- Drinks (2)
- Vegetables (3)
- Fish (8)
- Salads (6)
- Machine Knitting (103)
- PASSAP Duomatic S (27)
- Patterns (9)
- Plaids, bedspreads (2)
- Mittens, gloves, mitts (5)
- Hats, scarves, stoles (7)
- Books, magazines (11)
- Socks, booties, slippers (8)
- Techniques and Techniques (38)
- Thoughts aloud (5)
- Diary Decoration (22)
- Useful (28)
- Health (21)
- Legal notices (1)
- Russian language (2)
- Personal Care (12)
- Sewing (11)
- Tips and Tricks (2)
- Clothing repair (2)
- Pants (1)
- Bags (1)
- Shoes (1)
- Pillows (1)
- Bed linen (3)
Repairing a knitting machine is a complicated matter and only an experienced craftsman can do it. But it's good if you live in Moscow or another large city where there are knitting machine repairmen, but what if you can't find such a master in your city? All hope for the Internet or a book where there is a section - repair of knitting machines, is not so easy to buy, and most importantly to understand. The terminology used in the technical description of the device and the operation of machines literally hurts the ear, and only a specialist can grasp the meaning of what is written. But we still offer small general recommendations for the repair of a knitting machine such as Neva, Severyanka, Veritas, just for the case when the repair needs to be done on your own.
1. The breaker teeth must be parallel to each other.
The needle bar should be installed so that the breaker teeth (metal plates on the edge of the machine) are parallel along the length of the machine and there must be the same gap between them. Depending on the design of the car, it can be different, but for cars of the 5th class (Neva, Veritas, Severyanka and the like) it is 3.8 mm. This does not mean that you need to measure everything with a ruler, just when looking for the cause of a malfunction of your knitting machine, pay attention to whether all the teeth are even and are located strictly horizontally, perhaps it was one of them that was the cause of the failure.
2. The nicks on the ribs of the needle bar will cause the carriage to jam.
The presence of nicks on the ribs of the needle bar is not allowed, this leads to jamming of the carriage and breakage of the needle. If there is such a defect in one of the sections, for example, the central part of the needle bar, then it can be rearranged to the edge, since the needle bar is drawn from segments for 20 needles and the worn section, being on the edge, will be used only when knitting the fabric over the entire length of the needle bar.
3. The carriage guides must be strictly parallel.
The guides (long metal strips), along which the carriage moves, must be parallel to each other and parallel to the upper edge of the breaker teeth of the needle bar. It is worth paying special attention to this point, since sometimes these guides are the cause of the carriage jamming or tight movement. It so happens that the car falls, or you had to loosen their fastening when replacing the needles (they are fastened with long screws) and after tightening, the carriage wedges in this place, or does not pass this section at all. This means that the position of the guides is knocked down or you overtightened the mount, pressed this plate too hard against the needle bar. In addition, do not forget to periodically lubricate these rails with a small amount of oil.
Adjustment of the thread guide (the eye in the carriage, where the thread passes to the needles) is carried out in three directions: in the center of the gap between the needle beds; by height; lateral position along the gap.
When knitting the fabric on double-loop machines, the hole of the yarn guide should be under the center of the gap, at an equal distance from the needles or the breaker teeth of the needle bar. When knitting on single-loop machines, the yarn guide is set as mono closer to the hooks of the needles.
5. The yarn can produce a groove in the yarn guide.
During operation, the thread generates a groove at the lower end of the yarn guide, which leads to the release of the loops, breaking the threads and the formation of shaggy edges of the fabric. You can grind the end of the yarn guide and adjust its position. Sanding should be done carefully with very fine abrasive paper that does not leave scratches. If the groove cannot be removed by grinding, try making and installing a slotted bar on the top of the carriage to guide the thread into the yarn guide.
6. Depressions are formed on the working edges of the wedges.
In the process of operation, the wedges of the carriage wear out and depressions form on the working edges, which cause breakage of the needles, wear of the needle bar and heavy travel of the carriage. Minor wear can be corrected by grinding, while the symmetry of their location on the base of the carriage must not be disturbed, otherwise there will be frequent drops of the hinges. Grinding should be carried out with a small file only along the edge of the wedge, and not across. Transverse grinding will only increase the force of friction of the heels of the needles in this area and the noise will become even greater during operation of the machine. After grinding the wedges, it is necessary to smooth out their working edges with a fine sandpaper. In general, all parts of the knitting machine must be smooth, even and free from any roughness. Badly worn wedges, unfortunately, no repairs will help and they only need to be changed.
7. The brushes on the carriage expose the needle tabs.
| Video (click to play). |
Carriage-mounted brushes are designed to open the tongues of the needles, although many modern household knitting machines use a different mechanism, such as magnets. But on knitting machines like Neva, it is the brushes that raise the tongues of the needles, which is extremely inconvenient and leads to frequent skips. So these brushes are installed so that the bristles do not touch the thread guide, but lightly touch the needles and are located at a slight angle in relation to their rods. The bristles of the brushes should be thick and cut in such a way that the short pile is facing the yarn guide and does not fall into the hole in the yarn guide. The housing holding the bristles of the brushes should not touch the heads of the needles.

