In detail: do-it-yourself UAZ rear axle repair from a real master for the site my.housecope.com.
To assemble a "military" (with side gears) bridge, you need to do the following:
A) Pressing in the outer rings of all bearings and assembling the satellite box:
1) Completely clean the inside of the bridge halves from old oil and dirt. Flush the bridge cavities with solvent.
2) Press in
the outer rings of the differential bearings into both halves of the axle.
Press in through a spacer sleeve, for example, an old one
bearing outer ring
3) Press the drive pinion bearing outer races into the axle housing.
Outside can use 10mm plywood as spacer
For
to facilitate pressing, you can apply a couple of drops of oil to the outer
bearing rings and rub them over the entire surface with your finger.
All outer rings are pressed in until they stop completely.
4) Press the bearings onto the journals of the satellite box so that there is a 3-4mm gap between the ends of the bearings and the satellite box
Be careful when you are
Press on the second bearing. Do not lean the satellite box on
already pressed-on bearing, because it can shift. Ie, how
shown in the photo, press on the second bearing it is forbidden.
5) Install
a box of satellites with bearings in the axle housing. Scroll one of
halves of the bridge (smaller, the so-called "stocking") relative to the bridge housing for
self-aligning roller bearings.
Lift
stocking and install a spacer between the halves of the bridge. Combine
axle spring cushions in one plane and evenly pull the halves
bridge moment 70-80 H * m.
6) Again
disassemble the bridge. Remove the satellite box and measure with a set of probes
the distance between the ends of the bearings and the satellite box
(the gap set earlier is 3-4mm). Let's call these distances A and A1. By
using the formula B = A + A1 + 0.1, we calculate the desired thickness of the gaskets.
| Video (click to play). |
7) This
the distance B is divided approximately in half. Accordingly, we collect 2
set of shims. It is advisable to collect a bag of thin
gaskets. Spacers are available in 0.1mm, 0.15mm, 0.25mm and 0.5mm thicknesses.
It is better to measure the two packs of gaskets collected in this way.
micrometer in order to make sure that the dimensions are correct.
8)
We press the bearings (only a two-armed puller is suitable, in a box
satellites have 2 special recesses for its legs)
And we install under each selected package of gaskets
B) Assembling the drive gear (we do not put the satellite box in the axle housing yet):
1) Measure
micrometer the height of the old bearing, which is closer to the teeth of the drive
gears. Measure the height of the new bearing. The difference in height between the new and
the old bearings will be called the value "A". If the old bearing is lower
new by the value "A", then it is necessary to increase the thickness of the adjusting washer,
standing between this bearing and the teeth of the pinion gear. If
the new bearing is lower than the old one - then increase the height of this washer by this
the value "A". Washers are produced in 0.05mm increments.
If the bearing heights are the same, an old washer can be fitted.
2) We put
selected (or old) washer, press the new bearing onto the shaft
drive gear. Next, we install a new spacer sleeve and another
adjusting washer. The height of the new and old spacers is also
must be measured. If they are different, then install the old
an adjusting washer (which stands between the spacer sleeve and the outer
bearing) is not allowed. It is necessary to choose this washer so as to compensate
difference in the height of the spacers.The value of the height of the new sleeve is less,
then the adjusting washer should be thicker by this amount. AND
vice versa.
3) Install
the drive gear into the axle housing, press on the second bearing,
install a washer with an internal sprocket, DO NOT INSTALL the oil seal,
but we put a flange. The oil seal must not be installed because it will
give distortion when measuring the breakaway torque.
The flange nut must be tightened with a torque of 160 N * m. After tightening the nut, the breakaway torque should be measured. It should be in the range of 25-40 H * m. The moment of starting can be measured with an ordinary household balance wheel. The correct breakaway moment is in the range of 2.5-4kg.
5) If
the moment of starting is greater, then it is necessary to add shims
between the outer bearing and the spacer sleeve. And vice versa. Gaskets
go in increments of 0.05mm.
6) We mark the relative position of the nut and the flange. Remove the flange and press in the drive gear oil seal. Install the flange.
7) Tighten the flange nut until the marked position is reached again. We pin it.
1) Install
a box of satellites with adjusted bearings in the axle housing
(the pinion is already installed). Next, we apply paint (you can use any,
but there are special ones on sale for adjusting the side clearances) teeth
driven (large) gear.
We collect both halves of the bridge with a gasket, tighten them with bolts with a force of 70-80 H * m.
2) We rotate the flange in both directions for a long time.
3) We disassemble the bridge. And we look at the contact patch, which appears on the paint.
Drawings of correct and incorrect spots should be seen in the manual.
4) If
the spot of the side clearance of the GP is incorrect, then by rearranging the gaskets under
bearings of the satellite box, the box is moved
satellites closest to the pinion
By changing
the thickness of the spacer under the large bearing of the pinion gear, it is
most, moves deeper into the bridge (i.e. closer to the satellite box) or
out. The thicker the washer, the more the drive gear comes out and
vice versa.
5) Having achieved the correct contact patch, you can install the axle shafts and assemble the gearbox.
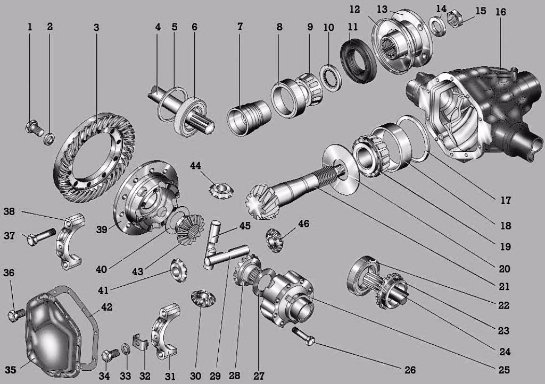
The Soviet off-road vehicle UAZ 469, produced by the Ulyanovsk Automobile Plant, is unique in its own way. A diagram of the rear axle of the machine is shown in Fig. 1. The design includes the following key components and assemblies:
- 1 - protective cover;
- 2 - differential device roller bearing;
- 3, 8 - corrective auto-gaskets;
- 4 - the tail part of the drive gear support;
- 5 - correction ring;
- 6 - oil distillation holder;
- 7 - nut;
- 9 - front gear of the rear axle;
- 10 - head bearing support;
- 11 - hydraulic thrust washer of the gear wheel axle shaft;
- 12 - gear element.
The rear axle is a support, inside it is the main transmission of the semi-axle, the differential. It can be of two categories: with a single final drive or an additional wheel drive. Wheel adjusters, which build up torque and transmit it to the hubs of the conductive wheels, are located at the ends of the beam.
The wheel roller bearings are supported by the governor housings. The wheel reducers provide huge ground clearance and are internally meshed gears. The main gear is bevel, with a spiral tooth, bearing unit, which has a main gear and a bevel drive with 4 satellites. The satellite is a gear wheel that is compact, simple, rarely breaks down, contributes to quick, easy gear shifting.
The crankcase has a drain and filler hole and contains a certain amount of oil to lubricate the wheel hydraulic governor.
The rear converter support is decoupled and consists of such elements as a cover, protection against contamination, pressed-in axle shaft housings. Its dimensions are reduced, the gear ratio is up to 2.77.
The driven rear axle reducer is mounted on the shaft. It is installed in the roller bearing and bushing, tightened with a nut, and is fixed in the shaft groove. The ends of the shafts of the gearbox have movable couplings that help to group, separate the shafts from the wheel hubs, if necessary.
With the couplings disconnected, the UAZ 469 becomes rear-wheel drive. This is useful on good paved roads. When driving on impassable terrain, switching off is impractical. It is possible to disconnect and reconnect the hubs from the beginning of the operation of the quick response clutch or the hub cam. In this case, it is not required to climb under the bottom of the car.
When removing the rear axle, you need to unscrew the nut of the tail device, discard the washer, counterflange, cover of the front roller gear assembly, press out the assembly gear with bearings from the rear oil cooler of the car.
This circuit is great for parsing a differential device. The next step is to unscrew the splines connecting the driven gear with the satellite box, reset it. Divide both parts of the box, pull out the gears, the rods of the planetary wheels, the support nuts. When evaluating disassembly, pay attention to the integrity of the teeth of the gear wheel. If they are damaged, the part must be replaced. To remove the rollers, outer and inner rings, special tools are required. Carefully study and understand the disassembly sequence in order to accurately carry out all the steps in the reverse order of assembly.
When inspecting the oil stripping ring, check for surface irregularities. If so, process to a thickness of 5 mm. The same - with the cardan flange. Grinding height up to 53 mm. Rinse the protection surfaces. Blow out oil lines. Drive construction parts, axle shafts, replace if there are scuff marks, severe wear.
The assembly (diagram) of the differential design of the drive is carried out as follows.
- Connection of both boxes of satellites, depending on the body serial number.
- A crosspiece is inserted into the left satellite box.
- Place the assembly gear in the left box.
- Lubricate differential units (axle gears, satellites, axles, thrust washers) with transmission oil.
- Secure the journals of the gear rings of the axle shafts with support washers.
- The satellites must be fixed on the axis of the disconnected cross-piece.
- Carry out the same actions with the right box.
- Tighten the parts of the boxes, enter the driven wheel of the base gear.
The master goes through the unit
Turn the gears of the axle shafts of the mounted differential using the splines with a force of no more than 59 N.
The adjustment of the drive structure elements is carried out when they are replaced.
- Fasten the inner rings of the differential bearing units on the journals, the end play between the box and the rings should approach 3.5-4.0 mm.
- The installed modular differential is closed by an auto-gasket, a reservoir cap. Roll in the bearings to set the correct position. Secure the heat exchanger closure.
Installation and adjustment of ball bearings of the rear transducer conductive gear.
- Fixing the guide elements to the main gear.
- Lapping the tail end with the guide element.
- Arrangement of spacers and spacers of the roller assembly between the inner rings.
- The main fastener of the main gear adjusting ring.
All intermediate actions, punching are shown by the diagram in Fig. 2. This diagram describes all the nuances in more detail.
- When adjusting the head assembly gear wheel, there should be no longitudinal play, the spring dynamometer will show the force. Indicators for new parts are 15-30 N, for worn-in parts - 20-35 N. To reduce tension when installing bearings, spacers can be added. To increase - remove.
- The correction has come to an end, we fix all the parts in their places, we fasten them with high quality cotter pins.
The adjustment of the backlash and the location of the central transmission gear are carried out as follows.
- Potential is established in the heat exchanger with well-adjusted assembled roller bearings, gasket of their separation from the cover, reinforced with a bolt.
- The distance between both teeth is set: 0.2-0.6 mm. The backlash is adjusted taking into account the number of oil seals of the driven gear: with a decrease in their number, an increase in the gap is necessary, and vice versa. When rearranging the gaskets, the tension of the potential elements is not violated only when the number of gaskets does not change.
- A diagram of the engagement of gear wheels along the contact patch is shown in Fig. 3.
Back to the table of contents
- Precise engagement with low load.
- Microcontact over the clove (when debugging, move the head to the driven part).
- Contacting at the root of the clove (correction: the conductive must move away from the slave).
- Block contact - narrow end of the tooth (deviation of elements from each other).
- Contact on the volumetric side of the clove (deviation of the driven to the leading).
A set of gaskets is installed between the valve face of the front bearing assembly, the wheel and the axle support. Package thickness - a gap not exceeding 1.3.
Fasten the closure of the outer bearing assembly with the collar with bolts, install the flange, and pin the washer. A modular differential is installed in the pan of the unit, then the oil seals between the crankcase and the damper. The top of the pallet is mounted taking into account the spring pads located in the outer lobe of the bridge.
The mounted axle must not get hot while the machine is moving. Correct adjustment of parts will not generate heat. Of course, you just need to check the absence of jamming, grazing of the rotating drive gears, if the device has any.
The device, adjustment, repairs must be carried out on time. Safety when driving in a car depends on this. Maintenance of the bridge part of the UAZ is as follows.
- Constantly maintain the technical level, timely change the oil, check the seals, detect and eliminate the axial gear backlashes of the head gear of the unit. Systematically observe the adhesion of the fasteners of assemblies and assemblies.
- Pay great attention to cleaning the safety valve. If the oil is dirty or contains iron impurities, flush the heat exchanger with kerosene before replacing it.
Experienced drivers recommend pouring 1 liter of gasoline into the pallet, raise the wheels, connect the engine, let it run for 1-2 minutes, then drain the remaining gasoline, work off and pour clean car oil into the tank.
UAZ 3741 - This is a four-wheel drive domestic utility vehicle, which in Soviet times was produced under the UAZ 452 index and for its characteristic body shape is called "Loaf". In the factory configuration, the car has an all-metal body, as well as a leaf spring suspension and two drive axles with non-locking differentials that transmit power to all four wheels.
Front-wheel drive is plug-in, rear-wheel drive is permanent. The bridges are unified with the 31512 model. The Loaf's carrying capacity is 850 kg. The ground clearance is 22 cm. Repair of the front axle 3741 is extremely rare, since its design is quite reliable. Basically, the repair is reduced to replacing the wheel bearings, as well as the oil in the differential, pivots and ball bearings. However, sometimes it is still necessary to remove the bridge. You have to do this yourself, since UAZ service centers do not work everywhere.
Since the UAZ 3741 has a frame structure, the front axle can be removed quite easily. To do this, you need to stock up on a powerful jack, stops that can withstand 1.5 tons of the front of the car, and WD-40 - liquid for unscrewing the nuts.
The procedure is as follows:
- First, you need to install stops under the rear wheels of the car.
- After that, disconnect the left and right brake pipes from the hoses that go to the front wheel drums.
- Then you need to unscrew the nuts securing the brake hoses and remove the hoses themselves.
- Next, unscrew the nuts securing the lower ends of the shock absorbers.
- Remove the bolts connecting the pinion flange c. front cardan.
- Then you should unpin the cotter pin, unscrew the nut of the ball pin of the bipod.
- Disconnect the link from the bipod.
- Unscrew the nuts that secure the ladders of the front springs, and remove the ladders with pads and linings.
- At the end, you need to lift the front of the car by the frame and pull the bridge out from under the car.
When the old bridge has been removed, you can proceed to the installation of the new part by performing the reverse procedure. If necessary, the removed unit is disassembled, its troubleshooting is carried out, damaged parts are replaced, and then the bridge is returned to its place.
Most often, the cause of inadequate behavior of the car on the road is a violation of the axial clearance of the pivots. It is very simple to check its violation - you just need to raise the front end with a jack and shake the wheel up and down. When axial play is detected, the pivot clearance needs to be adjusted.
Adjustment steps:
- We lift in front of the car, after placing the car on the handbrake.
- We dismantle the wheel.
- We unscrew the ball bolts securing the oil seal.
- We check the axial play by swinging the structure up and down.
- We unscrew a few bolts of the upper lining of the king pin and remove the lining.
- We take out the thinnest gasket, put the pad back.
- We carry out the same actions with the lower pad of the king pin.
- We tighten the bolts and check the result. When the backlash is eliminated, we screw the wheel and the oil seal back - and we go. If there is still play, adjust it again by removing the thicker spacers.
Assemble the differential in the following order:
1. Before assembling the differential, lubricate the side gears, satellites, thrust washers and pinions with gear oil.
2. Install thrust washers on the axle shaft gear journals.
3. Install the side gear with thrust washer assembly into the left gear box.
4. Install the satellites on the axle of the split cross-piece.
Rice. 7. Pressing out the outer ring of the differential bearing
5. Install the split crosspiece (Fig. 1) with the satellites into the left box of the satellites.
Rice. 8. Installation of satellite boxes by tags
6. Install the side gear with thrust washer assembly into the right gear box. Keeping the semiaxis gear, install the right cup of the satellites on the left so that the marks (Fig. 2) (serial numbers) of both cups are aligned.
7. Bolt the halves together and tighten. Tightening torque 32–40 Nm (3.2–4.0 kgf).
8. Install the final drive gear on the planetary gear box, aligning the bolt holes. Install the bolts and tighten. The tightening torque is 98–137 N · m (10–14 kgf · m). At the assembled differential, the gears of the semi-axles must be turned using a spline mandrel from a force of no more than 59 N (6 kgf) applied at a radius of 80 mm. Adjust the differential bearings (if replaced) in the following order:
Rice. 9. Pre-pressing of the inner rings of the differential bearings
1. Press the inner bearing rings (fig. 9) of the differential onto the journals of the assembled differential so that there is a gap of 3.5–4.0 mm between the ends of the planetary gear box and the ends of the inner rings of the bearings.
Rice. 10. Rolling in differential bearing rollers
Adjustment of the clearances in the gearing of gears and in the bearings of the drive axle of cars of the carriage layout of the UAZ-3741, UAZ-3962, UAZ-3909, UAZ-2206, UAZ-3303 is performed only when replacing gears or bearings, or when the axial clearance of the driving or driven gears of the main transmission. Replacement of the main drive gears should be done only as a complete set.
Adjustment of the bearing of the drive gear of the main drive of the drive axle UAZ-3741, UAZ-3962, UAZ-3909, UAZ-2206, UAZ-3303.
It is necessary to adjust the bearing of the driving gear of the main drive of the driving axle by selecting the thickness of the package of shims and tightening the flange nut.The bearing must be preloaded so that there is no axial movement of the pinion gear and the pinion rotates by hand without much effort.
Check the bearing preload with a dynamometer. In doing so, detach the left half of the crankcase. Remove the pinion bearing cover so that the friction of the oil seal does not affect the dynamometer readings. With correct adjustment, at the moment of turning the drive gear through the hole in the flange, the dynamometer should show a force of 1.5-3 kgf for worn-in bearings and 2.0-3.5 kgf for new bearings.
When putting the cover back in place, line up the lubrication holes in the crankcase, gasket and cover. The tightening torque of the pinion flange nut should be 17-21 kgcm. You cannot even unscrew the nut a little in order to achieve the alignment of the cotter pin hole with the slot in the nut. If the nut is not tightened sufficiently, the inner bearing rings can turn and, as a result, wear of the shims and the appearance of a dangerous axial clearance.
If the axial clearance of the drive gear appears during operation of the vehicle, tighten the flange nut. If this does not eliminate the axial clearance, then reduce the thickness of the shim pack and adjust the bearing as described above.
After adjusting, observe the heating of the bearings while driving. A slight heating of the bearing is not dangerous, but if the throat of the drive axle housing heats up to a temperature of 90 degrees and above, water boils on the crankcase, this means that the bearing has been overtightened and the total thickness of the gaskets should be increased.
Differential bearings must be adjusted by selecting the thickness of the package of shims installed between the ends of the inner rings of both bearings and the satellite box. When replacing the main gears and differential bearings, adjust in the following sequence:
1. Press the inner rings of the differential bearings onto the journals of the assembled differential so that there is a gap of 3-3.5 mm between the ends of the planetary gear box and the ends of the inner rings of the bearings.
2. Remove the axle shafts and install the differential assembly with the driven gear into the crankcase, put the gasket and the cover, tighten the cover bolts and turn the driven gear with a mounting blade through the crankcase throat, roll in the bearings so that the rollers take the correct position. Then, using fasteners, evenly and finally connect the cover to the crankcase.
3. Unscrew the fasteners again. Carefully remove the cover, remove the differential from the axle housing and measure the clearances A and A1 between the ends of the satellite box and the ends of the inner rings of the bearings with a feeler gauge.
4. Select a package of gaskets with a thickness equal to the sum of the gaps A + A1. To ensure preload in the bearings, add a 0.1 mm shim to this package. The total thickness of the package of gaskets should be equal to A + A1 + 0.1 mm.
5. Remove the differential bearing inner races. Divide the matched pack of shims in half. Install the gaskets on the journals of the planetary gearbox and press the inner bearing races against the stop. After that, adjust the side clearance by moving the driven gear.
When replacing only the differential bearings, measure and compare the height of the new and old bearing assembly. If the new bearing is higher or lower than the old one by some value, then the thickness of the existing package of gaskets should be reduced in the first case and increased in the second case by the same amount.
Adjustment of the side clearance and position of the main gears of the drive axle UAZ-3741, UAZ-3962, UAZ-3909, UAZ-2206, UAZ-3303.
The adjustment of the side clearance and the position of the main gears should be done only when replacing old gears with new ones in the following sequence:
- first adjust the pinion bearings and differential bearings as described above,
- then proceed to adjust the lateral clearance in the meshing of the teeth of the main drive gears.
The lateral clearance in the engagement of the gears must be adjusted by rearranging the shims from one side of the differential box to the other. If you remove the spacers from the side of the driven gear, then the gap in the engagement increases, but if you add, the gap decreases. The gaskets only need to be rearranged without changing their total thickness, so as not to disturb the tightness of the differential bearings.
The circumferential side clearance should be between 0.35-0.77 mm. Measure on the drive gear flange at a radius of 40 mm, check in four positions of the drive gear every revolution. After completing the assembly of the drive axle, it is necessary to check its heating after the movement of the car.
If the heating of the crankcase in the area of the double-row tapered bearing, the drive gear or differential bearings is over 90 degrees, the water boils on the crankcase, then the total thickness of the package of matched gaskets for the double-row tapered bearing of the drive gear must be increased. And for differential bearings, reduce the thickness of the gaskets on the side of the crankcase, with a circumferential side clearance of 0.64 mm or more, or from the side of the cover - with a circumferential side clearance of less than 0.64 mm.
Removing the rear axle
It is more convenient to work on a lift with two people.
SEQUENCING
We loosen the tightening of the rear wheel nuts.
We hang out the rear of the car and install reliable stops under the car frame in front of the rear axle.
Drain the oil from the gearbox
Disconnect the propeller shaft from the bridge
Removing the shock absorbers
We install jacks under the bridge beam.
We unscrew the nuts of the ladders of the springs, remove the linings and linings of the springs (see Removing, disassembling the spring and replacing its rubber bushings).
Having removed the wheels, ...
… We lower the rear axle onto the trolley and roll it out from under the car.
If there is no cart, the bridge can be rolled out on its own wheels (we don’t remove them for this).
We install the bridge and the removed units and parts in reverse order.
The nuts of the spring ladders are finally tightened in the "car on wheels" position.
USEFUL TIPS
Interchangeability of drive axle gears
If the final drive gears (pairs) in the front or rear axles are worn out, do not rush to buy new ones. The fact is that the teeth of the gears wear out in the front and rear axles from different sides. Therefore, if the pairs in the set are interchanged, the unworn sides of the teeth will come into operation. In addition, the front axle gearbox generally wears out much less, since it works less often.
Elimination of oil leakage between the axle shaft and the hub
If oil is constantly flowing between the flange of the rear axle shaft and the hub (if the gasket is in good condition) and, in addition, the axle shaft bolts are loosened, do not try to "tightly" tighten them, because this will not help. Better try to properly adjust the clearance in the hub bearings. All mentioned faults, including the risk of damaging the axle shaft, will disappear.
To repair the rear axle of the UAZ, you need to know exactly how it works, and clearly understand what functions this or that part performs.
See how the rear axle of the UAZ works:

