In detail: do-it-yourself repair of the washing machine inlet valve from a real master for the site my.housecope.com.
The inlet (inlet) valve is required in the washing machine to dispense water into the tank at a certain time. To check the inlet valve of the washing machine, we will briefly describe how it works.
The valve is normally closed. When voltage is applied to the valve coil, an electromagnetic field is created, which acts on the magnetic rod and draws it into the coil, the membrane opens and passes water into the valve outlet and further into the dispenser hopper and the washing machine tank. After water is collected in the tank, the power to the coil is turned off, the membrane returns to its original position and blocks the access of water.
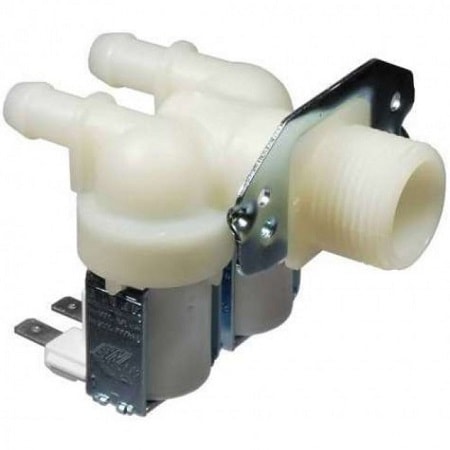
There are valves with one, two and three coils. The number of coils, and, accordingly, water supply channels, depends on the design features of specific models.
Where a single-section water supply valve is used, the further distribution of the flow is controlled by the mechanical lever of the command device, directing the stream into one or another section of the dispenser. Thus, the single-section valve is clearly only used in conjunction with a command device, that is, in earlier models.
In models where all processes are controlled by an electronic module, and there is no mechanical drive, two and three-section intake valves are used. But here you can ask a reasonable question: how can a two-piece valve ensure the intake of detergent in three sections of the dispenser? The answer is this: one of the sections is provided by the flow of water, which is created when both coils are turned on, then their flows are connected and form a third new direction.
| Video (click to play). |
To check the inlet valve, it is advisable to remove it from the washing machine, connect it to the inlet hose and alternately apply 220 V to each coil. A serviceable valve should open, and after disconnecting from the power supply, close tightly. The stream of water must be directed into a container with water.
- First of all, you need to check the valve mesh, if it is clogged, then water will not flow into the valve. The mesh must be removed, cleaned and reinserted. With this malfunction, the washing machine will fill in water very slowly, or it will not fill at all.
- If the valve does not open, then the coil is most likely burnt out. You can check it by measuring the resistance, which should be 2-4 kOhm. A defective coil can be replaced by removing it from a different valve. In this case, in one of the washing modes, water will not be supplied to the machine.
- If the valve opens, but after turning off the power, water continues to ooze for some time, then its membrane has lost its flexibility or the stem spring has weakened. Such a valve must be replaced, because, once installed again, it will constantly let water through, which can lead to flooding of the apartment.
- Also, you need to check the presence of pressed, plastic inserts in the fittings. These inserts reduce the flow of water per unit of time. They are mainly used on the valve connection that supplies water to the rinse aid compartment. When the insert falls out, the amount of water that the valve passes through increases, and it overflows the corresponding compartment in the corresponding wash cycle. This valve must also be replaced.
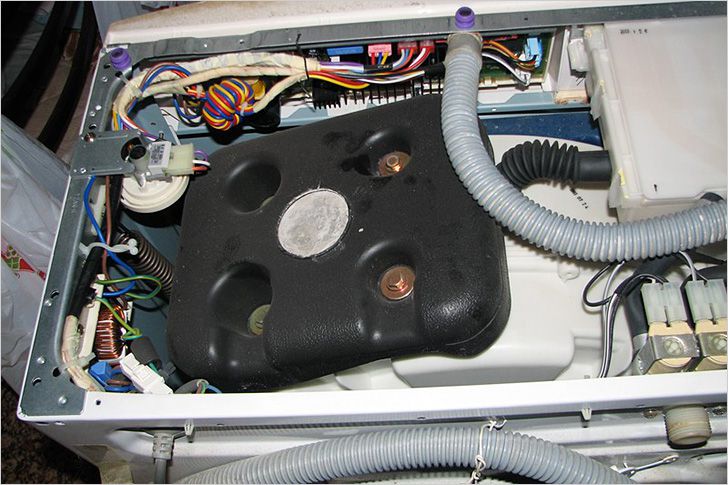
Basically, the inlet valves of front washing machines are located at the back of the top cover. The top cover must be removed to gain access.
The valves of vertical machines are often located on the back wall at the bottom, in the basement area. To gain access, in most cases, it is necessary to separate the side wall.
To replace the inlet valve, you must:
- turn off the water tap and disconnect the inlet hose from the washing machine;
- get access to the inlet valve;
- disconnect the electrical wires;
- disconnect the hoses from the valve fittings (in this case, disposable clamps can be replaced with worm gear, reusable);
- unscrew the screws securing the valve to the body of the washing machine (some valves, especially on German cars, are attached to the body with a latch, and to remove such a valve, you need to carefully remove the latch tongue, turn the valve body to the required position and remove it).
The installation of a new spare part is carried out in the reverse order.
In any model of washing machine, the most important element is the inlet valve for the washing machine, sometimes referred to as the filler valve. In this article we will tell you how this structural element is arranged, describe the principle of operation, and what types exist.
Washing machine inlet valve, has two types of working state - open and closed. In the second state, it arrives most of the time. A coil is installed inside the valve, to which the program supplies an electric current, which is a signal to open the valve, which accordingly leads to the filling of the working space of the machine with water. This principle of operation gave rise to another name for the valve - electromagnetic.
When the tank is filled to the required level, the control program sends a second signal to the filling valve, after which it closes and the liquid stops flowing into the system.
In almost all models of washing machines, the valve is located at the top of the structure, near the back wall. But in those machines where the laundry is loaded vertically, the valve is located at the bottom of the unit, also near the back wall. In the first case, in order to get to the element we need, it is necessary to remove the back cover, and in the second case, the side panel is dismantled.
Today inlet valve for washing machine has a more complex design, where the internal device is divided into many sections, and each of them has its own electromagnet. Accordingly, each section is connected to a specific place where water is required, and as needed, the control program sends signals and activates the coils. Therefore, we can safely distinguish the following types:
- single coil valves;
- with two coils;
- with three coils.
Also, now all coils have a completely electrical structure, they completely lack mechanical components.
To determine the serviceability of the valve, it must be removed. After that, connect the water supply hose to it, and supply current to the coils. If the unit is in good working order, the valve will open and let water through. After stopping the voltage supply to the coil, the locking mechanism should close. This check is very easy and will not cause any particular difficulties, but it must be carried out carefully, since you work in high humidity conditions with an electrical appliance, in no case do not allow exposed wires to come into contact with liquid.
Also, it is necessary to check the following units of the unit:
- It is necessary to check the filter mesh on the valve and clean it of any dirt.
- If the valve does not open, you should check if the solenoid coil in it is burned out, for this use a multimeter. The resistance of the working coil ranges from 2 to 4 ohms.
- Check for the presence of plastic elements in the valve fittings, they are designed to contain the water pressure. If these inserts are not available, then this structural element must be replaced.
The inlet valve of the washing machine is a non-separable part, therefore it cannot be repaired. This operation, for replacement, is carried out as follows:
- Firstly, it is necessary to de-energize the washing machine, then turn off the water supply and dismantle the back cover.
- We disconnect all hoses from the valve, the main thing is to remember which one, where it was installed.
- Then unscrew all the fasteners holding our part.
- Dismantle the old valve.
- Next, install a new element, and in the reverse order, assemble the washing machine.
After completing all the necessary points, check the performance of your unit, whether water is supplied and whether everything is functioning correctly.
The inlet or filling valve for a washing machine is similar in principle to a conventional tap for water supply. The only difference is that a conventional tap is opened manually, while the inlet tap is opened automatically.
How exactly it works and what the inlet valve is for, you will find out in this article. And you will also understand how to self-disassemble and replace parts without calling the master.
The water inlet valve for the washing machine is equipped with a thin membrane on the inside and coils on the outside. The main control module signals the valve to turn on. Then an electric current flows to its coils, which contributes to the appearance of a magnetic field. Due to this, the membrane opens, as a result of which water flows. After termination of the voltage supply, the diaphragm closes again.
Thus, the water filling (supply) valve has two positions - open and closed.
Their number depends on the model of the washing machine. In modern SMA, the manufacturer installs from two to three sections, so that each of them supplies water to a specific compartment of the powder receptacle.
- 1st section: powder section.
- 2nd section: compartment for rinse aid.
- 3rd section: section for other funds.
If there are only two spools available to pick up the detergent, they turn on at the same time.
Older models used a single-coil washing machine fill valve. He worked in conjunction with a command apparatus, the lever of which regulated the movement of the flow in a certain direction.
Where is the solenoid valve in the CMA? It is located under the top panel near the wall. You will see hoses connected to it that carry water to the detergent compartments.
The malfunction can be determined by external signs:
- Error code on the display of the washing machine.
- Water is drawn into the tank without stopping.
- When starting the machine, there is no sound of water being drawn in.
- The tank fills up with water.
For details on how to check and replace the inlet valve of a washing machine, see below.
Before checking the solenoid valve, inspect the mesh filter. It is located between the intake hose and the inlet valve and serves to delay particles of debris coming from the water supply.
Since the filter could become clogged over time, we will describe the principle of its cleaning:
- Disconnect the CM from the power supply.
- Close the inlet valve.
- Unscrew the water inlet hose and drain the remaining water into a sink or other container.
- You will find a mesh behind the hose. Pull it out with pliers and clean it under running water.
Let's look at how to open and check the inlet valve in a washing machine.
- Remove the cover at the top of the washer. To do this, remove the screws from the back that hold the top cover.
- Inspect the valve for damage.If nothing is visible externally, remove the device.
- Disconnect the hoses to the valve. You need to open the metal straps first, so use a pair of pliers.
- Now disconnect the wiring.
- Unscrew the bolts securing the part to the CMA body.
- Pull out the valve.
Inspect the hoses and the device itself at the time of blockage. How to check the filler valve? Check over a container or sink to avoid getting wet on the floor.
Connect the intake hose to the valve and turn on the water. If the element is serviceable, it should not leak water. If it leaks, then a replacement is needed.
The next version of the check must be carried out quite carefully. You must apply a voltage of 220 volts to the coils of the device. In this case, the section should open and fill the container with water. The danger of this method is that a short circuit can occur when electricity and water come into contact. Therefore, you need to work very carefully.
You can make sure exactly whether the valve of the washing machine needs repairs with a multimeter. Set the tester to resistance measurement mode. Apply the test leads to each winding one at a time, measuring its resistance. A defective part should show a result of 3 kΩ.
Some users are interested in how to remove, disassemble and repair the solenoid valve of the washing machine. The fact is that this element is non-separable, only a change of coils is possible.
However, a complete replacement is still recommended. To do this, you will have to purchase an item corresponding to the brand and model of your washing machine.
- Screw the valve to the body with the bolt that held it in place earlier.
- Plug the wiring connectors back into place. It's good if you marked or photographed the wires before disconnecting.
- Connect the hoses to the appropriate sections. Secure the clamps.
- Replace the top cover. Secure it with screws.
The solenoid valve has been replaced. It remains to put the filter mesh in place and connect the intake hose. After connecting the CM to the network, start the wash and check the work.
For those who are just going to start repairing, a video on the topic:
The washing machine inlet valve is a small device that allows you to automatically supply and stop the supply of water to the washing machine. In simple terms, the filler valve is a kind of ordinary tap, in any case, it performs a similar principle. Only you turn the tap manually in order to open the water, and in the case of the valve, water is supplied automatically.
The principle of operation is as follows: when you activate a wash program, the control module sends a signal to the solenoid valve. A voltage is applied to the valve coil and an electromagnetic field is formed in it, this field opens the valve itself and begins to supply water. After the water in the machine has accumulated to the desired level, the voltage supply to the valve coil stops and it closes.
Filling valves for washing machines can be different. Above, we just talked about the principle of operation of the solenoid valve, but in reality everything can be more complicated. After all, water must be supplied not through one hose, but several at different times.
The most primitive washer valves have a single coil, usually found on older washing machines. In them, the coil opens the water supply, and through which tube and into which compartment of the powder dispenser it will flow, it is mechanically controlled by the command device. But now you will not see such cars in stores.
Other Solenoid valves for washing machines include two or three sections with valves... Depending on which compartment you need to send water to, a specific coil is activated and the required valve opens. So, by actuating the desired coil, the direction of the water changes.If the valve has only two coils, then the third direction is activated by opening both sections. Otherwise, a third additional section is required.
As you can see, the principle of operation is very simple and does not raise any questions.
But, like any other part in a washing machine, the valve can fail. If this happens, your washing machine will stop picking up water. In order to check the valve, you need to do the following:
- The first step is to check is the valve clogged, to do this, unscrew the water supply hose, and pull out the mesh filter. Clean it up.
- Remove the valve from the washing machine and connect the water supply hose to it, open the water supply tap. The valve must not allow water to pass through. Next you need alternately apply a voltage of 220V to each section... Depending on which section you supply current to, the valve should operate and water should flow from the corresponding tube. If some coil of the washing machine valve does not work, then it is out of order.
- You can also check the performance of the valve coil with a multimeter, for this measure its resistance, if it is in the region of 2-4 kΩ, then the coil is in order, otherwise it is inoperative.
If we talk about repairing the inlet valve in a washing machine, then theoretically it not repairable. In practice, you can try replacing the burned-out coil with a similar one that can be removed from another valve. But we would not recommend doing this, because the efforts may not be justified.
It is best to buy a whole new valve and change it, it will not cost you a lot of money, but it will save you a lot of nerves and time.
If you have a new valve and are ready to change it yourself, then follow the instructions below.
Before starting the repair, you need to find the place where the inlet valve is in the washing machine. Usually, manufacturers place it at the top of the washer, and in top-loading machines at the bottom.
- Unplug the washing machine first. Shut off the water supply and unscrew the inlet hose from the valve.
- In order to get close to the valveif it is on top, remove the top cover of the washing machine, to do this, unscrew the two self-tapping screws on the back, slide the cover back and remove. For top-loading machines, the side panel must be removed.
- Now you it is necessary to disconnect all wires from the valve, as well as hoses... The hoses are secured with hose clips that can be reused. In some cases, the clamps are disposable, then take care of new ones in advance.
- Now you need detach the valve itself from the body of the machine... It can be screwed in or secured with latches. You need to either unscrew the retaining bolts or bend back the latches.
- Once the valve is unscrewed, it must be turned to pull it out.
Installation of the washing machine inlet valve is carried out in the reverse order. After you put everything in place, check the functionality by starting the washing program.
Most often it is in the closed position. When a current flows to its coil, an electromagnetic field arises. This field creates the actions required to open.
That is, it tightens the stem and the membrane comes into an open state. And the water enters the dispenser hopper, where it washes away the washing powder. And then, together with the powder, it is poured into the tank of the machine. When the required amount of water is drawn, electricity is stopped to the coil and the water supply is stopped.
In those models where there is only one valve, the direction of the water supply is controlled by a mechanic. control lever. It forces water to flow into the various sections of the plastic dispenser. This design is typical for older models of washing machines. In them, the one-valve system is adjacent and cooperates with the command apparatus.
More modern washing machines have an electronic control module. And there is no mechanical drive. They use valves with two or three coils (sections). One coil creates water supply to one compartment of the washing machine's plastic dispenser. The other is in the second. And in order to create a feed to the third section, you need a third coil. Or in the case of a two-coil valve, this is done by turning on both coils at the same time.
And in the absence of electricity supply - do not let water through. That is, to close. In carrying out this experiment, you need to be very careful. After all, if water gets on the wires under current, then there will be a short circuit. Therefore, you should protect yourself as much as possible. Also, one should not forget that water will flow during this test. It must be sent to some previously prepared container.
- First, you need to check the intake valve mesh. If there is a blockage inside it, then it can interfere with the water supply. This valve part must be removed and cleaned. And then return it to its original place. If you do not do this, then water will flow into the machine very slowly or not at all.
- In the event that the valve does not open when electricity is supplied, then most likely its coil has burned out. In order to make sure of the presence or absence of this breakdown, you can use a multimeter (tester). They need to measure resistance. Normal resistance is approximately 2-4 kOhm. You can change the coil. If there is a spare valve, you can remove it from it. If not, you can order a new coil or an entire valve. It is usually quite inexpensive.
- It is also necessary to determine if there are pressed plastic inserts in the fittings. They reduce the amount of water entering the machine at the moment. They are usually used on the inlet (inlet) valve union. The one who is busy supplying water to the rinsing section of the dispenser. If the insert falls out, then the water pressure increases. And it ends up in the dispenser section too much. A defective valve is easier to replace than to repair.
Most often, the valve is located at the top of the machine on its back wall. In order to get to it, we need to remove the upper part of the case (cover). The cover is fixed with 2 self-tapping screws located at the back. Unscrew them. Then push the cover from the front towards the back. Then you can shoot it.
If you have a top-loading machine, then in these models the valve is usually located at the bottom of the back of the body. In order to get to it, it is necessary to remove the side of the washing machine body.
Remember to turn off the water supply before removing the valve. Then disconnect the wire clamps and hoses from it. If the latter are fixed with disposable clamps, then you can prepare several disposable clamps in advance or use the reusable ones stored earlier.
Then unscrew the fixing bolts. In some models, the inlet valve is fixed with latches. In this case, you need to pull back the locking part of the latch, turn the valve and pull it out.


