The umbrella serves as an indispensable accessory in rainy weather, protecting from the currents of water and wind. If after another bad weather it has lost its attractiveness or one of its main parts has broken, do not despair and do not rush to throw it away. It can always be fixed! Before repairing an umbrella, study its device, determine whether it is possible to repair a faulty spare part. Sometimes, for automatic constructions, you may need the help of a specialist.
There are varieties of designs and differences between folding mechanisms from each other.The most important part of any umbrella is the canopy, which consists of a metal frame or plastic knitting needles, on which fabric is stretched and a one-piece or foldable handle. Each model can be equipped with a simple or automatic movement. All umbrellas are conventionally divided into:
Depending on the opening mechanism, there is a division into the following types:
The designs differ from model to model, but there are basic details for all umbrellas. Main elements:
The most common malfunction is when automatic umbrellas lose their rigidity. This happens when the wind turns them inside out, arching the thin spokes. It is important to periodically check the knitting points and, if necessary, reinforce the weakened fabric. For all umbrellas, there is a single rule: the fewer connections on the rod and knitting needles, the less often the structure breaks.
Whatever the expensive and high-quality umbrella, it cannot be insured against breakage. Before you throw your old one away and buy a new one, try to get your umbrella repaired. If you have a second - unnecessary copy - then it can become a source of scrap materials for restoration. Urgent repair of umbrellas, if necessary, can be carried out by professional craftsmen in specialized modern institutions like the House of Life.
Prepare the required materials and tools, depending on the cause of the malfunction. This can be a finished part from an old umbrella, round nose pliers, wire, or a tool for soldering metal parts. At home, you can repair the automatic umbrella with your own hands, fix the following breakdowns:
To join the seam on the dome, select the threads of the appropriate color: you should carefully, manually, sew the fabric. If the material comes off the end of the knitting needle, then wrap the edge with a thin fishing line and fix it with a knot. Pass the ends of the fishing line into the hole of the knitting needle and fasten it with several knots. This procedure is performed with a free arrangement of tissue on the frame.
How to repair an umbrella if the spokes are damaged? Follow the step by step instructions:
If the umbrella does not hold open, try repairing the product yourself.Such damage is easily eliminated if the latch is bent. To do this, press the ledge and sharply move the part to the side. This pulls out the tab of the retainer and gently straightens it. Install it back in the same way. Please note: if the spare parts for the umbrellas are of poor quality, then such repairs will not last long. In this case, you just need to replace the damaged part. It can be taken out of an old umbrella and inserted into the handle.
Repairing an automatic umbrella is a little more difficult than a mechanical one, and it takes more time. Sometimes the breakdown is associated with improper use of the product, then the parts are severely deformed and they can only be replaced with new ones. If the machine itself is faulty, it is better to contact the craftsmen in specialized institutions where umbrellas are repaired. This process is carried out in a short time.
Repair of damaged products of any complexity is carried out by specialized workshops or shops, which provide for the repair of shoes and clothes. In large cities, such as Moscow, St. Petersburg, there are service centers that provide high-quality repair of umbrellas. Small towns also have centers where the service will cost even less. Pay attention to advertisements on the Internet, in newspapers, read reviews, customer recommendations, compare prices.
Probably everyone uses an umbrella, since the rains fall on almost all places on our planet. And of course, almost everyone is faced with the fact that sooner or later the umbrella breaks.
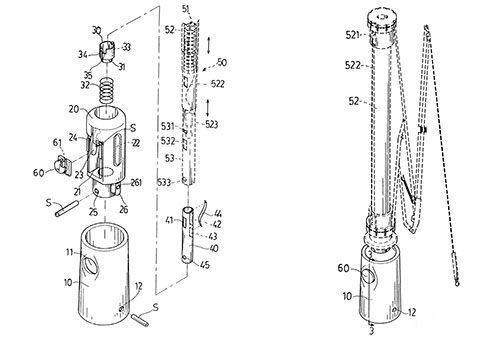
An umbrella usually consists of such main parts - a handle with a button, sliding pipes (of which the number can be different, but most often these pipes are 6 or 8), a lower support for the needles, the upper support for the needles to which the main cord of the umbrella is attached, thick short and thin long springs, plastic tube - the upper part of which is thickened, has a wheel and is inserted into the upper support.
Depending on what exactly broke, you will need the following things - ready-made parts from another umbrella, pliers, stainless wire, a soldering iron, a metal tube with a diameter of 6 centimeters.
- fluted knitting needles break very often.
In order to fix this, you need to take a metal pipe with a diameter of 6 centimeters and cut off a piece from it about 3 centimeters in length. Then you will need to straighten the ends of the knitting needle that broke, then put the cut piece of the tube on it and squeeze these two ends with pliers.
- damaged tubular rivets at the ends of the spokes. In order to fix the umbrella in this case, you need to insert a small piece of soft stainless wire into the hole, and then you will need to tighten the ends.
- the rod broke at the point of their articulation.
It is necessary to cut a small plate of 20 by 12 mm from a piece of tin and bend it along its length so that it looks like a trough. After that, you will need to tin the ends and install the overlay itself. Then you need to take a soldering iron and use it to solder the place where the umbrella was being repaired.
- quite often in umbrellas that open automatically there is such a problem that the retainer refuses to work. It is the latch that holds the umbrella when it is closed.
In order to eliminate this, you need to press the locking tab and move it closer to the handle. Then you need to get the faulty clip out of the tube, straighten it - and then put it back in its place.
VIDEO
Umbrella Is a mechanical device, which is a metal or plastic frame made of spokes on a tubular rod equipped with a handle, on which a synthetic waterproof material is stretched. The umbrella is designed to protect people from sunlight and rainfall.
An umbrella was invented in China 300 centuries ago for protection from the sun. In those days, the umbrella was considered a symbol of power, and only the emperor and those close to him were allowed to use it.
A lot of time has passed since then, and now the umbrella has become a constant companion of any person in everyday life. The airy design of the umbrella makes it foldable and lightweight, but not resistant to strong gusts of wind. Therefore, over time, everyone is faced with a breakdown of the umbrella, after which many simply throw them away.
But in vain, because you can save money and time, since usually the breakdowns of the umbrella are simple and are associated with the loss of a rivet or breakage of one of the spokes. Therefore, you can repair an umbrella with your own hands using a standard tool and improvised materials in half an hour.
The most common failure of an umbrella is a tubular rivet falling out of the articulated connection of the rods and spokes. From mechanical load in the wind, the edges of the rivet are unbent, it falls out and is lost.
If the breakage of the umbrella consists in a tubular rivet falling out of the hinge, and there are no conditions for repair, then it can be repaired with a paper clip.
To do this, it is enough to pass the bent end of the paper clip through the holes of the knitting needle and the rod, then bend the end of the paper clip, as shown in the photo.
If you have pliers with the function of nippers at hand, then you can take a piece of wire from a paper clip, bend it into a loop on one side, insert it into the holes and form a loop on the other side. Thus, the wire will reliably function as a rivet and will not tear the fabric of the umbrella canopy.
This is the most reliable repair method that I have been using lately. The repaired swivel in the umbrella did not have to be repaired.
A copper wire for electrical wiring with a diameter of about 1 mm is used as the material for the rivet. The wire is selected depending on the diameter of the holes in the rod and spoke.
Before making a rivet, you need to pass the wire through the hole in the rod and check that it runs easily. If it's tight, then you need to slightly reduce the diameter using sandpaper.
Next, you need to form the rivet head. To do this, the wire is clamped in a vice and with a small hammer blows along the edges, they are riveted, as shown in the photo. If the end of the wire is not flat, then file it with a fine notch.
When repairing an automatic umbrella, to be able to install a rivet, it must be kept in a half-open position, which is prevented by the spring trying to open the dome. In this case, you need to use a rope to tie the movable lower frame of the umbrella to the handle, as shown in the photo.
In the next step, you need to put the spoke into the slot of the rod and insert the prepared wire with the head. Bite off the excess wire with side cutters so that the protruding part of it is about a millimeter.
At the last step, you need to press the created head of the wire to the anvil (any massive metal object will do) and flatten the wire with light blows along the edges until the head is formed. Here is the umbrella hinge and refurbished.
As practice has shown, although the umbrella is used in wet weather, the copper rivet does not oxidize. If desired, it can be coated with, for example, nail polish.
Instead of copper wire, zip nails of the required diameter can be successfully used. Nails are made from soft iron and therefore rivet well too.
You can repair the swivel joint of the umbrella frame using a screw with a nut with a diameter of 1-2 mm of a suitable length.
To do this, you need to align the holes of the parts coaxially, thread a screw through them and screw a nut onto it. If the screw is too long, then after screwing in the nut it is necessary to remove the protruding part using side cutters.
Usually, when a screw is biting, the thread will deform and the screw will not be able to unscrew itself. But for reliability, it is better to rest the screw head on the anvil and rivet its protruding part from the nut with a hammer.
If there is only a screw, and there is no nut, then you need to shorten its threaded part to the desired length and slightly rivet the protruding part.
If at least one rivet has fallen out of the hinge, then most likely others have also weakened. Therefore, in order not to repair the umbrella again in the near future, you need to knock with a hammer, resting on the anvil, all the other rivets.
The second reason for the frequency of breakage of umbrellas is the breakage of fiberglass spokes or lugs on the rods.
In this umbrella, the end of the needle tip broke off at the passage of the hole for attaching the fabric of the dome. Most likely from the impact of the umbrella on a hard surface.
The entire tip is shown on the left in the photo, and a broken one on the right. If you have a new spoke or tip, the easiest way is to replace it. But there was no spare spoke available and therefore had to be repaired.
For repairs, a hole with a diameter of about 1 mm was drilled in the tip and with a file sharpened sharp edges in the place of its breakage. To prevent chafing of the thread at the points of exit from the hole, it is necessary to chamfer with a larger diameter drill or a knife blade.
Then, using a sewing needle and nylon thread, the umbrella dome was sewn to the knitting needle. The umbrella is now self-repaired and looks just like it did before.
As a rule, the knitting needles and rods in the umbrellas are made of metal, but recently umbrellas with plastic rods and fiberglass knitting needles have begun to appear.
Just such an umbrella got into the repair, in which one of the spokes broke off at the place where it entered the hinge rocker. The remainder of the spoke remained inside the hinge.
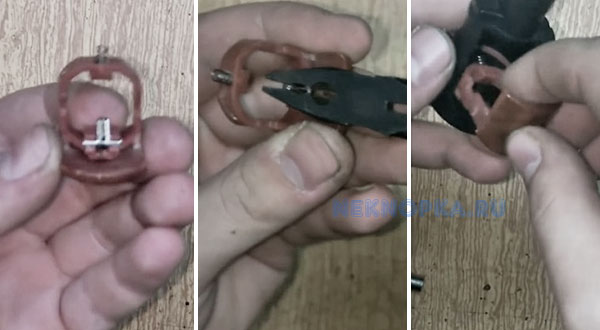
In the rocker, the spoke is fixed with the help of its bent edges. To remove the remainder of the spoke, bend the petals slightly with a thin blade of a flat screwdriver to the sides.
The broken end of the spoke fluffed up a little, so before fixing it in the rocker, it was smeared with Moment quickly drying waterproof glue.
After pressing the knitting needle with the petals in the rocker, the umbrella began to look like new. The same technology is used for repairs in the event of a broken spoke at the tip.
After the repair, the spoke became a little shorter, but visually, when the umbrella dome was open, it was invisible.
If the fiberglass spoke breaks in the middle, then you can restore its integrity using a piece of thin-walled metal tube taken from the telescopic antenna of an old radio receiver. The broken ends of the spoke are greased with glue and inserted into the tube so that the joint is in the middle of the tube.
If the eyelet in the pull rod breaks off, it seems that it is impossible to repair the umbrella without replacing the entire rod. But this is not the case. Using a metal knitting needle from an old umbrella, you can successfully restore the eyelet.
The photo on the left shows a working articulated joint, and on the right with a broken eyelet at the rod.
For repairs, you need to take a metal knitting needle about ten centimeters long with a hole at the end from an old umbrella and tin it along the entire length with solder using an electric soldering iron.
Next, you need to remove the rivet from the rod and cover the inner surface of the groove of the rod with solder, as shown in the photo. When working with a soldering iron, it is necessary to exclude the contact of the heated parts and its tip with the fabric of the umbrella dome, since the synthetic material may melt.
In the next step, you need to place a spoke in the groove of the rod and warm it up with a soldering iron along its entire length until the solder melts both on the spoke and in the groove of the rod. In this case, one must not forget and correctly orient the hole on the spoke. This technology can be used to successfully repair broken rods in the middle.
After installing rivets using one of the technologies described above, the repair of the umbrella can be considered complete.
Rarely, but it happens that the decorative cap, installed on the top of the umbrella dome, breaks off or twists off and is lost.
A cap that has broken off from the threaded part, if present, can be easily repaired, restoring its integrity.
To do this, you need to drill a hole in the center of the threaded part of the cap remaining in the umbrella reed, with a diameter equal to the inner diameter of the thread of the self-tapping screw.
In the center of the cap, you also need to drill a hole with a diameter equal to the external thread of the self-tapping screw. Pass a self-tapping screw through the cap and lubricate it so that it does not unscrew with any waterproof glue and screw it into an umbrella.
The photo shows an assembled umbrella, repaired by hand using the technology described above. The fabric of the dome is now securely fixed and water will not enter the frame parts.
If the cap is unscrewed and lost, then you can restore it using a self-tapping screw with a large press washer.
To do this, you need to make a cork from wood. A shortened furniture dowel may fit in diameter, as shown in the photo.
Further, the wooden cork is flush driven into the hole in which the umbrella head was previously screwed in.
In the next step, a hole is drilled in the center of the plug with a diameter equal to the inner diameter of the self-tapping screw.
It remains only to lubricate the thread of the self-tapping screw with waterproof glue and screw it into the cork. As you can see, it turned out beautifully.
If a self-tapping screw with a wide head is not available, then you can cut a round washer from a sheet of plastic of a suitable color and fix it on the dome. The washer can be made from any cork from a plastic bottle by removing the threaded part.
Repair of automatic umbrellas is not considered in the article, since it is very laborious and a home craftsman without repair experience is beyond his powers. It is necessary to completely disconnect the dome material from the metal structure, remove the upper clip, reach the roller and replace the tape. When assembling, a special device is required to compress a rather powerful spring. Therefore, if the opening mechanism in the automatic umbrella is out of order, it is better to go to a workshop or buy a new umbrella, leaving the broken one for spare parts.
Here's what to do if your umbrella is broken. The most detailed do-it-yourself umbrella repair master class (video)
Usually, many throw away umbrellas due to minor breakdowns, which, in fact, are easy to fix even for an inexperienced craftsman. Basically, the rods break at the point of their articulation, carried out using the axle. More often this happens with a large thrust at node “A” (Fig. 1), since this thrust in the open umbrella carries the main load, and even a slight lateral pressure on it leads to the breakage of the thrust, as a result of which the compression hook of the power spring is usually lost.
When starting to repair the traction, first of all, you should relieve the stress in the elements of the umbrella frame created by the power spring. For this, the upper end of the umbrella is abutted against some surface, for example, a door, and the power spring is compressed with the folded umbrella fixing sleeve so that all the hooks holding the spring in a compressed state can be freely detached from the rods.When releasing the hooks, the compression of the spring must not be loosened, otherwise other rods may break.
To repair a broken rod, you will have to make a connecting pad. To do this, a 45 × 13 mm plate should be cut out of 0.2 ... 0.3 mm tinned sheet (the width is given in excess, since it is not always possible to symmetrically bend the plate exactly along the longitudinal axis), turn the plate into a "trough" so that the latter was tightly put on the traction being repaired, to give the lining the desired shape (Fig. 2, a).
The broken and whole rods are freed from the fabric, if the first is deformed, it is straightened. The sections of the connecting rod ends, which will be located under the pad, must be tinned with excess. If the axle on the attached (whole) rod has no defects, the rod with the axle is installed in place, as shown in Fig. 2, b, the axle on both sides is tacked to the rod by soldering, a connecting plate is installed (Fig. 2, c). Having fixed in the desired position the end of the rod and the pad using a squeezing clamp, the pad is soldered to the rod without disturbing the axle soldering. The other half of the rod is firmly inserted into the pad (Fig. 2, d), after which the rod is fixed and the pad is soldered along its entire length. The joint is brought into proper form, checking the functionality of the articulated joint.
If the axle on the connecting rod is strongly bent and has any other defect, it is removed, a hole with a diameter of 1.5 mm is drilled in the lining, which coincides with the hole on the repaired rod, a wire is inserted into the hole, which will act as an axle. Further, the same operations for connecting the rods are carried out, which were described above. It remains to take out the wire, make an axis of the desired length out of it and connect it with the thrust axis. So that the axle does not fall out of the rods and does not catch the fabric, it is soldered to the pad on both sides (Fig. 2, e). The fastening of the fabric to the rods is restored. If there is easy access to the soldering point of the traction, it is better not to disconnect the fabric from the frame, but in order to avoid hot drops of tin from getting on the fabric, it is necessary to first put a gasket between the fabric and the soldering point. The breakdown in node B is eliminated in a similar way (see Fig. 1).
There are times when, after repair, umbrellas of this type do not fully fold. One of the reasons for this is the displacement of the lug inserts in the repaired nodes (especially in the A node), usually due to poor-quality crimping by the sidewalls of the rods. To eliminate such a defect, it will be necessary to move the eyelet to the desired place with light blows of a small hammer on the part of the eyelet protruding from the rod and again tightly squeeze the insert with the sidewalls of the rod. I draw your attention to the fact that grooves are made on the ear inserts for a more reliable connection with the rods (see Fig. 3, a).
In fact, broken rods are repaired only in the absence of intact rods from some other umbrella that cannot be repaired. It will not be difficult to separate the required traction from the umbrella frame. It is enough to cut off the flaring of the axles on a suitable rod from the samokal with a knife and disconnect it from other rods and assemblies. And the axles for the "new" thrust can be easily made of wire (or a stud) of the required diameter, not forgetting to solder the ends of the axle to the sides of the thrust.
In umbrellas with an extended power spring, along with the above breakdowns, the bushing of the power spring often cracks. Note that all the failed bushings that I dealt with could not be repaired, so to replace them I had to use suitable bushings from umbrellas of other designs. The new bushing can be installed both through the upper and lower parts of the umbrella shaft. It is only necessary to determine which pin is easier to knock out: either the pin that secures the handle, or the pin that holds the upper rod attachment point. First of all, of course, you need to free the rods from the broken bushing and remove the last one.The installation of the bushing through the upper part of the rod is carried out in the following sequence: the damping spring is shifted down (see Fig. 1), the pin is knocked out of the upper linkage attachment of the rods, this unit is removed and a new bushing is installed. The assembly of the umbrella, of course, is carried out in the reverse order.
All of the above repairs are performed with the power spring compression hooks removed. At the end of the repair, the presence of these hooks is checked, the missing number is made according to the shape of the existing ones, the sleeve for fixing the umbrella is folded down so that the cavity (slot) of the hook on it is in line with the protrusion of the retainer, hooks are hooked onto the sleeve, squeeze the power spring and hooks are inserted into the traction holes.
Opening and folding the umbrella, they check the correctness of its repair and assembly.
You can repair the mechanism in another way. It is a little simpler and takes less time to repair, but the ears are less durable. In this case, take a small piece of plywood (or a strip) with a thickness of about 5 mm and insert it into the slot of the fixing mechanism between the broken ears. On the remaining part of the lug in the plywood, mark and drill a hole for the axis, insert a stud of the appropriate diameter into the hole, install the plywood on the axis in the slots, weld on the mechanism body from the fragments of the ears or other suitable material or glue the missing parts of the ears to it. Next, from tin (stainless steel, copper, brass), cut out two strips half the width of the ear, bend them with a half-collar. Putting one half-collar on the ear, as shown in fig. 6, the semi-collar is heated with a soldering iron, gradually pressing it into the ear. We also press the second semi-collar into the other ear. It remains to take out the carnation-axis, remove the plywood, process the ears, and then assemble the mechanism. Do not forget to check the welding quality for strength. (For those who have not worked with plastic parts, I would like to inform you that such work is done in a well-ventilated area.)
For children's umbrellas with automatic opening, it happens that the hook protrusion at the retainer holding the umbrella in a folded state stops returning to its original position. This is due to the fact that the retainer is made of low-quality metal, and simply bends under load. You can quickly fix this problem. To do this, you have to press the locking lug (Fig. 7), move the lug towards the handle, pull the retainer out of the rod tube, bend the retainer at the bend point, and then insert the retainer into place. True, after a while the retainer will lose its shape again, so it is better to immediately replace it with a new retainer made of high-quality steel. If there is none, it is not difficult to make the retainer yourself from elastic metal.
For those who decide to do repairing umbrellas , I recommend making the devices shown in Fig. 8 and 9. Although they are primitive, they greatly simplify the repair process. So to form the linings (see Fig. 2, a), you will have to make a simple stamp. The die matrix (Fig. 8, a) is bent from sheet steel 1.5 mm thick. In the center of the bottom, a "trough" is formed with a beard or other suitable tool, a depression. The punch (Fig. 8, b), which has a protrusion in the center, is made from a strip of steel with a thickness of 3 ... 4 mm. When forming an overlay, a plate with a size of 45 ... 50 × 13 mm is placed on the matrix so that there is a depression under the center of the plate, a punch is placed on top and hit with a hammer. Everything. The cover is ready, you just have to work on it a little.By the way, the matrix described above is also useful for editing the rods, but the punch will have to be made a new one (Fig. 8, c). The deformed rod is placed in the recess of the matrix, after which it is straightened with a punch.
VIDEO
It is also necessary to make devices for compressing the power spring (Fig. 9). The principle of operation of this device is similar to the principle of operation of a simple screw press. Here, two crossbars "walk" along two guides (Fig. 10), one of which acts as a base, and the other acts as a slider, which can be moved by turning or unscrewing the thumbs on the guides where the M6 thread is cut. Each cross member consists of two halves (Fig. 10, a).
We will tell you a little how to compress a spring using this device. First, on each pin (guide), two halves of the jumper are put on and screwed on with a thumbscrew. The complete assembly of the device is carried out directly on the umbrella. The halves are connected with screws, as a result of which the resulting jumpers clasp the umbrella handle shaft. The fixture is now ready to compress the spring. You just need to spin the lambs. This simplifies the process of removing and installing the spring compression hooks described at the beginning of the text.
A little about the fabric. Broken ends of the rods tend to tear the fabric of the umbrella. Small holes can be sealed with the same cloth using BF-6 glue, which is sold in pharmacies, but it is easier to stick, as my friends do, a transparent self-adhesive film to the damaged area.
The weather is often unpredictable, and small rain can turn into torrential rain with strong gusts of wind. If your automatic umbrella breaks down during such a natural storm, do not rush to carry it to the workshop or throw it away. Our tips will help you repair it at home. By the way, see if you already have broken umbrellas in your house, the details of which you can use during the repair process.
Diagram of the construction of a standard automatic umbrella
The structure of umbrellas can be very different, but in general, several main parts of the structure can be distinguished. The main elements are a handle with a button, sliding tubes (there are 6 or 8 of them in the device), lower and upper supports for the needles, a plastic pipe. The upper part of the latter is thickened, a wheel is attached to it, which is inserted into the upper spoke support. In turn, short and long springs are attached to the support.
This is interesting: The most common today are semi-automatic umbrellas. They open when you press a button, close - manually. In a fully automatic umbrella, pressing a button both opens and closes the umbrella.
There are enough parts in automatic and semi-automatic umbrellas that could theoretically break. But, as practice shows, there are 5 most common breakdowns. We invite you to learn about the methods of eliminating them.
An antenna from an old TV or radio can be useful for repairing a spoke.
As it turns out in practice, it is the grooved knitting needles that break most often. In order to eliminate the malfunction, take a metal tube with a diameter of 6 mm and cut a small piece 3 cm long from it. The tube can be a spoke from another umbrella, an antenna from a receiver or TV. Straighten the broken knitting needle of your umbrella, put the prepared element on top of it and clamp it with pliers on both sides.Then put on the umbrella cover and try to open and close it several times. If the spoke doesn't fall out, you've done everything right. Feel free to continue using your favorite umbrella.
Useful information: Modern models of automatic umbrellas use from 8 to 16 spokes. The more needles a particular model has, the smoother the dome will look: the fabric will not sag. Also, an umbrella with more needles resists the wind better. Even with strong gusts, it will not bend in the opposite direction.
It also happens that the tips themselves break on the knitting needles. Then the fabric material ceases to hold and the spoke is exposed. This can harm both you and those around you, as the needles are sharp enough. They can scratch the body, rip clothing, etc. You will need stainless steel wire for repairs. Thread it into the knitting needle, roll the other edge in the form of a small sphere. Then stretch the fabric and insert it into the resulting ball. The most important thing is to twist the wire tighter so that after repair the spoke does not jump out in a strong gust of wind.
The design of automatic umbrellas provides for the presence of a special tape, which may break during operation. But this is easy to fix. Unscrew the upper part (umbrella plug), remove the canvas and take out the nail-fixer, which is located in the upper assembly. Then disassemble the entire assembly. To do this, place your hand over the open tube and remove it very carefully. This must be done carefully and carefully, as there is a tight spring inside the assembly, which can rebound and injure you. Then replace the torn tape with a new one, reassemble the assembly and reinstall the retainer.
Quite often, the rod located at the point of the articulated joint fails. It is important to remember that such a part can be repaired only after loosening the connections on the umbrella and removing the hooks - otherwise you may be injured. To do this, cut a small 4 x 1.2 cm plate out of a piece of tinned tin and bend it lengthwise. You should get a trough-shaped mold. Check if it is deformed from the link halves. Straighten it if necessary. Then, tin the ends along the length and fit the overlay. Finally, solder the entire length of the repaired section.
If you cannot fix the retainer, you may need to replace it.
It happens that in modern umbrellas the retainer fails. Because of this, it is not held open. But such a breakdown is easy to fix.
Press down on the locking tab and with a sharp movement of your hand slide it to the side. Then remove the bent retainer, gently straighten it and put it back.
However, if the retainer is made of low-quality metal, then straightening it will help for a short while. Then it's better to just replace it. Find the old umbrella, remove the retainer from it and place it in the new umbrella. Assemble the design and test. If done correctly, the mechanism will work as it should.
VIDEO
Video (click to play).
Many people do not want to waste time fixing a broken umbrella and are looking for a replacement. But it is quite difficult to choose a product that will not break after several exits in rainy and windy weather. Yes, and it will not be cheap. Therefore, it will be better to save time and money by renovating your old umbrella. We hope our tips will help you do this.

