The steering mechanism is an important part for controlling the movement of the car. Its main unit is the steering rack, which transmits the force that the driver applies to the steering wheel, through the tips and rods to the steering levers, connected through the trunnions to the steered wheels.
The drive gear engages with the steering rack and is mounted in the crankcase on bearings. A stop made of cermet, sealed in the crankcase with a special rubber ring, presses the rack against the gear with a spring.
The instruction indicates that the work is to be carried out on a well-fixed vehicle. For this, stops are installed under the rear wheels, the handbrake is tightened, the steering wheel is locked.
Tip: To avoid trouble when repairing the steering rack, it is better to disconnect the battery terminals from the car.
VIDEO
A new bushing is installed. New damping rings made of rubber are installed on it so that thin parts of the ring were against the cuts in the sleeve.
At the edges of the sleeve, the rings are cut and the cut pieces are discarded.
The retaining ring is removed from the pinion shaft.
Using a two-arm puller, press the ball bearing as shown in the photo.
Removing the ball bearing
The needle bearing is pressed out with a special puller. If it is not there, another option is proposed: two holes are drilled in the end of the crankcase, the diameter of which is two millimeters, this will make it possible for the needle bearing to come out onto the ring.
Pressing out the needle bearing
The crankcase cavity of the unit is washed. The needle bearing is pressed in with a piece of pipe. The hole is sealed with “cold welding” preparations. The PIOL-1 grease lubricates the bearings, drive gear, and rack teeth well. UNIOL-1 grease is placed in the cavity located above the nut fixing the drive gear bearing. The steering rack assembly is rebuilt in reverse order.
The boot is installed on the steering rack and secured with clamps.
A gap of 0.12 mm is maintained when assembling the structure between the rail stop and the nut. At the end of the clearance adjustment, the stop nut is screwed in, this protects it from unscrewing.
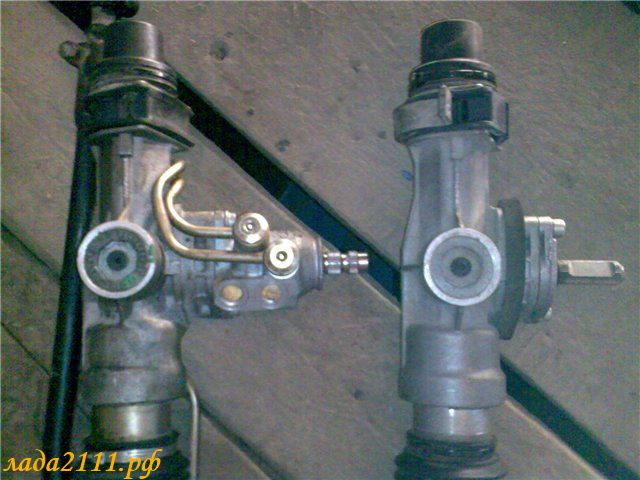
Steering rack of a car VAZ 2112
Tip: Before you start repairing the steering rack, it is better to get acquainted with all the operations on video.
Timely diagnostics and high-quality repair of the steering rack on a VAZ 2112 car will ensure reliable operation of the car, and the cost of repairing it will be lower than after an accident caused by a unit malfunction.
Repair of the steering rack VAZ 2110, 2112
A disdain for the state of your iron horse leads to far from the most pleasant incidents on the road. The car requires not only constant care, but also regular technical inspection, which confirms the serviceability of its key components.Timely repair of the VAZ 2110 steering rack and diagnostics of its malfunction is the key to your safety on the road.
The presence of a backlash in the steering mechanism, a dead zone for turning the steering wheel in its original position and a characteristic drumming knock transmitted to the steering wheel when moving on uneven surfaces is a clear sign of a breakdown characteristic of this article.
The rail design is relatively simple. The reasons for breakage, knocking and backlash appear in connection with insufficient lubrication of the product and its corresponding development along the sleeve or thrust mechanism.
An equally important role in the reliable operation of the rail is also played by rubber covers, which clean the mechanism from dust, dirt and moisture. If the anthers are torn or not tightly packed, this is a sure cause of serious problems, clogging and corrosion of product parts.
Suppose you noticed an uncharacteristic chatter behind your car when driving? How do you understand that it is time to repair the rail? There are not so many diagnostic methods, they are extremely simple and do not require special sophistication from you:
1. Check the steering gear at the point where the steering shaft and rack are combined. If it gives in to force and a characteristic knock is heard, the problem is most likely in the lack of lubrication of the needle bearing;
2. The presence of a backlash due to a worn out bushing or a banal insufficient tightening of the main units can be concluded by grasping the tie rod joint under the hood of your car.
If we have already decided on the need to restore the rail, it's time to decide on the method of repairing it.
Immediately it is worth making a reservation about repairing the steering rack from a VAZ 2110 with your own hands - the process is very laborious, nervous and ungrateful. It is recommended to decide what is easier for you: spend perhaps a whole day doing hard and painstaking work, buy a new rail, or give about 3000 rubles. for repairs in a service center?
In defense of do-it-yourself repairs, we note that only you yourself are able to perform the work with due seriousness and responsibility, dictated by the love for your own car. Repairing the steering rack of vases on your own will be much cheaper, but it is advisable to enlist the help of a friend when reinstalling the rack and pinion mechanism to its place under the hood - it is absolutely inappropriate to do this alone.
Necessary tools and spare parts for self-repair:
Repair kit for a steering rack VAZ 2112
The cheapest repair kit for repairing a steering rack from a VAZ 2110 with your own hands will cost around 200-250 rubles. A more complete and versatile set of spare parts will cost us about 500 rubles. It is also recommended to replace the central corrugation (its price is about 250 rubles).
In total, it turns out at least 500 rubles. At the same time, buying a completely new rack and pinion mechanism will cost about 1100 rubles. From the tool, we will definitely need:
special key 2110, which is a hollow octahedron;
wrench with long handle and 15 mm octagonal socket;
ratchet with 10 and 13 mm heads;
a set of locksmith tools;
mount;
jack.
penetrating grease for rusted bolts or kerosene (in the second case, you will also need a syringe);
diesel fuel, gasoline or other means for washing parts;
Litol-24 grease, ideally FIOL.
If you already have all of the above tool in stock, then it's time to get down to work. First, we open the hood and proceed to dismantle the accompanying parts: remove the battery, the platform under it and the air duct.
Dismantling the steering rack VAZ 2110
The steering rack brackets on both sides of the rack hold it securely with four bolts. The biggest danger at this stage is the risk of ripping off the bolts, for which we carefully wet them with penetrating grease or kerosene beforehand.
Now we unscrew the bolts holding the inner ends of the steering rods.Beforehand, of course, do not forget to remove the locking plate. It remains only to unscrew the flange bolt securing the rack to the steering wheel inside the cabin, but at the same time it is worth noting its relative position to the intermediate steering shaft in order to maintain alignment with the steering wheel straight.
We proceed to the direct repair of the steering rack for the VAZ 2110
If we have followed all the previous steps correctly, all we have to do is to release the two fastening brackets under the hood and forcefully swing the rail away from the body. Here we may need a crowbar. We will pull the rail through the hole in the mudguard. Here the jack will come to our aid.
We recommend sticking to the following algorithm when parsing the rail:
successively remove the support, the protective cap on both sides of the steering gear;
we release the clamps squeezing the protective cover and remove it;
use a special key to release the stop nut, remove the rail stop, spring, retaining ring;
sequentially remove: an O-ring, a protective washer, a retaining ring and a bearing nut;
after which we remove the drive gear directly with the bearing;
we remove directly the rail and the support sleeve.
For clarity, the dismantling process can be seen on.
Particular attention should be paid to the condition of the support sleeve and the worm gear mechanism. Damage to the boots will cause excessive rack corrosion, destruction of the transmission teeth, destruction of the stop spring and contamination of all parts with dirt.
Parts must be washed, check bearing play, cleaned. Also generously lubricate all mating surfaces. The rail stop and the retaining ring, as the parts most susceptible to friction and wear, are subject to mandatory replacement.
There are no eternal mechanisms, and automotive components and assemblies are no exception. When driving on uneven roads, sooner or later you may hear a knock on the steering wheel. Also, knocking can be felt when turning the steering wheel while standing still. These are the main signs that it is time to repair the steering rack of your VAZ 2110.
Grasping the steering shaft near the joint with the rack, try to jerk it up and down. If you hear a knock, the rack housing needs to be repaired. This could be due to the lack of lubrication in the needle bearing.
To check the backlash of the bushing and the contact of the rack with the steering gear, you need to grasp the joint of the steering rods from under the hood and try to move the shaft. If the knots are not tight enough, this is not too bad, but if the joints come from the rail, you will have to choose one of the following options:
purchase of a new rail for the VAZ 2110;
restoration of a worn-out rail from masters;
DIY repair of the rail.
If you have money for a new part, buy it better. Professional restoration of the mechanism in the workshop also costs a lot of money, and the most economical option is, of course, self-repair.
You can restore the rack using special repair kits for the steering rack, which have different configurations:
The minimum set with a bearing, washer, new nut and bushings (about 250 rubles).
Extended kit with shafts and bearings (about 500 rubles).
Complete repair kit for the rail, including the rail itself (from 900 to 1200 rubles).
Dismantling and installing a steering rack on a car is not difficult, but it requires a certain amount of time and patience.
You will also need a 24 octagon wrench with an internal hole.
If you do not have such a tool in your arsenal, you can use a long bolt with a 17 head. Carve a triangular out of the hex head, slightly sharpening one of the edges. Sharpen the side parts of the bolt with a wrench by 10 and you will receive the necessary special wrench.
First you need to remove the support sleeve by prying it with a flat screwdriver. After that, the place for the support sleeve must be lubricated, and then with a screwdriver through the hole we insert the sleeve into place.
We cut the O-rings and change the roller bearing.We also make replacement of the bearing on the drive gear shaft.
We insert the rail inside the case and assemble everything in the reverse order, lubricating all the parts.
The steering rack of a VAZ 2110 car is adjusted in a state clamped in a vice. The mechanism is fixed so that it does not move. This can be done by placing wooden blocks on the sides.
Grasping the rods of the rail, also called a mustache, with your hands, you need to shake them. This will allow you to determine the amount of backlash.
To eliminate the backlash of the steering rack, you need to use a manufactured or purchased special key. It needs to be inserted and rotated 10-15 degrees counterclockwise, and then try again to shake the rods, holding them with your hands.
If you feel looseness even during the subsequent check, tighten the nut by another 10-15 degrees. You need to repeat the procedure until the backlash is completely gone.
The development of the steering rack is different for each car, so there is simply no specific tightening torque. It should be noted that the rack must never be overtightened, otherwise the steering wheel will turn too tight.
After adjusting the steering rack on the VAZ 2110, you need to close the stop nut, carefully knocking out the crankcase thread.
To check the clearance between the steering rack stop and the stop nut, proceed as follows:
Remove the steering gear from the "ten".
Set the rack to the middle position, which is determined by a special dimension - 87 ± 0.25 millimeters from the end of the rack to the pinion axis. Using a special device, the rack should be loaded with a force of 51 ± 2 kgf at a distance of 84 millimeters from the pinion axis towards the stop of the steering rack.
The maximum allowable clearance between the stop and the nut is 0.2 mm. The maximum allowable movement X of the steering rack, measured through the relative movement of the pressure punch, should not be more than 0.16 mm.
So, you now know how to replace and adjust the steering rack with your own hands, saving money on a professional service.
If you find unusual sounds or tapping while driving on hilly terrain or uneven sections of the road, you will need to tighten the steering rack yourself. Below is a detailed description of how the steering rack is adjusted and repaired.
In order to adjust this part of the car, it is recommended to completely dismantle it. This will require the following tools:
screwdriver;
hammer;
pliers;
set of wrenches.
First of all, you need to look into the salon, find the place of attachment of the universal joint, which is located in the lower front of the car, and unscrew the nuts that attach it to the shaft gear in the steering column structure. When turning the bolt, you need to support it with another wrench from the back side.
After that, switch to the engine compartment, where you need to unscrew the fastening hardware for the boot of the rails. This piece is attached with one nut on the top and two nuts on the bottom. Then you need to carefully release and pull out the boot.
VIDEO
Using a reliable jack, it is necessary to raise the front part of the VAZ 2110 body and remove both wheels. The steering rack cannot be dismantled without first removing the steering rods. To do this, first of all, you need to remove the locking plate located on the fasteners of the steering rods. You will see 2 bolts that fix these parts, they need to be unscrewed.
Using a 13 spanner, unscrew the nuts securing the steering gear to the front panel with brackets. After that, move the rack forward, freeing the shaft gear from the opening of the front guard. The part can now be removed with a gentle movement.
To adjust the steering rack, you must first securely fix it in a vice. To eliminate the likelihood of its swinging, it is recommended to use wood blocks as spacers between the part and the vice. When starting the adjustment, you need to grasp the rack and pinion rods with your hands and move them from side to side. This will help you identify the presence and amount of backlash. You will need a special faceted wrench to fix the gap. Having inserted it into the opening, you need to turn the key 10-20 ° counterclockwise.
The steering gear assembly with the drive.
Observing the interval, you need to check the amount of backlash each time until it disappears completely. It should be borne in mind that excessive constriction is extremely undesirable, since there is a possibility of complicating the rotation of the steering column. Upon completion of the adjustment, you will need to tighten the stop nut by wrapping the crankcase threads.
This adjustment method is considered official, since it is described in the technical manual for the VAZ 2110. If you have dismantled a part and found that it has become unusable, it is advisable to replace it completely. Regardless of whether you are installing a stock part or a new one, the assembly of the mechanism is the same.
Before installation, it is necessary to turn the shaft gear until it stops to the right or left side using pliers. Then you need to scroll it all the way in the opposite direction. As a result, the flat on the shaft gear should fit straight ahead of the machine in an upright position. Now you can install the steering rack in the required sequence. Everything is done in the same way as during disassembly, with exact observance of the reverse order.
In order to tighten the steering rack on a VAZ 2110 without dismantling it, it is necessary to find or purchase a special octagonal spanner wrench at 17. As in the previous case, the car must be driven onto an overpass or raised with a jack. Make sure the machine is held securely as you will have to work underneath it.
VIDEO
First of all, you need to dismantle the engine protection. You need to take a screwdriver and establish good lighting in the space under the car. Climb under the car from the back of the subframe and get to the steering gear. Find the intersection of the rack and the steering shaft, there you will find a small nut with which you can adjust the mechanism.
It should be borne in mind that there is also a cork in this place, which has a similar shape. Therefore, before starting work, you need to thoroughly clean this plane from dirt. The nut has an octagonal shape, and a special key fits to it. It is this factor that should be guided by when searching.
If this is the first time you adjust this part, you will find it has a green plastic cap, which is factory fitted when the vehicle is manufactured. It can be easily removed with a screwdriver, the main thing is not to overdo it, since the cap is quite fragile and breaks easily.
After removing the cap, insert a wrench into the octagonal opening and adjust the rail. The nut tightening scheme remains unchanged. The adjustment is carried out according to the same rules as during disassembly. In this case, the tightness of the nut must be calculated based on the force of the knock that occurs when hitting obstacles. There is no need to turn it all the way, just eliminate the noise that occurs.
To check the result of your efforts, you will need to turn the rail in one direction with a sharp movement. If there is no knock or noise, the adjustment is completed successfully. Now you can put the cap back on. The procedure for adjusting the steering rack on a VAZ 2110 takes no more than 30 minutes. This interval is relevant for situations when the rack is being adjusted for the first time. With the necessary experience, the adjustment process takes much less time.
VIDEO
Most car services refuse this service, since such a malfunction is insignificant, therefore, it is very cheap. For this reason, it is recommended that you learn how to tighten the steering rack yourself. After the first try, you will understand that the process of adjusting the rail is elementary and does not require professional knowledge.
On many foreign-made cars, when driving over ledges or pits, recoil is not transmitted to the steering column. This is achieved thanks to the power steering and steering rack damper. While the first device is found on almost all cars, the second is found only on some models.
The steering rack damper is designed for two-way shock absorption. It is often installed on SUVs and expensive premium cars with rear-wheel drive. The device helps to maintain the steering position when driving on gravel or overcoming difficult terrain.
On the VAZ 2110, such a device is not provided, but it can be purchased and ordered for installation in a car service. It is not recommended to do the installation yourself, since the damper must be reliably strengthened and the steering rack protection equipped. Otherwise, the steering gear will quickly loosen, and you will have to spend a lot of money to restore it.
Installing a damper on a VAZ 2110 provides certain advantages. When traversing uneven terrain, steering recoil is reduced by up to 30 percent. At the same time, the suspension noise level is reduced several times. If there is no balance, when braking at high speed, the vibration of the wheels ceases to give feedback to the steering wheel.
Video (click to play).
VIDEO


