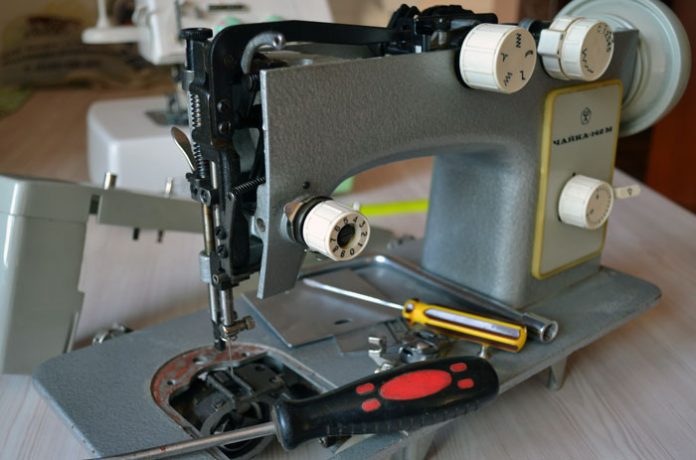
Details: sewing machine podolsk 142 DIY repair from a real master for the site my.housecope.com.
The most widespread household sewing machine, despite the 21st century, the age of electronics, is the Podolsk sewing machine, class 2M. A simple, old sewing machine with a manual, sometimes a foot drive, and even less often an electric drive. You can buy such a machine for a purely symbolic price, since they are morally outdated for a long time, and their repair will sometimes cost more than the cost of a Podolsk sewing machine. However, many people still use such machines and there are a lot of reasons for that.
One of the main advantages of the Podolsk sewing machine is that many performance characteristics are not inferior to some modern sewing machines, and in most cases they are superior.
You can easily sew jeans or sew a thick patch of leather on a Podolsk sewing machine, which cannot be said about modern seamstresses.
Since the device and instructions for all models of straight stitching machines of the Podolskaya type, even imported ones, are practically the same, there are almost no problems with spare parts. They can always be bought at any flea market. But, as a rule, you don't have to buy anything, since metal parts practically do not break. This applies only to manual sewing machines Podolsk, performing only one straight stitch. The PMZ plant also produced other models of sewing machines for zigzag stitching - Podolsk 142; 132 and others. These are full zigzag machines and they are discussed in other articles, for example, the Chaika Sewing Machine.
Another advantage of such a sewing machine is that most of the “breakdowns” are associated with an incorrectly installed needle and upper threading. That is, there is practically no need to repair this car, only a preventive inspection and lubrication are required.
| Video (click to play). |
To repair it yourself, set up the Podolsk car, sometimes it is enough to put the needle correctly. It would seem a simple matter, but some seamstresses really cannot do it correctly, and sometimes they call the master, believing that the machine is broken.
In almost all Podolsk machines and its imported counterparts, the needle is inserted as shown in the figure. The needle blade on which the hook nose runs should be on the left and the long thread groove on the right. But keep in mind that in some machines, especially the first models, the needle is put the other way around.
To make sure how to properly insert the needle into the sewing machine, remove the stitch plate and turn the handwheel while observing the hook point. On which side of the needle it will pass, on that side there should be a blade. You need to thread the thread from the side of the long groove of the needle.
Stick a small diagram of the position of the needle with tape on the body. You may know how to insert the needle correctly, but your schoolgirl daughter will definitely put it wrong.
Of course, sometimes breakdowns occur with such a machine, but most often they are associated with the weakening of the fasteners of the nodes or the curiosity of "home" craftsmen who disassemble the nodes of the machine completely. In such cases, it is much easier to buy a “new” car on the ad than to repair it.
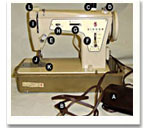
The only thing you can do with your own hands is to tighten the fastening of the nodes (B) at the bottom of the machine platform (M - lubrication points).
But before you start renovating sewing machine Podolsk, the shuttle section and other mechanisms should be cleaned from the lint: the rack, the shuttle course, the bobbin case, the grooves in which it rotates and other connections.
Remove all easily removable parts: front cover, throat plate, presser foot, needle, etc. Disassemble the shuttle stroke.
Remember how to put everything back together or make a sketch, diagram.The Podolsk sewing machine has no superfluous parts - they all have their own purpose.
The best way to clean is with a stiff glue brush or old toothbrush.
Now you can check the fastening of the couplings and bushings. These bushings are tapered and are secured against untwisting with a locknut. If there is a strong longitudinal play in the fasteners (this happens), loosen the nut and tighten (to the right) the sleeve with a screwdriver, but not too tightly so that the play decreases, but a small gap remains.
The difficulty lies in not overtightening the mount while tightening the nut. The nut, when tightened, pulls the screw along with it, so hold the sleeve screw in the required position with a screwdriver, and carefully tighten the nut. On the fifth try it turns out well.
After checking all the fasteners, adjusting them (do not adjust them unnecessarily), start lubricating the machine. Here you can already work hard, lubricating all rubbing places and parts.
We recommend filling the oil with a syringe - it is very convenient and economical. When lubricating, it is sometimes necessary to turn the flywheel of the machine, so the oil passes better into small gaps and you will see where else you need to lubricate. Do not forget about the back cover that you removed, there is a lot of things that can and should be lubricated.
Lubricate the front of the machine carefully, although there are a lot of hinges and you really want to spill them with oil. But this part of the machine is in contact with the fabric and it is very offensive when, while sewing, a drop of oil suddenly falls on a light-colored item. For lubrication of the main shaft, there are special holes on the top of the housing.
Look at the condition of the manual drive of the machine. It often happens that all its nodes are loose and not lubricated. Tighten the hub screws (M) and (K) with a large screwdriver. Of course, everything needs to be lubricated abundantly, especially oil should be dripped under these screws, since they also serve as a bushing at the same time.
If the wooden handle dangles, place the lower edge of the sleeve with the handle on a solid metal surface, flare the upper edge of the sleeve with a hammer, but it is advisable to do this by a skilled person, otherwise the handle may be damaged.
Check the attachment of the drive to the body of the sewing machine and tighten with a powerful screwdriver or wrench.
The weakest knot of the Podolsk sewing machine is the thread winding device. Most often, the rubber rim wears out and it is almost impossible to repair it, except to remove it by winding a little thread into the groove.
Be sure to check the attachment of the winder to the machine body (T). Sometimes you have to remove the flywheel to tighten it.
The screw (Y) adjusts the pressure of the rubber wheel to the flywheel. Achieve a position where the wheel engages securely with the flywheel when the lever is lowered and disengages completely when raised. It is best to adjust its position with the bobbin on the shaft, with the thread already wound.
The hole (M) is for lubrication, remember to lubricate the thread winder too.
The most difficult and unfortunately not uncommon case is when the sewing machine does not turn at all, causing bewilderment and a lot of fantasies about such a “breakdown”.
In fact, this is not a breakdown, just the sewing machine was greased with the wrong oil, and sometimes even sunflower oil, confusing the sewing machine with a frying pan.
While they are working on it, it will rotate even on sunflower oil, but after a long standing it turns out that the machine does not turn, it is jammed. Sunflower oil just doesn't dry out easily, turning into glue. Since this is far from a rare case, we give advice on how to remove dried grease.
Remove all possible covers and parts and fill all accessible and inaccessible places with oil. After that, when little penetrates into all nodes and connections, fill in the same places with kerosene and leave the car for at least a day.
After a day or more, remove the flywheel, just pay attention to how the petals (L) of the friction washer are installed (up).Then take a screwdriver and insert it into the slot on the main shaft (Z), and very carefully try to wiggle the main shaft. It is very important not to break the shaft slot, since it is cast iron and its edges easily break off with excessive force. If the shaft does not even move, repeat the kerosene lubrication procedure again, oil is no longer needed. And so on until it starts to move slightly.
When the shaft is already turning, put the drive on and turn the machine idle, constantly adding lubricants and kerosene, until an easy move appears.
Of course, this is not a complete list of all the adjustments and settings that sewing machine Podolsk, but quite sufficient to fix many problems on your own.
Many who tried to sew knitwear on an ordinary sewing machine noticed that the machine often refuses to make a beautiful and even stitch. There are gaps in the knitted stitching, the lower thread loops and sometimes breaks. Why is this happening and how can you fix it?
Sometimes it is required to make a perfectly even decorative stitching on a product, but you cannot draw a line with chalk - traces will remain, and there is not enough experience to scribble "by eye". Simple tips on how to sew on “difficult” areas.
Home sewing machine needles are different from industrial machine needles. Their main difference is the saw cut on the flask. Sometimes a needle of an industrial design is installed in a sewing machine in Podolsk, without a saw cut. This leads to knocking during sewing and skips in the stitch.
The thread looping in the stitching, as well as the characteristic knock during work, is perhaps the main difference between all models of sewing machines with a zigzag, such as Chaika, Podolsk. In short, the looping in the stitch occurs due to the uneven tension of the thread along its path.
Sewing machine Podolskaya 142, "Chaika" and numerous models based on these machines are perhaps the most popular models of household sewing machines, despite the abundance of imported household sewing machines in stores. At one time, I had to buy it for a lot of money, and it seemed like recently it was still sewing well, but it just began to twist.
The sewing hook for any sewing machine is its main device. The quality of the machine's operation, the absence of gaps, thread breakage depends on the state and setting of the interaction of the needle with the shuttle. The Podolsk sewing machine has a sewing shuttle that differs from machines that perform a zigzag stitch.
Even a household overlock is much more complicated than the Podolsk sewing machine and it is almost impossible to set it up, moreover, to repair an overlock without special knowledge and skills. However, overlock repair or adjustment is not always required, sometimes it is enough just to adjust the thread tension and it will again overcast the fabric with high quality.
In this article, we will figure out whether such a combination is possible - "an inexpensive and good machine" and how an inexpensive sewing machine that costs 3-4 thousand rubles differs from a machine that costs 30 thousand.
This is a intricate zigzag machine for special and decorative stitches. Version with electric drive.
The upper thread loops at the bottom and breaks off. Skipped stitches in the stitching. The shuttle is jammed. Severe bobbin thread slack in the stitching. Heavy driving. In the drive, the belt is skewed on the pulleys. Stitch length from 0 to 2 mm.
- Inspect the car for completeness and damage. Disconnect the electric motor from the mains, remove the protective shield for the belt drive of the electric motor, remove the electric motor.
- Unscrew the two screws at the top and remove the cover.
- Remove the electrical assembly in the cover: cartridge and switch. Unscrew the bulb, the lower part of the socket and remove the bulb shield.
- Remove the part of the cartridge to which the electrical wires are attached.
- Tighten the screws securing the wires on the socket and on the switch.On the light shield from the bottom, from the side of the mechanism, one or two spots can often be seen - traces of blows by the screws of the needle bar frame when performing a zigzag. Hitting the shield shakes off the filament and the light bulb fails. To avoid blows, bend the bend of the protective shield so that the angle is 80 °. In this case, the shield without deformation will come close to the light bulb, and the blows of the screws will stop. Reassemble the assembly in reverse order. Tuck the lighting wire strictly along the longitudinal axis of the cover in the form of a straight line. Otherwise, the wire will interfere with the operation of the levers when zigzagging.
- Check and tighten all screws on the cover. Loosen the screw that secures the bobbin holder to the bobbin winder. Move it to the right until it stops and tighten the screw.
- Remove the needle and see what type it is, whether there is curvature, bluntness or other defects (see part 2, "Needle knot"). It is better to put a new needle No. 100, in extreme cases - No. 90. It should have a flat (flat) on the cone. Put the needle up to the stop with the flat back, and with a long groove towards the seam. Fasten the needle in the needle holder with the screw using a screwdriver.
- Remove the machine from the wooden stand. Dismantle the bobbin device: remove the bobbin case, locking ring, hook.
- Rebuild the upper thread tension adjuster based on the following reasons:
a) the direction of the thread changes two times: the first turn by about 120 °, the second by 90 °. Both turns during operation provide the thread with dynamic resistance, which contributes to its breakage (rice. 65);
b) long-term practice of repairing household sewing machines has shown that the thread guide bracket is not used for its intended purpose, which means that the compensation spring is also turned off from work;
Rice. 65. Thread position in the regulator. Regulator pusher (car "Podolsk" -142 class):
v) In the first year of machine operation, the thread guiding bracket is so loose at the attachment point that it becomes mobile and interferes with the seamstress.
a) the thread at the exit from the regulator does not change direction, and the compensation spring, being on its way, provides it with softness and reliability in the operation of the machine;
b) threading is simplified and the work of a seamstress is facilitated;
v) due to the transfer of the spring to the left side of the regulator, it is impossible to turn it off from work.
- To reconstruct the upper thread tension regulator, loosen the locking screw on the left, remove the regulator, the conical buffer spring, remove the pusher with tweezers, and the thread guide bracket of the regulator with nippers (cancel it).
- Bending back the pusher, which is located inside the frontal cavity (see fig. 65, a, b), set the angle between the disc and the rod part to 100 °. If the shaft is deformed, straighten it. Use tweezers to put pusher 2 into place (rice. 66). The tweezers should be bent.
Rice. 66. Diagram of the squeezing device in the regulator (machine "Podolsk" -142 class, etc.):
Working household sewing equipment Podolsk today is not less than half a century. And someone, probably, uses older models of typewriters in business. The offspring of the American plant Singer in Podolsk is distinguished by the highest reliability and durability. However, repairs to the devices are still required from time to time. It is better to replace parts and complex faults with the hands of a master, and minor breakdowns can be corrected on your own, relying on expert advice and video instructions.
Cars Podolsk class 2M or 1M, despite their considerable age, are strong and reliable. The technique is usually hand or foot operated and only produces a straight stitch. The Podolsk sewing machine has a number of inconveniences, but is still relevant. She works with thick and dense fabrics, jacket zippers and leather.
Advice. The old apparatus Podolsk today can be bought for a symbolic price from hand. Full-blooded repairs with the involvement of a master will cost more. Therefore, if you cannot fix the problem yourself, then it is better to buy another typewriter.
Straight stitch parts can also be found at the flea market.Even parts from similar devices from other manufacturers will do. The most common breakdowns of the Podolsk household sewing machine of class 1M and 2M:
- the needle is incorrectly installed and the upper thread is threaded;
- there are problems with lubrication;
- the fastening nodes are loose;
- the thread winding knot is worn out;
- the manual drive is out of order.
It is the needle that is the key element in the construction of the sewing machine. Malfunctions of this part of the mechanism can be classified as follows:
The needle makes many punctures of the material, including dense and thick ones. It is not surprising that after a certain time it dulls or bends. Indirect signs of this:
- the tip breaks through, and does not pierce the surface of the tissue;
- loops appear in the line;
- the thread breaks from time to time, especially in difficult areas.
In general, experts advise changing the needle regularly, even if the old one is intact. Do not throw away old needles. They will definitely come in handy for sewing products from thick fabrics and leather. Also, don't forget that special needles are sold for jeans, stretch and knitwear.
The second reason for the incorrect operation of the Podolsk machine - incorrect installation of the needle - is not a breakdown. If the machine starts to loop and break the thread, check the following:
- The sewing machine contains a household needle, not an industrial needle. The latter is longer and does not have a characteristic cut on the flask. She will sew, but with skipped stitches and hook scratching.
- The needle is not inserted correctly. Correct position: blade to the left and long groove to the right.
It would be nice to know exactly how the needle is correctly positioned specifically in your model. Because the pre-war Podolsk machines have a mirror-like needle arrangement. Seamstresses have the following secret on this score:
- remove the needle plate;
- turn the flywheel slowly and examine the nose of the shuttle;
- the needle blade should be on the side where the shuttle will pass;
- thread from the side of the long needle groove.
Advice. Have you found the correct needle placement? Draw and glue the schematic directly onto the case. There is always a risk that after a long pause in using the device, you will forget about the nuances or someone else will sit down at the device.
It is better to lubricate the machine with a syringe, the handwheel can be slightly turned. Remember to remove the back cover. Use a special machine tool. Do not lubricate with vegetable oils and similar oils. Over time, they will dry out and jam the mechanisms. If your clipper no longer turns, try cleaning the old grease with the correct oil and kerosene first.
Advice. Be especially careful with the hinges on the front of the clipper that come into contact with the fabric.
Sometimes in the machine it is required to tighten the fasteners and knots. To do this, first disassemble and clean the mechanisms from the hairs with an old toothbrush. Then carefully tighten the nuts while holding the screws with a screwdriver. It is very important not to overtighten them. The same applies to hand drive assemblies.
The device for winding threads is the weakest link in the Podolsk machine. A worn rubber gasket is almost impossible to repair. Only thread winding will extend her life. Also, over time, the fastening of the winding mechanism becomes loose. To tighten it, you may need to remove the flywheel shaft.
It is better to disassemble the sewing machine while fixing it on the diagram. Otherwise, the assembly will be delayed, "extra" parts will appear, which Podolsk cannot have.
We express our gratitude to you for purchasing a sewing machine from our plant.
Please read this manual carefully before using your machine. There you will find everything you need to know about the sewing operations that the machine performs.
When you have read the manual in detail, do not rush to throw it away, it can always come in handy and give you the necessary help.
1. GENERAL REQUIREMENTS
2. PURPOSE OF THE MACHINE
Household sewing machine class 142 is designed for sewing cotton, linen, synthetic, woolen and silk fabrics with straight or zigzag stitches with one or two (double-needle) needles, for sewing decorative and special stitches, as well as for embroidery and darning. To the table of contents
3. TECHNICAL DETAILS
3.1 Maximum frequency of rotation of the main shaft, rpm - 1000.
Note: At the maximum sewing speed, the parts will wear faster.
3.2. The largest total thickness of materials to be sewn, mm - 4.5
3.3. Raising the presser foot, mm - not less than 6.
3.4. Stitch length (adjustable), mm - up to 4.
3.5. Zigzag width (adjustable), mm - up to 5.
3.6. Displacement of the needle to the right-left from the middle (adjustable), mm - 2.5.
3.7. Head dimensions, mm - 290x178x412.
3.8. Departure of the sleeve, mm - not less than 170.
3.9. Machine weight with foot drive, kg - no more than 39.
3.10. Overall dimensions of the cabinet-table, mm - 570x430x780.
3.11. Mass of a car with an electric drive in a suitcase-case, kg - no more than 16.
3.12. Dimensions of the case-case, mm - 500x220x340.
3.13. Applied needles: 0220 No. 70, 80, 90, 100, 110 GOST 22249-76 and two-pins No. 0240 No. 70, 80, 90 GOST 22249-76.
Applicable threads: sewing cotton 21 tex x 3 (No. 30); 16.5 tex x 3 (# 40); 13 tex x З № 50); 10 tex x 3 (no. 60); 7.5 tex x 3 (No. 80) GOST 6309-80, as well as natural silk threads No. 65 GOST 22665-77.
4. CONTENTS OF DELIVERY
4.1 Sewing machine class 142 is manufactured in the following versions:
a) sewing machine with a foot drive and a table-cabinet (142-22, 142-22-0, 142-22-1);
b) a sewing machine with an electric drive on a stand in a suitcase (142-33).
c) a sewing machine with a wardrobe table, with a foot and electric drive (142-22-33); 142-22-1-33). To the table of contents
4.2 Each car comes with:
a) a set of accessories included in the box:
needles - 5 pcs.
two-pin needles - 3 pcs.
oiler - 1 pc.
large screwdriver - 1 pc.
small screwdriver - 1 pc.
darning device - 1 pc.
foot with ruler - 1 pc.
sewing foot 1 - 1 pc.
bobbin - 4 pcs.
ripping knife in a case - 1 pc.
brush-brush - 1 pc.
lighting lamp with voltage of 220 V,
power -15 watts - 1 pc.
needle threader - 1 pc.
blind stitching device - 1 pc.
button sewing foot - 1 pc.
switch foot - 1 pc.
foot for embossed stitching and sewing on a cord - 1 pc.
buttonhole and stitch foot - 1 pc .;
b) operation manual with a certificate of acceptance and a warranty card.
4.3 Collecting the machine with a table (fig. 1)
The head 3 with its lower part (platform) 15 is attached to the table-cabinet with two hinges 14 and screws 16, the visor 11 with two screws 13 and washers 12 is screwed to the machine platform.
5. PREPARING THE MACHINE FOR OPERATION
5.1. Preparing the Foot Operated Machine (see fig. 1)
Fold back the top cover 2 and place it on the previously opened door 1 of the table-cabinet as a support.
Then raise the front valve 5, pull out the machine head 3 and, lowering the valve, install the machine head on it.
After that, put the belt 6 on the flywheel stream 4, pass its two ends through the holes in the visor 11 and connect with a paper clip. Before starting work, put the belt 6 on the drive wheel 7.
Working with a foot machine requires a certain skill. First of all, beginners need to learn how to idle the machine. To do this, loosen the friction screw 2 from the side of the flywheel 1 (Fig. 2a) and turn it in the direction of the arrow (towards yourself). At the same time, hold the flywheel stationary with the other hand.
By alternately pressing the feet on the pedal 8 (see Fig. 1), set the flywheel 4 in motion, which should rotate in the direction indicated by the arrow in the figure.
When switching the machine to work, you need to be extremely careful.
Friction washer 1 (Fig. 26) must be placed with the horns 4 outward, ie, to the friction screw 2. Then screw in the friction screw 2 as far as it will go and screw in the screw 3.
If in this position the machine does not start to work, unscrew the stop screw 3 and turn the washer 1 half a turn and again, fastening with the friction screw 2, screw in the screw 3.
5.2. Preparing the Electric Machine for Operation (fig. 3)
A cord with three plugs is attached to the machine. Plug 4 is connected to the socket of the rheostat 5, plug 3 - into the socket of the engine on the machine, plug 2 - directly into the socket from the mains.
To turn on the lamp, plug 1 must be inserted into the socket located in the top cover of the machine.
The machine is put into operation by smoothly pressing the rheostat pedal 5 with a foot. When starting, it is recommended to lightly touch the flywheel rim with your right hand and turn it in the direction indicated by the arrow in the figure (ie, towards yourself).
Note: Do not over tighten the drive belt. When pressed in the middle, it should flex by about 5mm.
5.3. Control elements and components of the machine (fig. 4)
1. Pressing foot.
2. Shaft of the foot.
3. Needle holder.
4. Needle bar.
5. Cover.
6. Thread take-up lever.
7. Cover fixing screws.
8. Rods for coils.
9. Reel tension unit.
10. Pointer for selecting the type of stitches.
11. Zigzag width indicator.
12. Winder.
13. Flywheel.
14. Knob for zigzag width.
15. Left and right needle bias knob.
16. Knob for switching the type of stitches.
17. Lever for reverse feed.
18. Knob of the stitch length regulator.
19. Upper thread tension dial.
20. Sleeve with platform.
21. Sliding plate.
22. Shuttle device.
23. Material engine.
24. Needle plate.
5.4. Installing or replacing the needle (fig. 5)
By turning the handwheel towards you, the needle bar is set to the uppermost position.
Then the needle 1 is inserted into the needle holder 2 up to the stop and fixed with the screw 3.
The flat side of the flask 4 (flat) on the needle must face away from the worker.
Note: The needle is always inserted up to the stop, with the long groove on the thread entry side.
5.5. Preparing the machine for work
First, fix the friction screw 2 (see Fig. 26) by turning it in the opposite direction to the arrow, that is, set the machine to working stroke.
Then set the needle to the uppermost position by turning the handwheel towards you.
After that, lift the presser foot 5 (Fig. 6) with the lifting lever 2 and pull the spool pin 3 up from the sleeve cover until it stops and install the spool of thread on it.
5.6. Threading the upper thread
The upper thread is tucked in the following sequence (fig. 7):
a) from the spool 1 into the holes 2 and 3 of the thread guide;
b) between the tension washers of the adjuster 6;
c) through the thread guide spring 5;
d) down under the hook 7;
e) up through the hole of the thread take-up lever 4;
f) down into the thread guide 8;
g) down into the thread guide 9 on the needle bar;
h) into the eye of the needle 10 from the side of the person working from himself.
The threads are threaded into the double-pivot needle in the same sequence.
5.7. Getting a quality stitching can be achieved with the correct selection of needles and threads, depending on the thickness of the materials being sewn.
It is recommended to take the lower thread one number thinner than the upper one, or, in extreme cases, one number.
The machine you have purchased has a needle No. 100, therefore, to check the machine for sewing, you need to use threads No. 40 and cotton fabrics such as coarse calico or flannel.
When sewing thin and viscous fabrics, it is recommended to guide and hold the fabric or place thin paper under the fabric to avoid puckering at the seam.
The numbers of the needles and threads, depending on the materials being sewn, are indicated in table. one.
Note: You can see the table of modern needles here. It is necessary to use the type of needles for which the machine is configured. Domestic needles - the diameter of the bulb is 1.75mm, imported - 1.7mm.
In the 19th century, Georg Neidlinger, the European agent of the Singer firm, proposed to establish the production of sewing machines in Russia. The plant under the leadership of Walter Frank Dixon was built quickly. Provincial Podolsk had a lot of cheap land and labor. The German concern, expanding the production of sewing equipment, opened a plant in Podolsk in 1902.
By 1913, the Podolsk enterprise produced 600,000 cars a year. This is 2500 items per day. They were sold throughout the Russian Empire, were not inferior in quality to imported devices, for poor people they were sold in installments. A network of branded stores was deployed in the country.
After the revolution, the enterprise was nationalized, but, despite the severance of relations with the "head office", the production of equipment did not stop.Only 77 years later, in 1994, Singer resumed cooperation with the Podolsk office.
[admitadGoods img_size = ’item-img-thumbnail-small’ img_pos = ’img-pull-left’ txt_align = ’cpa-text-left’ id = 2725]
The most common apparatus in the Russian Federation is a simple machine with a manual drive, sometimes with a foot pedal; for a long time it was almost the only running car in Russia. Until now, in school workshops, you can see such hand-operated specimens.
The advantage of the "two" is that in terms of power characteristics it is not inferior to modern electronic counterparts. Thick fabrics are sewn neatly and securely.
The model specializes in working with synthetics, silk, linen and wool.
Stitches that can be sewn:
1) Direct
2) Zigzag
Also, the machine is able to embroider and darn. It is possible to use both single-rod and double-rod needles.
The list of threads allowed for use: 1 tex x 3 (No. 30); 16.5 tex x3 (# 40); 13 tex x 3 (# 50): 10 tex x 3 (# 60); 7T5 tex x 3 (No. 80) GOST 6309-73, as well as threads from natural twisted silk No. 65 in accordance with GOST 22665-77.
A simple unit made of steel parts - almost never breaks. Like its predecessor (132), this model sews both in a straight line and in a zigzag. It differs insignificantly from the previous model: improved quality of the metal from which the parts are made and improved design with ergonomics (ease of operation).
142nd requires only periodic maintenance and lubrication; there is a device for winding a thread.
1) Functional check
If a copy of a typewriter fell into your hands (and you can't find others now - only if someone has carefully kept it for several decades in ideal conditions), first of all you need to:
a) Check the shuttle course (cleaning the compartment from the feathers is just a necessary measure);
b) Remove any moving parts that can be removed (including the throat plate and main cover);
c) With a rag or a special brush (with soft metal bristles), go over the teeth, rotation grooves (where most of the dirt accumulates due to oil / grease) and over the bobbin case;
d) No matter how anecdotal it sounds, try to make sure that after reassembling the machine you do not have any extra parts. The peculiarity of the products of the Podolsk factory is that it simply does not have extra parts.
2) How the needle is placed
Many novice seamstresses can "cut off" at this moment, and consider that the machine is irretrievably broken and beyond repair - it often turns out that the needle is simply incorrectly inserted into it.
The schematic figure shows how everything should look like:
3) Lubrication of central units
It is important to follow two rules:
a) Do not forget about hard-to-reach places - connecting joints, inconspicuous grooves, hinges. The main units - the shaft, the drive, almost always have holes into which you can drop special oil (GOST for oils is described in the instructions);
b) The external, visible part of the device just as needs lubrication, as well as the internal (this greatly ennobles the appearance of the machine). Try not to oily areas where the fabric will later be located so that you do not have to throw it away due to greasy stains.
4) Features of the needle bar
Periodically, when working with a coarse fabric, the following happens - due to the specifics of the material, the needle bar moves up and the sewing line begins to break. To prevent this, you need to change the position of the needle. This is done as follows:
5) Drive status test
As you know, when sewing by hand, the drive elements rotate in different directions - the small shaft is clockwise, the large shaft is counterclockwise. On each of them there are screws - bushings, they must be tightly fixed (in case of unscrewing), after having lubricated special. oil. First a large shaft, then a small one.
in the video I saw a very beautiful sewing machine. And the title of the video is also good. The only question is, HOW to rebuild the machine under the skin?
Video tutorials on setting up machines for leather and thick shoe threads, see here

Is it possible to customize Chaika 132 m under the skin, automobile, eco-leather.?


Watch video # 311 and # 313 Podolsk 142, Chaika 142M and other cars from this series, they are all alike.


Want to buy
But who is selling this sewing machine now? ??


Master Universal thank you very much


Such a car can be bought, only used, on sale sites. Search the internet.

Hello, I set up the machine, polished the 130 needle, but it is spinning the wheel. Please tell me what you can do?


A person, from the beginning, should know how you need to, and only then how you can.
having learned to put a thread in a needle, they begin to teach others, their work in our time was called a cheap samopal.I have nothing against domestic machines, although imported
were no worse (industrial), though I didn’t go down to sewing slippers, but I did sewing tsigy fur coats and leather jackets.
PS And the marriage was in production, because they did not sew on what was needed, but on what was, and
the quality was "and so will come down".


Why should I protect them from what is possible to do. Moreover, they want it and do it, but not skillfully enough. Some of my subscribers started a business of sewing leather covers for cars, on such heels that they found in my grandmother's closet. Now we have already bought normal steppers with an enlarged shuttle for thick threads and are working. Many do not start such a business, but they work at home, they sew something and they do not need an industrial machine, and maybe there is nothing to buy. I just remember the 80s. Grannies and grandfathers sewed slippers, cloaks, quilted jackets, I also thought the same way as you do now. But over the years and with experience, you understand more. There are rules that cannot be broken, BUT if you do not break the rules, then there will be no way out and movement forward. If at a professional level, that is, there are moments when the technological process and the machine simply do not work on certain materials, so it was necessary to introduce rationalization proposals that significantly reduced rejects, increased productivity and quality. And he did it in a large joint-production factory. Well, my opinion is that if someone remakes the Podolka into thick threads, then he himself will be able to repair it. The machine is hardy and with a large margin of safety. )))


Your views are undoubtedly useful for those who want to master sewing or are already sewing, but you, as a professional, need to protect them from rash decisions (thickness of fabric, thread and needles) that
may damage the sewing machine.


So there was an idea to make the finishing line with thick thread. If purely as in technology, then you are right, this is a violation. In practice, such violations have been made for a long time. He worked in large factories as a mechanic: sewing, shoe and knitwear equipment. This year will be 40 years old. At one time he combined mechanics and cut decking.


If I'm not mistaken, we were talking about a padding polyester and a lining, and your videos, sorry, are good for amateurs
and I have been in this profession for more than 30 years, although the last 15 I have been doing more.

Tell poyzhalusta why when it goes backwards it is very small and forward is normal


Watch the video. Maybe your machine has been set. That would give more stitch length forwards, then the bartack becomes, less stitch length. The video shows how to increase the stitch length and how to make the stitch the same both forward and backward. Keep in mind if you make the same stitch length on the bartack and forward, then the front stitch length will be less than it is now.

Dear Master! Please specify whether it is possible for Podolsk 142M to sew a tarpaulin? Thanks!


| Video (click to play). |
I sew a tarpaulin on Chaika 132 (no more than 4 layers), the main thing is that the needle is sharp (N90)

