Details: Singer sewing machine DIY repair from a real master for the site my.housecope.com.
Complex repairs of sewing machines related to the adjustment of units and mechanisms can only be performed by an experienced master. But such repairs are rarely performed, only when a part breaks down at the sewing machine and needs to be replaced with subsequent adjustment.
Most often, the sewing machine starts to “play up” if the rules of its operation, specified in the instructions, are violated or if simple settings and adjustments are not followed.
The main reason leading to a sewing machine malfunction is sewing fabrics that are not intended for this sewing machine model. Sewing a double hem on jeans, replacing a zipper in a leather jacket or bag, etc. - this is the main reason for the appearance of gaps in the stitch, thread breakage, needle breakage. Sometimes this can even lead to a breakdown of the sewing machine, subsequent complex repairs associated with the replacement of parts.
This article provides basic recommendations on how to set up and perform a simple DIY repair of a sewing machine.
Oddly enough, but it is the needle that is the most important part of the machine. During its “life” it makes thousands of punctures in the tissue and is not always light and thin, so sooner or later the needle point becomes dull, and the needle itself bends. And if at least once the needle hits the metal part of the machine body, the tip will bend in the literal and figurative sense of the word.
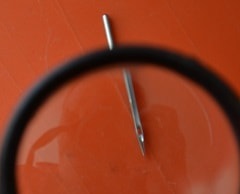
However, do we pay attention to this? The needle seems to be intact, so everything is fine. But take a magnifying glass and look at its point, its blade will be bent to one side. How would such a point pierce the tissue? Only one way is to break it.
| Video (click to play). |
Now let's see how such a needle will form a stitch.
The thread passing through the eye of the needle will catch on the curved point and “slow down”, creating excess upper thread in the stitch. Here is the first reason the loops appear in the stitching. Moreover, the curved tip will cause periodic thread breakage, especially in difficult to sew areas, when the upper thread is extremely stretched.
It turns out that sometimes the whole repair of a sewing machine consists only in replacing the needle.
Treat the needle with great care. Even if it outwardly has no blade defects and is not bent, try to change them more often anyway.
You do not need to throw out the used needles, as there are situations when the needles break one after the other, for example, when sewing a leather bag. Then remember about the jar with old needles.
Another reason for adjusting the sewing machine, especially the old manual machines such as Singer or Podolsk, is the incorrect insertion of the needle into the needle bar. The needle blade (fig. B) should be on the side of the hook nose. Remove the stitch plate and see if this is the case if the machine suddenly begins to twist and break the thread.
It often happens that a seamstress installs a needle from an industrial sewing machine into a household sewing machine. It is impossible to confuse a household needle with an industrial needle. A household needle has a special cut on the flask (Fig. B). But, nevertheless, it is the industrial types of needles that are installed. This absolutely should not be done. Firstly, you break the gap between the hook point and the needle blade, hence the gaps in the stitches, and secondly, you risk damaging the sewing machine hook. Some commercial needles are noticeably longer than household needles and may touch the surface of the hook, scratch it or even damage the hook.
Figure (A) shows a diagram of how to check the curvature of the needle. Externally, the needle cannot be determined whether it is a curve or not, and if you put it on the glass (2), you can easily check the gap (1).Please note that an uneven, bent needle will cause gaps in the stitching and will break sooner or later.
To make the sewing machine “more confident” to work with fabrics that are difficult to sew, such as knitwear, stretch, thin natural and artificial leather, denim, needles are produced for sewing just such fabrics and materials. They have a special point shape and make it easier for the thread to pass through the fabric, almost eliminating skipped stitches and looping of the upper thread.
See Home sewing machine needles.
The thread looping in the stitching, as well as the characteristic knock during their operation, is perhaps the main difference between sewing machines with a zigzag, such as Chaika, Podolskaya 142 of all models. In short, the looping in the stitching occurs due to the uneven tension of the thread along its path: a broken compensation spring, rusty sole of the foot, the shuttle is incorrectly set, etc. However, it is impossible to set many parameters yourself without experience. Therefore, if you have a poor quality stitch, pay attention first of all to the condition of the needle, to the tension of the lower thread in the bobbin case, and whether the upper thread tensioner is working properly. Very often, children like to disassemble and assemble it, and after such a repair, the machine stops working.
It is sometimes necessary to repair the sewing machine Chaika quite often, and this is not due to the breakdown of parts, the parts are just very strong, but to the misalignment of the interaction of some units of the sewing machine, mainly the shuttle move.
Almost all of these tips for repairing a sewing machine Chaika can be used for other models of household machines.
First of all, check the nose of the shuttle with a magnifying glass, it should not have any chipping or rusty spots. If there are jags, they must be removed with a small file and polished to a shine, otherwise the thread will constantly linger behind the file marks, and loops will appear below. Only this must be done carefully so as not to blunt the tip of the shuttle nose.
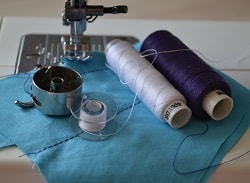
Sometimes the bobbin (the bobbin thread is wound around it) can cause repairs to the sewing machine. Yes, it is repair, since an inexperienced "master" often disassembles and assembles all the units, when it is enough to simply replace the old metal bobbin with a new plastic one. If the edges of the metal bobbin are jagged and the bobbin case itself is clogged with thread fleece, the bobbin thread will come out in jerks and the upper thread in the stitching will periodically loop from below.
Often the reason for contacting a sewing machine repairman is that the upper thread is poorly regulated. You are tightening it almost completely, but the tension is still too weak. Look, perhaps, between the tensioner plates, thread fluff has accumulated, which prevents the washers from fully squeezing. The fastening of the tensioner (Chaika) may have loosened.
But still, most often, sewing machines such as the Seagull have a malfunction in the parameters of the shuttle and the needle. This is a complex type of repairing a sewing machine, more precisely adjustments, but for general information it is advisable to know the main reason due to which all the "troubles" of sewing machines occur.
The most common cause of a sewing machine malfunction is the upper thread. Thread breakage, looping in a stitch, uneven stitching, skips, etc. This often depends on the upper thread tensioner.
It is the fastening of the tension regulator (Seagull) that most often causes its poor performance. The plastic body is pressed under the pressure of the screw and over time the tensioner starts to stagger, or even completely "falls out" of the body.
In this photo, arrows indicate the attachment of the needle bar and tensioner. When sewing rough fabrics, intersecting seams on leather goods, and especially when hemming jeans, the needle bar may move upward with the needle.
Loosen the screw slightly and adjust its position, making sure that the blade and needle groove are in the correct position in relation to the hook (not turning left or right).
For details on how to disassemble and assemble the sewing machine tensioner, see the article "The device of the sewing machine tensioner Chaika".
Adjusting the shuttle mechanism of sewing machines performing zigzag stitching by Chaika, Podolsk, Veritas and others implies setting the position of the looper point above the needle eye by 1.2 (3) mm at the moment the looper point approaches the needle. This parameter is checked when the sewing machine sews not only the straight stitch, but also the left and right needle drop (when sewing the zigzag stitch).
The point of the shuttle must at the same time pass almost closely to the blade of the needle - this is the second condition that allows you to form a stitch without gaps.
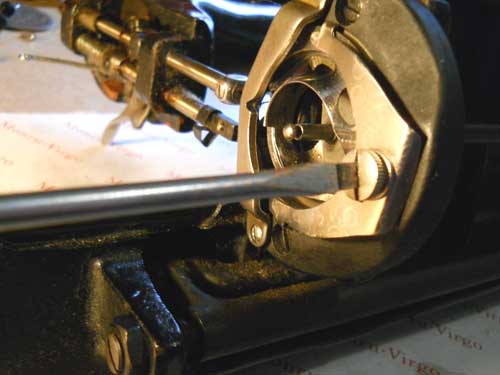
In this photo, the arrow indicates the fastening of the shuttle shaft. Loosen the screw with a 10-point wrench, and holding the handwheel by hand, you can turn the shaft (together with the shuttle stroke) by adjusting the position of the hook point in relation to the needle.
However, these are not all of the parameters for adjusting the interaction of the hook nose and the needle. There is such a parameter as the timeliness of the approach of the shuttle nose to the needle, namely at the moment when the needle starts to rise. The needle descends to the lowest point, and when raised by 1.8-2.0 mm, it should meet the nose of the shuttle, the shuttle removes the loop from the needle and wraps around itself.
But that's not all. For sewing machines performing a zigzag stitch, there is such a thing as right and left needle prick. With the left and right prick of the needle, the nose of the shuttle should “confidently” remove the loop formed above the eye of the needle. It should run slightly above the eye of the needle, but less than the distance of the eye of the needle itself, about 1 mm.
However, such adjustments are often not required to be performed, it is enough just to check with a magnifying glass how the shuttle interacts with the needle and make sure that repairs, adjusting the sewing machine are not needed, and look for another reason. For example, change the threads, thread them correctly, change the needle, clean the shuttle from dust and fleece, etc.
To make it easier for you to repair the sewing machine, disassemble the shuttle move and study its device. Observe how the stitch is formed when the stitch plate is removed. At the same time, check all the shuttle settings described above. See also How the sewing hook works.
The settings above can be used as a guide if you decide to repair your sewing machine yourself. As a rule, the machine will work normally with such gaps, but if you need to sew knitted fabrics that are too thin (silk) or, on the contrary, thickened fabrics, you need a more accurate adjustment of these parameters, which can only be set by the master.
In many cases, sewing machine repairs will not be necessary as long as the sewing machine is kept clean and lubricated periodically. If a seamstress takes care of her machine, then, therefore, she will protect it from overload during work, not let it into the “wrong” hands, which means that the sewing machine will break less often.
After prolonged operation, clean the bobbin compartment and other accessible places from dust, fleece, oil stains. The shuttle itself, the shuttle mechanism, should be periodically cleaned with a stiff hair brush. It is advisable to lubricate the machine at least once every six months, and after lubricating it a little “idle” on it, especially if the machine is not used for a long time. During operation, the oil heats up slightly and better penetrates into units and places of friction.
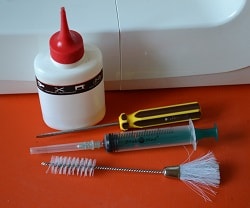
It is better to draw machine oil into a medical syringe and bury it in small drops in accessible places where there is friction of metal parts.
The big enemy of all mechanisms is dirt and rust, try to keep the car in a cool, dry place. If the machine will not be used for a long time, protect it from dust, otherwise the oil from the dust will harden, and the machine will turn tightly, or even jam. This case is considered in the article Podolsk Manual Sewing Machine.
In this article, we will figure out whether such a combination is possible - "an inexpensive and good machine" and how an inexpensive sewing machine that costs 3-4 thousand rubles differs from a machine that costs 30 thousand.
Many who tried to sew knitwear on an ordinary sewing machine noticed that the machine often refuses to make a beautiful and even stitch. There are gaps in the knitted stitching, the lower thread loops and sometimes breaks. Why is this happening and how can you fix it?
The coverlock is a modern and versatile machine that can overcast fabrics, sew cover stitches and even stitch parts like a regular sewing machine. But it is impossible to repair such a sewing machine with your own hands, you must definitely contact the service center.
Sometimes it is required to make a perfectly even decorative stitch on the product, but you cannot draw a line with chalk - traces will remain, and there is not enough experience to scribble "by eye". Simple tips on how to sew on “difficult” areas.
For those who rarely sew simple products or occasionally perform minor repairs on clothes, you can buy an inexpensive economy-class sewing machine. It performs almost all operations, is easy to operate, and most importantly, for such a machine, it will be cheaper to build repairs if suddenly it is needed.
The overlock is much more complex than sewing machines. It is almost impossible to repair an overlock without special knowledge and skills. However, repair or adjustment is not always required, sometimes it is enough just to adjust the thread tension and it will again overcast the fabric with high quality.
How to sew a dress with your own hands. Technology and sequence of sewing dresses for beginners.
How to make a pattern, what tools are needed for this. These and many other tips for beginners.
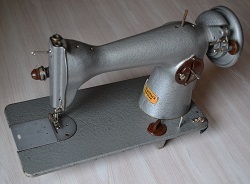
Perhaps the most legendary sewing machine in the world is an old Singer antique. Not only has this old machine covered the whole world for almost a century, many myths have also been created for it, such as that parts of some models have an admixture of precious metals, or even the entire Singer machine is made of gold. A very beautiful version, and probably this old model of the Singer sewing machine deserves it.
Another myth that Singer sews everything, especially leather, is just a myth, nothing more.
But, our task is not to discuss such "fairy tales", but to help you repair such an old car, if you suddenly decide to use it. Although, as a decoration for the interior of a house in a retro style, such a Singer sewing machine is more suitable.
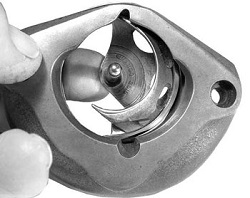
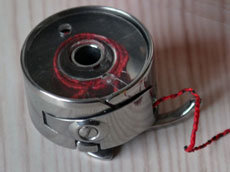
This model old sewing machine Singer, indeed, can be called real antiques. Her sewing shuttle is not round, like ordinary sewing machines, but long, like a bullet, into which the same elongated bobbin with thread is inserted. This machine is so obsolete that you shouldn't even try to repair it. But we will assume that you have such a need. Then, to add confidence to you, let's say that the old Singer model has one unique property that allows it to sew without gaps. The needle, when it “meets” the nose of the shuttle, creates a loop for gripping twice.
Perhaps, this technical feature of the machine became the reason for the myth of the impeccable sewing of any fabric on the old Singer sewing machine. In fact, any Podolsk manual machine, and even more so modern machines, sew much better and faster. In addition, they have a zigzag stitch, on the basis of which many additional operations and stitches are provided.
The old Singer sewing machine with a swinging shuttle is practically no different in design from the PMZ sewing machine and has the same adjustment parameters, despite its hundred years of age.
The shuttle course is attached to the machine body in a slightly different way, and on some models there is a rather original device for winding thread onto a bobbin. Otherwise, the swing shuttle sewing machine is absolutely similar to the Podolsk sewing machine. Is that the flywheel of the Singer sewing machine is more massive and larger in diameter.
There are antique Singer sewing machines with a vertical shuttle, but in our country they are very rare.
Such a machine can only be called antiques, many of them are still used without causing any complaints. But small adjustments and lubrication, nevertheless, will not interfere with any typewriter.
Before proceeding with the repair of the Singer sewing machine, you need to clean it of lint and dirt. Remove the foot, throat plate and front cover. Now see how the hook nose interacts with the needle. But, this should be done only if gaps are formed in the line, and you cannot eliminate them in other ways. In such a case, you may have to lower the needle bar and make another setting. For more details, see the article about industrial sewing machine sewing machine 1022, 22 grade. It has a section on needle bar adjustment.
If the machine sews normally, it is better not to touch this knot at all. Most often, the cause of the "malfunction" is that the needle is incorrectly installed. In older Singer machines, the needle is usually set so that the thread will feed into the eye of the needle from the left. That is, when installing the needle, the cut of the flask should be on the right. But sometimes, it depends on the type of shuttle fastening, the needle must be put in reverse. And then the thread starts on the right, and the cut of the flask is on the left.
This is how the needle is installed in most sewing foot and hand-held machines PMZ and other brands of lockstitch machines. But, sometimes there are PMZ models where the thread starts on the left. It depends on the year of manufacture of the machine and the type of shuttle fastening.
To find out how to set the needle correctly, lower the needle with the needle plate removed. When turning the handwheel, make sure that the point of the hook fits exactly to the needle blade, the indentation above the eye of the needle. In this case, the needle is installed correctly.
The thread must always be threaded into the eye of the needle from the side of the long groove.
Improper assembly of the upper thread tensioner is one of the reasons for poor stitching. For Singer sewing machines, the tensioner is assembled in exactly the same sequence as shown in this photo.
A compensation spring must be installed. Its purpose is to pull back the upper thread while forming the stitch. Too little or no spring tension can cause the upper thread to “loop” from the bottom.
When raising the foot, the upper thread tension should be completely released. A small stud-shaped rod inside the tensioner is responsible for this. He should squeeze the washer (W) with the foot fully raised, which blocks the pressure of the spring on the plates (T).
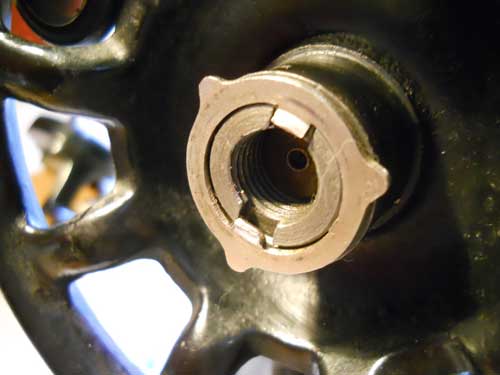
It is often necessary to remove the flywheel of the Singer sewing machine. When installing it back, it happens that the friction washer is inserted incorrectly. The puck antennae should point upwards, as in the photo, but they are often placed the other way around.
A correctly placed washer strives to fly off all the time, but it is difficult to hold it. That's why I want to put her antennae down. Not only should the antennae only stand up, they still have only one correct position, otherwise the stop screw will not allow the flywheel to be tightened tightly with the main shaft.
Sometimes it happens that the machine, after being lubricated with an unsuitable oil, stops turning. In this case, it is possible to turn the car only after abundant lubrication with oil and kerosene.
After prolonged “oxidation”, you need to rotate the machine by the splines of the shaft, and very carefully, literally by a millimeter. To do this, insert a solid non-metallic object into the grooves of the main shaft, which will serve as a lever. The shaft is made of cast iron, and its grooves can break, move it carefully.
Before proceeding with the repair of the manual drive, remove (unscrew) it from the machine bed. This requires a large screwdriver. For some models of Singer sewing machines, the drive is bolted, then you need a wrench for 11.
The manual drive of the Singer sewing machine has two gears. They are screwed to the drive body with large screw bushings with a slot in the head for a screwdriver, a powerful screwdriver. Tighten these screws first, they may be loose. Be sure to lubricate them with machine oil first.
You can unscrew them completely, wipe them, lubricate and wrap them up again. Or you can not remove it, but just carefully drip oil into the holes available for this with an oiler.
Often, the internal thread for these screws on the drive body is “torn off”, then the screw will twist and not tighten. This is a "sad" case, and you yourself cannot fix such a breakdown. It is possible to advise to “plant” the threaded connection with super glue, but without a guarantee. For more information about the device of the manual drive, including for the Singer sewing machine, see Sewing manual drive.
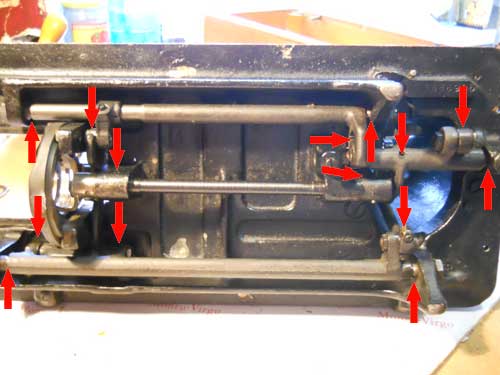
Everyone knows how to lubricate sewing machines. Indeed, there are many holes for lubrication on the body of the Singer sewing machine. What many overlook, however, is that the most important lubrication points are at the bottom of the machine, not at the top. Therefore, turn the car on its side and be sure to lubricate all the places indicated by the arrows in this photo with machine oil.
It is better to draw machine oil into a medical syringe and instill in small drops in all accessible places where there is friction of metal parts. And remember not to use other brands of oil other than special sewing machine oil.
Singer sewing machine hook
Throughout its history, Singer has produced many models of sewing machines. The first of them were delighted with a real weaving shuttle. Some of the older sewing machines have a modern type of horizontal swing shuttle. But there are also models, almost a century ago, with a horizontal type of shuttle, which is only now massively used in modern household sewing machines.
Repair of sewing machines Podolsk, Singer
Repair of Singer sewing machines produced a hundred or more years ago is complicated by the complete lack of spare parts. You can only find used parts. But, does it need to be repaired when there are many modern and inexpensive sewing machines in stores?
Singer type sewing machine bobbin
Singer sewing machine bobbin antiques is not at all like modern bobbins. It is a long narrow spool on which the thread is wound with a special device. It is installed on the body of the machine, and rather does not wind the thread, but puts it, turn by turn.
Foot sewing machine drive
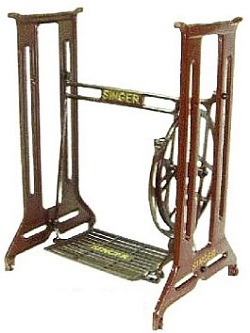
The foot drive is most often found on antique Singer sewing machines. Openwork beautiful patterns and the corporate logo “Singer” cast in cast iron make it attractive for lovers of retro style. Repairing the foot drive of this machine is the same as repairing the foot drive of any other machine. There are some tips on how to get your drive repaired in this article.
Causes of breakage of the sewing machine needle
The reason for the breakage of the needle on the old Singer sewing machine with a “bullet” hook may be the needle plate, or rather the hole in the needle plate. From prolonged use, the hole is badly broken with a needle and enlarged. There are many notches at the edges that interfere with the free movement of the fabric.
Reasons for skipped stitches on the sewing machine
The gaps on any sewing machine are of the same “nature”.Also for the old Singer sewing machine, the main reasons for the omissions are related to the needle and the shuttle. For one reason or another, the nose of the shuttle does not remove the thread from the needle. Why this happens, read this article.
Sewing machine lubrication
Regular lubrication of the sewing machine is imperative. The machine must be lubricated at least once a year and only with machine oil. If you decide to repair your old Singer sewing machine, first of all remove the stitch plate and front cover, clean all its parts and lubricate it liberally with machine oil.
Do you have a sewing machine and love to sew? Then this site is for you. Professional craftsmen will tell you how to make minor repairs to a sewing, knitting machine. Experienced technologists will share the secrets of tailoring. Review articles will tell you which sewing or knitting machine to buy, a mannequin iron and many other useful tips you will find on our website.
Thank you for viewing the entire page.
Sewing machines do not lose their popularity even in the twenty-first century. Those who were born in Soviet times remember that girls were taught from childhood to sew various things, from gloves to jackets and coats.
During the Soviet era, most people did their own sewing machine repairs. Even today, those who attend sewing and sewing courses understand that it is better to repair a sewing machine on their own than to take it to a service center:
- Firstly, companies that repair sewing machines demand quite a lot of money from their customers for the services they provide.
- Secondly, the device of even modern machines can be figured out in a matter of hours, one should only carefully approach this issue, and in the future this will allow repairing sewing machines without involving third parties.
Let's take a look at the basic rules for operating sewing machines:
- Sewing equipment should not be placed near batteries or heaters. But at the same time, it should be in a dry room, in which there are no signs of dampness;
- Before starting work, it is necessary to select the necessary materials and tools, needles and threads that will be needed in the process of work;
- Before you start sewing, you need to make sure that the needle and thread guide are in the up position;
- Remember that the sewing machine must be helped at the time of sewing by pulling the fabric towards you;
- After the sewing work is finished, raise the presser foot and pull out the fabric. Next, cut the thread, having found a free end in advance, the length of which will be equal to a maximum of seven, but at least five centimeters.
There are rules and they must be followed. The use of quality materials and additional tools minimizes the occurrence of problems and malfunctions when working with sewing machines. Therefore, the following reasons, which led to malfunctions, are the most common:
- Broken thread. Breakage can occur both with the upper and lower threads. In the first case, the problem is associated with the selection of low-quality threads or the size of the needle is not correctly selected. In the second case, the problem of a malfunctioning sewing machine may be associated with irregularities, the presence of burrs in the bobbins, and with improper winding of the thread.
- Problems with advancing the fabric. If such a problem arises, you need to carefully look at the position of the teeth. If they are lifted up or lowered to the bottom, then it is required to bring them to a normal state;
- Cutting through the fabric. If such a problem arises, in order to fix the machine, we need to reduce the pressure of the presser foot, and check the condition of the needle, it may be too dull.
The above problems are not serious, and are eliminated in a matter of minutes. But there are some types of problems that occur infrequently. Therefore, repairing sewing machines with your own hands, if they occur, will take a lot of time.
The most difficult, most serious breakdown should be considered the appearance of a knock when the sewing machine is running. To solve this problem, it is necessary to pull the flywheel several times, and do this in accordance with the axial direction of the machine.
In order to repair the sewing machine, it must be disassembled. We disassemble the sewing machine in the following sequence:
- Remove RP (manual drive). It is necessary to remember its location, this will allow you to subsequently assemble a sewing machine in a short period of time;
- Unscrew the stopper from the nut, which is a classic screw. It is under a manual drive, at the time of assembly it must be screwed back to its original location;
- Remove flywheel. This must be done carefully, avoiding damage to it, in case of a malfunction of the flywheel after assembling the machine, you need to see if everything is in order with it;
- Remove the bobbin that looks like a taper. It is located below, after the flywheel. Finding it will not be difficult;
- Remove the bushing from the shaft base;
- Slide a tin washer onto the shaft. It is very simple to make such a washer, just cut out the bottom of a tin can.
The washer in 40% of cases is a guarantee of high-quality performance of work using a sewing machine. Sometimes adding it to the typewriter is enough to solve the problem, but this does not always happen. When adjusting the operation of sewing machines, in 60-70% of cases, it is necessary to turn the rail 180 degrees.
The needles are the basic elements that make the sewing machine work. Its further work depends on which needle is chosen. If a defective needle is selected, then the occurrence of the above problems is not a rare case, because the needle is the basis, and without it it is impossible to sew a single thing.
Therefore, when choosing a needle, you must carefully consider its size and thickness. You also need to check the needle numbering if you are doing any complicated sewing work, otherwise it may happen that the thing does not turn out the way you imagined it earlier.
There is another problem in which the wrong choice of a needle can lead to stretching and damage to the tissue. If the needle is too thick and the fabric is thin, then you cannot use the needle with such fabric, otherwise it will break.
Using too thick fabric with a small needle may break the needle. In order to sew something from a compacted fabric, you need to choose a thicker needle, if it is not available at home, then go to the store and purchase it. Before doing this, measure the thickness of the fabric in advance - this will allow you to choose a needle in the store in a shorter time, you will need to tell the seller the thickness of the fabric, and he will independently select the needle of the size you need.
- Handicraft (1835)
- Knitting (1116)
- Sewing (417)
- Embroidery (266)
- Sewing (31)
- Zelnik (286)
- For face beauty (99)
- For healing (71)
- For hair beauty (62)
- For body beauty (49)
- Practices (207)
- Ladies (2)
- Healthy (134)
- Healing (110)
- Domostroy (82)
- Magic (69)
- Crystals (48)
- Star Reading (44)
- Chakras (40)
- Usefulness (40)
- Conspiracies (29)
- Pleiades (28)
- Vedas (25)
- Predictions (22)
- Mantras (22)
- Gayatri Mantra (4)
- Flowers (22)
- Life Rules (19)
- Charms (18)
- Reiki (18)
- Prayers (14)
- Yoga (11)
- Meditation (8)
- Ceremonies (7)
- Mudras (2)
- Channelings (1)
- Decoupage (1)
These machines are 40-50 years old, and they still sew, which cannot be said about modern imported consumer goods. I bought it and threw it away, but my grandmother's rarity is carefully kept, in many families, as a memory and as a masterpiece of Soviet industry.
Podolsk Mechanical Plant named after M.I. Kalinina produced such sewing machines of class 2-M.
Unpretentious, reliable, easy to operate, always rescued in difficult times, and allowed many to earn bread. It is a pity to see how young people are now getting rid of old things that can serve their masters for a long time to come. Most of these machines are now resting in a landfill. And earlier the sewing machine was affectionately called the nurse, she fed and sheathed the family.
It's time to get down to business.
First of all, we cut off the fabric that women love to sew on the “waist” of the machine. Believe me, there is no benefit from it, used needles, bent, blunt, are stuck into it, and then they try to reuse the same needles. And they cannot understand why this machine does not sew. In addition, after such sticking, the coating deteriorates and such scars remain. Used needles should be thrown into the trash can, where they should be.
We disassemble the machine, remove all covers, the stitch plate, disassemble the shuttle, as shown in the photo.
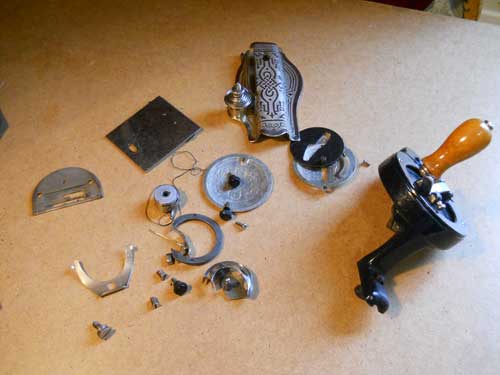
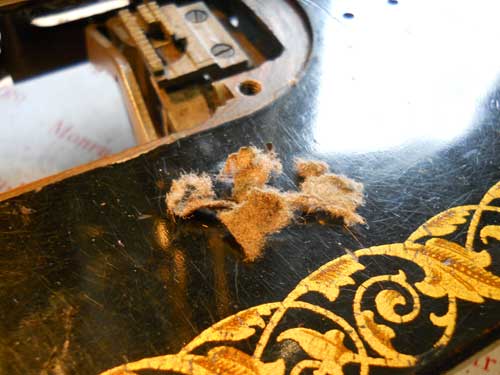
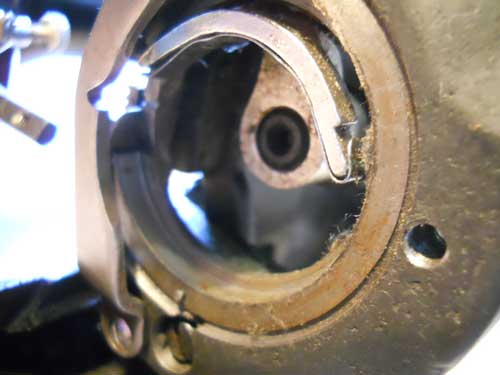
It can be seen that pile from fabric and thread has accumulated on the shuttle travel body, there are even pieces of thread and all this is mixed with thickened oil.
And here, too, dust and thickened oil.
And this is the place where no seamstress, during the entire operation of the machine, never looks. Lint and dust and sand accumulate here, in general, everything that gets into the holes of the needle plate.
We remove all this byaka with a needle and tweezers.
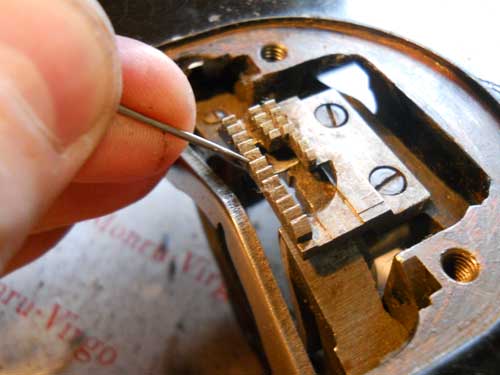
The toothed rack also needs to be cleaned; it is best to do this with a large needle.
And naturally we clean the shuttle, it is good to use kerosene for these purposes, if it is not there, then you can remove the thickened oil with a knife or screwdriver.
We removed all the dirt and old oil, now we start lubricating the machine.
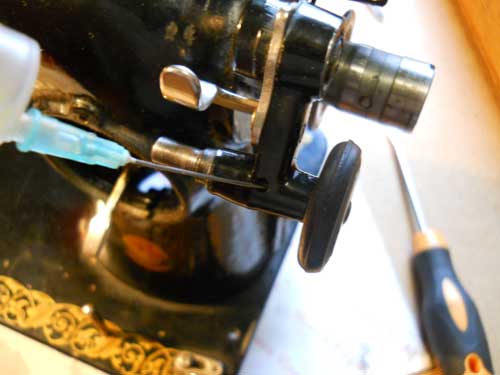
For these purposes, it is best to use an ordinary disposable syringe, with the thickest needle possible. I do not advise you to lubricate with an oil can, it overflows the oil, and you will stain the machine, and you yourself will get dirty. The oil can be bought at any hardware store. Household Lubricating Oil will do.
Here, the arrows indicate the technological holes for lubrication, we bury 3-4 drops in each hole, no more.
And here it is imperative to instill in both holes, one hole of the needle bar and the other of the presser foot.
In these places, the needle bar is rarely lubricated at all, the friction is frantic and the metal is generated, a backlash is formed, as a result of which the needle hits the throat plate or the shuttle.
And accordingly, the foot should also move freely up and down. Without braking, otherwise the fabric will be unevenly pressed, it will simply walk under the foot and the stitches will be of different lengths.
And one more place that we must lubricate.
Winding a bobbin, dripping three drops of oil.
Now we put the machine on its side. The arrows indicate all the places that need to be lubricated.
After full lubrication, we turn the handle for a couple of minutes, so that the oil flows into all the joints and cracks of the machine mechanism. Feel the difference, it began to work completely differently, softly and quietly.
Pay particular attention to the installation of the friction device.
Here you can see how not to do it, usually amateurs install the friction washer this way, as a result, they do not turn on the working stroke. After which they begin to turn on their imagination, cut out the washers from cardboard, wind the wire, in general, who is good at what.
This is how the washer should be, the protrusions should be outward.
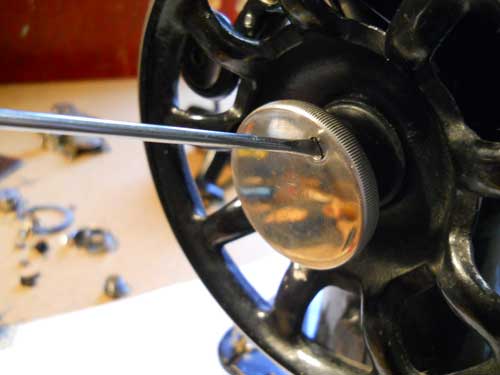
After that we tighten the friction screw and the stop screw.
The result of our work.
Do not store the sewing machine near heating appliances or in cold, damp places.
| Video (click to play). |
Cited 21 times
Liked: 7 users

