In detail: do-it-yourself brake pipe repair from a real master for the site my.housecope.com.
Repair of the brake system is often not only reduced to replacing brake pads or replacing and pumping brake fluid in both circuits. More difficult, requiring accuracy and certain qualifications during installation, is the repair of brake pipes. Often this happens when through corrosion or pipe destruction due to an accident or repair of the brake caliper.
Do-it-yourself repair of brake pipes and successful connection of the brake pipe to the distributor nipple, tees, brake master cylinder and brake calipers requires high-quality processing of the tube end and the formation of a flange flange, or the so-called "funnel". It is obtained using the brake pipe flaring procedure.
There are several basic funnel options.
- Eurostandard fungus (center). It resembles a wheel tire in shape, it is widely used in most cars produced at factories on the Eurasian continent. It turns out the most durable connection option from the above, but it is considered one-time. Can be used up to three times if properly staged.
- An ordinary simple funnel, obtained by bending the walls of the end part of the tube with a special tool for flaring brake pipes.
- A funnel obtained by double-folding the rim of a tube or a simple funnel. It is considered the standard in American cars. This type of brake tube flaring is obtained from the fungus, upsetting its upper part with a tapered mandrel.
The time of using a simple funnel is long gone, first of all, the metal from which pipes were made on old cars has changed. Instead of soft and ductile rolled copper, a strong and hard steel pipe is often used. If earlier the driver could flare the end face with pliers, a wrench and a couple of hammer blows, now it is impossible to flare steel brake pipes without a device.
| Video (click to play). |
The main condition for the successful flaring of the pipe end has always been and will be the use of high-quality, and better professional, tools. For our cars, Europe-Asia, buy flare kits in metric design. The Americans look more than decent, sparkle with chrome plating, but they can slip an inch system. The old Soviet standard for copper brake pipe is 8 mm, more recent Soviet and Russian versions used 6 mm steel.
In terms of choice, the most affordable is a set for flaring brake pipes Force 656B, 906T2, you can use more elegant JonnesWay sets, or the common Biltema or Licota.
The flaring tool kit includes:
- a screw rolling press and a clamp, with the help of which the vise strips are tightened and the metal of the brake pipe is deformed;
- two split vise strips with six to seven holes with cones, into which tubes for flaring are clamped;
- a cutting device that allows you to cut off the end in a strictly perpendicular direction;
- a set of mandrels and cones of various diameters for the formation of fungi.
Please note the following points when choosing a flaring kit. First, the screw-nut of the press and the clamps should be matte black. This indicates heat treatment and hardening of the helical surface. In a cheaper version, chrome plating is used.
Second, the accuracy of making calibrated holes in the vise strips. Typically, the inner surface of the cones is coated with a protective phosphate-based oxide film.Such a coating facilitates the sliding of the wrought metal along the inner surface of the matrix.
Third, all calibrated holes are numbered with dimensions, indicating the units of measurement - millimeters or inches, punched by a stamp to a depth of 0.1 mm, without additional chrome plating or painting. Alternatively, the entire structure can have an oxidized coating. Non-working parts can be painted with a plain light paint.
The procedure for flaring brake pipes with a fungus with your own hands:
- choose from the set a device for accurate perpendicular cutting of the end of the brake pipe, inserting it into the hole of the corresponding diameter, tighten the screw and wrap the cutter a couple of times until it stops;
- there is also a sharp semicircular saw for removing internal chamfers and burrs;
- after filing the end of the brake pipe with a file, we put a nut-union on the pipe and fix the end in a vice with a clamp, observing the amount of release of the end of the pipe above the plane of the vice;
- add a couple of drops of "brake" to the end of the tube, insert a mandrel of the appropriate size and press down on the edges of the tube, getting a fungus.
If, according to the conditions of flaring, it is necessary to obtain an American version of the fitting, a cone is inserted into the clamp, and the edges of the upper part of the fungus are pressed under the cone of the matrix. Sometimes a ratchet is built into the structure of the clamps, which allows you to limit the force applied to the surface of the fitting.
If the flaring needs to be done quickly and in a large number of points, in the case of copper pipes, a simpler tool is used - a pliers and a swivel roller.
The ductility and pliability of copper does not require much effort to deform the metal, therefore it is faster and easier to flare the end with the effort of the hand. Due to the compactness of the device, the pliers can be used for flaring brake pipes directly on the car, in conditions when it is difficult to carry out work with a standard set.
Steel brake pipes, in contrast to copper ones, have practically no reserve of plasticity, so the fungus and the funnel can turn out with the formation of a large number of microcracks. In this sense, the rolled edge of the fungus remains less sensitive to the presence of microcracks, if, of course, they are located only in the area of the hole. If cracks have formed at the periphery, at the widest point of the fitting, this option is definitely subject to rejection.
For the American double funnel, it is often possible to use only a copper brake pipe. In extreme cases, if there is an urgent need to expand the steel tube according to the American standard, the procedure is performed in two or three stages. At the first stage, after cutting and filing the end of the tube, it is expanded under the fungus. Further, the resulting version is subjected to short-term annealing by heating with a torch, which allows you to remove a significant part of the stresses in the metal. The third stage will be flaring at an intermediate angle of 25-30 °, instead of 45 °, and repeated annealing. Finally, the final flaring is performed to the desired funnel size.
If possible, before flaring the tube, it is worth practicing obtaining a steel American funnel on unnecessary trimming of a pipe made of a similar material.
The video shows the process of expanding the brake pipes:
Flaring brake pipes is a procedure that may be required at any time by someone who has their own car. Of course, the implementation of this and any other operation related to the maintenance and repair of a vehicle can always be entrusted to qualified specialists at service stations, but many motorists go the other way and try to do everything with their own hands.Each car owner has the right to decide for himself who to trust the maintenance of his vehicle, but many of these issues can be resolved independently.
Learning to self-expand tubes is a snap.
Brake pipes are an integral part of the braking system of any car, which is responsible for stopping it at the right moment. To understand how important such tubes are for the operation of the brake system as a whole, you should at least superficially familiarize yourself with the principle of its operation.
So, the process of stopping the car, for which the braking system is used, consists of the following stages.
- If it is necessary to reduce the speed of the vehicle or to stop it completely, the driver presses the brake pedal.
- The master cylinder piston connected to the pedal is activated and begins to act on the brake fluid.
- Under high pressure communicated by the piston of the master cylinder, liquid begins to flow through pipes and hoses into the cylinders of each wheel, acting on their pistons.
- Under fluid pressure, the pistons act on the brake pads, which are pressed against the brake discs, stopping the rotation of the wheels.
Car brake system diagram
Obviously, brake pipes play a crucial role in the operation of the entire brake system, and if they break, it completely fails. That is why the repair of these elements, which includes the expansion of the brake pipes, should be approached with all responsibility.
Through the brake pipes, as mentioned above, high-pressure brake fluid is supplied to all elements of the system. When the throughput of such tubes deteriorates, the entire system begins to work ineffectively, which leads, in particular, to a significant increase in the stopping distance. The fact that the elements of the brake system, including pipes, require diagnostics (and, possibly, repair), may be indicated by the following characteristic signs:
- the appearance of extraneous sounds and pulsating movements when you press the brake pedal;
- free movement of the brake pedal when you press it;
- leakage of brake fluid, which leads to a decrease in pressure and, accordingly, to ineffective braking and intensive wear of the brake pads;
- driving the car to the side when braking (this situation, although it is an indirect sign, can also indicate that the brake pipes need to be repaired).
Old brake pipes in terrible condition should be urgently replaced even if there are no leaks
However, the main sign that the brake pipes do not fully fulfill their functions and require flaring is an increase in the braking distance. The most common causes of deterioration in the performance of brake pipes are:
- violations in the design of the hex heads with which such tubes are equipped;
- deterioration in the quality and reliability of threaded connections, the ingress of debris or coked liquid into them.
Such malfunctions, negatively affecting the technical condition of individual elements of the brake system, significantly reduce the efficiency of its work. That is why experts and car manufacturers recommend diagnosing it every six months. If you are tied to the mileage, then this procedure must be performed every 50,000 km of run, and it is necessary to replace rubber tubes, regardless of their technical condition, every 125,000 km of vehicle run.
Car repair, whatever it is associated with, rarely causes pleasant emotions in the car enthusiast. This is also explained by the fact that such an event, as a rule, is associated with certain financial costs. Meanwhile, if we talk about a situation in which it is necessary to expand the brake pipes, the cost of such a procedure can be minimized if you do it yourself.
So, in order to flare the brake pipes with your own hands, you need not only to study in detail the theoretical information on this issue and watch the corresponding video, but also to purchase a special device. The kit for flaring brake pipes, which can be obtained inexpensively at many automotive stores, includes the following tools and accessories:
- pipe cutter;
- a fitting used as a connector;
- ticks.
The flaring kit usually includes a clamp for various tube sizes.
Using such a simple set, to which you need to add a drill (in order to chamfer the ends of pipes), as well as gasoline, which is necessary as a lubricant, you can not only perform high-quality flaring with your own hands, but also save a decent amount of money that would have to be paid to specialists service stations.
When replacing the tube with a new one, we first make a copy based on the old one.
Immediately prior to flaring with a brake pipe, perform the following steps.
- The tube is unscrewed with a tool or manually from the brake cylinder or caliper.
- By visual inspection, the presence of damage on the surface of the tube is determined. If they are close to its edge, then the tube can be restored, if not, then it must be replaced with a new one.
- Using a tool such as a pipe cutter, a damaged area is cut from the edge of the tube and the cut edge is processed with gasoline.
- The cut end of the tube is clamped with pliers and a chamfer is removed in its inner part using a drill with a drill of the appropriate diameter.
- The section of the inner surface of the tube, where the chamfer was removed, is cleaned of chips. After that, the end of the tube is inserted into a fitting that acts as a connector.
Gently shorten the tube using a special cutter
After all the above steps have been completed, the tube must be flared, for which it is best to use a special machine. The flaring carried out using such a machine is carried out according to the following algorithm.
- The end of the tube to be flared is inserted into the clamping hole of the machine. In this case, the part of the tube protruding from the clamping mechanism of the machine should be approximately 5 mm.
- With the help of a special punch, which such a machine is equipped with, the end of the tube is expanded.
- If it is necessary to expand the second end of the tube, the entire procedure described above is performed in the same sequence.
We squeeze the die with a press, visually monitoring the formation of fungus, and we get a high-quality crimped tube
As a result of flaring with the help of such a device, with the rules and subtleties of work with which it is best to get acquainted with the video, the end of the brake pipe becomes neatly expanded. The use of a special machine allows you to adjust the parameters of such an expansion, because for brake systems used on cars of different brands, they can seriously differ. As a rule, in special kits, with the help of which you can flare brake pipes with your own hands, there is also a template that allows you to monitor the result of a technological operation.
Unfolding the end of the tube using a special knife located on the back of the cutter
Thus, it is not difficult to expand the tubes used in the braking system of a car if you use special tools and devices for this. Performing such a flaring with your own hands, you not only save money, but also completely control the process of performing a technological operation, the results of which depend on the performance of your vehicle. In such cases, you should always remember that the car locksmith does not do the job for himself, and therefore treats it accordingly.In order not to worry about the results of self-repairing your vehicle, you must adhere to a few simple recommendations:
- strict adherence to instructions, which can also be video;
- using only high-quality tools, fixtures and consumables for flaring;
- strict control at all stages of the implementation of repair measures.
Following these recommendations, you will be able not only to flare the brake pipes with high quality, but also to perform many other work related to the maintenance and repair of your car, without worrying about the result of these activities.
The metal brake pipe is frayed, it leaks a little. I can't find it at the showdown. Is it possible to repair it somehow? The situation will be further complicated by the fact that the hole is almost at the bend of the tube and the access there is not convenient. I tried to wrap it with electrical tape, it does not help. I don’t know what to think of.
Why not make a new one? the way to you IMHO to the "cargo" store or to the service station where the trucks are made. I always do that. The price of the issue is a penny.
I tried to wrap it with electrical tape.
Murdered
I tried to wrap with electrical tape, it does not help. I don’t know what to think of.
The plaster rules
Murdered
I thought at least how a temporary option would help
The plaster rules
witty
I thought at least how a temporary option would help
Your pressure in this tube is on the order of 250-300 kg / cm2
Your pressure in this tube is on the order of 250-300 kg / cm2
therefore the current is window putty!
Your pressure in this tube is on the order of 250-300 kg / cm2
Zero one is probably superfluous, 300 kgcm2 is 300 atmospheres that cannot be created with a foot (even with the help of a vacuum amplifier). There are 10 atmospheres, on the strength of 15, and even then hardly. On trucks from 8 kgcm2 everything slows down.
The metal brake pipe is frayed, it leaks a little. I can't find it at the showdown. Is it possible to repair it somehow? The situation will be further complicated by the fact that the hole is almost at the bend of the tube and the access there is not convenient. I tried to wrap it with electrical tape, it does not help. I don’t know what to think of.
It is better to make a new tube. You take off the old one, you accurately measure the length. Then a piece of the required length is cut out of a copper tube, fittings are put on and the tube is expanded on both sides. A special set for flaring is needed. We cut and expand pipes right in the car market. The fittings are sometimes very difficult to unscrew. If not unscrewed, you can heat the connection with a small gas burner. The second option is to try soldering the tube in the damaged area.
It is better to make a new tube. You take off the old one, you accurately measure the length. Then a piece of the required length is cut out of a copper tube, fittings are put on and the tube is expanded on both sides. A special set for flaring is needed. We cut and expand pipes right in the car market. The fittings are sometimes very difficult to unscrew. If not unscrewed, you can heat the connection with a small gas burner. The second option is to try soldering the tube in the damaged area.
If the fitting does not unscrew, then we bite off the tube under the fitting and unscrew the head
The metal brake pipe is frayed, it leaks a little. I can't find it at the showdown. Is it possible to repair it somehow? The situation will be further complicated by the fact that the hole is almost at the bend of the tube and the access there is not convenient. I tried to wrap it with electrical tape, it does not help. I don’t know what to think of.
The car markets (in St. Petersburg for sure) have points that specialize in these pipes (copper). You come, say the length, and you will be minutes later that way. Twenty you they bring it out rolled up. It cannot be that they were not in Kiev.
The metal brake pipe is frayed, it leaks a little. I can't find it at the showdown. Is it possible to repair it somehow? The situation will be further complicated by the fact that the hole is almost at the bend of the tube and the access there is not convenient. I tried to wrap it with electrical tape, it does not help.I don’t know what to think of.
If the tube is not dry, and the hole from mechanical damage is easiest to remove, go to any service for the repair of refrigeration equipment and give 10 UAH. soldered in 5 minutes. If rotten, see above. At the expense of electrical tape
Zero one is probably superfluous, 300 kgcm2 is 300 atmospheres that cannot be created with a foot (even with the help of a vacuum amplifier). There are 10 atmospheres, on the strength of 15, and even then hardly. On trucks from 8 kgcm2 everything slows down.
That's right! Up to 250 atmospheres! This is hydraulics. The ratio of strokes and working areas of the pistons ("main" and "working"). The principle of the jack. Physics Grade 7. Trucks have pneumatics 6-8 atm. But look at the size of their working cylinders (diameter, membrane area).
Found a company that sells plastic brake pipes and sets of fittings for them. They are easy to install and are cheap for money, but I don’t know how reliable it is. They also say that in the event of a hole in such a tube, the tube is cut in that place and connected with additional fittings. I also found where copper tubes are made, but the option with plastic is simpler and even cheaper. Who knows about plastic brake tubes?
why it seems to me that plastics are an unreliable element in the brakes, especially on ours, and in general in any car it is better not to save on brakes
why it seems to me that plastics are an unreliable element in the brakes, especially on ours, and in general in any car it is better not to save on brakes
It’s not a matter of savings, of course, I was primarily interested in the speed and ease of installation of such a tube, plus the possibility of repairs on the road.
It’s not a matter of savings, of course, I was primarily interested in the speed and ease of installation of such a tube, plus the possibility of repairs on the road.
if we admit it as a temporary rem. set, then it's okay, well, if something is on the road. and so to put them, of course, everyone's business, plastics do not bend, but breaks, and if they bend, then in the place of inflection it will no longer be so strong, and sometimes oh, how you need to bend it somewhere. + to everything, as you say, if a hole appears somewhere in the tube, you can cut it and dock it with a fitting. The more links there are, the less reliable I think. If I honestly would not have put plastic tubes, it hurts as it is suspicious. and life, as they say, is more expensive.
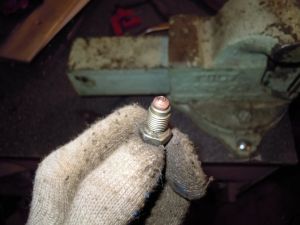
The second culprit for unplanned brake pipe wear is utilities. Chemical reagents and salt, generously scattered to fight, for example, with ice, significantly accelerate metal rusting and reduce the lifespan of many parts released by the plant. And the third factor that makes it premature to engage in brakes is the notorious Russian roads.
Potholes and bumps create an off-design physical stress, due to which the tubes are deformed, or even burst; in addition, they act as a storage facility for chemical reagents even when the snow has already melted (in spring). All together leads to the fact that the mentioned parts fail not after 70-100 thousand km, as the manufacturer expected, but after 30-50, and even then - in the best cases.
How to flare a brake pipe with your own hands: The process is quite simple, but it will require a purchase, self-manufacturing, renting or borrowing a special device from a neighbor in the garage to carry out these works. But if you do decide to buy a flaring machine, don't be tempted by the cheapest options on the market.Yes, you can take the device for 700-800 rubles, but it will definitely turn out to be completely disposable. It has been experimentally established that a more or less high-quality machine cannot cost less than 1800-2000 rubles or even more.
Often the main body in the brake pipe remains intact, but the structure of its 6-sided head is destroyed. There may be other options: coking of threaded connections as a result of the ingress of liquid on them, clogging them, etc. In such situations, if the length permits, you can simply cut off the defective part. But it is better to replace the tube completely if you are going to carry out such a repair. In addition to the flaring machine, pliers, a pipe cutter, a fitting and a drill will be needed. Of the materials - a little acetone.
- The pipe cutter cuts off the desired piece of the tube;
- It is clamped by the holder in such a way that the edge protrudes 5-6 millimeters beyond it;
- Instead of a cone, a stamp is placed that matches the cross-section of the tube (both the holes in the holder and the stamps in the flaring device from 5 to 8, so it's easy to choose the required size);
- The inner edge of the tube is cleaned with something sharp, a regular knife is fine;
- The end is slightly trimmed with a file;
- The fitting is put on - exactly at this moment, since later it will no longer be pulled. The thread of the nut should be directed towards the end of the tube, not towards its body;
Each motorist should understand a little about the design of his car in order to be able to fix the malfunction with his own hands in the event of repairs, if possible. This is especially true for the braking system. Often, when it breaks down, flaring of the brake pipes is required, through which fluid is transmitted, when the pedal is pressed, from the cylinder to the pads.
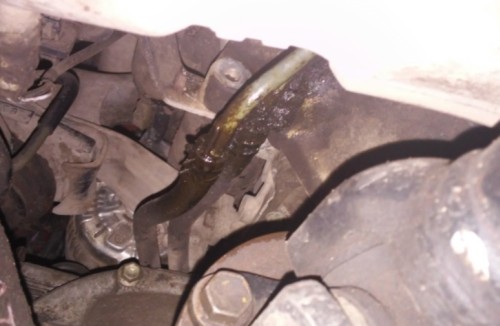
You can determine the malfunction of the tubes yourself with the following symptoms:
- Leakage of brake fluid from the system;
- Overheating of brake drums;
- Squeak when you press the pedal;
- Increasing the travel of the brake pedal;
- The braking distance becomes longer;
- The wear of the pads is uneven.
- Corrosion occurrence;
- Crack formation;
- Sourness of the thread;
- The impact of the external environment;
- Poor attachment.
Of course, if the pipes are malfunctioning, you can drive the car to the service station and entrust the repair to specialists. But why spend money on something you can do yourself? To do this, you need to purchase a tool for flaring in specialized stores or order online. It is available for inch or metric threads. The set includes a pipe cutter, a device, pliers, a clamp, dies for different diameters of tubes for flaring with fungus.
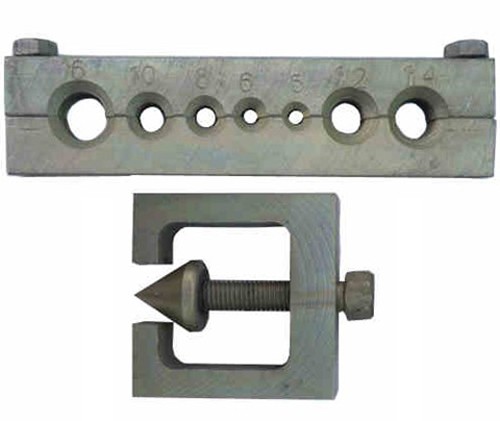
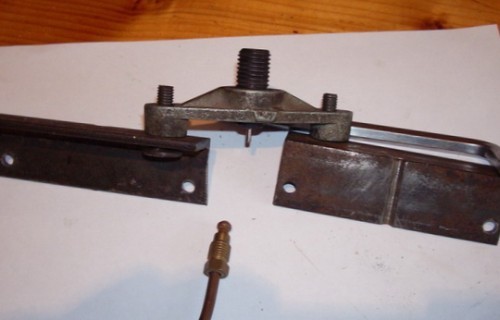
An even cheaper method is making a homemade device. With a desire and minimal skills to work with your hands, there is nothing difficult in this. First you need to make a base (frame) for attaching the tubes. You can assemble it from two steel corners. Cut the corners to the required length with a grinder, drill two holes in them for bolting. This is done in 15 minutes.
Having assembled the bed, you need to make holes for the tube, and chamfer on a drilling machine or drill. The most difficult thing is the manufacture of punches (mandrels). You can order them to a familiar turner.
First, it is necessary to determine the degree of tube breakage and the possibility of repair. To do this, unscrew it from the caliper or brake cylinder. If it is possible to remove the damaged area while maintaining the desired length, cut this piece with a pipe cutter. After that, we process the remaining part with gasoline, clamp it with pliers and remove the inner chamfer with a drill. If it is impossible to carry out repairs, we buy a pipe in a store.
DIY tube repair instructions:
- We install the tube in the fixture (base). It is necessary that the end protrudes 5 mm beyond the edge;
- Change the cone to a stamp required for the diameter of the tube;
- We twist the stamp;
- We screw in the stamp and slightly flatten the end of the copper tube;
- We put on the fittings.Be sure not to forget, otherwise you will have to redo everything;
- Remove the stamp and change it to a cone-shaped tool;
- Gently, without rushing, we twist;
- We take out the tube and clean it if necessary.
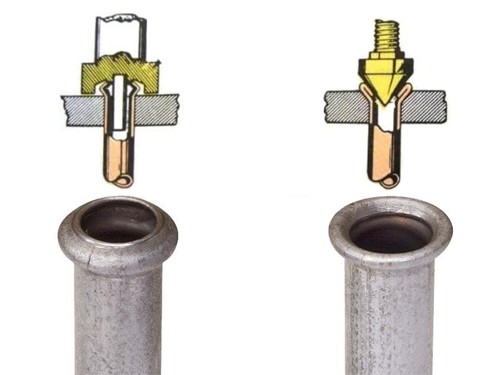
At the exit we have a new brake pipe under the cone. You can also flare the tube in another way, called "fungus". Usually, European-made cars use mushroom flaring, and Japanese and other Asian models use a "cone". To flare under the "fungus" you just need to not remove the required stamp.
Of the minuses, it is worth noting that brake pipes do not fail very often and your tool may only be needed once. The exception is if you buy used high-mileage cars that have been kept in bad, unfavorable conditions or have been in accidents and change them quite often.
Doing it yourself according to the instructions or entrusting it to specialists has to be decided by each person individually, but it is always necessary to monitor the condition of the brake system and pipes, including!
Repair of the brake system is often not only reduced to replacing brake pads or replacing and pumping brake fluid in both circuits. More difficult, requiring accuracy and certain qualifications during installation, is the repair of brake pipes. Often this happens when through corrosion or pipe destruction due to an accident or repair of the brake caliper.
Do-it-yourself repair of brake pipes and successful connection of the brake pipe to the distributor nipple, tees, brake master cylinder and brake calipers requires high-quality processing of the tube end and the formation of a flange flange, or the so-called "funnel". It is obtained using the brake pipe flaring procedure.
There are several basic funnel options.
- Eurostandard fungus (center). It resembles a wheel tire in shape, it is widely used in most cars produced at factories on the Eurasian continent. It turns out the most durable connection option from the above, but it is considered one-time. Can be used up to three times if properly staged.
- An ordinary simple funnel, obtained by bending the walls of the end part of the tube with a special tool for flaring brake pipes.
- A funnel obtained by double-folding the rim of a tube or a simple funnel. It is considered the standard in American cars. This type of brake tube flaring is obtained from the fungus, upsetting its upper part with a tapered mandrel.
The time of using a simple funnel is long gone, first of all, the metal from which pipes were made on old cars has changed. Instead of soft and ductile rolled copper, a strong and hard steel pipe is often used. If earlier the driver could flare the end face with pliers, a wrench and a couple of hammer blows, now it is impossible to flare steel brake pipes without a device.
The main condition for the successful flaring of the pipe end has always been and will be the use of high-quality, and better professional, tools. For our cars, Europe-Asia, buy flare kits in metric design. The Americans look more than decent, sparkle with chrome plating, but they can slip an inch system. The old Soviet standard for copper brake pipe is 8 mm, more recent Soviet and Russian versions used 6 mm steel.
In terms of choice, the most affordable is a set for flaring brake pipes Force 656B, 906T2, you can use more elegant JonnesWay sets, or the common Biltema or Licota.
The flaring tool kit includes:
- a screw rolling press and a clamp, with the help of which the vise strips are tightened and the metal of the brake pipe is deformed;
- two split vise strips with six to seven holes with cones, into which tubes for flaring are clamped;
- a cutting device that allows you to cut off the end in a strictly perpendicular direction;
- a set of mandrels and cones of various diameters for the formation of fungi.
Please note the following points when choosing a flaring kit. First, the screw-nut of the press and the clamps should be matte black. This indicates heat treatment and hardening of the helical surface. In a cheaper version, chrome plating is used.
Second, the accuracy of making calibrated holes in the vise strips. Typically, the inner surface of the cones is coated with a protective phosphate-based oxide film. Such a coating facilitates the sliding of the wrought metal along the inner surface of the matrix.
Third, all calibrated holes are numbered with dimensions, indicating the units of measurement - millimeters or inches, punched by a stamp to a depth of 0.1 mm, without additional chrome plating or painting. Alternatively, the entire structure can have an oxidized coating. Non-working parts can be painted with a plain light paint.
The procedure for flaring brake pipes with a fungus with your own hands:
- choose from the set a device for accurate perpendicular cutting of the end of the brake pipe, inserting it into the hole of the corresponding diameter, tighten the screw and wrap the cutter a couple of times until it stops;
- there is also a sharp semicircular saw for removing internal chamfers and burrs;
- after filing the end of the brake pipe with a file, we put a nut-union on the pipe and fix the end in a vice with a clamp, observing the amount of release of the end of the pipe above the plane of the vice;
- add a couple of drops of "brake" to the end of the tube, insert a mandrel of the appropriate size and press down on the edges of the tube, getting a fungus.
If, according to the conditions of flaring, it is necessary to obtain an American version of the fitting, a cone is inserted into the clamp, and the edges of the upper part of the fungus are pressed under the cone of the matrix. Sometimes a ratchet is built into the structure of the clamps, which allows you to limit the force applied to the surface of the fitting.
If the flaring needs to be done quickly and in a large number of points, in the case of copper pipes, a simpler tool is used - a pliers and a swivel roller.
The ductility and pliability of copper does not require much effort to deform the metal, therefore it is faster and easier to flare the end with the effort of the hand. Due to the compactness of the device, the pliers can be used for flaring brake pipes directly on the car, in conditions when it is difficult to carry out work with a standard set.
Steel brake pipes, in contrast to copper ones, have practically no reserve of plasticity, so the fungus and the funnel can turn out with the formation of a large number of microcracks. In this sense, the rolled edge of the fungus remains less sensitive to the presence of microcracks, if, of course, they are located only in the area of the hole. If cracks have formed at the periphery, at the widest point of the fitting, this option is definitely subject to rejection.
For the American double funnel, it is often possible to use only a copper brake pipe. In extreme cases, if there is an urgent need to expand the steel tube according to the American standard, the procedure is performed in two or three stages. At the first stage, after cutting and filing the end of the tube, it is expanded under the fungus. Further, the resulting version is subjected to short-term annealing by heating with a torch, which allows you to remove a significant part of the stresses in the metal. The third stage will be flaring at an intermediate angle of 25-30 °, instead of 45 °, and repeated annealing. Finally, the final flaring is performed to the desired funnel size.
If possible, before flaring the tube, it is worth practicing obtaining a steel American funnel on unnecessary trimming of a pipe made of a similar material.
The video shows the process of expanding the brake pipes:
Pass the bitten tube into the fitting, flare it evenly, screw the fitting into the GTZ, then, using a flux, solder the fitting to the tube so that everything is hermetically sealed. Or with epoxy glue.
What do you say, is it reliable enough?
PS: Finding a new tube is not a fact that it is possible
Tighten - that's all, that's enough. The main thing is to do everything carefully, then it will be no problem to keep the pressure. I did this repeatedly, including with steel pipes, and not only copper ones (in particular, it broke off once from vibrations on the hydraulic driver, whose bracket went to crack - so after restoration (there was nothing to replace in the village) the tube passed without problems more than 110 thousand km and was replaced when transferring the hydraulic system, when replacing the engine with a VAZ one). With soldering, there are just no guarantees (that it will not flow after some time in operation), and you will burn the GTZ while you warm up and solder the threaded fitting itself :)). Epoxy is not a “sealant” for hydraulic pipes at all.
Technology: sawed off the tip along a non-deformed section, hooked on the fitting, pre-expanded it with a conical striker (or even in a circular motion - with an ordinary beard), and finally minted the cone with a ball about 7 mm in diameter. The main thing is the cleanliness of the flared conical surface and a sufficient amount of flaring - so that when tightening the tube is guaranteed to be clamped with a fitting, and not along the edge of the flaring. Of course, a normal set of accessories guarantees quality with a simple step-by-step implementation of all the prescribed operations, but here you need to do everything more carefully and knowing what you are doing, and there is a high probability that a flared tube (especially steel) will flow, especially with careless installation (then - all over again , with control of the state of the cone in the GTZ socket under the tube, it can be lifted up like this.). But, nevertheless, during the repair, even in the field, it was possible to achieve a completely reliable connection.
| Video (click to play). |
PS The problem was solved after the second soldering, putting a second tube with a 3.5 mm wall on the tube and scalding it all.


