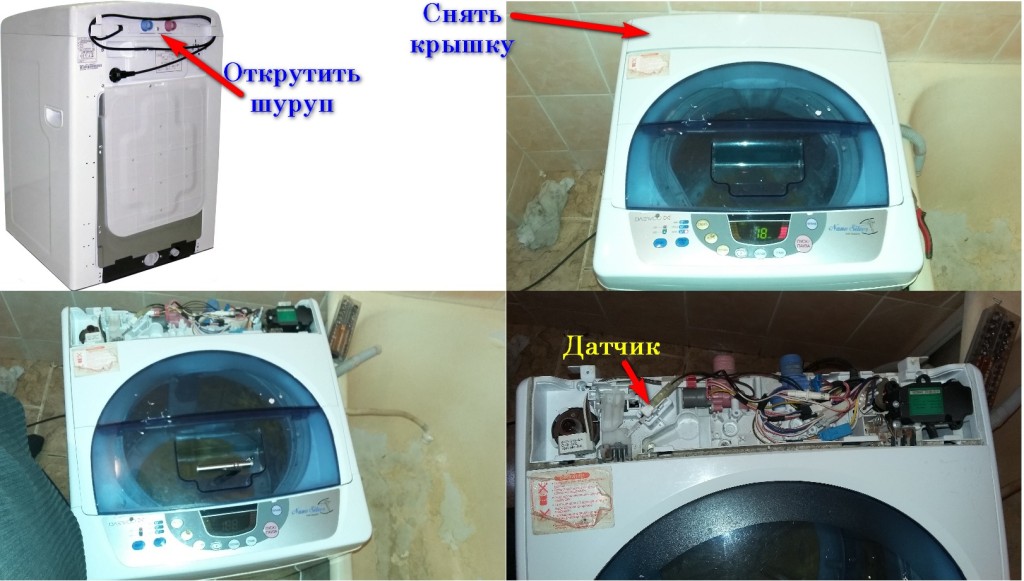
In detail: do-it-yourself air bubble washing machine repair from a real master for the site my.housecope.com.
I have been using the Daewoo DWF5590DP washing machine for many years, but it has worked for me for more than 10 years, but how much before? Excellent device, it is a pity that they are no longer produced. Reliable, simple, great washing.
But sometimes it breaks ... Age, after all.
And this is where troubles begin. Details on them can no longer be found anywhere, in the workshops they have already forgotten about them, it is difficult to find service manuals, and the manual is not very extensive.
Nevertheless, the cars are practically indestructible, the people still have a lot of them. I will try to systematize my experience and information on repairing such machines (as well as their analogs: Japanese counterparts for 110 volts and assembled in Ussuriisk EVGO) here and help those who wish.
For starters, a link to the complete DAEWOO service documentation:
diagramas.diagramasde.com/otros/DWF-5990.pdf
These machines have sores that, knowing how, can be successfully treated with your own hands.
First you need to decide on the symptoms.
1. The most common. When washing in wash modes, rinsing the activator rotor turns in one direction, and wedges in the other, while the motor hums and stands. It immediately switches to the other direction of rotation - no problem. Repair immediately, otherwise there is a chance to burn the motor or, more likely, the triacs in the control unit.
How do we treat? First, we disassemble. There is no photo yet, I will upload it as it arrives, since I will revise my typewriter.
Remove the back cover, take out the pallet. We unscrew the control panel - under the gray plugs there are two self-tapping screws, after unscrewing - the panel moves sideways (in my opinion to the right) and remove the two connectors.
Three self-tapping screws on the back hold the panel on which the power button is.
Remove the rubber bands around the water inlets and remove the panel. Leave the button on the wires by unscrewing it from the panel.
Under this panel there will be wiring to the bubble generator, valves, and more. Carefully disconnect the connectors, you can't go wrong during reassembly - all are different in color. Unscrew the bubble generator (this is the box under the power button), remove the two hoses going down (it is better to remove not from the block, but from the tee near the tank)
We disconnect all the wiring going from there down the rear right wall of the machine by connectors (in a plastic bag screwed to the wall) and take out the tube going to the rear left into the tank (water level sensor) from the top panel and remove it.
We see the top of the tank, and the end cap of the tank on four self-tapping screws. We shoot.
Now we put the machine on its side, or, as I do, I tilt it forward, resting the front edge against the wall (otherwise, you can damage the front panel of the case). Now you can work from below.
| Video (click to play). |
Around the pulley there is a plate in the form of the letter P, protection. Having detached the harness from it, we unscrew the four bolts. We see the motor and through the belt - the pulley. We unscrew the pulley (we rip off the nut, but do not completely remove it) Putting a screwdriver under the belt, and turning it to the side, turning by the motor pulley, we removed the belt, removed the pulley.
I will continue.
Another common sore - at the start of the spin cycle, the laundry gets bunched up, the tank starts hitting the walls, the machine tries to go into another room)))))
The reason is in the lower spring clutch or spin drive. Directly on the switched on machine, we look from behind from below the actuation of the drive at the start of the spin cycle. The cable should retract the lever with the spring-loaded tooth that fits the gear and retract it. If not, we revise the drive. If it pulls in, remove the pulley (see above), pull together the gear and the spring with two cylinders. More precisely, the lower one will come down. We look at the spring, it is cylindrical, with a tendril below. This tendril fits into a hole in the gear. If it is broken, we are looking for a spring for aliexpress, they are there, pay attention to the dimensions.
One more nuance.Very similar models - 5590 and 5570 have differences in gearbox design. In the 5590, a spiral spring made of wire with a diameter of 3 mm was installed in the upper part of the gearbox, the repair of which I described above. In 5570, this spring may not be present, in this case its function is performed by a band brake (steel strip with a friction lining) in the middle of the gearbox. When the cable is pulled in by the drive of the release through the lever, the band brake, which in the washing mode is tightened and blocks the rotation of the drum, is released. When the friction pair is worn out, the friction lining - the gear housing will cause the drum to slip during washing and, as a result, bite the activator shaft in one direction. To repair this unit, you need to remove the gearbox (see description above), remove the spring tensioning the band brake and unscrew the M6 screw that secures the second side of the band. Take out and inspect the tape. If there is wear on the friction lining, you can replace it by gluing it with superglue. The easiest replacement option is thick leather, for example a piece of belt))))
Hey! Can you tell me, I have a similar machine DEU, only it seems 806, Ussuriysk. Such a problem, suddenly began to turn off, i.e. completely, the entire display goes out. You press the power button and everything turns on again. But, for example, I choose a spin, set the very minimum and press Start. For a few seconds I hear how the drum stopper is removed, even sometimes you can hear the motor humming (but not spinning!) And everything turns off instantly, i.e. the panel goes out. Later, I checked the motor myself - a worker, checked the starting condender - it seems like it was also a worker, I rang all the wires, everything is ok! I called the master, he looked, again rang something and said that the brains were in order, and the engine was not working. But since the car is rare and there is no s / h, I took 500 re for the diagnosis and hello. I don’t know what to do, it’s a pity to throw it in the trash, I worked for only 7 years. So it goes. Before that, it was the same, but LG. She also worked for more than 10 years, then she died, i.e. the contact on the board began to be lost. I did not bother and bought this Daewoo, and left it for s / h. I took off the motor and the Conder (wires of the same color with the DEU!) And connected it - the same story! I suspect. the problem is in the module (board) ?! What do you think?
Hi, I’ll give you a hint. I once had such a machine. EVGO - in my opinion.
Assembly in Ussuriisk from original Korean parts.
One problem is with crooked Russian handles. I had it flowing from the purchase along all the joints, because all the hoses and pipes were put on glue, even without clamps. I wrote to the post office of the plant - they ignored it)))))
I disassembled everything and put the clamps and sealant on NORMA.
She worked for 10 years.
The motor and starting capacitor should come from DAEWOO and LG, this is essentially what it is.
You got a strange master. If a person takes money for diagnostics, he must name the reason, at least a faulty node.
Let's figure it out. You changed the engine, the Conder too. The result is zero.
Accordingly, the matter is in the control board. I had a problem with this once.
The control board contains two triacs in the 220th case (in my opinion, triacs, but possibly transistors, I don't remember now) that control the operation of the motor. To put it very simply, without special terms - they are impulses fed to the motor, and the more often they are, the faster the motor turns. PWM is called.
99% - it's about them. You remove the board, it is filled with compound.
Triacs can be seen - they even stick out from under the fill in my opinion. Two black rectangles on three legs.
Carefully remove the compound around and nibble them out of the board, leaving the legs longer on the board.
And then you read what is written on them in the radio store. Perhaps you will not find exactly those, then you drive into the search engine what is written on them and the word analog.
They cost 30-50 rubles)))))
Solder back, rejoice, erase)))))
Yes, after checking - fill it back with sealant!
This article is about washing machine repair Daewoo (Daewoo), or rather, the elimination of the most common malfunction in the DWF model - 806 WPS, specifically, what to do if the display washing machine pops up error LE.
This washing machine is equipped with an air bubble system. Loading type - vertical, it is possible to connect hot and cold water.
According to the client, the machine washed, rinsed, drained and poured water perfectly, but did not wring it out. When, after the entire washing process, it came to spin, the machine began to emit intermittent signals and the display was highlighted error LE.
After examining the instructions, it was revealed that this error means an open or loosely closed lid. Since the lid was closed, it was concluded that the fault should be sought in the lid close sensor circuit. Perhaps the sensor itself, the contacts leading to it, or the triggering mechanism of this sensor are faulty.
Further, it was decided to disassemble the part of the washing machine body where this very sensor for closing the lid is located, which, in fact, was done.
The principle of operation of this unit is as follows: when the cover is open, the sensor is in an open state and, as a result, the spin function does not work. When the lid is closed, a closing mechanism is triggered, consisting of a plastic tab and a spring. Thanks to the spring, the plastic eye rises and touches the metal lever plate. The ear raises the lever, which, in turn, presses the button of the sensor itself and the sensor is triggered, i.e. goes into a closed state.
By the way, in case of failure of the sensor for closing the lid, it can be replaced with one of the buttons that are installed in microwave ovens.
After examining the closing mechanism, it was revealed that the eyelet is raised "not in full force" and thus does not press the lever that presses the sensor trigger button. The reason for the inoperability of the lid closing mechanism was in the spring, which had corroded from moisture and did not open properly.
The spring was not at hand and, after consulting with the client, it was decided to simply short-circuit the sensor so that the washing machine could be fully used while searching for the spring.
Since it was impossible to disconnect the contacts leading to the sensor (maybe they got stuck or something), the wiring of the contacts was interrupted and closed together with a twist, which was carefully insulated.
It was explained to the client that now the washing machine will work even with the lid open and so that he does not forget to close it.
If you need information on error codes washing machines, I propose to go to the page " Error codes ».
As always, it is presented simply, accessible, interesting. And most importantly, with excellent photos, which undoubtedly adds clarity to the renovation. Thank you. Keep it up.
Thank you for your feedback, we will do our best!
Tell me what difficulties may arise when replacing the door, namely the plastic blue part on the side of the ear and spring of this washing machine.
Yes, in general, no, if everything is done correctly. True, I did not have to make such repairs.
Here, if it's correct) And where to find it correctly is not clear. Google rustled, nowhere are there any normal instructions for disassembling the car. Taking into account the fact that I just need to remove the lid and unscrew the door there. I'm only afraid of the problem with the lock and the spring.
Hello!
My machine is constantly draining water during washing, what's wrong? And how to order repairs from you?
Hello Nadezhda! We need a make and model of a car. And my contacts are on the "Contacts" page.
Daewoo DWF-760MP Sorry Victor that you are far from Vladivostok!
Yes uzhzhzhzh ... far from Vladivostok. The most common reason for this behavior of this particular model is that the location of the drain hose is too low. Try lifting the drain hose. The instructions for the machine contain information on this matter.
Good afternoon. In the DAEWOO - 750 WPS typewriter, the brake gauge stopped working. Sometimes it works, but not always. The cable is intact. After pouring water with a manual pull of the brake lever, everything works fine, and without intervention, the brake is tightened.If you do not mind, answer me by mail:
Sincerely, Alexander
Unfortunately, I can’t help you, I haven’t encountered such a malfunction.
Good evening!
Please tell me what could be with the Daewoo machine
knocks out the error e8?
Depending on the model, this is a malfunction of the load sensor or the engine.
Good day. Similar problem with LE error. To be honest, in the photo it is not entirely clear which wires need to be twisted: (I had to put a piece of rubber under the lever-plate. While it is working. If you can explain in more detail what wires and where. Thank you.
Hi Olga! you need to twist the wires that go to the sensor. The sensor itself can be seen well in the photo. Three wires go to it (if the same model) and they need to be twisted together.
Olga, but it makes sense to twist the wires if you yourself have found a good way out of the situation. The result is the same; it may be necessary to replace the spring to restore the shutdown function.
Hello, I can not disassemble the gearbox for dwf 806mps. What would he advise, maybe there is a photo or video where you rosberali.
Hi Denis! Unfortunately, I cannot help with anything, I never had to do this.
Good day!
The Daewoo DWF-806WPS machine stopped turning on. After pressing the "POWER" button, nothing happens and it happened all of a sudden.
I unscrewed the bolts, checked the fuses, rang the wires going to the control unit - everything is fine. There are not many elements on the board near the power connector. Advise what you can check first.
Thank you.
Check the power cord, this is often the case. Look at the power supply circuit, the control unit ... I can’t say anything concrete, sorry.
Hello.
Washing machine Daewoo DWF-810MP.
It worked for about 3 years without problems, but recently we began to notice a slight appearance of water in the tank after the end of the wash. It looks like water is dripping in the area of the powder tray. If you can tell me the order of disassembly (I think getting to the solenoid valves may be the reason for them).
Hello Peter! Unfortunately I can not. I have never made it out. I had a similar problem, it turned out that the hostess poured water with a hose into the tank, but sometimes she missed and poured it into the case.
In this case, everything works as usual, the hose is not poured.
Hello Victor, can you tell me about my problem: the washing machine is the same as in the topic, in the photo where the "sensor" is indicated in the right corner there is a bubble pump (black box with a green sticker), so it hums like a transformer, always. I ordered a new one, put the same picture)) if silence disconnects the power supply to the pump ... can you guess something?
Uv. Nikolay
Buzzing and not twisting? If it twists, let it hum. I did not understand further than what is written in the article.
Hello! If the problem persists after disconnecting the sensor and twisting the wires, is it a problem with the control board?
Hey! I don’t know exactly, but it’s possible.
I have exactly the same machine and it just does not turn on, the lights are off. what could it be and if there are fuses on it then where to look?
Hey! I don't even know about the fuse. try to disassemble and look at the power cord.
Good afternoon. Daewoo dwf 806wps car. In the spin mode, when the drum starts spinning, for some reason the activator rotates clockwise several times. At the same time, the laundry is strongly displaced to one side and the drum wildly knocks against the walls of the machine. When you try again to spin and lay the laundry manually, the activator does not spin, the spin is normal. What reason? What to replace?
Unfortunately, I cannot answer ...
Hello,
washing machine Samsung SW70A1 (P). The drum stopped spinning. There is a rumble, the drum is not spinning. If you move your hands, then something is grabbed there, and the machine erases.
I turned the car over, took off the bottom panel, made a couple of turns of the wheel with my hands, on which the belt was wrapped, put it on, turned it on. The drum is rotating, but there is an extraneous sound. And when scrolling clockwise, a sound is heard, as if the ball is rolling inside.
What can you unscrew / see?
Hey! Most likely the bearing in the drum has crumbled.
And from which side can you get to it? Need to remove the engine and pull out the tank and drum?
Or is it necessary from the inside - to remove the upper lining around the drum, remove the pulsator (if I call it correctly), and then unscrew this big nut and pull out the drum?
Try the second option, if it doesn't work, then disassemble it completely. In different models in different ways.
Thank you, I'll try to find such a hex head.
Good evening. Does my Daewoo 750wps washing machine have a problem? Water flows from under the machine from the moment the program is turned on. All hoses, connections are dry. What could have happened? Please help with advice!
Hello! I don't know, unfortunately ... maybe a tank.
Good afternoon, Victor. The problem with the 760 MP model, during the spin cycle, the drum begins to swing and knocks on the walls. At first there was a little, but over time he began to beat very hard. I went through the entire mechanical part, I did not find any backlash or broken places. The springs are all in place and at rest the drum hangs on them evenly. Have you faced such a problem?
I have not encountered such a problem.
The machine starts up, washes, but when you press it, it throws out E1 and the pump does not pump out water well. Cause?
Clean the pump and connections.
Hello. The Daewoo DWF-750WPS machine worked normally and then started up. turned off the power. disassembled the contacts of the water drain pump melted removed cleaned. now, when you turn on the outlet, the pump immediately works, turn on the power supply and the water is poured and drained at the same time. Prompt this is a control module.
Hello Victor!
Have you ever seen something like this:
During squeezing, the DAEWOO 55550DP machine stops before the drum stops rotating with a wild knock and does not shake the laundry during squeezing.
Is it possible to repair it on your own?
Thank you
It looks like the bearing flew ... Better to the master
Good afternoon, Victor. Please tell me, We have a Daewoo washing machine for 8 kg load. During spinning, the drum starts to wobble and the machine turns off. They called the master, he said that the springs had sagged. Refused to repair due to lack of availability. Tell me they can be purchased anywhere, and if so, where can I contact?
In service workshops must be or also in workshops disassembled.
You must be logged in to post a comment.
This site uses Akismet to combat spam. Find out how your comment data is processed.
The history of the "Great Universe", that is how the Korean name of the company Daewoo is translated into Russian, began in 1967, when Kim U-Jun and four of his comrades founded an enterprise for the export and import of light industry products. A year later, they created a factory for the production of clothes, and in the early 70s. - enterprises of the construction industry. In 1976, Daewoo, which by that time had already entered the international market, adopted a new business principle - the purchase of promising enterprises. The first of these was an oil refinery in Belgium, then heavy industry plants.
By the beginning of the 80s. Daewoo began to produce cars, ships, consumer electronics and telecommunications, as well as household appliances. Unfortunately, the financial difficulties experienced by the company in recent years have led to a decrease in the level of technical support for products sold on the Russian market.
The original Daewoo development is a washing machine that uses the principle of washing with air bubbles. Washing machines of this type do not have a heating element. This reduces energy consumption and allows you to effectively wash delicate fabrics that cannot be boiled (wool, silk, angora, cashmere).
Table 1 shows the manufacturer's data on the condition of the fabric (the object of washing is a silk jacket) during normal dry cleaning and when washing in an air-bubble machine.
Other differences between Daewoo air bubble machines and machines with front and top loading of the "European" type are lower weight (30.47 kg), low noise level (55 dB during spinning, 46 dB during washing and 43 dB during washing on program "Suit"), short (51 minutes) wash time.
Typical appearance of Daewoo washing machines is shown in fig. one.
Rice. one. Type of air bubble washing machine Daewoo:
A drum is located in the vertical tank of the machine, at the bottom of which there is a so-called pulsator, which serves to create a complex swirling stream of water.
The machines can be connected both to the cold water tap and to the hot water tap.
A special adapter is used to connect the water inlet hose (Fig. 2).
Rice. 2. Connecting the water inlet hose of the washing machine Daewoo
When connecting the adapter, first separate it from the hose (Fig. 2 a), then use a screwdriver to unscrew the fastening screws in the upper part A of the apron, while preventing them from falling out of the sockets (Fig. 2 b), put the adapter on the tap, tighten the fastening screws and turn the lower part B of the adapter relative to the upper part A (Fig. 2 c), after which the water inlet hose is connected (Fig. 2 d).
The water is drained out through the connection at the bottom of the machine. A feature of Daewoo washing machines is that almost all models are available in two versions - with and without a drain pump. In the latter case, there is a drain valve in the lower part of the machine, when opened, a natural (without additional injection) drainage of water occurs (it is assumed that there is a hole in the floor for its drain).
Table 2 and 3 show the designation system of Daewoo washing machines and their decoding.
Let's consider the device of Daewoo washing machines using the example of Z bubble series products (models 5510, 5511, 5520, 5521, 6010, 6011, 6020 and 6021). The technical characteristics of these washing machines are given in table. 4.
In fig. 3 shows a view of the control panel of this series washing machines.
Rice. 3 External view of the control panel of the Daewoo Z bubble washing machines
The purpose of each of the buttons on the control panel is shown in table. 5.
Example: if it is 8 am and the wash is to be finished by 5 pm, the button must be pressed 9 times so that the display shows “9”.
This function does not work for Wool and Suit modes.
The setting of the program of the machine is as follows.
- By pressing button 1, turn on the power to the machine.
- Pressing button 5 toggles (indicated by the corresponding indicator light on the control panel) between the Add, Wash, Rinse and Spin positions. Simultaneous illumination of the "Add" indicator and one of the other three functional indicators (washing, rinsing or spinning) means the addition of 1.2 minutes to the time of this function.
- Pressing button 2 sets the water level (high, medium or low).
- Pressing button 7 starts the machine.
To eliminate the imbalance in the drum loading, the pulsator rotates alternately with short (0.4 sec) jerks clockwise and counterclockwise, with a total duration of about 40 sec. In fig. 4 shows a sequence diagram of the load balancing process.
Rice. 4 Cyclogram of the load balancing process
The pulsator (Fig. 5) is a disk with blades located in the bottom of the drum, the rotation of which leads to a complex movement in the volume of the drum
water.
Rice. 5. Daewoo washing machine pulsator
The pulsator is designed in an asymmetric manner, with displacement of the blades relative to the axis of rotation. This is done to impart asymmetry to the vortex motion of water and to minimize the volume of stagnant flow zones.
Additive dispenser is located on the upper rim of the drum and is intended for introducing special additives into the tank cavity, for example, fabric softener. The movement of the softener from the compartment to the compartment of the dispenser occurs under the influence of two factors: the centrifugal force arising from the rotation of the drum (the rotation speed must be at least 100 rpm), and the force of gravity, under the action of which the softener flows through the compartments of the dispenser in the pauses between its rotations.
In fig. 6 shows the phases of the overflow of the additive from compartment A to compartment D, and Fig. 7 - the location of these compartments on the rim of the drum.
Rice. 6. Overflow of additives in the compartments of the additive dispenser
Rice. 7. Location of the additive dispenser compartments
You can check the operation of the dispenser by pouring milk into compartment A: during the final rinsing phase, milk should appear at the outlet of the dispenser.
Naturally, this check should be carried out without loading the laundry into the machine.
The device is triggered when the lid is closed (fig. 8). An imbalance in the drum loading during spinning leads to a deflection of the lever A, opening the blocking circuit and stopping the spinning process; an audible signal sounds.
Rice. eight. Top cover locking device
By opening the lid, the user can redistribute the laundry in the drum. When the lid is closed again, the beep stops.
The filter is installed on the upper rim of the drum.
Rice. 9. Water flow to the fiber filter
Rice. 10. Location of the fiber trap filter on the upper rim of the drum
At the place where the filter is installed, there is a guide plate in the gap between the walls of the drum and the tank, which forms a channel for supplying water to the filter. When the machine is operating, the water circulating in the tank cavity through this channel enters the filter with a flow rate of about 40 l / min.
The water that has passed through the filter is poured into the drum. The filter must be periodically removed from the drum rim and washed with water. The rotational speed of the drain motor shaft is 900 rpm, therefore, to reduce the speed, the torque is transmitted to the washing machine pulley through a transmission mechanism (reducer). As the pulley rotates, a rope is wound around it, which opens the drain valve (fig. 11).
Rice. eleven. Converting the rotational motion of the pulley to translational
Thus, the rotational motion of the pulley is converted into translational motion. The tension of the cable activates the brake lever, with the help of which the mechanical separation of the transmission mechanism from the electric motor occurs. After turning off the drain motor, the cable is released and returned to its original position.
The transmission mechanism (reducer) is designed to transfer torque from the electric motor to the pulsator and drum of the washing machine. The structure of the mechanism is shown in Fig. 12.
Rice. 12. The device of the transmission mechanism (reducer)
The shaft of the gearbox is made coaxial, its inner part is used to drive the pulsator into rotation, and the outer part is used to drive the drum of the washing machine. The key element of the gearbox is the planetary gear assembly (Fig. 13), and its plastic center gear is the most vulnerable component of Daewoo washing machines.
Rice. thirteen. Planetary gear reducer
In fig. 14 shows a diagram of the transmission of torque from the shaft of the electric motor to the pulsator of the washing machine,
Rice. 14. The diagram of the transfer of torque from the shaft of the electric motor to the pulsator of the washing machine
and in fig. 15 shows the values of the speed of rotation of the shaft of the electric motor, pulley, pulsator and drum.
Rice. 15. The values of the rotation speed of the shaft of the electric motor, pulley, pulsator and drum
The bubble generator device is shown in Fig. sixteen.
Rice. sixteen... Havebubble generator device
When the armature moves upward with a magnet attached to it, the bellows expands, flap B opens, flap A closes, and air enters the bellows cavity. When the armature moves down, on the contrary, the bellows is compressed, flap B closes, flap A opens and air is pushed out of the bellows cavity through the outlet nozzle. In turn, the armature is activated due to the periodic movement of the magnet attached to it in an alternating magnetic field (Fig. 17). The frequency of movement of the armature is about 3600 min-1.
Rice. 17. The movement of the armature under the influence of an alternating magnetic field
Portions of air entering with this frequency through a nozzle located in the bottom of the washing machine lead to the formation of many air bubbles, which are immediately thrown into the cavity of the drum by a rotating pulsator (Fig.eighteen).
Rice. eighteen. The formation of air bubbles in the cavity of the washing machine
Lifting the top cover, remove the drum rim (fig. 19).
Rice. nineteen. Dismantling the drum rim
Unscrew the screw securing the pulsator and remove the pulsator (fig. 20).
Rice. twenty. Dismantling the pulsator
Using a socket wrench, unscrew the nut that secures the drum to the shaft (Fig. 21) and
Rice. 21. Unscrewing the fixing nut
Putting the washing machine face down on the floor, unscrew the four bolts securing the protective bracket of the gearbox, and remove the bracket (Fig. 3.12.23). Remove the drive belt.
Rice. 23. Removing the protective clip
Unscrew the four bolts securing the transmission mechanism and remove the mechanism (Fig. 24).
Rice. 24. Dismantling the transmission mechanism (gearbox)
Installation of the transmission mechanism is carried out in the reverse order.
Putting the washing machine face down on the floor, unscrew the adjusting screw and the two bolts securing the drain motor (fig. 25).
Rice. 25. Dismantling the drain motor
Remove the cable from the guide.
Disconnect the drain motor. Use a screwdriver to turn the drain valve cover as shown in fig. 26 and remove the cover from the valve body.
Rice. 26. Removing the drain valve
For models without a drain pump: by loosening the adjusting screw, set the clearance as shown in fig. 27. Re-tighten the adjusting screw.
Rice. 27. Brake adjustment (for models without drain pump)
For models with a drain pump: Tighten the brake pivot screw (fig. 28).
Rice. 28. Brake adjustment (for models with a drain pump)
Loosen the adjusting bolt and turn it until the end of the bolt touches the brake lever (fig. 29). Tighten the fixing nut and drip paint to fix it.
Rice. 29. Adjusting the brake mechanism (brake lever)
Do not use excessive force when tightening the adjusting screws.
Table 6 shows messages about possible malfunctions that appear on the digital display of the washing machine.
Despite the fact that Daewoo washing machines are not very popular in the Russian Federation, they go on sale, and some buyers choose them.
These washing machines are reliable, but sooner or later they will break down just like the others. That is why many owners are interested in how to repair Daewoo washing machines with their own hands.
The manufacturer has provided a self-diagnosis system in the washing machines.
Washers on electronic control, having found a problem, report it by displaying fault codes on the display. And Daewoo semi-automatic washing machines signal a breakdown by flashing lights.
Let's consider the main error codes and the reasons for their appearance.
The essence of the malfunction is that the CM does not drain water. This could be caused by a malfunction of the drain pump (pump) or damaged wiring and connections to the pump.
Clogging of the drain filter and other elements of the drain system is not excluded. In addition, the water drain hose may be pinched or incorrectly connected.
The failure is that the water does not enter the tank or is poured too slowly. Sometimes this error does not mean a breakdown: the IE code can appear if you simply forgot to open the valve that supplies water to the system from the water supply.
If there is water, then its pressure may not be enough for the normal filling of water. It will not hurt to check the filter mesh on the inlet hose and the hose itself too - there may be blockages in it.
A less likely, but possible cause of the error is a breakdown of the water level sensor (pressure switch).
A breakdown of the solenoid valve or freezing of the water intake hose is possible.
The code indicates an imbalance in the drum. The most likely cause of the error is a bundle of loose laundry. The code also lights up in cases of incorrect installation of the CM (uneven, not in level).
A rare but possible cause is a violation of the integrity of the counterweight.
He talks about an incompletely closed hatch or a breakdown of the locking device (UBL).The door could be crooked (wear of the curtain), or the UBL was out of order.
DTC E8 means the loading sensor is broken, so the Daewoo washing machine does not work and the drum does not rotate. The sensor needs to be replaced with a new one.
These symbols on the CM Deo screen indicate a breakdown of the water level sensor (pressure switch) or level switch. You need to check the sensor pipe and the tightness of the connections.
The pressure switch itself could have broken down - then you need to replace it.
The code symbolizes an open circuit in the heater's electrical circuit. It may mean a breakdown of the heating element - in this case, the heating element needs to be replaced.
Important! If you have a Daewoo bubble washing machine, the last breakdown is not terrible for you. Bubble machines are not equipped with a heater, so there is nothing to break in this case.
For the attention of users. Air bubble machines first entered the market under the Daewoo logo and are still leading in sales of this type of machine. The most popular model in the Russian Federation is Daewoo DWF-806WPS. They also do not have such breakdowns as the lack of spinning or draining of water..
Based on the errors listed above, you can immediately identify the most vulnerable points of the AGR of this brand. Usually, owners of Daewoo washing machines contact workshops with the following problems:
- Damage to the electronic board. Failures confirming a breakdown can be very diverse - from stopping the wash to too long a program. If the Daewoo washing machine does not spin, it can also mean an electronic breakdown.
- Breakdown of the level sensor.
- Water intake filter clogged.
- Temperature sensor malfunction. It is accompanied by poor water heating and a stop in the washing mode.
- The drive belt is worn out (often associated with a breakdown or factory defect of the pulley).
- The heating element is malfunctioning. Usually due to a large layer of scale or corrosion.
- The hatch is leaking due to the fact that the rubber cuff bursts.
The breakdowns considered are the most typical, and it does not matter what type of your Daewoo washing machine is - with a vertical or horizontal load. These nodes are vulnerable to all types of SM.
Experts also attribute the drum to the weak points of Deo machines, which wears out over the years, rusts, suffers from too hard water.
If you have chosen the German quality CM Daewoo, pay attention to the reasons that most often cause malfunctions. If you eliminate the influence of these factors, there is a chance to extend the performance of your washing machine:
- Natural wear and tear of components and assemblies.
- Poor water quality.
- Power supply problems.
- Poor powder quality.
Below we will visually look at instructions on how to proceed if you decide to carry out repairs yourself, with photos and videos.
If water does not flow into the machine, or this process is too slow, check the water level sensor. Proceed as follows:
- Disconnect the CM from the mains.
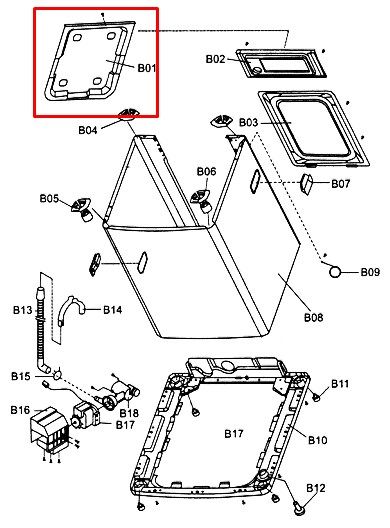
- Remove the top panel from the machine body (cover). It is attached with two screws on the back of the washer.
- After unscrewing the bolts, slightly push the panel back, removing it from the machine body.
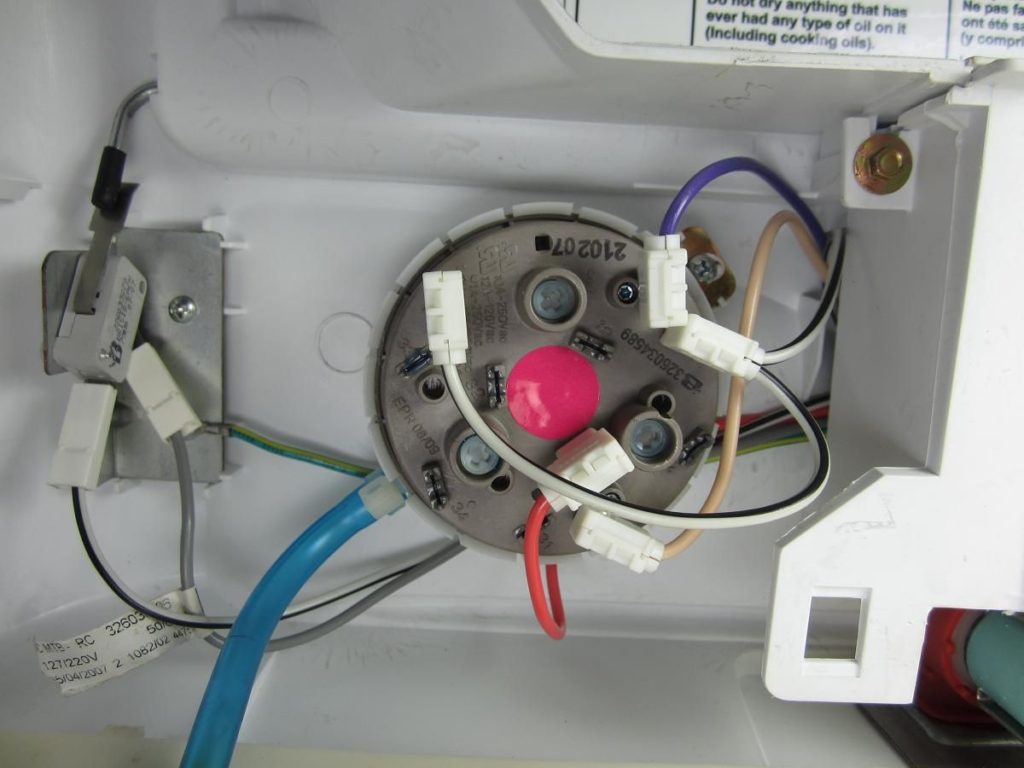
- In many models, the sensor is located on the wall of the CM, near the top cover.
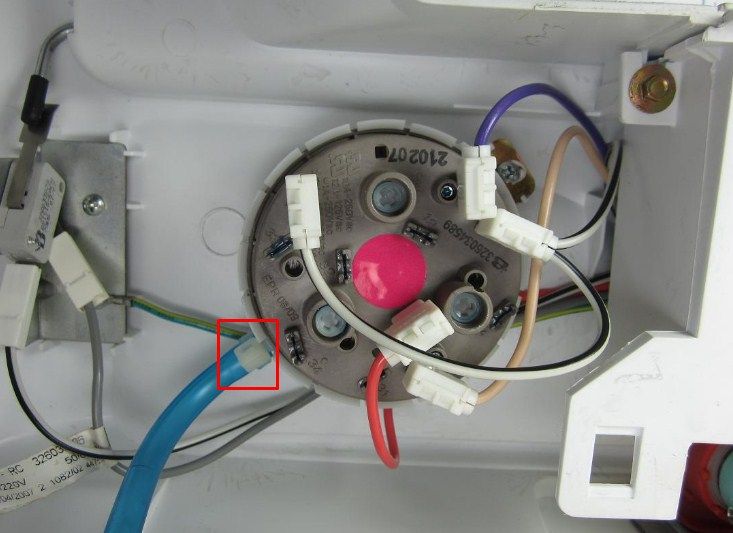
- Having found the sensor, remove the branch pipe from it, which is fixed with a clamp - for this you will need to unclench this clamp, armed with pliers.
- Replace the old hose with a new one. Blow lightly into it.
- If the contacts are triggered, you will hear clicks. Their number depends only on how many water levels are provided in your CM.
- Examine the tubing for damage. If required, they must be replaced. If the tubes are dirty, just clean. If the tubes are stuck, then it is worth changing the sensor itself.
You can clean the water intake system in 2 stages: rinsing the water inlet filter and the inlet hose itself. These works are carried out in the complex as follows:
- Expand the CM with the back panel facing you or go around if the room allows.
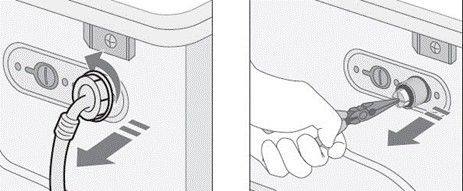
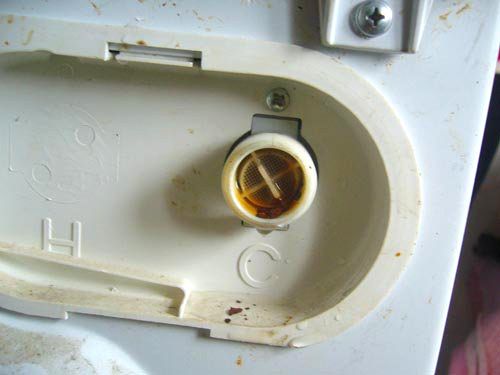
- You will see a hose through which water enters the machine. Take it off.
- You will immediately see a small mesh. Remove and rinse it.
- Inspect and rinse the inlet hose.
- Reinstall the filter, secure the inlet hose.
- Start a test wash.
If the problem has not been resolved, then further self-repair is to replace the inlet valve of the Deo washing machine.
| Video (click to play). |
Other breakdowns, which we talked about above, are eliminated in the same way as in other brands of typewriters.

