In detail: do-it-yourself pyramid hood repair from a real master for the site my.housecope.com.
It is difficult to imagine a modern kitchen without a good hood that removes cooking odors and renews the air in the room. Although the device of this device is not particularly complex, sometimes problems may arise with its operation. If you are one of people who, in the event of a breakdown of household appliances, try to find the cause of the malfunction on their own, before contacting specialists, then this article is for you. Below we will look at how to repair kitchen hoods with your own hands when typical problems arise.
The main components of any hood are:
- an exhaust fan with an electric motor;
- speed switching scheme;
- lighting lamps;
- filters.
Standard electrical wiring diagram for a cooker hood
The fan is undoubtedly the heart of this machine. It is he who ensures the movement of air flows through the filter elements, on which fat is retained. Fan rotation in hoods is provided, as a rule, by a multi-speed induction motor.
For your information! The design of a multi-speed AC motor includes a squirrel-cage rotor and a stator with several independent windings. The change in the engine speed is achieved due to the different connection of the stator windings.
Three-speed motor switching circuit: when the switch is in the L position, the rotational speed is minimum, in the H position - the maximum
The fan itself can be of axial or tangential design. From a performance point of view, the latter are preferable to the former because they are able to create a more stable air flow. From the point of view of reliability, the situation is similar - the loss of one blade will practically not affect the performance of the tangential structure, which cannot be said about the axial one. Therefore, the repair of the kitchen hood with the replacement of spare parts for the exhaust fan in tangential models is carried out less often.
| Video (click to play). |
Switching speeds in different models can be implemented by:
- buttons;
- slide switch;
- sensor.
The first two options are the simplest. With the help of buttons or a movable lever, the necessary contacts are switched, supplying voltage to the motor windings. It is due to their simplicity that such switches are considered to be quite reliable. All that can happen to them is oxidation or burning of contacts. But even in this case, the repair is not particularly difficult.
More expensive models are equipped with touch control. The panel has additional lighting and looks very stylish. However, the maintainability of the sensor is low. Often it is necessary to completely replace a failed control unit, which costs a lot of money.
Cooker hood speed pushbutton switch
Hob lighting is an important part of the cooking process. Modern hoods can be equipped with incandescent lamps, halogen or LED devices, the power and quantity of which depend on the model of the device.
Note! The most economical are LED bulbs. With the same luminous flux, they consume 8-10 times less power than incandescent lamps. In addition, their service life is more than 30,000 hours.
In most cases, the repair of a kitchen hood, in which the backlight lamp has burned out, can be done by any housewife with her own hands.However, there are situations where a more professional approach is required with the use of measuring instruments.
Hob lighting
There are two types of filters that can be used in kitchen hoods: grease and charcoal. The grease filter is installed on all models without exception, since without it, the internal components of the device will very quickly become covered with an oily film, which will subsequently lead to their breakdown. According to the number of applications, such filter elements are divided into disposable and reusable. The first ones are made of acrylic, synthetic winterizer or non-woven fabric and must be replaced every 2-3 months. The latter are made of metal, so their service life is equal to the service life of the hood itself.
Carbon filters are installed in recirculation models and are designed to remove odors. The basis of these elements is activated carbon - a high-quality adsorbent that absorbs all kinds of gases very well. Since the resource of carbon filters is not unlimited, they are subject to periodic replacement, approximately 1 time in 3-4 months.
Metal grease filter
Repairing kitchen hoods at home may be required as a result of various operational problems, the most common of which are:
- decreased productivity;
- lack of lighting;
- lack of any reaction to inclusion;
- malfunction of the speed switch;
- engine breakdown.
Possible reasons: the filter element is clogged, the impeller of the exhaust fan is broken.
Repair: Wash the metal grease filter under water using detergents and / or change the disposable filter. In the event of a fan malfunction (as a rule, one or more blades breaks down), it is necessary to replace it (how to disassemble the hood in the kitchen will be described a little below).
Insufficient performance of the cooker hood is in most cases caused by untimely filter maintenance.
Possible reasons: one of the lighting devices or the lighting switch button is out of order.
Repair: Before you run to the store for a new lamp, you should check its functionality. Incandescent and halogen lamps are checked with a tester (multimeter) in resistance measurement mode. The resistance rating of a thread is usually in the tens of ohms. The absence of readings on the meter indicates a burnt-out filament.
With LED lamps, the situation is somewhat more complicated. Inside such devices, in addition to LEDs, a control driver is installed, which cannot be checked with an ordinary multimeter without disassembling the lamp. In this regard, to test the performance of the LED lamp, it is easier to screw it into the working cartridge.
Important! Before testing a lamp in a different socket, make sure that its rated voltage is 220 V.
If all the lighting fixtures are in good working order, then there is a high probability that the button for turning on the lighting does not work. It can also be checked with a tester - in the pressed state, the resistance between the contacts should be less than 1 Ohm.
Measuring the resistance of an incandescent lamp with a digital multimeter
Possible reasons: lack of mains supply, blown track or fuse.
Repair: In the case when the hood does not respond to any manipulations after it is connected to a 220 V network, first of all, it is necessary to check the voltage in the outlet, for which a multimeter is used in the AC voltage measurement mode.
Note! The use of a voltage indicator allows you to determine only the presence / absence of a phase, while a break in the neutral wire cannot be identified using this device.
If everything is in order with the input power, then the track on the control board or the fuse that is installed in the device in order to protect it from voltage surges may have blown. In this situation, repairing a kitchen hood requires at least some basic knowledge of electrical and electronic engineering.
Checking for the presence of voltage at the outlet
Possible causes: The exhaust fan speed switch is faulty.
Repair: Normal wear and tear is the main cause of failure of a pushbutton or slide switch. In terms of maintainability, the buttons are better, since it is possible to replace one element, and not the entire block. If the slide switch began to "junk", then you can try to disassemble it and clean the contacts. However, so that the problem does not return soon, it is more advisable to replace the old switch with a new one.
To replace the button, it is enough to be able to work with a soldering iron
Possible reasons: thermal fuse blown, starting capacitor faulty, motor winding burned out, rotor wedge.
Repair: It is possible to determine the exact cause of engine breakdown by indirect symptoms. If, when turning on any speed, the unit does not make any sound, and there is also no smell of a burnt winding, most likely the thermal fuse has blown.
Note! The thermal fuse is installed directly in the motor housing and burns out due to strong overheating of the windings.
In the event of a "hum" of the engine when power is applied to it, two options are possible: a malfunction of the starting capacitor or a wedge of the rotor due to poor operation of the grease filter. Well, it's a very bad situation if there is a smell of burning insulation. Only rewinding the engine or buying a new unit will help here.
Asynchronous motor for kitchen hood operation
To repair the hood with your own hands, you need to know how to disassemble it. By following the instructions below, you should not have serious difficulties with this process.
- Remove the grease filter located at the bottom of the device.
- We unscrew the protective panel (if any).
- We disconnect the panel with lighting lamps, having previously disconnected the power connectors.
- Next, remove the control board.
This instruction is an example of disassembling a modern cooker hood in a kitchen. It should be noted that in many models, individual blocks are attached independently of each other. For example, to remove the engine, it is not necessary to unscrew the backlight unit.
Advice! If disassembly requires disconnecting connectors or wires, be sure to mark or photograph the items before handling. Thanks to this approach, you will not have any difficulties with connecting blocks during assembly.
In order not to resort to repairing the kitchen hood, you should adhere to the rules for operating this equipment, which are established by the manufacturer. Let's highlight the main points:
If a gas stove is used in the kitchen, the hood should be installed at a height of 70-80 cm from the hob, if an electric one - at a height of 60-70 cm. If the hood is located below this mark, overheating of structural elements with subsequent deformation is possible. At the same time, a higher position will reduce the efficiency of the device.
If there is a manual speed switch, it is advisable to start starting from the lowest stage. Setting the maximum speed immediately will lead to an increase in the load on the electric motor, which can reduce its service life.
Failure to clean or replace the filter elements leads to the fact that grease particles begin to penetrate into the device, covering the engine, control board and backlight with an oil film. In addition, practically no air passes through the clogged filter, so the efficiency of such a hood is zero.
- Overvoltage protection.
Like any other electrical appliance, the cooker hood must be protected from power surges. Of course, a fuse is usually installed inside the device, but this may not always protect the equipment from unstable network. It is better to cope with this additional installation of a protective relay, which instantly cuts off the power when the voltage deviates too much from the norm.
Voltage relay - additional protection of equipment against power surges
The difficulty of repairing a kitchen hood depends on the nature of the problem. Anyone can change a burned-out light bulb, but serious difficulties may arise with the restoration of the fan operation. If there is no experience in repairing electrical appliances at all, then it is more advisable to contact specialists so that you do not have to buy new equipment.
The preparation of everyday meals and culinary delights is often accompanied by different smells, and they are sometimes not very pleasant, especially if they spread.
The ventilation ducts in our homes, unfortunately, do not always cope with polluted air and odors. This was the reason for the development of various.
For most people, the kitchen has long ceased to be a utility room where food is prepared, food is cleaned, and dishes are washed. The family often gathers here.
A working hood must absorb all vapors and odors
Hood malfunctions in the kitchen deprive the inhabitants of a house or apartment of their usual comfort - unwanted odors are spread around the rooms, condensation accumulates on the walls and windows, and the air itself becomes harmful to health.
In the event of a breakdown of the kitchen ventilation system, many immediately turn to workshops and service centers, which, for a considerable fee, repair kitchen hoods. But, this kitchen equipment, even with additional functions, is not too complicated, and it is quite possible to repair it with your own hands.
The primary function of any hood is to remove air saturated with vapors and odors from the room. Therefore, the kitchen owners suspect poor-quality ventilation when condensation appears on the windows. An increased cooking odor also indicates that the kitchen exhaust ventilation equipment is not doing its job, although the motor is running.
The accumulation of condensation on the kitchen windows indicates poor performance of the hood.
In this case, there are two possible reasons for the poor-quality operation of the hood:
- Hood filter and grease trap clogged;
- The exhaust duct is clogged.
Filter cleaning and other maintenance work should be described in the manufacturer's instructions. Since there are many different hood designs, it is not possible to give a universal description of this process.
But, having carefully studied the instructions, almost any user will be able to do a simple filter cleaning with his own hands, as shown in the video:
Often users complain: “We bought a high-quality Cata hood, installed it, everything works, but there is little condensation on the windows, too.” If the hood is installed for the first time, be sure to check the draft of the exhaust duct - if there is no air circulation in it, then no matter how powerful the fan is, it will not be able to blow out water vapor and odors from the kitchen.
Air duct without visible traces of clogging
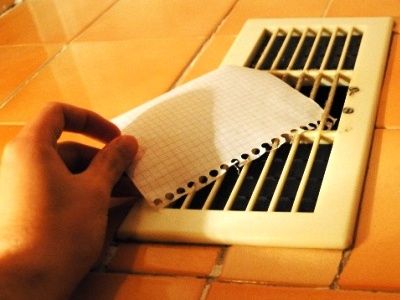
The draft is checked with a lighter (the flame should be deflected by the air stream) or by applying a paper sheet to the ventilation grill. If the exhaust duct in a private house is clogged, then it can be cleaned with your own hands, and in an apartment building, most likely, you will have to contact the appropriate services.
Checking the draft of ventilation by deflecting the flame
If for some reason it is impossible to clean the ventilation duct, then in order for the hood to function, its outlet pipe must be brought out in a different way - for example, by making a hole in the wall, or changing the window frame.
Checking the traction with paper - the sheet should press against the grate
If the exhaust fan does not work at all, then the following reasons are possible:
- Poor contact in the socket, plug, the power cord is broken or there is no voltage;
- Blown fuse;
- The connection terminals inside the hood casing are loose, or the wires are unsoldered;
- Malfunction in buttons or switches;
- If the hood has an electronic control interface, there may be breakdowns in the electrical board, relays, sensors, etc.
- Fan motor defective.
When starting to repair the hood, you need to look for malfunctions, excluding the possible causes indicated above, alternately going through the points.
Troubleshooting inside the hood
Initial diagnostics of the hood is made by turning on the built-in light bulb. But, due to overvoltage, all components of the hood may fail, or at best, the fuse may blow. Checking the wiring and fuse, measuring voltage and repairing the outlet are described in detail in other articles of this resource.
To get to the internal connection terminals, you need to disassemble the hood casing, having previously disconnected the power cord from the outlet. Due to the vibration of the fan, the terminal bolts may loosen and the contact will disappear. If checking and tightening the bolts fails, proceed to the next step.
Check the reliability of the connection terminals of the exhaust fan
You can check the buttons and speed switches with an ohmmeter (tester, multimeter in continuity mode) or a probe (factory or homemade). Since the motor windings connected to the switches have low resistance, when tested with a probe, they can affect the false operation of the indicator, so the terminals should be disconnected first.
At home, without skills and tools, repairing an electric motor is impossible, so you will have to look for an identical or suitable replacement.
As a rule, capacitor single-phase electric motors are used in hoods, to familiarize yourself with the principle of their operation and test methods, follow the link provided. The electric motor for the hood has several taps from the windings, which are switched to change the fan speed.
Exhaust motor connection diagram with outputs for speed switching
It is also possible that the starting capacitor, relay or electronic control unit malfunction. Sometimes, if a complex electronic circuit cannot be repaired, it can be replaced with a simpler solution based on reliable mechanical switches, as shown below:


