Details: zanussi te 1025 v DIY repair from a real master for the site my.housecope.com.
Do-it-yourself training portal about repairing washing machines, repairing dishwashers, repairing boilers and refrigerators
In this article, we will look at the error codes of the Zanussi and Electrolux washing machines. We have combined both brands in this article for a reason, because they belong to the same production association.
Since both brands belong to the same manufacturer, almost all units and components are the same and interchangeable, and the same control modules (electronic controllers) are used in their production.
In our country, Zanussi and Electrolux equipment has earned the love of customers due to its excellent design, ease of use and high reliability. But even the highest quality equipment can break down and malfunction over time.
When a malfunction occurs, the Zanussi washing machine generates an error that indicates a faulty unit or component. Zanussi errors, like Electrolux errors, are displayed on the device display as a combination of a Latin letter and a number. In the event that the machine is not equipped with a display, the Zanussi error, as well as the Electrolux error, is read using the light indicators located on the control panel, or rather, using their combination.
In order to read the Zanussi errors, you need to enter the service mode. Next, let's see how to do this on different types of controllers.
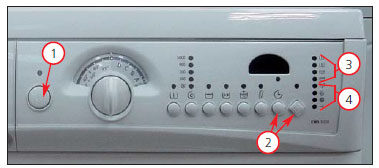
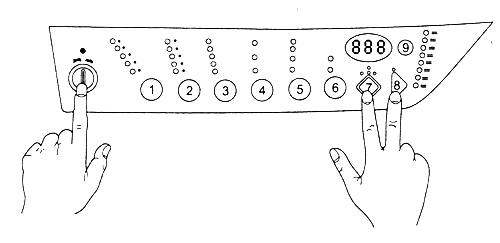
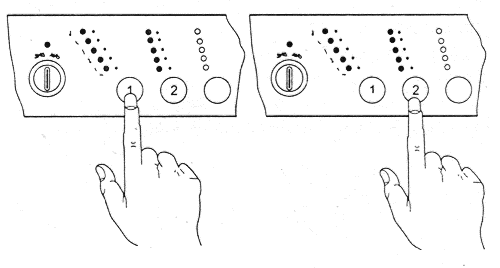
Control panels for washing machines with a knob for the selection of modes, equipped with EWM2000 controllers, can be with a display and light diodes, or only with diodes. Appearance options are shown in Fig. 1 and Fig. 2.
| Video (click to play). |
Fig. 1. Front panel of the machine with EWM2000 board.
Fig. 2. Front panel of the machine with EWM2000 board.
To enter the service mode, you must do the following:
- set the mode selection knob to the "off" position;
- simultaneously press the "start" button and some other button, as shown in Fig. 1 and Fig. 2 (in Fig. 2 these are buttons 2, in relation to other control panels the purpose of the buttons may be different), and holding both buttons , turn on the washing machine (in Fig. 2 - by button 1);
- hold both buttons until the LEDs start blinking.
Blinking of the indicators indicates that the machine has entered the service mode.
In the zero position of the mode selection knob, we check the operation of the user interface (buttons and indicators). When a button is pressed, the corresponding LED lights up.
In service mode, you can check the functionality of individual machine components. To do this, turn the selector knob clockwise and check all modes step by step:
step 1 - check the water supply to the main wash compartment;
step 2 - supplying water to the prewash compartment;
step 3 - supplying water to the air-conditioned compartment;
step 4 - supplying water to the bleach compartment;
step 5 - heating and recirculation (if any);
step 6 - check the tightness (the drum with water starts up at high speed);
step 7 - checking the draining and spinning. Also, the consistency of the signals of the analog and protective level sensors (pressure switches) is checked;
step 8 - checking the drying operation (for AGA with drying).
At all steps, the serviceability of the hatch blocking is checked, and at the time of filling with water, the time of filling the tank to the overflow level and the operation of the pressure switches are checked.
In the service mode, you can view the most recent Zanussi errors (Electrolux errors) and reset them.
In order to reset the Zanussi errors (Electrolux errors), turn the program selection knob counterclockwise two steps from the “off” position. The display panel will show the latest Zanussi error immediately.On panels without a display, the corresponding LEDs will light up (for example, in Fig. 2 these are groups 3 and 4), indicating an error in the binary code. You can translate the binary code into the corresponding letter or number using Table 1 (a black circle means that the indicator is on).
The bottom four LEDs (4) show units (see fig. 2), the top four LEDs show tens (3).
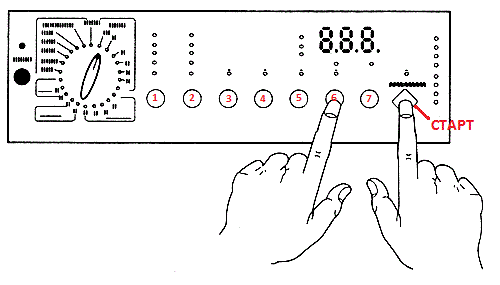
To clear the error, press the "start" button and button 6 simultaneously during the diagnostic cycle (see Fig. 3). The bottom four LEDs (4) show units (see fig. 2), the top four LEDs show tens (3).
Fig. 3. Resetting the Zanussi washing machine error code (Electrolux washing machine errors).
In this case, the control panel can be either with a display or with light diodes (Fig. 4) or only with light diodes (Fig. 5).
Fig. 4. Entering diagnostic mode.
Fig. 5. Entering diagnostic mode.
In order to enter the service mode, you must:
- press simultaneously the "start" and "reset" buttons, as shown in fig. 4 or fig. 5, keeping them pressed, turn on the machine;
- keep both buttons pressed until the LEDs on the panel start blinking.
This means that the machine is in service mode. Checking the operation of the front panel buttons is similar to the previous version of the panel with a program selector.
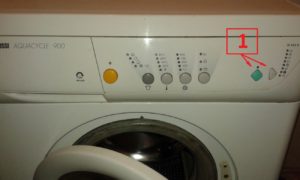
By pressing button 1 (Fig. 6), you can sequentially go to the next diagnostic step. Button 2 returns to the previous step (Fig. 6). The execution of each step is accompanied by the indication of the corresponding LED (for example, in Fig. 2 they are located vertically on the left of the panel).
Fig. 6. Service mode management.
The order and content of the steps of the service mode are similar to those of the CMA with a mode selection knob. (see above).
After performing the service mode, the last error of the Zanussi washing machine will be displayed (Fig. 7).
Fig. 7. Indication of the last error code.
The order of reading the code is clear from this figure, as well as from the table (see above).
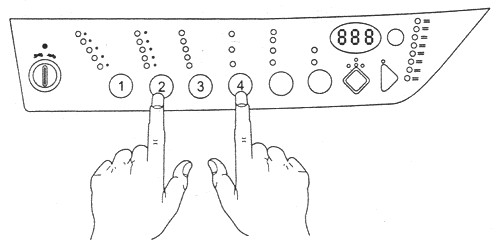
In order to reset the error, you must simultaneously press buttons 2 and 4 during the passage of the service mode (see Fig. 8).
Fig. 8. Reset error.
See table 2 below for all Zanussi and Electrolux error codes with a description of their causes and solutions.
As already noted, the repair of Zanussi washing machines should begin with typical breakdowns. Most of the models of such washing machines are quite demanding on the quality of water. AND The most common consumer mistake when buying and installing Zanussi equipment is its direct connection to the water supply. The water in the water supply system is far from the best quality and we are talking not only about hard water, often rusty water with all kinds of debris flows from the tap, which very quickly clogs the filters of the washing machine.
Important! Some craftsmen, when installing a Zanussi machine, specially remove the filter from the intake valve. This is absolutely impossible to do, because dirty water can literally destroy the machine from the inside.
Hence, the first typical reason for the failure of the Zanussi washing machine is clogged filters. In addition, these washing machines are equipped with extremely unsuccessful hatch locking devices. According to experts, this is one of the most common breakdowns. In this situation, both the mechanism itself and the sensor breaks down.
As in any other automatic "washing machine", the ten is broken in the Zanussi technique. Hard water should be considered one of the main reasons for such a breakdown, although some experts also talk about unsuitable materials from which the heating element tube is made. They say that this metal attracts scale even more. And finally, the last weak point of Zanussi washing machines is the drive belt. It is recommended to check the belt at least once every 4 years and, if necessary, tighten or replace it.
Periodically, all the filters of the washing machine need to be cleaned, if this is not done for some time, then you may encounter a problem. If there is a blockage in one of the filters of the washing machine, the household appliance either does not have the ability to collect water for washing, or does not drain it. Specifically, in Zanussi washing machines, the first option is more common. What can be done?
- Unscrew the inlet filter located on the water pipe and clean it.
- If the inlet filter was not installed, it means that a blockage has formed on the inlet valve filter (in the place where the inlet hose connects to the machine). Remove the top cover of the washing machine and unscrew the inlet valve and filter.
- We unscrew the filter and thoroughly rinse its cuff and mesh from dirt, then we twist the filter with the inlet valve and put it in place, then close the top cover of the machine.
The "delicate" inlet filters of the Zanussi washing machine create many problems, but they protect the internal units from damage due to the ingress and accumulation of foreign objects and debris brought along with the water. Experts recommend installing an inlet filter with a water softener cassette directly on the water pipe.
Dirt in the washing machine can not only accumulate from tap water, but also from clothes. With clothes, not only sand and pieces of dirt get into the car. The peel from seeds, coins, hairpins, buttons settles in the drain filter. All this at one moment can stop the work of the machine. Experts recommend every time after 2-3 washes to clean the drain filter with your own hands, preventing it from getting littered.
Note! Before washing, be sure to check the pockets of items that you put in the drum of the Zanussi, foreign objects can damage the internal parts of the "home assistant".
In this case, it is almost impossible to repair the device blocking the hatch, you will have to change it. Its average cost is about $ 30. It is quite expensive to purchase such spare parts for future use, so you first need to remove the old device in order to be 100% sure of its malfunction, and only then “go shopping”. How do I remove an old device?
- We open the hatch cover wide open.
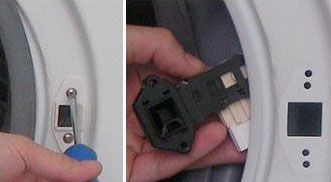
- To the right of the hatch there is a hole for a locking hook and two screws holding the hatch locking device, they must be unscrewed.
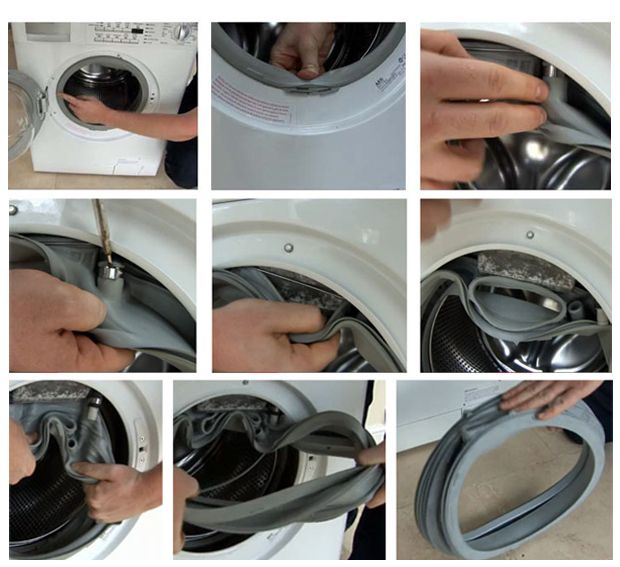
- Next, we pry on and remove the clamp that holds the hatch cuff (a large elastic band located around the hatch of the washing machine). It is most convenient to pry the clamp with a screwdriver, because it is quite thin and fits snugly, you cannot pick it up with your fingers.
- After removing the clamp, we take out the cuff itself. You need to pull it out with your fingers.
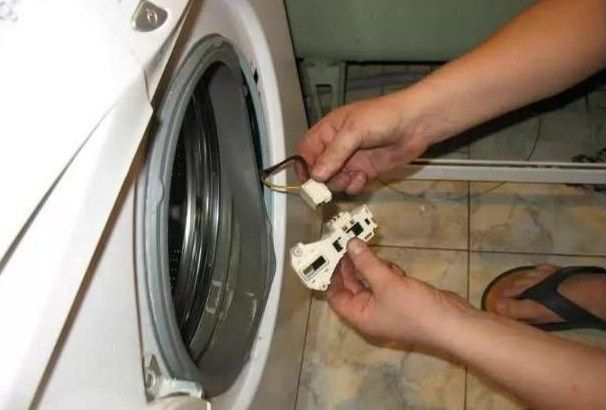
- We put our hand between the front wall of the washing machine and the edge of the drum and take out the locking device.
- We examine it visually, make sure that the plastic part is broken, and the plates have popped out, we get together and go to the store with the old device.
- We show it to the seller, buy the same new one, come home, and install it in place of the old one. Problem solved!
Note! "Hit" each time for $ 30. this is an overhead, so treat your Zanussi washing machine as carefully as possible. It is better to close the hatch carefully, and then press down on its edge until it clicks, this way a gentle and safe fixation of the hatch cover is achieved.
Teng is the weak point of all washing machines that have to work in conditions of using water with a high content of mineral salts. Some companies are trying to protect the heating elements of their cars with special polymer coatings. For example, the Samsung company five years ago announced heating elements with a polymer coating, which supposedly repels scale. Their idea failed miserably, because scale on their heating elements formed in the same way as on others, without coating.
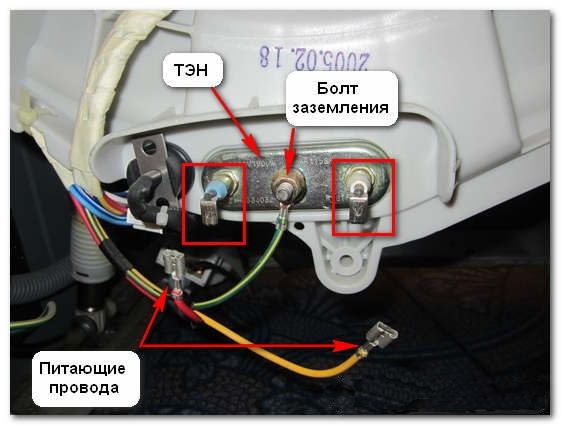
If the heating element of the washing machine breaks down, then the water in the tank stops heating up, and the system may give an error E05. In washing machines The Zanussi Teng is located at the back of the tank, so you will need to remove the rear wall to get to it. We need to first check the heating element for operability, if it does not work, then it must be removed and a new unit installed. How it's done?
- We unscrew the bolts holding the back wall of the washing machine body, remove it.
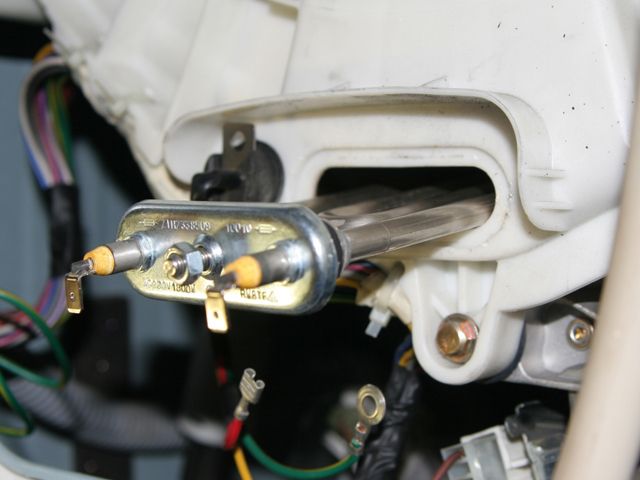
- In the lower part, two contacts will stick out directly from the tank, from which the wires go - this is the ten.
- Take a multimeter and check the resistance of the heating element, if the device shows zero, you will have to change the heating element.
- There is a nut between the contacts of the heating element, it must be unscrewed.
- We remove the wires from the heating element.
- Carefully remove the old heating element from the groove.It may be difficult to do this, as he got used to it over time.
- Sprinkle WD-40 grease on the right and left of the contacts in the slots and pull out the old ten in a swinging motion.
- Remove any limescale and dirt that you can reach through the hole, and do not forget to wipe the edges of the hole with a clean cloth.
- Carefully insert and screw on the new heating element and connect the wires to it.
- We put the back wall in place and check the operation of the washing machine.
Important! Buy only original heating elements made specifically for the required model of the Zanussi washing machine. There is a risk that an unsuitable heating element will burn out, "taking" the control unit with it, and repairs will become even more expensive.
"Symptoms" of drive belt problems are the motor running, not the drum spinning. In this case, washing, as you understand, is impossible. The hum of the engine cannot be confused with anything, but you should not make it idle again. What should be done if there is a problem with the drive belt?
- First, inspect the location of the malfunction by removing the back wall of the washing machine.
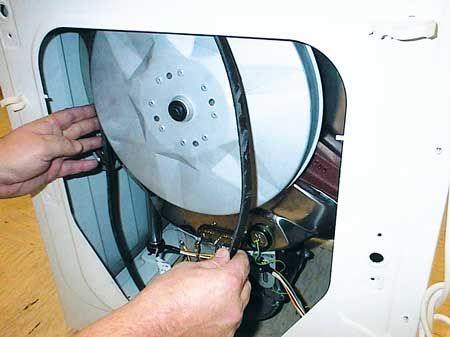
- In the niche that opens, we will see a large round drum pulley, on which the belt is put on, and below there is a small engine pulley, on which the drive belt is also put on.
- If the belt is in place, but does not rotate the drum pulley, it means that it has exhausted its resource and needs to be changed. If the belt comes off, you just need to put it back in place.
- We put the belt on the pulleys, put the back wall in place and check the performance of the washing machine.
Summing up, we note that the Zanussi washing machine, despite its reliability, has several typical malfunctions that consumers encounter most often. These are clogged filters, a broken hatch blocking device, a burned out heating element and a drive belt that has worked out its life. If you have a washing machine of this brand, you should have an idea of how to troubleshoot the listed malfunctions.
The bearing made a noise so much that when spinning it seems that the plane takes off in the bathroom. Why I chose vertical:
1. It immediately seemed that such a machine is more reliable and technologically advanced, because the drum is supported by two semi-axles and two bearings. I think it's clear why - there are no forces applied at an angle to the bearing, as in front-end machines.
2. The tank has one hole at the top. Overflow is possible only through the drum half-shafts or when the tank is full. Both are highly unlikely. The first is verified on this fact, since there was a small leak through the oil seal and bearing, which caused it to rustle and rustle.
3. The general maintainability is much higher than that of the frontal ones; there is almost complete access to all units only by removing one side cover. We shoot two - the car is practically disassembled. (CAUTION: The machine loses vertical rigidity when both covers are removed.)
4. For 4 years, the car served as a changing table for the baby in the bathroom. has an almost horizontal surface of a decent area.
From the pictures below it will be clear how to replace a leaking bearing. As I understand it, the repair of all Zanussi and Electrolux verticals is exactly the same, becausethe left and right calipers are the same for all vertical machines.
I opened the side cover and. here it is.
The limescale formed in 7 years, to which the liquid with the “means” does not reach the semi-axles in any mode, rubbed the oil seal like emery, and off we go. The grounding contact had to be cut off, but there is a hole for a self-tapping screw, which can be fixed after cutting the plastic rivet. It will be seen below.
Something incomprehensible was written on the support - 632305222316434, but this is garbage, tk. the catalog is here - on page 13. There are probably other manufacturers, but these were in the store. Left and right are different. The threads on the body are different. Which one I don't know which one, but one has the catalog code 061, the other has 062.062 comes with a cover that was not in the car, but it is needed there. The Italians are great - they thought of the manufacturer.
I went to the nearest store and bought two pieces of iron, drilled two holes d = 6mm and one d = 8mm in the middle (the side ones don't count, just to lengthen the handle, bolts M6 45mm, M8 25mm) and got a puller:
I think everything is clear with the puller. It must be twisted STRICTLY in the direction shown on the caliper body by the arrow “open”. In my case, clockwise.
Rotate 60 degrees, unscrew the central bolt 120 degrees. Otherwise, the structure will bend. And so several times, then we unscrew the central bolt completely and remove the caliper without effort. We take out a new one from the package, smear the gland sponges liberally with the applied grease. There are grooves - right to their bottom. And we screw everything back. ALL! replacement has been made. Below is the same self-tapping screw on the drum grounding contact ..
Repair of washing machines Zanussi (Zanussi) is a frequent occurrence. Despite the fact that these cars come off the assembly line under the sign of a foreign brand, they can also break. And often the manufacturer is not at all involved in the fact that the machine broke down too early.
External factors and improper operation are the most likely reasons for the failure of the SM.
Using the statistics of service centers, you can quickly understand which nodes and parts in the device of the Zanussi washing machine are the most vulnerable
- The dependence of parts on water quality. By the way, this is typical not only for the Zanussi brand, but also for other machines. Water oversaturated with salts with strong heating is deposited with scale on the heater and other elements.
The purity of the water in our water supply systems also does not differ, so the filter systems of the machine can become clogged with dirt and rust over time. As a result, the typesetting and drainage system suffers. - Hatch lock. This is already the fault of the manufacturers: both the blocker and the sensor are slightly underdeveloped, therefore they break more often than other brands of SMA.
- The heater (heating element) quickly builds up with scale. Experts believe that this is also due to the fact that manufacturers miscalculated in the selection of components from which the tubular part of the heater is made.
- Drive belt. It does not differ in reliability, so every 3 months it does not hurt to check its tension and integrity. If you see signs of stretching or damage to the belt, a tightening or replacement of the knot is required.
The only good thing is that it is possible to determine the malfunction on time, since the "smart" automatic washing machine Zanussi notifies the user of problems using fault codes.
Usually a Zanussi washing machine gives out the following error codes: E11, E12, E21, E22. Let's consider the most common combinations.
Water does not leave the system - cleaning of the drain filter and checking the nozzles for blockages is required.
It is also necessary to check the performance of the pump impeller - it should rotate freely in both directions. If the stroke is difficult, the pump needs to be replaced.
Complex breakdowns should be entrusted to a professional, but easy repairs to Zanussi washing machines can be easily done by yourself.
Next, we will look at how to repair a Zanussi washing machine with your own hands.
All filtration systems need to be cleaned periodically. If you neglect this rule, then later problems cannot be avoided. If there is a blockage in any of the filters, then there are problems with the intake or drainage of water.
In SM Zanussi, it is the filler filter that is most often clogged. What to do to normalize the work of the typewriter?
- Just unscrew the inlet filter - it is located on the water pipe.
- If you have not installed such a filter, then you need to clean the filter mesh.
Attention! Experts advise placing the inlet filter on a pipe with a special filter cassette that softens the water.
To clean the filter mesh, proceed as follows:
- Find the junction of the water intake hose with the washer body.
- Remove the top cover of the CM to unscrew the valve and filter.
- Disassemble the filter and rinse it under the tap.
- Replace the filter.
- Reassemble everything in reverse order.
Important! The device of the Zanussi horizontal loading washing machine is different from the front design, but the filter is cleaned in the same way.
By the way, pollution can accumulate not only because of the "errors" of the water supply system, but also because of the clothes that you send to the drum. From too dirty things, sand, dirt, debris, threads penetrate into the machine systems.
Craftsmen often find small coins, seeds, hairpins, crumpled checks in the drain filter. All this "nonsense" can provoke a stop in the work of the AGR.
Important! Remember to clean the filter at least every 3 months.
The problem with the UBL is a frequent malfunction of the Zanussi Aquacycle CM, but it also occurs in other models: for example, the Zanussi Easyiron.
It is difficult to tell right away why the blocker breaks down - through the fault of the manufacturer or user negligence. But there may be problems with the control board - then the blocker has nothing to do with it.
The plastic components of the sunroof locking device are unreliable and can break even if you simply slam the hatch shut with force. In this case, the metal hook will survive, but due to the breakdown of the UBL, washing will still be impossible.
The blocker is usually not repaired - it is easier to replace it with a new one. For Zanussi UBL typewriters costs about 1,500 rubles. It's a little expensive, of course, so first you should remove the old blocker to make sure it is 100% broken.
Remove the device according to the following scheme:
- Open the door.
- On the right you will see a small hole for the locking hook, and next to it there are two screws that hold the UBL. Unscrew the fasteners.
- Remove the gasket (lip).It is held in place by a wire tie that runs in a circle along the entire elastic. Pick it up with a thin screwdriver and remove. Then remove the cuff - do it by hand, without tools, so as not to damage the delicate elastic band.
- Remove the blocker by disconnecting the wires.
- Carry out a visual inspection of the device and make sure that the plastic part is intact. If the plastic is broken, and the records popped out, take the device with you and go for a new one.
- Show UBL in the store to sell you exactly the same.
- Install the bollard in reverse order.
Important! Close the door gently until it clicks, pressing down on the edge to extend the life of the device.
As we said above, the heating element is one of the most vulnerable places of any washing machine, especially Zanussi. The washing machine with such a breakdown may give an error E05, while the water in the tank stops heating.
To make repairs yourself, you will have to disassemble the SM case a little:
- Turn the machine with the front wall towards you.
- Unscrew the screws from the panel to remove it.
- From the bottom of the tank you will see the heater shank - it has 2 contacts and wires coming from them.
- Measure the resistance with a tester. If the device shows a value close to zero, the heating element will have to be changed. The readings of a working heater will be 20-40 ohms.
- To remove the heating element, unscrew the nut located in the center of the shank.
- Disconnect the wiring to the heater.
- Make an effort to get the heating element out of the groove. If there is a lot of plaque on it, then it could get stuck. Take WD-40 grease and lightly spray on the crevices. Loosen the old heating element and pull it towards you.
- Clean the hole well.
- Install a new heater, connect the wiring.
- Reattach the back panel and run a test wash. If the water heats up, and the E05 code is gone, then you did everything right.
Important! When choosing heating elements for the Zanussi washing machine, buy only original parts. Don't go for cheap Chinese counterparts - they won't last you long. An unsuitable heating element can also provoke a breakdown of the control unit, and then the repair will definitely "fly into a penny."
Damage caused by the drive belt is accompanied by the fact that the motor in the washing machine does not stop working, but the drum does not rotate. To check the integrity and location of the belt, proceed as follows:
- Remove the back cover by unscrewing the fasteners.
- In the niche you will see the drum pulley on which the belt should be put on. The motor pulley is much smaller and must also have a belt on it.
- Correct the belt if it has shifted.
- If the drum does not rotate and the belt is in place, then a replacement is needed.
- After adjusting or installing a new belt, refit the panel and run a test wash.
As you can see, the repair of Zanussi washing machines consists in eliminating typical failures and breakdowns. Fortunately, these malfunctions are such that you can easily eliminate them without the help of a wizard.
We only advise you not to touch the electronics. Even if you have a Zanussi washing machine circuit, in order to repair or replace an electronic module, you need special tools and relevant knowledge and experience. Do not want to provoke additional breakdowns - trust the master for complex problems.
This video may help you:
Do you like automatic washing - love to fix the machine too! This is how any owner of a washing machine could paraphrase the well-known proverb.
Units of the Zanussi brand are no exception. Although there is little to complain about the quality of these machines, they sometimes give an unpleasant surprise. So, Zanussi is a washing machine: do-it-yourself malfunctions and repairs.
But such malfunctions occur relatively rarely. In most cases, the failures of Zanussi machines are due to very commonplace reasons, which the owner himself can cope with.
We list the weak points of these units:
- Dependence on water quality: this feature, I must say, is typical for all washing machines. The hardness salts present in the water at high temperatures are intensively deposited on the heating element in the form of scale, and dirt and rust clog the filters, as a result of which the collection of fresh water and the removal of waste water slows down or completely stops.
- Poorly thought-out design of the locking device on the hatch: in Zanussi cars, this mechanism, as well as its sensor, are clearly incomplete and fail very often.
- TEN: some experts believe that the heater in these machines is particularly susceptible to lime scale formation due to poor choice of tube material.
- Drive belt: another relatively unreliable element. Zanussi owners should check the condition of the belt at least once every 4 years, carrying out a tightening or replacement if necessary.
Now let's look at the typical symptoms that manifest themselves in certain malfunctions.
If at the same time it is clearly audible that the engine is running, then the matter is most likely in the drive belt. To inspect it, you need to remove the back panel of the machine body by unscrewing the screws that fix it.
- If the belt has slipped off one of the pulleys, it must be reinstalled.
- If there is a break in the belt, you need to purchase and install a new one.
- If the belt is intact and in place, but does not transmit rotation due to slippage, then it has exhausted its resource and must also be replaced.
If, upon inspection, you find that the electric motor pulley does not rotate, then there is a more serious breakdown and you need to contact the service center.
If the bollard is jammed, the hatch can be opened using the emergency cable by pulling it towards you. You can find it behind the bottom panel (you need to unscrew it), to the right, near the filter. The cause of the malfunction lies in the electronics, so you will have to contact a workshop.
The latches that hold the hatch closed are made of fragile plastic, so they often break.
- after opening the hatch, unscrew the two screws with which the lock is screwed to the body;
- remove the hatch seal (cuff), having previously removed the clamp holding it (you need to pry it off with a screwdriver);
- after removing the cuff, the lock can be pulled out.
If the plastic parts of the mechanism are indeed broken, a new lock must be purchased and reinstalled.
To make the lock last longer, close the hatch as gently as possible.
Self-draining will also take place if the drain pipe is damaged, only in this case the water will flow not from the hose, but from under the machine.
More serious reasons are faults in the control module or level sensor that mistakenly turn on the drain pump.
We are looking for the cause of the malfunction:
- First you need to make sure that the water is not turned off.
- Next, you need to check the throughput of the filling hose by disconnecting it from the machine and turning on the water supply.
- If the water flows through the hose properly, put it back in place and check the condition of the filter. Together with the priming valve, it is located where the hose enters the unit housing. After removing the top cover, the assembly (valve + filter) must be unscrewed, after which the filter can be disassembled and cleaned.
Cleaning the filters, both inlet and outlet, must be performed regularly, without waiting for problems.
If the water supply has not resumed, it is necessary to check the operation of the priming valve. The resistance of its winding should be 3.75 kOhm, and when the voltage indicated on the case is applied to the contacts, the device should open. The defective valve must be replaced.
This problem can also signal a breakdown of the level sensor or clogging of its tube.
What criteria should be considered when choosing a shower stall, read in this topic.
Breakdown of heating elements, bearing wear, failure of the control unit - these types of malfunctions in washing machines are the most common. Here https://my.housecope.com/wp-content/uploads/ext/740/cancliz/mnogokvartirnyie-doma/santehnika/stiralnaya-mashina-indezit-neispravnosti-remont-svoimi-rukami.html you will learn how to fix it yourself breakdowns of cars Indesit.
It will be difficult to do this without sufficient experience, so it is better to contact the service center.
Here, if necessary, they will check the correct operation of the control module circuit - perhaps it is it giving the device incorrect commands.
Most often, the cause of such failures is the breakdown of the heating element - due to natural wear and tear or due to fouling with scale. Follow these steps:
- After unscrewing the fasteners, remove the back panel of the case.
- Check the resistance of the heating element with a multimeter (its shank with the wires connected to it protrudes from the tank in its lower part). At room temperature, the meter should read 30 ohms.
- If the resistance is different from normal, the heating element must be replaced. The wires are disconnected from it, and then the nut located between the contacts is unscrewed. The heater can then be pulled out. This should be done with care, gently rocking the element and not applying excessive force. If the heating element is stuck and does not give in, you need to soften the scale with WD-40 liquid. After dismantling the heater, its seat must be cleaned, after which it will be possible to install a replacement. The new heating element must correspond to the given model of the washing machine. Heating element from another model can burn out, moreover, together with the control module.
- If the resistance measurement showed that the heating element is working properly, you need to check the condition of the temperature sensor. Its performance is also verified by measuring the resistance. At room temperature, it should be 5.7 - 6.3 kΩ.
The reason may lie in the "sticking" of the contacts of the heating element relay located near the control module.
If water is found under the washing machine, the following items should be checked:
- Gasket at the connection of the filling hose. If excessive wear occurs, it must be replaced.
- Hatch seal. Over time, this element can deform or crack. To dismantle a worn cuff, it is necessary to remove the clamp holding it. It fits snugly enough, but if you pry it off with a screwdriver, it comes off quite easily.
- Drain connection or where the drain hose is attached to the pump. If there is damage in this area, water will start to seep out at the same time as filling the machine. A damaged part - hose, pipe or pump - must be replaced.
- Tank of the car. Leaks can be caused by its depressurization.
In the latter case, you will need specialized equipment for repairs, so you will have to contact the service center.
The machine itself informs the user of some breakdowns by displaying a special alphanumeric sequence on the display - an error code. Here are some of them:
- E11 - insufficient water supply during washing. As already mentioned, you need to check the water inlet path, filter and valve.
- E13 - there is a water leak into the sump.
- E21 - problems with water drainage. Most likely, you need to clean the drain filter. Together with clothes, sand, seed husks and other small debris, buttons, pins and other small objects can get into the machine, therefore it is recommended to clean the drain filter after every 3 washes. If this measure did not give a positive result, it is necessary to check the operation of the pump. Its winding resistance should be approximately 170 ohms.
- Codes E23 and E24 speak of a malfunction of the drain pump control semiconductor in the control module.
- E35 - the water level in the tank has exceeded the permissible threshold. Most likely, the reason is a breakdown of the level sensor or a clogged tube.
- E41 - E45 means a malfunction of the hatch lock or its blocking elements.
We will analyze the types of mixer taps and the features of their device in this material.
Loud noise when the drum rotates at high rpm may be due to the following reasons:
- The position of the machine is not strictly horizontal.
- The drum is underloaded, as a result of which the center of gravity of the laundry has deviated from the center of rotation (strong vibrations will occur at high speeds).
- One of the bearings is broken.
Bearings in Zanussi machines can be replaced by yourself. This is done like this:
- Having completely disassembled the machine, you need to remove the tank with the drum.
- After removing the drum pulley and unscrewing several bolts around the perimeter of the tank, the latter must be disassembled into two parts.
- Using careful hammer blows through a wooden lining, you need to knock the drum axle shaft out of the bearing assembly in the rear half of the tank.
- Next, using a puller, the bearing itself should be removed along with the oil seal.
- The drum axle shaft and bearing seat must be thoroughly cleaned.
- In place of the old bearing, a new one is installed, while its oil seal is stuffed with special grease.
Having lubricated the axle shaft and the inner ring of the bearing, the drum and the rear of the tank are again assembled into a single unit, after which both halves of the tank are fastened, having smeared the junction with a sealant.
After removing the drive belt, you need to dismantle the drum pulley (it is held by a screw). Next, you need to disconnect the grounding plate and unscrew the caliper by turning it to the right.
The caliper on the side opposite to the pulley (in machines with top loading) is unscrewed in the opposite direction. The direction of rotation at each node is indicated by arrows labeled “Open” and “Close”. After installing a new caliper, the unit is assembled in the reverse order.
To keep the screw holding the pulley securely, the threads should be coated with Loctite before screwing in.
| Video (click to play). |

