Details: zelmer ck1004 DIY repair from a real master for the site my.housecope.com.
The Zelmer electric kettle with digital temperature control, which served for almost 3 years, during which it finally convinced the whole family of the advantage of push-button setting of the water temperature over simple ones, where it is simply brought to a boil, stopped working. Well, he held out for a good time, and I'm even glad that there was an opportunity to look inside, which I did not do in his last review, not daring to break the factory seals on the case.
The first thought is that the heating element has burnt out. After such a kettle, you can safely throw it into the barn, since it will be extremely problematic to find exactly such a kettle. You can check it with an ordinary ohmmeter, poking with probes on the contact plates in the lower part of the case, with which the electric kettle is placed on the stand.
There are 4 contacts in total: 2 from the heater and 2 from the thermistor, which is the temperature sensor for the electronic filling. Luckily everything was fine - a 20 ohm heater and a 100k ohm thermistor.
Now it's time to disassemble the stand with the control unit inside, after finding a curly screwdriver with 6 petals. If it is not there, a simple 2.5 hex key is perfect.
Inside was a whole printed circuit board with details - pretty pretty. It has an LED indicator of water degrees, and LEDs for operating modes, and a relay for turning on the heater (for some reason, the triac was supposed to be a key), and many other radio elements - planar and not so much.
There are 3 repair options:
- Change the button to a new one.
- Disassemble and clean the inside of the contact plates.
- Swap with another similar one that is not used.
| Video (click to play). |
Since it is not always possible to find a 100% copy, and not every button can be disassembled (and especially assembled) - I followed the simplest path. In total, there are 4 buttons on the board: on-off, setting a preset temperature value (40 - 60 - 70 - 80 - 90 - 100 degrees) and plus / minus keys for manually setting the value. We never use them, so one of the buttons will go to the place of the faulty one.
Electric kettle. Power: 2200 W. Volume: 1.7 l. Stainless steel flat heating element. Body material: metal. Sound signal. Temperature support and regulation. Anti-scale filter. Color: stainless steel.
Video Electric kettle Zelmer CK 1004 channel Alexander Lesnikov


Who does not like boiling water, everyone on the thermopot)) A kettle with a thermostat from Zelmer. Pros and cons. Comparison with Philips HD4686 / 90. How to clean with improvised means.
We have been using a teapot with a thermometer for a very long time (about 8 years) and we are not the first to have the Zelmer CK 1004 model, so there is something to compare with.
Usually the thought of buying such a kettle comes to mind for people who love green tea, or people who have or are planning children =) I was guided by simple convenience - I don’t drink boiling water, and it’s unbearably long to wait until the tea or coffee cools down to the desired temperature.
Therefore, the first model was bought without any special choices, just which one came to hand (and got Philips HD4686 / 90, others were exorbitantly expensive).
On the whole, of course, we were happy with it, if not for one thing - the kettle quickly broke down =) In just 4 years ..
We bought the next one already carefully choosing and it was exactly Zelmer CK 1004, price about 2360 rubles.

Let's talk about the advantages and disadvantages of this model.
- stainless steel body (unlike Philips, which is made of plastic)
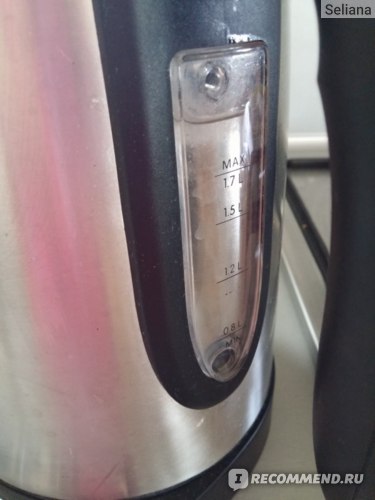
- a display that constantly shows the current water temperature. (many models do not have it). It turns off after about 1.5 hours.

- a large temperature range - 40, 60, 70, 80, 90, 100 degrees, using the + and - buttons, you can adjust it with an accuracy of 5 degrees (Philips only has 40, 80, 90, 100)
- the function of a thermo-pot, that is, maintaining the temperature (however, Phillips also has this)
- a fairly large volume - 1.7 liters
- there is protection against switching on without water (did not check)
- there is a compartment for storing the cord, it is not necessary to pull out the entire length
- relatively cheap (among "metal")
- boils the entire volume of water for quite a long time (although not to say that low-power - 2200W)
- not very convenient scale / window, located under the handle
- it is easy to fill the stand with the display with water (though it dried up later and the kettle continued to work)
- no filter (like Philips)
Generally I am very pleased with the work of the kettle, serves already 4, although I will not say that without problems. Buttons are already starting to glitch and water is leaking.
Phillips by this time began to leak in exactly the same way (as it turned out later, the rubber gasket, which let water through, had served, and it could not be replaced ..).
By the way, a little remark. This kettle NOT thermopot =) It has the function of maintaining the temperature, but it is carried out due to constant heating (that is, electricity is used), in thermopots, heat is stored due to the case, as in a thermos (although heating also happens there).
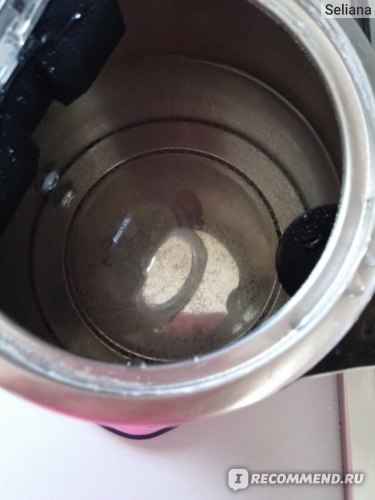
Now a little about how to clean it.
I take a sachet of citric acid, pour it into a full kettle and just boil it. Next, I pour out the water, just rinse it and continue to use it as usual. An excellent and cheap BIO product, cleans 100%, this is what the kettle looks like between cleanings
Summing up, I can conclude that cheap teapots with a thermostat fail equally quickly, a maximum of 4-5 years of service, and if you are lucky. The mother-in-law's kettle is an order of magnitude more expensive (Stollar, I don't know the model, also with a regulator), has been serving without complaints for six years already, so the quality of the price in this matter apparently depends directly
In general, the Zelmer CK 1004 recommend to the purchase, everyone who is interested in a pretty design for a reasonable price and more or less good quality =). But if you need a reliable thing, look for another option.
3novichok3, to ban you or what?
I'm sorry. But the last time I inserted the text completely, something didn't work out.
In continuation of this topic, I want to inform you that recently, after 2 weeks after the replacement and disappearing of the triac, it stopped turning on again.
The reason was the lack of solids in the control circuit (which is with LEDs). I soldered the details on the board and the device started working.
I'm waiting for Saturday PCB (day of genius, general cleaning), I will test it again.
I bought myself a barter LG vacuum cleaner model V-3300T. It was faulty, more precisely, the M12JZ47 thyristor was punctured in it. The tracks on the board were burnt out in places, and there was a burned-out motor manifold with torn out current-carrying terminals of the windings. I replaced the engine with a new one, and replaced the punctured thyristor with a BTB12 600 triac. And the whole vacuum cleaner worked like new. The regulator is working properly! Also, the lid of the dustbin was broken on the vacuum cleaner, in the sense of fastening the hinge there are small hooks. This is fixable, you need to cut them out of the piece of iron, bend the plates and fasten them with screws. Thank you. If you have any problems with the repair, write to me on Yandex. in contact Zhabyuk Ivan Vyacheslavovich. you will find me.
Good afternoon, the engine rattled during operation, disassembled, crumbled to shreds, the upper bearing, replaced it. But I did not write down where which wires go and if it is clear with thin ones, then black and blue I probably confused and the light in the apartment went out (((. Help is very necessary. are on (vacuuming at the very minimum) .When the light was turned on, they found knocked-out resistor R5 at 510 KΩ, R2 62 KΩ, conductor C3 470 mF and C5 at 100 pF, changed the result to zero, there is no more visible damage, the triac has no visible damage .. Where need to dig? soap
In your case, it would be more correct to ask “where” to dig, and not “where”. (- Where to dig a grave ?, or - Where to dig a grave ?, think for yourself!)
always on the vacuum cleaner, the engine has thick wires. no matter what color they are. a little tough. have tip folders.there are several types of them. they have locks. by which they are attached to the motor terminals. thin wires. they are always located for connecting controls and connectors. and for the mains voltage are not calculated.
))) two wires, which means two folders, which means you need to know which mom to put on which dad not? The question is precisely in this on a kukuya black to wear on what blue!
Trolls are so cute, but I don't like feeding them ok ?!
220 volt. and not, the constant where + and - have a high value, the polarities are what I'm trying to explain to you. engine powered by 220 volt alternating voltage. do not need polarity. and connecting the engine where to put mom on which dad. irrelevant! plug it in and don't be afraid.
2 black thin ones (go together on the left) - to the left side of the board - black on the outer connectors, blue next to it. And the wires on the right are blue doubled - the most extreme where there are 2 connectors. Next to him is black thin. And the black double ones are on the other side, where there is one connector.
Tell me, how to remove the impeller? The same problem as beach240382 - the upper bearing crumbled. The cap seems to be riveted (flattened).
An impeller of this type, like a rivet, cannot be removed at all. Because it is riveted at the factory and tack welded. Such engines are considered disposable and cannot be repaired.
At first I thought so too, but beach240382 also writes that he changed the bearing. I did not find any engines in the services. You will have to “suffer” yourself.
Interestingly, the bearing of both of us crumbled with a difference of a month - mysticism or expired abruptly?
There is a photo of the wiring and buttons. Photo of a triac. If someone is not too lazy or who is more for the order on the forum - I will send a photo to the soap for insertion on the forum. It will not work by itself because of the bad Internet.
I will be in touch for the photo of the posting
I would be grateful for a photo of the wiring and buttons, soap below
Does anyone have a power regulator circuit?
ZELMER 919 The control unit grunted! Microcircuit in the module for shorty power supply. Ordered from abroad (waited almost a month). I put a new one on the socket and the module is dead. I rang the body kit _ I did everything. I swung the manual about mikruhu and she went to a campaign without brains, such as need to be stitched. Who worked with this miracle, tell me.
Who can flash it? As an option, I decided to mold a simple control from the masterkit schemes.
Although the spark is crushed by the toad sho grandmother rolled off not small, and the beautiful light bulbs will not burn.
help .. the vklyuchutsa the vacuum cleaner has stopped turning on and the vacuum cleaner itself is not .. earlier it was already while the curtains were turned on for repairs and started working.
The selmer 919 vacuum cleaner stopped working. My wife took me away for diagnostics. She was told the motor repair with replacement flew - 7000r. I found a new engine through the Internet in Barnaul, but I'm in Vladimir. Delivered by mail cash on delivery - 2427 rubles all together. I decided to install it myself, I did everything fine, but I forgot where the blue wire (thick double wire) goes, and where the black one goes. As a result, the trial and error method was short-lived. Disassembled again. There is a small scarf next to the motor. I took it off, and her tire was burnt out - I soldered it. Collected. Everything works except for power adjustment. PS I checked the old motor - it works too. I put the blue wire first, if you look at the vacuum cleaner with a hose forward, the upper right corner of the board, below is red, well, you can't go wrong, his mother is less than blue and black, well, black is below all. As a result, the vacuum cleaner works at full steam and the diagnosticians - the freaks wanted free money. Tell me what to do with the power control ?!
Sanek33, do not whistle, tell stories in social networks.
Not understood?! Look for the whistlers in the mirror. If there is no answer to the question, then it’s okay to show your IQ to the whole Internet 
Looking for a bottom for a Zelmer CK1004 kettle? The Detalyuga online store will be happy to help you with this. A wide selection of Zelmer teapot bottoms, at affordable prices, with delivery anywhere in the world.
Buy the bottom for CK1004 now.With the ubiquitous spread of the World Wide Web, more and more people began to opt for online stores, realizing that online trading allows the seller to avoid the costs associated with renting premises, maintaining a huge staff of sellers, etc. Therefore, we offer our customers spare parts at lower prices than in ordinary stores. We are constantly expanding the range of spare parts by concluding contracts directly with manufacturers.
To pay for the order, various options are provided that are convenient for both individuals and organizations. Delivery is possible in several ways: the goods can be delivered by our courier, you can use the services of transport companies, or send by mail not only to such large cities as Moscow, St. Petersburg, Nizhny Novgorod, Yekaterinburg, Kazan, Samara, Novosibirsk, Kiev, Dnepropetrovsk, Donetsk , Kharkov, Zaporozhye, Odessa, Lvov, and in any corner of Russia and Ukraine.
Do not waste time searching for the desired spare part, fill out an application for ordering the goods and our manager will contact you and agree on the order.
Zelmer 919.0 st vacuum cleaner coil repair
To get to the coil you just need to remove the front
On the sides from the bottom, open the doors and use a short screwdriver
we unscrew the screws, but I also removed the doors on the right side
you need to remove the bolt and two screws under it
The front part is prevented from removing the wires going to the control board
We unscrew three self-tapping screws and remove the part with tubes
do not lose the rubber rings on the tubes through the formed
snap the hole off the panel latches with buttons
we get to the control board disconnect the wires
Unclench and spray WD40 press on the axle with a screwdriver
one of the sidewalls is removed remove the white disc with a spring
take out the current collector with rings solder the wires
The wires apparently came off from the fact that the rings
scroll on the current collector and when pulling the cord
the wires moved here and there broke off
Therefore, the rings must be glued during assembly.
The spring must be corrected before assembly as in the photo
We tighten the spring contacts
For those who have forgotten where the wires were
Krasnoyarsk repair of vacuum cleaners t. 8 933 332 3164
About a year ago, it was decided to purchase a new vacuum cleaner for household needs, because the old one was already completely tired and worked anyhow. Having studied the turn, he fixed his gaze on the Zelmer 919.0 st aquawelt model. The Niibazza vacuum cleaner was also suitable for us in terms of price, functionality and equipment. I must say right away that it worked perfectly! Everything that was expected of him, he performed without problems ... well, or almost everything. The carpets in the house were clean, in spite of the presence of living creatures in the form of a cat named Terry, who had never heard that it was not ice to throw wool around the house. But then at one fine moment the vacuum cleaner began to periodically emit non-standard sounds, as if something was slipping in it, and eventually began to hum so that the wife turned it off with fear and took it away, or maybe she poured holy water away from sin.
Soon we went on vacation. He stood there for about 2 months, after which it was decided to make efforts to fix the device.
In order to save nerves, I turned to the service center next door. In the SC, the answer was given that the vacuum cleaner is very funny in the sense that if it "grabs" the water (washing vacuum cleaner!) Then his cunt runs into a bearing, that the impeller and actually - ALL-FUCKING! Because the motor, bitch, is non-separable, unlike competing models.
On the question of whether it is possible to buy a motor or order it, they refused, saying that we do not have it in the price lists, and how long to wait for HZ.
Fuck-rattle, I thought, that's an ass, and when I came to the office, having calmed down a little from annoyance, I began to disassemble the vacuum cleaner on my own - after all, he's already fucked up! Having disassembled the unit, I found the motor, which was my headache. The motor, bitch, turned out to be really enchanted. Turning it around from all sides, I found its name and began to dig a tyrnet to buy the same, but serviceable and, if possible, new.The fact that the motor is non-separable (count as disposable) and is not often found on sale was not ignored by sellers. Prices for this device are about 4500 - 5500 rubles, which is almost comparable to the cost of the vacuum cleaner itself (about 7000 rubles new!). I found several options in Ukraine for 2500 + delivery of 1000, but decided that before bothering you need to try to do something yourself.
So it's decided! We will fix the motor ourselves!
On one of the few forums, I found a description of the problem and general methods for solving it. The text is simple: the impeller is firmly pressed onto the rotor and cannot be removed. The bearing we need is under it and the only way to replace the bearing is to drill out the lock washer.
Fuck-rattle, I thought, that's an ass, and when I came to the office, having calmed down a little from annoyance, I began to disassemble the vacuum cleaner on my own - after all, he's already fucked up! Having disassembled the unit, I found the motor, which was my headache. The motor, bitch, turned out to be really enchanted. Turning it around from all sides, I found its name and began to dig a tyrnet to buy the same, but serviceable and, if possible, new. The fact that the motor is non-separable (count as disposable) and is not often found on sale was not ignored by sellers. Prices for this device are about 4500 - 5500 rubles, which is almost comparable to the cost of the vacuum cleaner itself (about 7000 rubles new!). I found several options in Ukraine for 2500 + delivery of 1000, but decided that before bothering you need to try to do something yourself.
So it's decided! We will fix the motor ourselves!
On one of the few forums, I found a description of the problem and general methods for solving it. The text is simple: the impeller is firmly pressed onto the rotor and cannot be removed. The bearing we need is under it and the only way to replace the bearing is to drill out the lock washer.
Repairing vacuum cleaners, like other household appliances, is a common practice, since all appliances tend to break. The cause of breakdown is most often the wear of parts and the destruction of mechanisms. However, a breakdown of a vacuum cleaner does not always mean that you need to buy a new one, since it is quite possible to repair such equipment with your own hands.
The vacuum cleaner is rightfully considered the most popular piece of household appliances. Most housewives today can no longer imagine their life without a vacuum cleaner, since it significantly saves time and helps to keep the house clean and tidy.
See also - How Do I Pick a Good Vacuum Cleaner at an Affordable Price?
In most cases, the motor is the cause of the vacuum cleaner's failure. Such a breakdown occurs with almost all brands and models of the device, regardless of the manufacturer. By the characteristic signs and features of the device, you can diagnose a problem and try to repair the vacuum cleaner with your own hands.
- The first sign of a malfunctioning engine is a hum and the appearance of a dusty cloud during the operation of the device.
- Insufficient suction power or its complete absence indicates that the hose is out of order. Another sign that the tightness of the hose is broken is the quiet operation of the device. In addition to breakdown in the corrugation, the receiving brush can be damaged.
- Slow suction speed and a drop in operating speed can be the result of bearing failure. Proof of failure of these particular components is the periodic restoration of normal operation.
- Excessive hum during proper operation indicates that the engine is out of order. In most cases, malfunctions in the motor directly affect the suction power of the air.

See also - DIY microwave oven repair at home
Regardless of what is the cause of the malfunction, you need to know how to disassemble the vacuum cleaner in order to repair it yourself.
Repairing a vacuum cleaner with a wet cleaning function will be a little more difficult, since you will also have to work with a water pump.The main task of the pump is to supply water to the dust collector, for this reason the pump is installed at its inlet. When repairing a washing vacuum cleaner, you must pay attention to disconnecting the pump.
See also - Do-it-yourself multicooker repair
When repairing a vacuum cleaner from companies: Hoover, Vitek, Samsung, Rowenta - it is recommended to check the power cord is working properly. You can check the integrity of the cord using a multimeter. The reason for the failure of the cable most often lies in the active use of the vacuum cleaner, in which the cable is frayed, twisted and broken. If such a breakdown is confirmed, it is enough just to shorten the cable to the required length or replace it.
Vacuum cleaners of the Dyson, Miele brand have a distinctive feature that manifests itself in the frequent failure of the filter. Low suction power is a sign of dirty filters.
It is very important to periodically clean and rinse not only the dust container, but also the filter. Timely maintenance of the filtration system of the vacuum cleaner is the key to its long-term and high-quality operation, which primarily depends on the serviceability of the engine.
See also - How to repair an electric kettle yourself
Regardless of the manufacturer and type of vacuum cleaner, the main difference lies in quality, power and design.
The most important thing in a vacuum cleaner is the electric motor, which creates a vacuum and, as a result, sucks dust and various particles through special filters through which only air passes.
In different types of such devices, these filters are different, and flasks and just bags and cyclone-type vacuum cleaners.
But it is the engine and, occasionally, the electronic power (rpm) control circuit that requires the most attention in this whole device.
Do-it-yourself engine repair is not difficult to carry out if the breakdown is simple and the engine is still running, but you can hear a heavy engine stroke (when turned off) or the engine starts to rumble or buzz strongly, it happens that the vacuum cleaner gets very hot in a short period of time.
The heart of the vacuum cleaner, as we have already figured out, is the engine and, as a rule, the collector.
What is such an engine?
The motor is housed in a housing where the fan impeller blades are hidden. It is of the tangential type, where air is drawn in at the center and exits through the periphery and already exits through the rear filter.
The brushes in the engine are placed in special shafts made of brass, as a rule, this is ordinary carbon in the form of graphite. Over time, the brushes rub against the collector roller, their middle is ground down and they become slightly semicircular, due to which the contact area with the collector pads increases. The brushes in their shafts are pressed by springs, creating the necessary pressure of the graphite, in the process, by the robots, to the collector. The brush will work until it wears off and the spring cannot properly contact the graphite with the manifold.
It is necessary to monitor the cleanliness of the collector shaft itself, clean it from carbon deposits if necessary and remove the oxide layer to a copper sheen.
The shaft is attached to the stator by two bearings of different sizes, as a rule, this is done in order to make it easier to disassemble it. The front is usually large and the back is smaller.
The shaft is carefully knocked out of the stator using any suitable tools. Then we look at the course of the bearings, because of the dusty robots they get clogged despite the presence of anthers. If necessary, the anthers are carefully removed with a thin screwdriver or an awl, washed with a jet of WD-pulleys, after which the balls must be lubricated, for example, with grease such as Litol-24 or EP-2, after which the boot is put in place and snaps into its grooves in the bearing itself.
To start some kind of repair or maintenance of the vacuum cleaner, you need to remove the case. Each model has its own methods.
First of all, all filters that impede access to the motor are removed, the housing screws are unscrewed, including secret ones (under the buttons, for example). Having unscrewed all the screws, you need to carefully try to disassemble the case, if this fails, take a closer look where there may still be latches or additional screws, if you do not pay attention to this, you can break the case.
Then the entire electrical installation is disconnected, as a rule, the connections are made on the connectors.
The plastic motor housing is unscrewed from the bed and the motor is then removed from its plastic housing.
In some models, it is simpler and the motor itself is fixed in the body of the vacuum cleaner in special rubber grooves-seals or screwed tightly to the general body of the vacuum cleaner.
To disassemble the engine and remove the fan impeller first of all, we will remove the front part of the casing (above the impeller). We take a thin metal object, you can use a screwdriver and gently bend it off the side of the casing so that the screwdriver goes a little into the middle, then gently push the upper part of the casing out, as a result of which the entire impeller becomes available to us.
The nut on the impeller usually has a left-hand thread (but there are exceptions) We try to unscrew it by holding the impeller with our hand, if it scrolls and in this way it is impossible to unscrew the nut, there is one great way
So .. we take a good stranded wire with a cross section of more than 1.5mm in dense rubber insulation (to prevent slipping). We push in such a wiring and wrap the collector shaft 2-3 times, turn to turn and stretch it in different directions, thereby fixing the shaft motionless.
It is most convenient to do this together, one person fixes the collector with the ends of the wire stretched to the sides, and the second unscrews the nut on the fan disk.
The method is very convenient and safe for fixing the anchor. In the same way, when reassembling, tighten the nut.
After removing the fan impeller, unscrew the housing screws; by this time, the brushes should already be removed.
Then carefully pull out the anchor, twisting the upper part slightly if necessary.
If necessary, the bearings are removed using a commercially available tool or special thread pullers. In especially severe cases, the bearing sometimes “sticks” tightly to the sleeve; a special hydraulic press is used to remove the bearings.
- bearings
- brushes
- fuse
- network wire
- no contact in the switch
- motor winding, breakage or burnout of the winding (stator or rotor)
- capacitor failure
- breakdown of the electronic circuit of the power regulator
Drop in power and suction power.
The most common cause is either a clogged filter or a defective bearing.
It is necessary to clean the filter and check the operation again, also check the operation (draft) of the vacuum cleaner without filters, since it happens that the usual cleaning of the filter does not help and it already needs to be replaced.
If the draft without filters does not give the same working draft, you will have to disassemble the vacuum cleaner, the impeller on it should easily turn with your finger without much effort. Additionally, we remove and inspect the brushes and clean the collector from carbon deposits using zero sandpaper or a piece of ordinary cloth.
In some cases, the tightness of the hose is broken, this can be both a violation of the integrity of the hose itself and the connecting pipes at the ends of the hose, the hose simply slips out of them a little.
The vacuum cleaner does not turn on.
If everything is fine with the voltage in the outlet, disassemble the vacuum cleaner and first of all inspect the fuse and the power cord, especially at the very end of the cord on the winding drum in the soldering points.
If there is a tester, we call for a contact.
The power button could break or the contact is simply broken in it, it sometimes gets clogged, again, with the help of the tester, we make sure that the button is working properly.
If all the elements have been called by the tester and the voltage comes to the engine brushes without problems, and the brushes themselves are not erased, then most likely you will have to repair the engine expensively or simply replace it, since in most cases it is more expedient to install a new motor than to repair a tired old one by rewinding.
If the vacuum cleaner worked for a long time and does not turn on then it is quite possible that the protective thermostat on the engine itself has worked as a result of overheating - in this case, there is nothing to repair, it will be enough to leave the vacuum cleaner to cool the engine.
The speed of the vacuum cleaner motor is not regulated.
The most common cause of such a malfunction is the breakdown of the triac, in which the voltage through it is not regulated but freely passes through it without any control. It is possible that this element fails, and it is possible that contact is lost on one of the legs of this element on the board.
By slightly pressing down on the speed regulator knob, you can make sure whether the regulator itself is in good working order or the contact may be broken in it and the regulator slider does not contact its site.
The vacuum cleaner emits a foreign smell and hot air.
First of all, you need to make sure that the suction inlet is not clogged, inspect the hose, check the retraction force at the inlet and whether the sound of the engine changes when you plug the inlet with your palm. In case of satisfactory operation on the part of the suction system, we can assume that the engine is malfunctioning, but most likely the brushes.
The vacuum cleaner hums and rumbles - the reason for this action is the engine, and in particular its bearings. Most likely they need additional lubrication or, if there is a large shaft around their axis, they need to be replaced with new ones.
The cord does not tighten when the button is pressed or is constantly tightened during operation - malfunction of the winding drum, perhaps the spring has burst, is weakened or, on the contrary, is too tight.
We inspect the pressure roller of the button and, if necessary, removing the drum, we wind up or unwind the wire on the drum - changing the tension of the drum itself to the one we need.
As a rule, it is not complicated and is pretty standard in most models.
Repairing vacuum cleaners, like other household appliances, is a common practice, since all appliances tend to break. The cause of breakdown is most often the wear of parts and the destruction of mechanisms. However, a breakdown of a vacuum cleaner does not always mean that you need to buy a new one, since it is quite possible to repair such equipment with your own hands.
The vacuum cleaner is rightfully considered the most popular piece of household appliances. Most housewives today can no longer imagine their life without a vacuum cleaner, since it significantly saves time and helps to keep the house clean and tidy.
See also - How Do I Pick a Good Vacuum Cleaner at an Affordable Price?
In most cases, the motor is the cause of the vacuum cleaner's failure. Such a breakdown occurs with almost all brands and models of the device, regardless of the manufacturer. By the characteristic signs and features of the device, you can diagnose a problem and try to repair the vacuum cleaner with your own hands.
- The first sign of a malfunctioning engine is a hum and the appearance of a dusty cloud during the operation of the device.
- Insufficient suction power or its complete absence indicates that the hose is out of order. Another sign that the tightness of the hose is broken is the quiet operation of the device. In addition to breakdown in the corrugation, the receiving brush can be damaged.
- Slow suction speed and a drop in operating speed can be the result of bearing failure. Proof of failure of these particular components is the periodic restoration of normal operation.
- Excessive hum during proper operation indicates that the engine is out of order. In most cases, malfunctions in the motor directly affect the suction power of the air.


