In order to repair vertical blinds, in which the chain connecting the lamellas has broken, the old chain must be removed. Then a whole chain is mounted in its place, to which the vertical petals of the lamellas are attached.
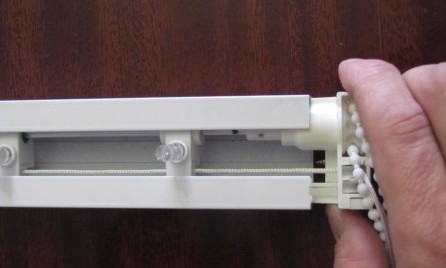
Replacing the control chain will require a fairly large investment of time and effort. First of all, you need to remove the side cover and dismantle the plastic gear on which the chain is wound. After removing a piece of the old chain from the gear, we put a new one on it. Place the gear in its original place and close the side cover.
A common problem with vertical structures is plastic breakage. The most vulnerable part is the shoulder of the lamella. The shoulder is a plastic plate with which the vertical petal is attached to the cornice. It is not difficult to replace it - the shoulder is attached to the fabric lamella by means of an ordinary fishing line or thread. To the plastic lamella, the shoulder is attached to the nibs with a composition. But there is a nuance here - the width of the lamella, which means that the hanger for different blinds can be of different sizes.
Before buying a new spare part, measure the size of the lamella.
The control cord is rarely torn. But even if this misfortune befell you, it is not so difficult to fix it. You need to purchase a new cord of the required length from the store. You can find out by making small measurements. Take the width of the blind and multiply it by two. To the resulting product, we add the height of the structure, multiplied by 1.5. As a result, we get the required length of the cord. How to replace the control mechanism on the blinds, see this video:
VIDEO
To install a new lace, we pass its two ends through the side cover of the cornice. Then we pass the lace through the runners to which the slats are attached. Further, one end of the cord is fastened in the latch, and the other is passed through a special roller located at the end opposite from the control mechanism.
This is just a small part of the many possible malfunctions and breakdowns of blinds. But, using simple tools and ingenuity, it is quite possible to fix any malfunction at home. At the same time, do-it-yourself repairs can be in no way inferior to repairs made in a professional workshop.
Any blinds consist of a large number of parts and it is quite natural that some of them periodically fail. Do not rush to throw away the entire structure, because most often it is enough to replace just one broken part. And for this it is not at all necessary to contact specialists. Try to repair vertical blinds yourself. You will need desire, a little creativity, and a minimum of experience with basic tools. And you can always buy all the necessary parts in a specialized store.
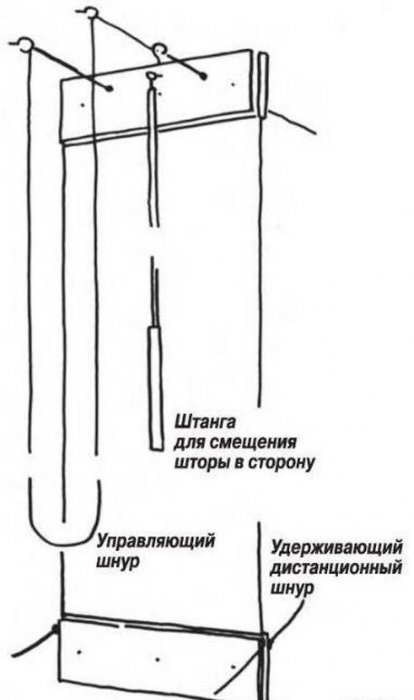
Before starting to study the repair instructions, let's remember what elements the vertical blinds consist of:
Carrying and decorative cornices;
Runners, to which the lamellas are attached;
Lamella holders (hangers) connecting the lamellas with the bearing cornice;
Weights that give weight to the canvases;
A chain connecting the lamellas from below;
Control chain (with its help the lamellas rotate around the axis);
Control cord (moves and spreads the lamellas) with a plastic tensioner;
Lamels.
The most common breakdowns are:
break of the chain connecting the lamellas from below;
breakage of the adjusting cord;
breakage of the runners on which the slats are held;
breakage of the "shoulder";
loss of the presentable appearance of one or more lamellas.
None of these breakdowns are critical, and you can fix them yourself. How to fix vertical blinds with fabric slats, we will analyze step by step below.
The lower chain consists of small plastic balls through which the fishing line is threaded. If handled carelessly, it breaks quite often, but it will also be difficult to replace it with a new one.
The procedure is as follows:
We purchase a new part in a specialized store, having previously calculated its length. To do this, you need to measure the width of one lamella and multiply it by their total number.
Then, without removing the blinds from the eaves, remove the damaged chain and insert a new one in its place.
The construction of the control chain is the same as that of the lower connecting chain. If you pull it sharply, sooner or later it will inevitably break. Replacing the control chain is also not difficult, but one condition must be met: before disassembling the sliders for replacement, they must be set to the open position. Then:
Determine the length of the new chain. It is equal to the length of the lamellas.
We unscrew the side cover on the cornice and take out the plastic gear.
We remove the damaged chain and insert a new one in its place.
We return the gear to its place.
We put the side cover on the cornice and check how each lamella turns.
The control cord is, in general, just a rope on which the movement of the lamellas along the eaves depends. And like any rope, it is not immune to a burst. But this rarely happens, most often the quality of the control cord fixation deteriorates and it does not stay in place. To replace and align a torn control cord, the following steps must be taken before removing the louver for repair:
We measure the eaves of vertical blinds in width and height of the lamellas. This data will allow you to calculate the required length of the new cord. The calculation is performed as follows: the width of the cornice is multiplied by 2, the height of the lamellas is multiplied by 1.5, and the resulting values are added.
Remove the tensioner from the old rope and attach it to the new rope.
We pass the ends of the new control cord one by one through the holes in the side cover of the cornice, and then through each slider.
Then we fix the first end in the fixing device, and thread the second through the roller from the opposite side of the cornice, return it to the fixing device, fix it in the form of a loop and twist it from above with any suitable tool.
This repair is the most time consuming. First of all, it is necessary to purchase new runners and the so-called connecting distances that serve for their fastening.
When removing a broken slider, you must be careful, since you will have to disassemble the mechanism and reassemble it in strictly reverse order.
The procedure is as follows:
Dismantle the control cord (otherwise it will interfere with the work process).
Unscrew the control mechanism and carefully remove it from the cornice.
We carefully remove all the runners.
We take the broken element, squeeze the distance on both sides and remove it from the damaged slider.
We insert the distance into the new slider until it clicks.
We pass the control cord through all the sliders.
We insert the runners into the cornice, stringing them one by one onto the shaft.
We fasten the control mechanism. It is advisable to do this together: one person holds the cornice, the second screws the mechanism.
We return the control cord to its place.
In the process of replacing the shoulder, no problems should arise. This is done quite simply:
Before repairing the shoulder, we acquire a new part corresponding to the width of the lamella.
We carefully take out the broken shoulder from the canvas.
We put the new part in the place of the old one.
In the production of blinds, lamellar holders are either sewn into the canvas using a fishing line, or simply inserted. To get a broken shoulder, in the first case, you will have to first cut the line.
In some cases, new blinds are larger than the window. Therefore, it becomes necessary to shorten them in length and width.
For this we need the following tools:
crosshead screwdriver;
ruler and tape measure;
painting knife;
sharp scissors;
lighter or matches;
iron;
pencil.
Since weights are fixed at the bottom of the lamellas, it is more convenient to shorten the blinds in length from above. The sequence of actions is as follows:
Before shortening the vertical blinds, remove them from the window along with the cornice and lay them on the floor. We start work from the top from the side with a lifting mechanism.
Carefully pry off the side cover of the cornice with a painting knife, remove it and unscrew the fixing screws.
We remove the runners from the slats of the vertical blinds and the cornice. You need to work with them carefully, without excessive effort. Otherwise, the not too strong plastic can be damaged.
We measure the length of the curtains and determine how many centimeters they need to be cut. When assembled on the cornice, no more than 1-2 cm should remain from the bottom edge of the blinds to the floor. You should also take into account 2-3 cm for tucking.
We cut all strips with scissors or a clerical knife to the required length. So that the lamellas do not fray at the cut points, the cut edges must be melted on fire using matches or a lighter.
Tuck the edges of the lamellas. Fix the folds with an iron.
In the center of the folds with a painting knife we make holes for the ears.
We insert the strips with ears into the lamellas.
We collect the blinds and fix them over the window.
It should be understood that the above instructions are only suitable for fabric slats. To shorten vertical blinds, the lamellas of which are made of aluminum, plastic or bamboo, you will have to contact a specialist.
In order to reduce the width of the blinds, first of all, you will have to shorten the cornice. For this we need a hacksaw for metal. The procedure is as follows:
Remove the side eaves cover.
With a hacksaw, we saw off the eaves to the desired width.
We remove the extra slats.
We return the side cover to its place.
Sometimes one or several lamellas lose their presentable appearance: they are torn, covered with spots that cannot be cleaned, so there is no need to throw away extra lamellas. They will be useful to you as a replacement. In addition, if necessary, new lamellas can be purchased individually from a specialized store or workshop, just like all other parts.
There are many reasons why the blinds fail, but if you follow their operating rules and even check the quality of the components when buying, the repair will not take a very long time. Of course, it is not necessary to repair them yourself, but keep in mind that some experts exaggerate the complexity of the problem. Therefore, try to make purchases from trusted manufacturers who give a guarantee for all parts and the structure as a whole, and repair the blinds with your own hands only when their guaranteed service life expires.
High-quality blinds, with proper care and handling, will serve a very long time. However, blinds, like any other product, can experience various kinds of breakdowns during use. If your blinds also have any trouble, assess the degree of the malfunction and consider the possibility of repair work. You can deal with the solution of a number of minor problems with your own hands. By the way, you can read about the installation of blinds on our website.
Do-it-yourself blinds repair
Contents of step-by-step instructions:
There are a number of the most popular breakdowns that you can fix yourself.
General view and arrangement of vertical blinds
One of the most common breakdowns is the breakage of the chain, through which the louvers are connected.
For repairs, buy a new chain from a specialized dealer and insert it in place of the old part. Pre-count the number of vertical elements and measure their width. Traditionally, blinds are equipped with 8.9 and 12.7 cm wide slats.
This chain breaks quite rarely, but you need to be prepared for such a situation.
First step. Remove the side eaves cover.
Second step. Remove the plastic gear.
Step three. Put the connected back or a new chain on the gear and insert it into the proper place.
The connecting lock should be located on the side opposite to the hanging gear. The runners, however, must be open.
Fourth step. Put back the eaves cover.
In vertical blinds, a "shoulder" breaks quite often into lamellas. This element connects the fabric to the cornice.
Buy a new "shoulder" in a specialized salon, having previously specified the width of the slats of your blinds.
Remove the damaged product and insert a new one in its place. Usually the "shoulder" is sewn in with a fishing line, but some manufacturers glue the lamellas. Be sure to clarify this point individually.
There are also such blinds in which the "shoulder" can be freely reached and a new product can be installed in its place. If this is not your case, simply carefully cut the line and sew the whole "shoulder" using ordinary thread.
This cord is rarely torn. Much more often, the quality of its fixation simply deteriorates, as a result of which the cord is pulled out of its place.
Before heading out to the salon for a new cord, measure the height and width of your blinds. Based on this data, the specialist will be able to calculate the amount of new cord you need.
You can also do the calculation yourself. To do this, multiply the width of the curtain rod by 2 and add one and a half the height of the blinds to the resulting value. This will calculate the amount of lace required.
Thread the two ends of the new lace first through the side cornice cover and then through the runners. Insert one cord into the fixing element, and thread the other through the roller. You will find it in the side cover, installed opposite to the control mechanism.
Pull the cord back to the retaining element, loop it and twist it from above using a suitable tool (depending on the situation). In the process of screwing, try not to press too hard, otherwise the product may burst.
Repair of runners in vertical blinds
Repair of runners in vertical blinds
The most time-consuming repair option for vertical blinds.
Buy runners and special connecting distances to attach runners. Select the distances in accordance with the width of the lamellas.
First step. Remove the control cord so that it does not interfere with your work.
Second step. Unscrew the control mechanism.
Step three. Pull out the sliders.
Fourth step. Move the sliders away from the broken element. Squeeze out or unfasten (as appropriate) the distances and remove the damaged slider.
Fifth step. Set the distance to the click in the entire slider, fixing the new element in place of the removed product.
Sixth step. Thread the control lanyard through the sliders.
Seventh step. Insert new runners into the curtain rod by threading them onto the shaft.
Eighth step. Screw on the louver control mechanism. At this stage, it is advisable to enlist the support of one assistant - he will hold the shaft, and you will screw the mechanism. Twist gently, without excessive force, otherwise the mechanism may crack.
Ninth step. Return the control cord to its original position.
These are all major breakdowns that you can fix yourself with your own hands. In the presence of more significant damage, it is better to immediately contact a qualified technician, otherwise you risk completely breaking your vertical blinds.
General view and device of interframe blinds
This section of the manual will be useful for owners of horizontal blinds. Here are some recommendations for fixing the most common problems. Preliminarily assess the scope of the upcoming work and decide whether you can cope with the planned activities on your own, or whether it would be wiser to immediately contact a professional repairman.
Very often, in horizontal blinds, the hooks that take part in the rotation of the lamellas, as well as the lower clamps, break.
To solve this problem, you need, first of all, to buy out-of-order spare parts in a specialized store and replace them. Make sure the new clips are the same as the clips on your blinds (they can be small or large).
Remove the old hook and then simply replace it with a new product. To do this, insert a new hook into the hole in the swivel mechanism. Hold the swivel mechanism with one hand to prevent it from rotating while inserting the hook with the other. Then insert the cane into the new hook.
To replace the lower blinds, unscrew the broken products and screw the new fasteners in their place.
Replacing the cord in the horizontal blinds
Buy a new cord to fit your blinds. Pre-measure the height and width of the structure. You will inform the consultant of a specialized store these parameters, and he will calculate the required amount of cord.
First step. Remove any remnants of the old lace if present.
Second step. Thread the new string through the lifting mechanism so that the string is between the cylinder and the roller.
Step three. Pass the rope through the bottom of the plastic basket where the ladder is attached. At the same time, the rope must be passed between the ladder.
Fourth step. Pull the rope up to the basket, while pulling it down the bottom and running it into the space between the ladders into the eaves hole.
Fifth step. Stretch the second rope by analogy with the first, but in this case it must be launched into the nearest punching of the lamellas.
Sixth step. Thread the string through the needle and alternately pull it through the slats through the right and left ladders.
Seventh step. Pass the needle and rope through the bottom of the blinds through the ladder plug and tie the cord into a strong double knot. Do the same with the other end of the rope.
If possible, pull a new lace through the slats with the blinds in normal condition, that is, it is better that they hang on the window during this repair.
Replacing the lift-and-turn mechanism
Replacing the lift-and-turn mechanism
Before starting the repair, remember in what order the parts of the mechanism are placed, so that then nothing is confused during the reassembly process. You can even take pictures of everything - this will make it easier for you to navigate.
First step. Remove the side plugs from the curtain rod of the louver, and then remove the shaft from the swing mechanism. The shaft can be made of plastic or metal.
Second step. Unclench the edges of the curtain rod and dismantle the mechanisms for the subsequent installation of new elements.
Step three. Remove the mechanisms from the grooves.
If repairing the hoist, pull out the rope. Untie the hanging ends of the lace (usually they are tied in a knot) or cut (they can also be a single piece). Solder the ends of the rope with a lighter.
Fourth step. Insert the ends of the lace between the rollers of the new mechanism.
Fifth step. Sink both ropes into the grooves. In this case, it is important to make sure that the ropes do not intertwine in the curtain of the blinds.
Sixth step. Connect the mechanisms back. Place the swivel mechanism closer to the center of the cornice, while the two antennae should rest against the back edge of the cornice. The lifting mechanism must be placed deep into the cornice, so that the laces in the slots also "look" deep into.
Seventh step. Place the connected gears on the cornice. Straighten the ends of the cornice to its original position. When performing this operation, make sure that the hole in the installed mechanism coincides with the shaft. Otherwise, the shaft may simply not go through.
Eighth step. Put back the side covers.
This completes the replacement of the cord.
Thus, you can easily cope with the correction of simple breakdowns of vertical and horizontal blinds with your own hands. However, if you see that the damage is quite serious (not included in the list of problems discussed above), and the blinds are very expensive, it is better to immediately contact the services of a professional repairman. Otherwise, follow the instructions and everything will work out.
Animals often disable blinds
It is extremely rare, but sometimes the horizontal bar still breaks, which serves as the base for the entire structure of the blinds. It is impossible to properly repair this product - all "patches" fail very quickly.
Therefore, the only correct solution to this problem will be a complete replacement of the mentioned element. The knowledge gained in the previous sections of the instruction will help you with this.
First of all, buy or order a new plank in the correct size from your specialist retailer. Next, you need to dismantle all structural elements from the broken crossbar. Remove ropes, slats, internal controls and other components.
Remember, or even better, take a picture of the order in which you perform disassembly in order to successfully reassemble the blinds in the future.
Try on a new plank in place of the old one. Make sure the dimensions are correct and proceed to reassemble the louver. Install and secure all structural elements in the reverse order of disassembly. Check that the system is functioning correctly at each step. When removing and reassembling elements, use the instructions given earlier.
Video (click to play).
VIDEO


